

AWS allows you to create new EBS volumes, and you can attach them to instances for extra storage. However, to make EBS volume usable as storage inside the instance, you need to mount it to a specific folder.
Mount an EBS Volume to EC2 Linux
This tutorial will teach you how to attach and mount an EBS volume to ec2 Linux instances.
Follow the steps given below carefully for the setup.
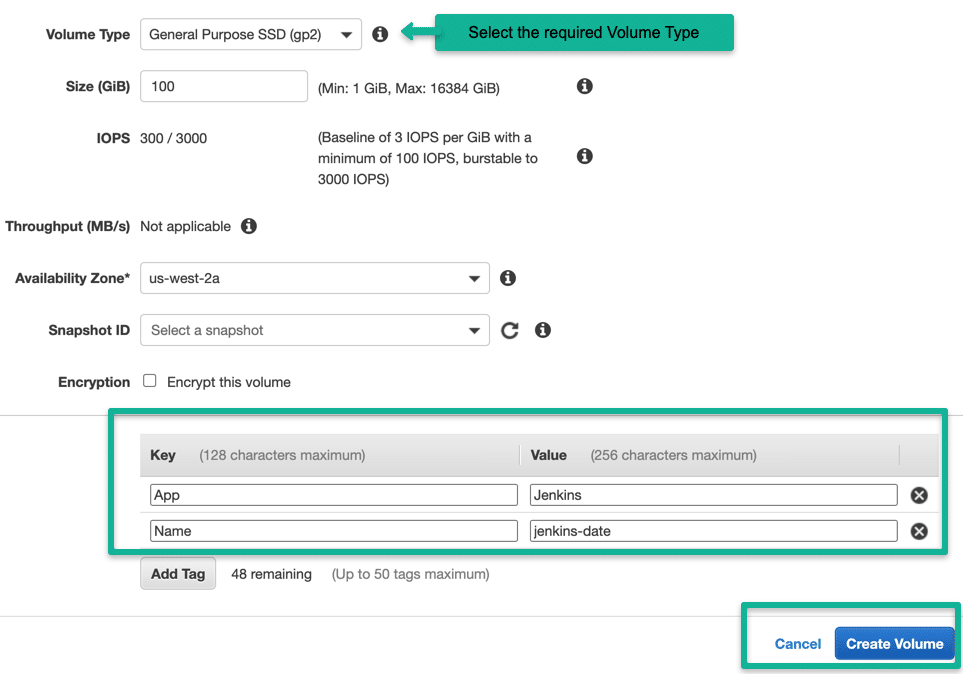
Step 1: Head over to EC2 --> Volumes and create a new volume of your preferred size and type.
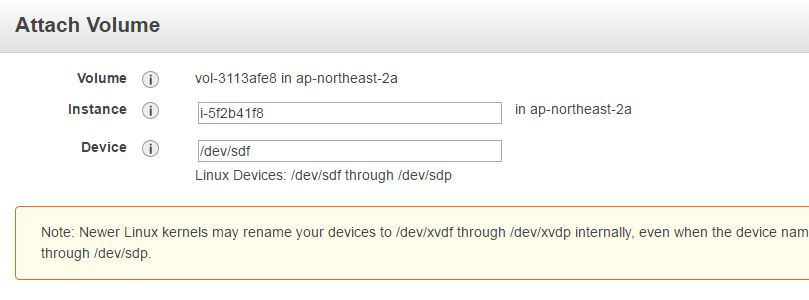
Step 2: Select the created volume, right-click and select the "attach volume" option.
Step 3: Select the ec2 instance from the instance text box as shown below.
Step 4: Now, login to your ec2 instance and list the available disks using the following command.
lsblkThe above command will list the disk you attached to your instance.
Step 5: Check if the volume has any data using the following command.
sudo file -s /dev/xvdfIf the above command output shows "/dev/xvdf: data", it means your volume is empty.
Step 6: Format the volume to the ext4 filesystem using the following command.
sudo mkfs -t ext4 /dev/xvdfAlternatively, you can also use the xfs format. You have to use either ext4 or xfs.
sudo mkfs -t xfs /dev/xvdfStep 7: Create a directory of your choice to mount our new ext4 volume. I am using the name "newvolume". You can name it something meaningful to you.
sudo mkdir /newvolumeStep 8: Mount the volume to "newvolume" directory using the following command.
sudo mount /dev/xvdf /newvolume/Step 9: cd into newvolume directory and check the disk space to validate the volume mount.
cd /newvolume df -h .The above command should show the free space in the newvolume directory.
To unmount the volume, use the unmount command as shown below..
sudo umount /dev/xvdfAutomount EBS Volume on Reboot
By default on every reboot, the EBS volumes other than the root volume will get unmounted. To enable automount, you need to make an entry in the /etc/fstab file.
Follow the steps given below to automount the EBS volume to the ec2 instance.
Step 1: Back up the /etc/fstab file.
sudo cp /etc/fstab /etc/fstab.bakStep 2: Open /etc/fstab file and make an entry in the following format.
device_name mount_point file_system_type fs_mntops fs_freq fs_passnoFor example,
/dev/xvdf /newvolume ext4 defaults,nofail 0 0Step 3: Execute the following command to check if the fstab file has any errors.
sudo mount -aIf the above command shows no error, it means your fstab entry is valid.
Now, on every reboot, the extra EBS volumes will get mounted automatically.
Add Multiple EBS Volumes To EC2 Instance
You can add more than one EBS volume to an ec2 instance as an additional disk. You can follow the same steps explained above and the only difference will be the disk name that you get from the lsblk command.
Here is an example output having two EBS volumes attached to an instance.

Mount one EBS volume to Multiple EC2 Instances
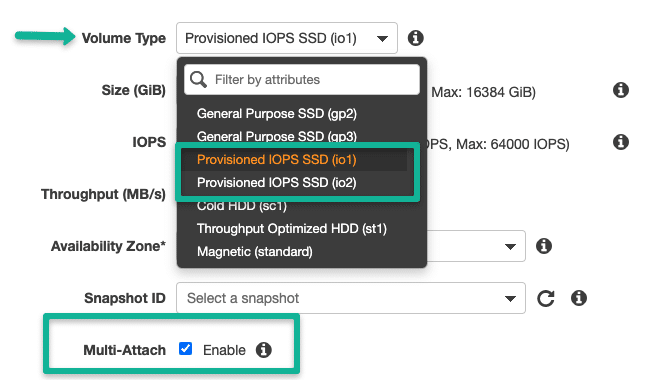
If you have any use case to mount an EBS volume to multiple ec2 instances, you can do it via EBS multi-attach functionality.
This option only serves specific use cases where multiple machines need to read/write to the same storage location concurrently.
The EBS multi-attach option is available only for Provisioned IOPS (PIOPS) EBS volume types.
XFS, EXT2, EXT4, and NTFS file systems. It supports only cluster-aware file systems.How Many EBS volumes can I attach to an Instance?
You can attach a maximum of 27 EBS volumes to an ec2 instance. Also, this count changes for a few instance types. Please check the Volume limits document to know more.
Also, limit the number of EBS maximum volumes attached to ec2 instances to have optimal performance. Also, plan your instance capacity based on the workload you are trying to run.
For example, databases require high IOPS for high read-write rates. IOPS depends on the disk size. Higher the size, the higher the IOPS.
It is recommended to take snapshots of EBS volumes for high data high availability and restore options. Check out the EBS snapshot automation article for strategies and restore options.
Conclusion
In this article, you have learned how to mount an EBS volume to the ec2 instance.
As a DevOps Engineer, it is very important to understand all the EBS attach options when working on real-time projects.
If you get any errors during the setup, please feel free to contact us in the comment section.
If you are also working with s3 object storage, check our guide on mounting s3 bucket to ec2
