It is essential to have AWS ec2 backup using EBS volumes for data recovery and protection. AWS EBS snapshots play an important role in the backup of your ec2 instance data (root volumes & additional volumes).
Even though AWS EBS snapshots are considered "poor man's backup," it gives you a point in time backup and faster restore options to meet your RPO objective.
Towards the end of the article, I have added some key EBS snapshot features and some best practices to manage snapshots.
Automation AWS EBS Snapshot For EC2 Instances
AWS EBS Snapshots are the cheapest and easiest way to enable backups for your EC2 instances or EBS volumes.
There are three ways to take automated snapshots.
- AWS EBS Life Cycle manager
- AWS Cloudwatch Events
- AWS Lambda Functions.
This tutorial will guide you through EBS snapshot automation and its life cycle management using all three approaches.
Automation EBS Snapshot with Life Cycle manager
AWS EC2 lifecycle manage is a native AWS functionality to manage the lifecycle of EBS volumes and snapshots.
It is the quickest and easiest way to automate EBS snapshots. It works on the concept of AWS tags. Based on the instance or volume tags, you can group EBS volumes and perform snapshot operations in bulk or for a single instance.
Follow the steps given below to setup a EBS snapshot lifecycle policy.
Step 1: Tag your ec2 instance and volumes
EC2 EBS snapshots with the life cycle manager work with the instance & volume tags. It requires instances and volumes to be tagged to identify the snapshot candidate.
You can use the following tag in the instances and volumes that needs automated snapshots.
Key = Backup
Value = True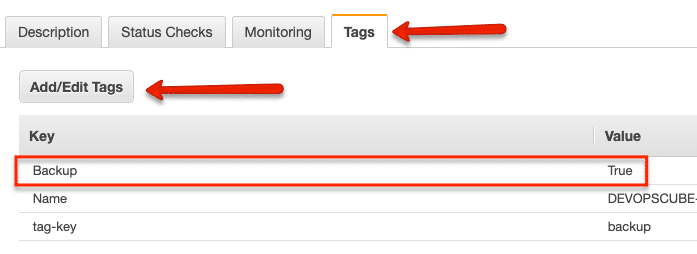
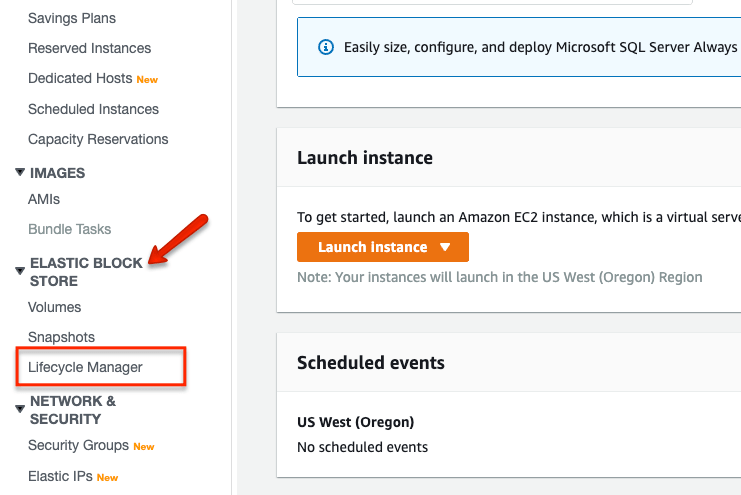
Step 2: Go to the EBS life cycle manager to create a snapshot lifecycle policy.
Head over to the EC2 dashboard and select "Lifecycle Manager" option under ELASTIC BLOCK STORE category as shown below.
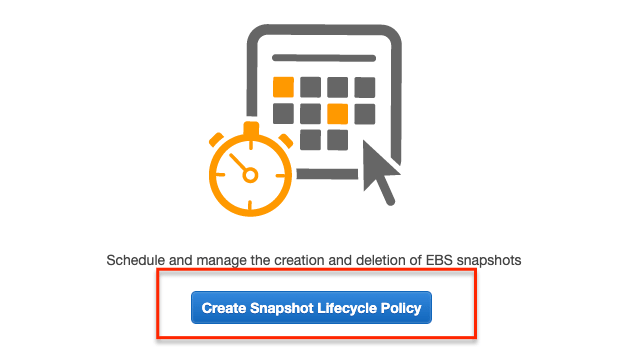
You will be taken to the life cycle manager dashboard. Click "Create Snapshot Lifecycle Policy" button.
Step 3: Add EBS snapshot life cycle policy rules
Enter the EBS snapshot policy details as shown below. Ensure that you select the right tags for the volumes you need the snapshot.
Note: You can add multiple tags to target specific Volumes
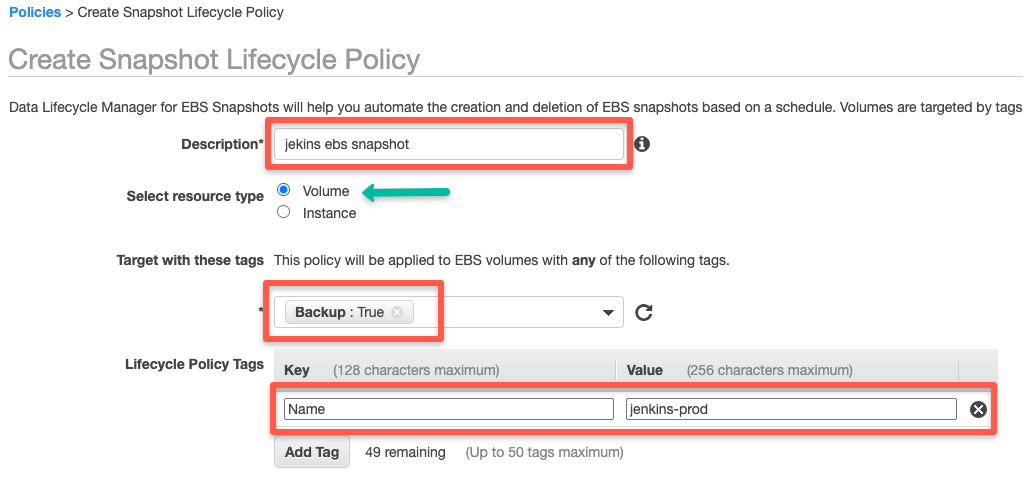
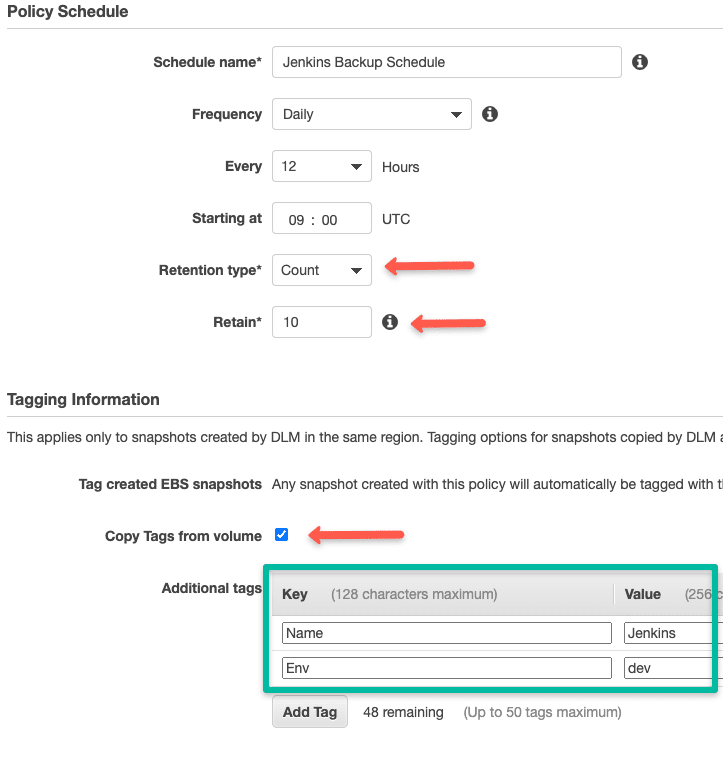
Enter EBS snapshot schedule details based on your requirements. You can choose retention type for both count & age.
For regular ec2 ebs backups, count is the ideal way.
Also apply proper tags to identify the snapshots.
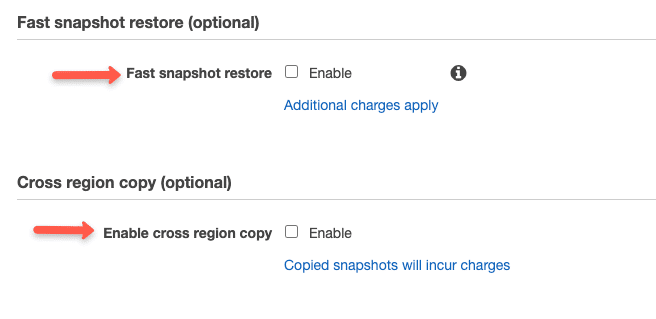
There are two optional parameters for the EBS snapshot high availability and fast restore. You can choose these options for production volumes.
Keep in mind that these two options will incur extra charges.
Select an IAM role that has permission to create and delete snapshots. If you don't have an IAM role, you can use the default role option. AWS will automatically create a role for snapshots.
I recommend you to create a custom role and use it with the policy to keep track of IAM roles.
Also select "enable policy" for the policy to be active immediately after creation.
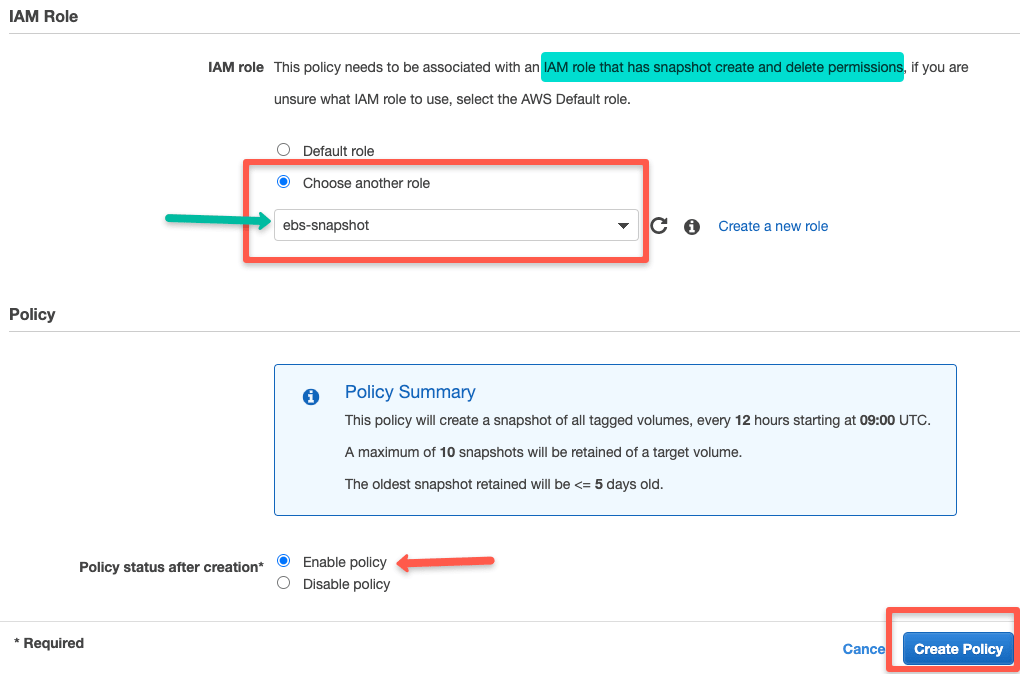
Click create policy.
Now the policy manager will automatically create snapshots based on the schedules you have added.
Create EBS Volume Snapshots With Cloudwatch Events
Cloudwatch custom events & schedules can be used to create EBS snapshots.
You can choose AWS services events for cloudwatch to trigger custom actions.
To demonstrate this, I will use the cloudwatch schedule to create EBS snapshots. Follow the steps given below.
[powerkit_posts title="Also Read" ids="6350" image_size="pk-thumbnail" template="list"]
First we need to create a Cloudwatch Schedule.
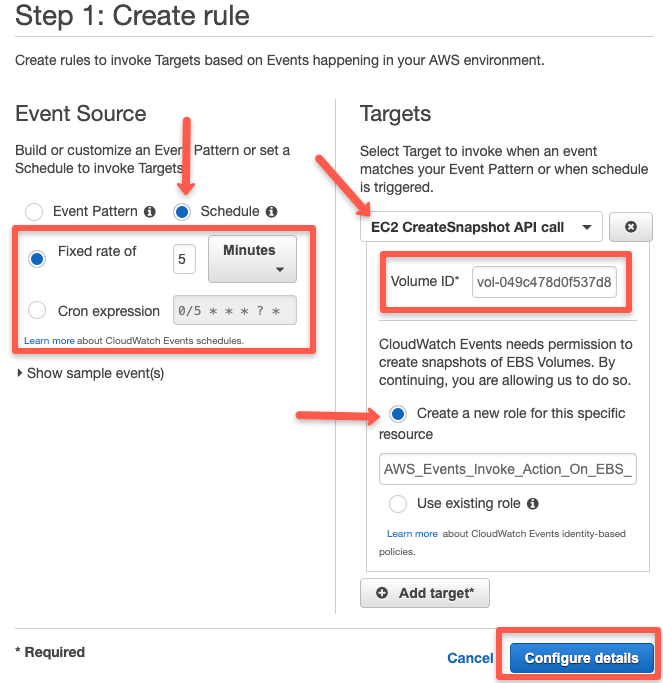
Head over to cloudwatch service and click create a rule under the rule options as shown below.
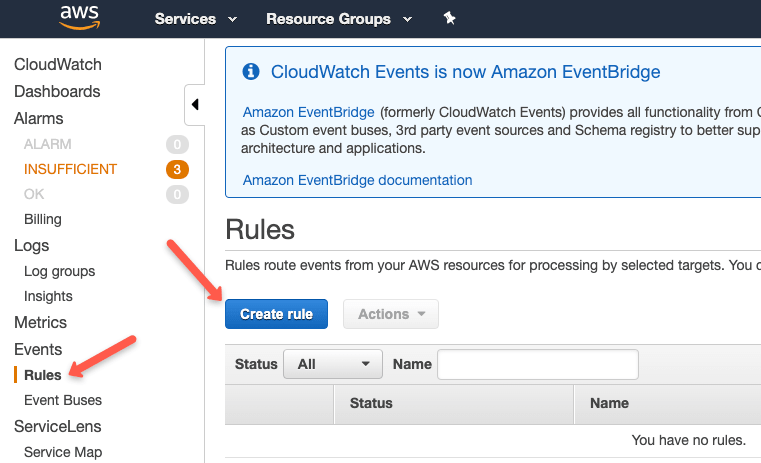
You can choose either a fixed schedule or a cron expression. Under targets, search for ec2 and select the "EC2 CreateSnapshot API Call" option.
Get the Volume ID from the EBS volume information, apply it to the Volume ID field and click "Configure details".
Create more targets if you want to take snapshot of more volumes.
Enter the rule name, description and click create rule.
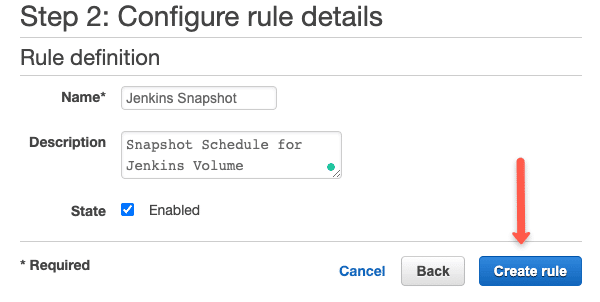
Thats it. Based on the cloudwatch schedules, the snapshots will be created.
Automate EBS snapshot Creation and Deletion With Lambda Function
If you have any use case where the lifecycle manager does not suffice the requirements, you can opt for lambda-based snapshot creation. Most use cases come under unscheduled activities.
One use case I can think of is, taking snapshots just before updating/upgrading stateful systems. You can have an automation that will trigger a lambda function that performs the snapshot action.
Getting Started With Lambda Based EBS snapshot
We will use Python 2.7 scripts, lambda, IAM role, and cloud watch event schedule for this setup.
For this lambda function to work, you need to create a tag named "backup" with the value true for all the instances for which you need a backup.
For setting up a lambda function for creating automated snapshots, you need to do the following.
- A snapshot creation python script with the necessary parameters.
- An IAM role with snapshot create, modify, and delete access.
- A lambda function.
Configure Python Script for EBS Snapshot
Following python code will create snapshots on all the instance which have a tag named "backup."
Note: You can get all the code from here
import boto3
import collections
import datetime

ec = boto3.client('ec2')

def lambda_handler(event, context):
    reservations = ec.describe_instances(
        Filters=[
            {'Name': 'tag-key', 'Values': ['backup', 'Backup']},
        ]
    ).get(
        'Reservations', []
    )

    instances = sum(
        [
            [i for i in r['Instances']]
            for r in reservations
        ], [])

    print "Found %d instances that need backing up" % len(instances)

    to_tag = collections.defaultdict(list)

    for instance in instances:
        try:
            retention_days = [
                int(t.get('Value')) for t in instance['Tags']
                if t['Key'] == 'Retention'][0]
        except IndexError:
            retention_days = 10

        for dev in instance['BlockDeviceMappings']:
            if dev.get('Ebs', None) is None:
                continue
            vol_id = dev['Ebs']['VolumeId']
            print "Found EBS volume %s on instance %s" % (
                vol_id, instance['InstanceId'])

            snap = ec.create_snapshot(
                VolumeId=vol_id,
            )

            to_tag[retention_days].append(snap['SnapshotId'])

            print "Retaining snapshot %s of volume %s from instance %s for %d days" % (
                snap['SnapshotId'],
                vol_id,
                instance['InstanceId'],
                retention_days,
            )


    for retention_days in to_tag.keys():
        delete_date = datetime.date.today() + datetime.timedelta(days=retention_days)
        delete_fmt = delete_date.strftime('%Y-%m-%d')
        print "Will delete %d snapshots on %s" % (len(to_tag[retention_days]), delete_fmt)
        ec.create_tags(
            Resources=to_tag[retention_days],
            Tags=[
                {'Key': 'DeleteOn', 'Value': delete_fmt},
                {'Key': 'Name', 'Value': "LIVE-BACKUP"}
            ]
        )
Also, you can decide on the retention time for the snapshot.
By default, the code sets the retention days as 10. If you want to reduce or increase the retention time, you can change the following parameter in the code.
retention_days = 10
The python script will create a snapshot with a tag key "Deletion" and "Date" as the value that is calculated based on the retention days. This will help in deleting the snapshots which are older than the retention time.
Lambda Function To Automate Snapshot Creation
Now that we have our python script ready for creating snapshots, it has to deployed as a Lambda function.
Triggering the Lambda function totally depends on your use case.
For demo purposes, we will set up cloudwatch triggers to execute the lambda function whenever a snapshot is required.
Follow the steps given below for creating a lambda function.
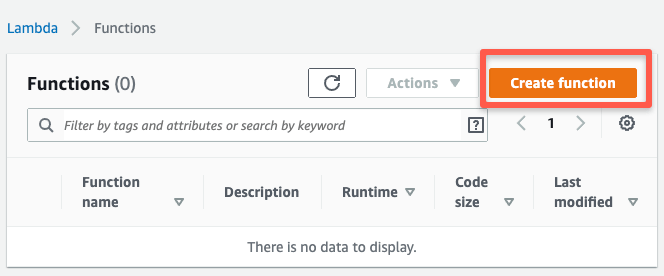
Step 1: Head over to lambda service page and select "create lambda function".
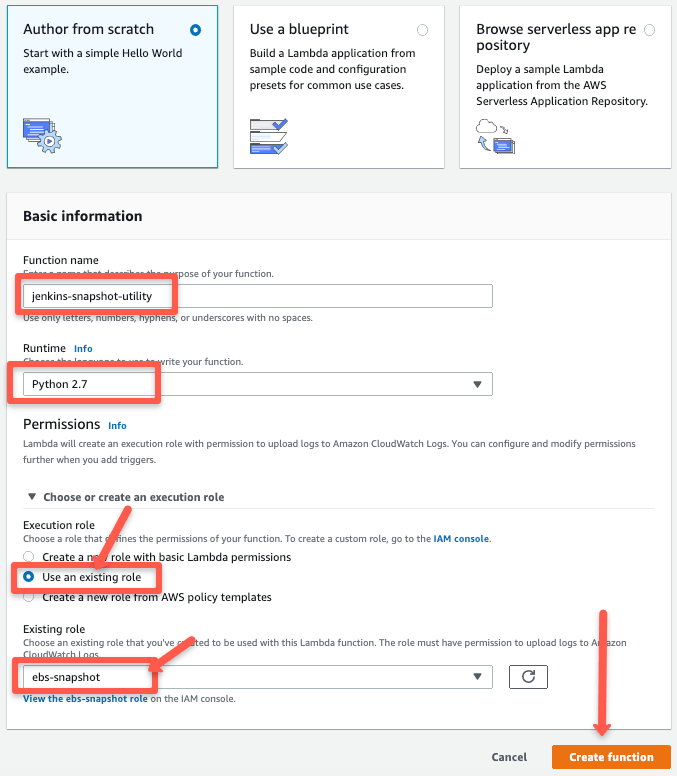
Step 2: Choose "Author from Scratch" and python 2.7 runtime. Also, select an exiting IAM role with snapshot create permissions.
Click "Create Function" function button after filling up the details.
Step 3: On the next page, if you scroll down, you will find the function code editor. Copy the python script from the above section to the editor and save it.
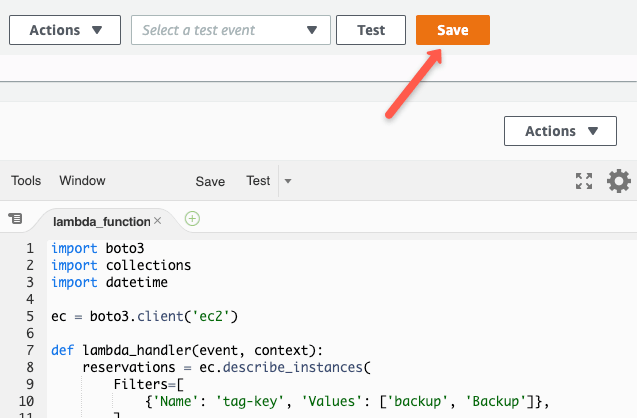
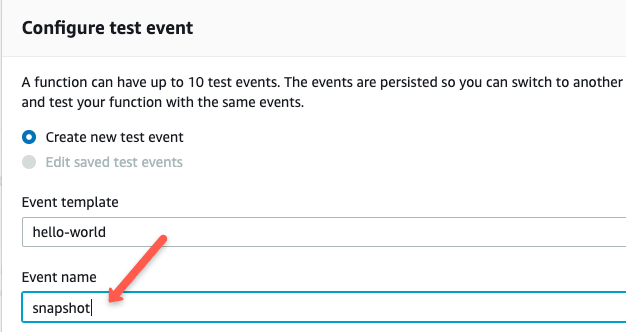
Once saved, click the "Test" button. It will open an evet pop up. Just enter an event name and click create it.
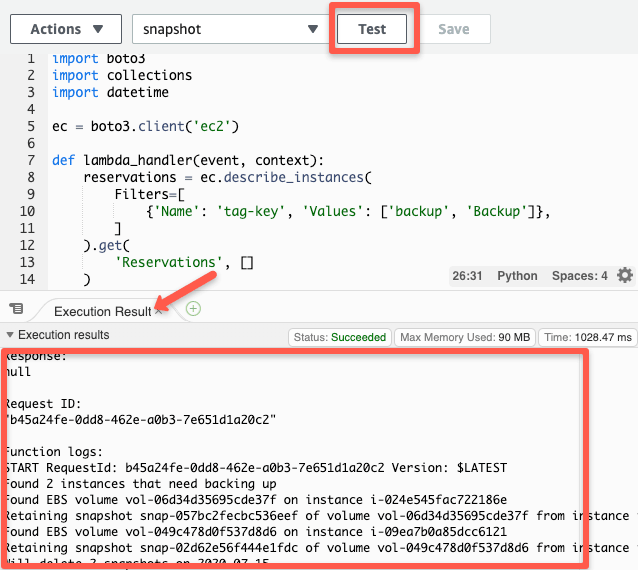
Click "Test" button again and you will see the code getting executed and its logs as show blow. As per the code, it should create snapshots of all volumes if a instance has a tag named "Backup:True".
Step 4: Now you have a Lamda function ready to create snapshots.
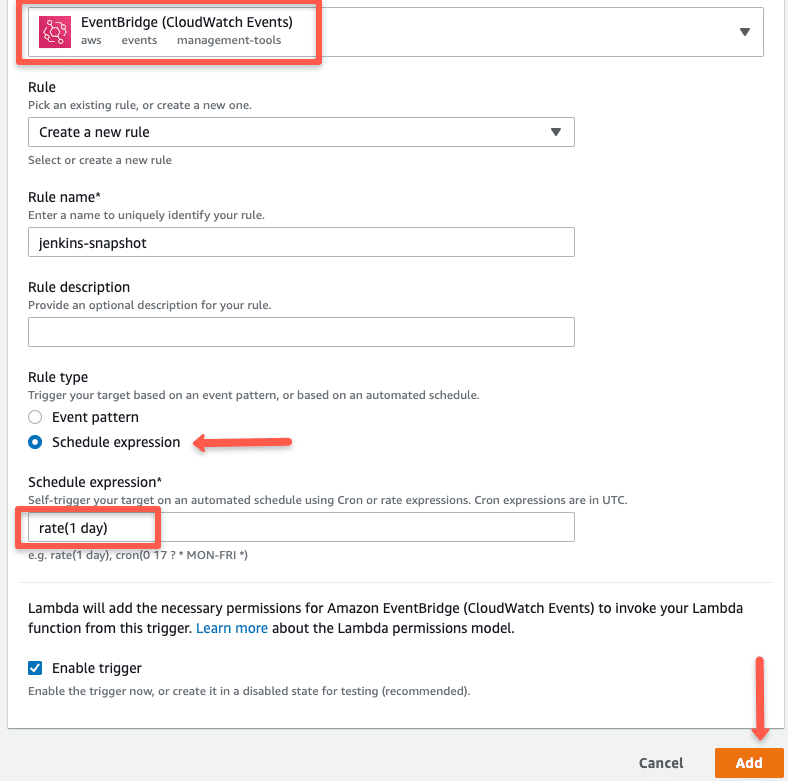
You have to decide what triggers you need to invoke the lambda function. If you click the "Add Trigger" Button from the function dashboard, it will list all the possible trigger options as shown below. You can configure one based on your use case. It can be API gateway wall or a cloudwatch even trigger like I explained above.
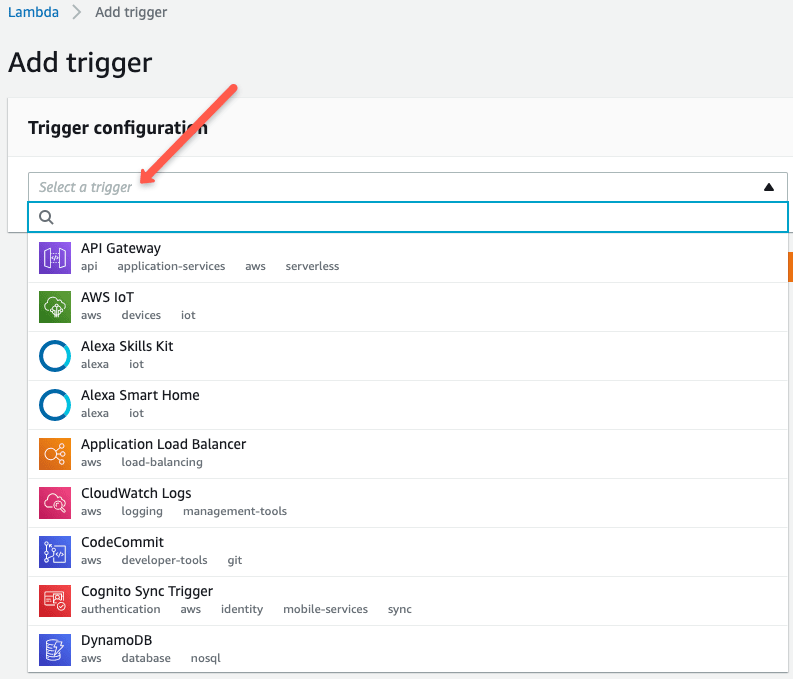
For example, I if choose cloudwatch event trigger, It will look like the following.
EBS Snapshot Deletion Automation Using Lambda
We have seen how to create a lambda function and create EBS snapshots of ec2 instances tagged with a "backup" tag. We cannot keep the snapshots piling up over time. That's the reason we used the retention days in the python code. It tags the snapshot with the deletion date.
The deletion python script scans for snapshots with a tag with a value that matches the current date. If a snapshot matches the requirement, it will delete that snapshot. This lambda function runs every day to remove the old snapshots.
Create a lambda function with the cloudwatch event schedule as one day. You can follow the same steps I explained above for creating the lambda function.
Here is the python code for snapshot deletion.
import boto3
import re
import datetime

ec = boto3.client('ec2')
iam = boto3.client('iam')

def lambda_handler(event, context):
    account_ids = list()
    try:
        """
        You can replace this try/except by filling in `account_ids` yourself.
        Get your account ID with:
        > import boto3
        > iam = boto3.client('iam')
        > print iam.get_user()['User']['Arn'].split(':')[4]
        """
        iam.get_user()
    except Exception as e:
        # use the exception message to get the account ID the function executes under
        account_ids.append(re.search(r'(arn:aws:sts::)([0-9]+)', str(e)).groups()[1])

    delete_on = datetime.date.today().strftime('%Y-%m-%d')
    filters = [
        {'Name': 'tag-key', 'Values': ['DeleteOn']},
        {'Name': 'tag-value', 'Values': [delete_on]},
    ]
    snapshot_response = ec.describe_snapshots(OwnerIds=account_ids, Filters=filters)

    for snap in snapshot_response['Snapshots']:
        print "Deleting snapshot %s" % snap['SnapshotId']
        ec.delete_snapshot(SnapshotId=snap['SnapshotId'])
How To Restore EBS Snapshot
You can restore a snapshot in two ways.
- Restore the EBS Volume from the snapshot.
- Restore EC2 Instance from a snapshot
You can optionally change following while restoring a snapshot
- Volume Size
- Disk Type
- Availability Zone
Restore EBS Volume from a EBS Snapshot
Follow the steps given below to restore a snapshot to a EBS volume.
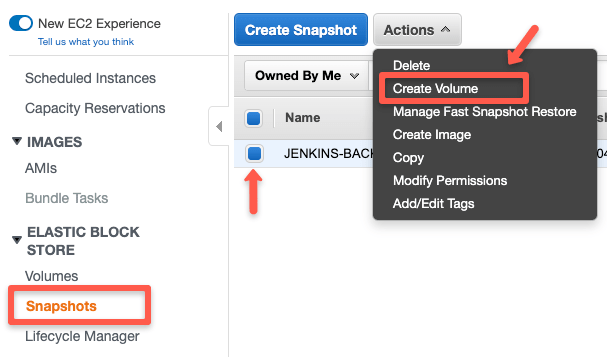
Step 1: Head over to snapshots, select the snapshot you want to restore, select the "Actions" dropdown, and click create volume.
Step 2: Fill in the required details and click "create volume" option.
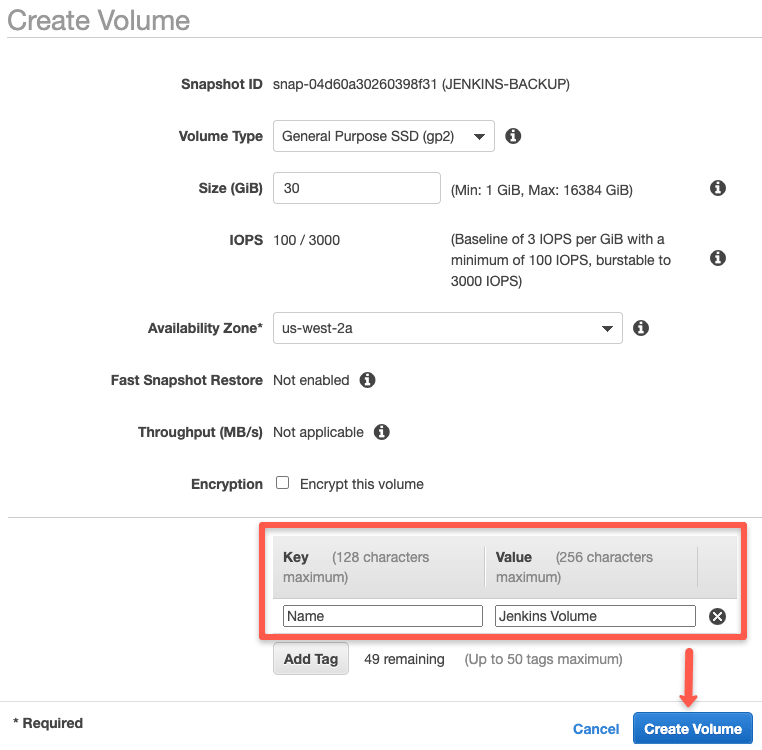
That's it. Your volume will be created. You can mount this volume to the required instance to access its data.
Restore EC2 Instance From EBS Snapshot
You can restore an ec2 instance from a EBS snapshot with two simple steps.
- Create an AMI (ec2 machine Image) from the snapshot.
- Launch an instance from the AMI created from the snapshot.
Follow the below steps.
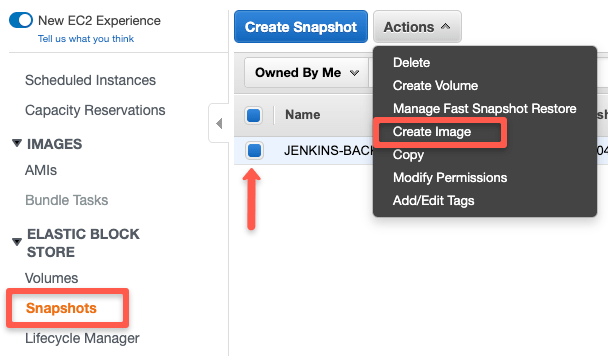
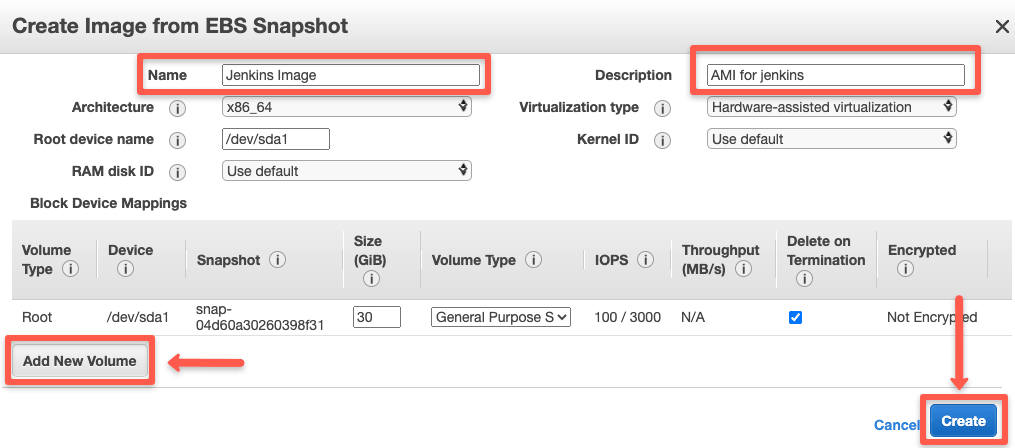
Step 1: Head over to snapshots, select the snapshot you want to restore, select the "Actions" dropdown, and click create an image.
Step 2: Enter the AMI name, description, and modify the required parameters. Click "Create Image" to register the AMI.
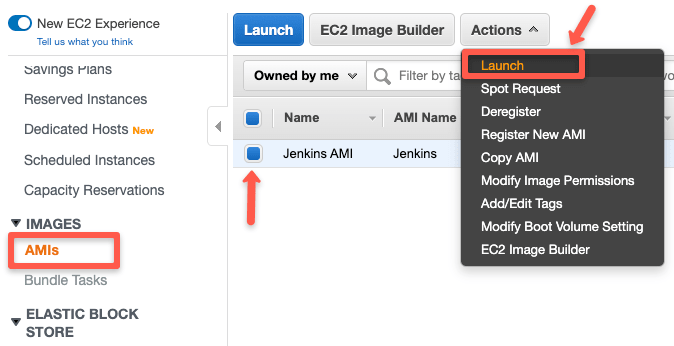
Step 3: Now, select AMIs from the left panel menu, select the AMI, and from the "Actions" drop-down, select launch.
It will take you to the generic instance launch wizard. You can launch the VM as you normally do with any ec2 instance creation.
AWS EBS Snapshot Features
Following are the key features of EBS snapshots.
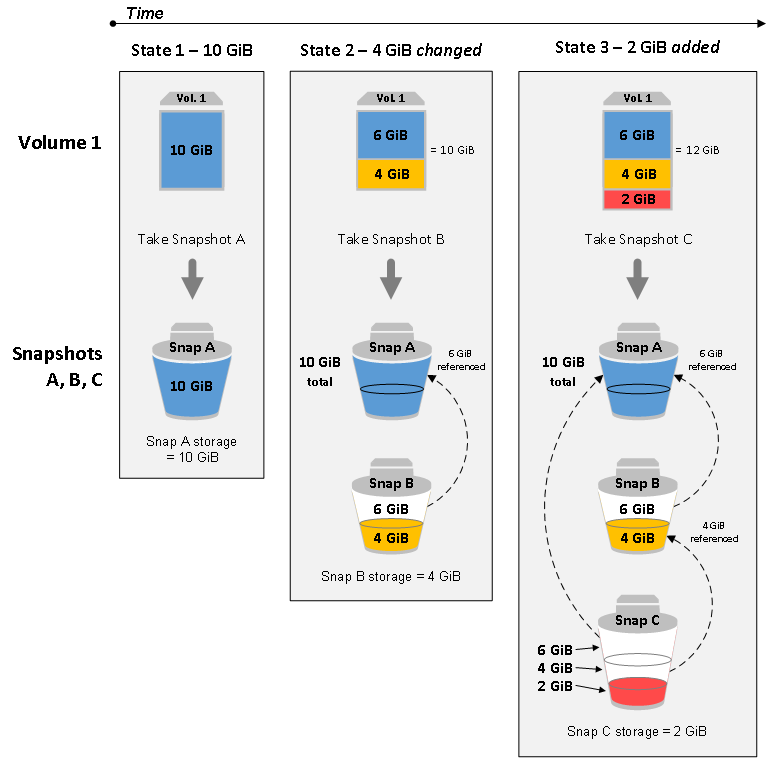
- Snapshots Backend Storage is s3: Whenever you take a snapshot, it gets stored in S3.
- EBS snapshots are incremental: Every time you request a Snapshot of your EBS volume, only the changed data in the disk (delta) is copied to the new one. So irrespective of the number of snapshots, you will only pay to changed data present in the Volume. Meaning, your consistent data never gets duplicated between Snapshots. For example, your disk storage can be 20 GB, and snapshot storage can be 30 GB due to the changes notified during every snapshot creation. You can read more about this here
EBS Snapshot Best Practices
Following are some best practices you can follow to manage EBS snapshots.
- Standard Tagging: Tag your EBS volumes with standard tags across all your environments. This helps in a well-managed snapshot lifecycle management using the life cycle manager. Tags also help in tracking the cost associated with snapshots. You can have billing reposts based on tags.
- Application Data Consistency: To have consistency for your snapshot backups, it is recommended to stop the IO activity on your disk and perform the disk snapshot.
- Simultaneous Snapshot request: Snapshots do not affect disk performance, however, the simultaneous request could affect the disk performance.
Conclusion
In this article we have seen three methods to post an EBS snapshot automation.
You can choose a method that suits your project needs, which complies with the organization's security standards.
Either you are looking for a solution to take snapshots or trying to migrate to snapshot lifecycle manager.
Either way, leave a comment below!

![How to Automate EBS Snapshot Creation [ AWS Ec2 Backup ]](/content/images/size/w100/2025/03/aws-ebs-snapshot-creation-min-1.png)