

In this blog, you will learn about the Kubernetes Gateway API and its setup and configuration in a Kubernetes cluster.
By the end of this guide, you will have learned:
- What the Kubernetes Gateway API is
- Key concepts of the Gateway API
- Practical implementation of Gateway API controllers
- How to use Gateway API objects like
GatewayClass,Gateway, andHTTPRoute - How to implement path-based routing using the Gateway API and more.
Let's get started.
What is Kubernetes Gateway API?
The Gateway API is a Kubernetes feature that helps create gateways for external traffic entering your cluster.
Ingress is the traffic routing mechanism primarily used in Kubernetes environments. However, it comes with several limitations. One such example is that it supports only Layer 7 HTTP-based traffic.
So, to overcome all the Ingress limitations, the Kubernetes Gateway API was developed.
The Gateway API has the following key features.
- Gateway API can perform L4 and L7 routing based on HTTP, gRPC, or TCP/UDP (experimental)
- Can route traffic based on HTTP headers.
- Can perform cross-namespace routing.
- Supports weighted traffic routing, blue-green deployments, canary deployments, and more.
- Reduced reliance on vendor-specific controller annotations, making configurations more portable across environments.
- Gateway API also works well with service mesh integrations such as Istio, Linkerd, etc.
In summary, the Gateway API is an improved version of Kubernetes Ingress that offers more powerful and flexible traffic management.
Kubernetes Gateway Concepts
Before we get into the hands-on section, let's understand the key concepts behind the Gateway API.
Gateway API Controller
In Ingress controllers, we define routing rules in the Ingress object. The Ingress Controller handles the actual routing.
The same concept applies to the Gateway API.
While the Gateway API provides many objects to manage cluster traffic, the actual routing is done by a Gateway API Controller. This controller is not built into Kubernetes. You need to set up a third-party (vendor) controller, just like with Ingress.
Various Gateway API controllers are available. The following are some of them.
For this document, we selected the Nginx Gateway Fabric controller.
When deploying Nginx Gateway Fabric,
In Nginx Gateway Fabric, two types of controllers.
- Control Plane Controller
- Data Planes
Control Plane Controller
When we install the Nginx Gateway Fabric on Kubernetes, the Data planes will be deployed.
The job of this controller is to watch its custom resources, such as Gateway, HTTPRoute, TLSRoute, etc.
When we create a custom resource, the control plane controller will get the required resources and create the object.
Date Planes
When we create a Gateway Custom Resource, the control plane controller will create a Data planes with the given information on the Gateway.
The data plane pods actually routes the traffic to the specific services.
Gateway API Resources
The following are the key resources that are part of the Kubernetes Gateway API
GatewayClass- This resource is used to select the Gateway Controller that will manage the Gateway resources. It tells the system which controller should handle the traffic routing. It is similar toingressClassin Kubernetes ingress.Gateway- The Gateway resource defines how external traffic enters the cluster. Think of it as the main entry point for requests coming from outside the cluster.HTTPRoute- The HTTPRoute resource defines how traffic should be routed to applications inside the cluster once it reaches the Gateway for HTTP trafficgRPCRoute- Resource to manage the gRPC traffic.ReferenceGrants- This resource is used to refer resources in other namespaces securely. Primarily for cross namespace routing.
Complete Gateway API Traffic Flow
Now that we have looked in to key Gateway API concepts, lets understand how everything works together to handle the traffic.
The following workflow explains how the traffic is routed to the cluster pods from outside world through the Kubernetes Gateway API resources.

Here is how it works.
- When we install the Gateway API, it only deploys the Control Plane Controller.
- When we create a Gateway Custom Resource configuration for our application, the Control Plane controller creates a Data Planes and a Load Balancer for it.
- When someone tries to access the application, the request goes through the external Load Balancer, then reaches the Gateway API Data Planes.
- All the settings from the Gateway and HTTPRoute custom resources are converted into routing rules inside the Data Planes.
- The Data Planes will then send the traffic to the correct backend services based on rules.
Setup Prerequisites
The following are the requirements for the setup
- Kubernetes Cluster v1.30 or higher.
- HELM [Local Machine]
- Kubectl [Local Machine]
We can begin the installation from the Gateway API.
Set up Gateway API in the Kubernetes Cluster
The Gateway API setup consists of three important section.
- Gateway API CRD installation
- Gateway API controller installation
- Gateway API object creation and traffic validation.
We will look at all the steps in detail.
Install Gateway API CRDs
The Gateway API objects are not available as native objects in Kubernetes. We need to enable them by installing the Gateway API Custom Resource Definitions (CRDs)
To install the Gateway API CRDs, use the following command. To get the latest version of the CRD, please visit this page. At the time of updating this guide, v1.3.0 is the latest version.
kubectl apply -f https://github.com/kubernetes-sigs/gateway-api/releases/download/v1.3.0/standard-install.yamlNow, validate the installed CRDs using the following command. You should see the five CRD resources we discussed earlier.
$ kubectl get crds | grep gateway

gatewayclasses.gateway.networking.k8s.io     2025-05-21T13:49:23Z
gateways.gateway.networking.k8s.io           2025-05-21T13:49:29Z
grpcroutes.gateway.networking.k8s.io         2025-05-21T13:49:32Z
httproutes.gateway.networking.k8s.io         2025-05-21T13:49:35Z
referencegrants.gateway.networking.k8s.io    2025-05-21T13:49:36Z
You can also check the API resources to get more details about the registered CRDs.
$ kubectl api-resources --api-group=gateway.networking.k8s.io

NAME              SHORTNAMES   APIVERSION                          NAMESPACED   KIND
gatewayclasses    gc           gateway.networking.k8s.io/v1        false        GatewayClass
gateways          gtw          gateway.networking.k8s.io/v1        true         Gateway
grpcroutes                     gateway.networking.k8s.io/v1        true         GRPCRoute
httproutes                     gateway.networking.k8s.io/v1        true         HTTPRoute
referencegrants   refgrant     gateway.networking.k8s.io/v1beta1   true         ReferenceGrant
Install Gateway API Controller
There are various controllers that support the Gateway API, you can refer to the supported controllers list in the official documentation.
For this tutorial, we will be using the NGINX Gateway Fabric Controller, which is now generally available (GA).
We'll deploy the controller using Helm. To pull the Helm chart, run the following command:
git clone https://github.com/techiescamp/cka-certification-guide.git

cd cka-certification-guide/helm-charts/nginx-gateway-fabric/
This will give the local copy of the Helm chart so we can modify and store it in version control systems like GitHub.
The modifiable values will be available in the values.yaml file, and we can make changes in this file as per our requirements.
The following snapshot is the directory structure of the Nginx Gateway Fabric Controller Helm Chart.
controlplane:~/cka-certification-guide/helm-charts/nginx-gateway-fabric$ tree
.
|-- Chart.yaml
|-- README.md
|-- crds
|   |-- gateway.nginx.org_clientsettingspolicies.yaml
|   |-- gateway.nginx.org_nginxgateways.yaml
|   |-- gateway.nginx.org_nginxproxies.yaml
|   |-- gateway.nginx.org_observabilitypolicies.yaml
|   |-- gateway.nginx.org_snippetsfilters.yaml
|   `-- gateway.nginx.org_upstreamsettingspolicies.yaml
|-- custom-values.yaml
|-- templates
|   |-- _helpers.tpl
|   |-- certs-job.yaml
|   |-- clusterrole.yaml
|   |-- clusterrolebinding.yaml
|   |-- deployment.yaml
|   |-- nginxgateway.yaml
|   |-- nginxproxy.yaml
|   |-- scc.yaml
|   |-- service.yaml
|   `-- serviceaccount.yaml
|-- values.schema.json
`-- values.yaml
Note: The custom-values.yamlfile we have created for the Gateway API customization, that we explain in the NodePort section.values.yaml is set to LoadBalancer. This means that when you deploy it in a cloud environment, it will automatically provision a LoadBalancer.If you're not deploying in a cloud environment, you'll need to expose the controller service using a
NodePort instead. Refer to the NodePort section for instructions on how to deploy the controller with this configuration.Following are the container images the controller chart uses.
ghcr.io/nginxinc/nginx-gateway-fabric:1.5.1ghcr.io/nginxinc/nginx-gateway-fabric/nginx:1.5.1
Also, make sure to review your company's security policies to confirm whether pushing community images to private registries is permitted.
We're not making any changes to the controller configuration at this stage.
We'll go ahead and install the NGINX Gateway Fabric Controller (Control Plane) directly using the following command.
$ helm install ngf . -n nginx-gateway --create-namespaceOnce the installation is complete, make sure all the controller components are running correctly by using the following command.
$ kubectl -n nginx-gateway get all

NAME                                           READY   STATUS    RESTARTS   AGE
pod/ngf-nginx-gateway-fabric-85f857f4b-p47c4   1/1     Running   0          31s

NAME                               TYPE        CLUSTER-IP      EXTERNAL-IP   PORT(S)   AGE
service/ngf-nginx-gateway-fabric   ClusterIP   10.100.247.89   <none>        443/TCP   32s

NAME                                       READY   UP-TO-DATE   AVAILABLE   AGE
deployment.apps/ngf-nginx-gateway-fabric   1/1     1            1           32s

NAME                                                 DESIRED   CURRENT   READY   AGE
replicaset.apps/ngf-nginx-gateway-fabric-85f857f4b   1         1         1       32s
As you can see, the control plane controller pods are up and running without any issues.
During this installation, the Nginx Fabric related Custom Resource Definitions also be installed.
$ kubectl get crds | grep -iE "gateway.nginx"

clientsettingspolicies.gateway.nginx.org     2025-07-02T05:20:35Z
nginxgateways.gateway.nginx.org              2025-07-02T05:20:35Z
nginxproxies.gateway.nginx.org               2025-07-02T05:20:37Z
observabilitypolicies.gateway.nginx.org      2025-07-02T05:20:37Z
snippetsfilters.gateway.nginx.org            2025-07-02T05:20:38Z
upstreamsettingspolicies.gateway.nginx.org   2025-07-02T05:20:38Z
These Nginx Fabric CRDs are used to customize the controller configurations.
LoadBalancer. In AWS, this means the Gateway API Controller will provision a Classic Load Balancer to handle incoming traffic.
In Azure, it creates a Standard Public Load Balancer.
In GCP, it provisions a Google Cloud External Load Balancer to route traffic to the backend pods.
Create Gateway Class
Gateway Class is a Custom Resource of the Gateway API (gatewayclasses.gateway.networking.k8s.io).
This will map the identity of the Control Plane controller to a configuration file. This helps the Gateway object to choose which Gateway API controller to use.
GatewayClass isn't included in the controller Helm chart, you'll need to create it manually.Create a GatewayClass manifest named gateway.yaml and add the following contents.
apiVersion: gateway.networking.k8s.io/v1
kind: GatewayClass
metadata:
  name: nginx-gateway-class
spec:
  controllerName: gateway.nginx.org/nginx-gateway-controller
  parametersRef:
    group: gateway.nginx.org
    kind: NginxProxy
    name: ngf-proxy-config
namespace: nginx-gatewaygateway.nginx.org/nginx-gateway-controller- The identity of the Nginx Fabric Gateway API Controller.
Deploy the Gateway Class manifest
$ kubectl apply -f gateway.yamlTo see the available Gateway Class
$ kubectl get gatewayclasses

NAME                  CONTROLLER                                   ACCEPTED   AGE
nginx-gateway-class   gateway.nginx.org/nginx-gateway-controller   True       58s
We can describe the GatewayClass to get the detailed information.
kubectl describe gatewayclass nginx-gateway-classWhen you describe the GatewayClass, you'll see details like its status, controller name, and other relevant information.
Before creating the Gateway object, make sure to note down the GatewayClass name, as you'll need it for the Gateway configuration.
Now, let's start with a simple application to see how traffic is routed through the Gateway API.
Deploy a Demo Application to Test the Traffic Routing
To test the Gateway API implementation, we will Deploy an Nginx webserver and expose it as a ClusterIP service.
cat <<EOF > nginx-deploy.yaml
apiVersion: v1
kind: Namespace
metadata:
  name: webserver
---
apiVersion: apps/v1
kind: Deployment
metadata:
  name: nginx
  namespace: webserver
spec:
  replicas: 2
  selector:
    matchLabels:
      app: nginx
  template:
    metadata:
      labels:
        app: nginx
    spec:
      containers:
      - name: nginx-container
        image: nginx:1.21
        ports:
        - containerPort: 80
---
apiVersion: v1
kind: Service
metadata:
  name: nginx-service
  namespace: webserver
spec:
  selector:
    app: nginx
  ports:
  - protocol: TCP
    port: 80
    targetPort: 80
  type: ClusterIP
EOF
To deploy this, use the following command.
kubectl apply -f nginx-deploy.yamlTo get the deployed components status.
$ kubectl -n webserver get all

NAME                                                   READY   STATUS    RESTARTS   AGE
pod/nginx-74f7c565c5-h5rhd                             1/1     Running   0          61m
pod/nginx-74f7c565c5-p5tqh                             1/1     Running   0          61m

NAME                                      TYPE           CLUSTER-IP       EXTERNAL-IP
service/nginx-service                     ClusterIP      10.100.247.161   <none>

NAME                                              READY   UP-TO-DATE   AVAILABLE   AGE
deployment.apps/nginx                             2/2     2            2           61m

NAME                                                         DESIRED   CURRENT   READY   AGE
replicaset.apps/nginx-74f7c565c5                             2         2         2       61m
This ensures that the deployed webserver is appropriately running and that the service is also created for the deployment.
On the next section, we will create a Gateway with listeners (incomming traffic Port and Protocol)
Create Gateway object
The Gateway acts as the entry point for traffic entering the cluster.
When we create a Gateway, the Control Plane will create a Data Plane on the cluster.
The Data plane is nothing but a Nginx server deployment with a service.
The control plane translates the configuration from the Gateway manifest to the Nginx configuration.
Meaning, once the traffic reaches the cluster, the Gateway determines how it should be handled based on the defined Listeners
Gateway is a namespace-scoped object. So you can't use the same Gateway across multiple namespaces.Lets create a Gateway for the demo application. We are creating the Gateway in the webserver namespace
cat <<EOF > web-gateway.yaml
apiVersion: gateway.networking.k8s.io/v1
kind: Gateway
metadata:
  name: web-gateway
  namespace: webserver
spec:
  gatewayClassName: nginx-gateway-class
  listeners:
    - name: http
      protocol: HTTP
      port: 80
EOF
Key Parts in this YAML should know.
gatewayClassName: nginx-gateway-class: Associates this Gateway with theGatewayClassnamednginx-gateway-class
Now, lets create the Gateway
kubectl apply -f web-gateway.yamlTo list the Gateway from webserver Namespace, use the following command.
kubectl -n webserver get gateway

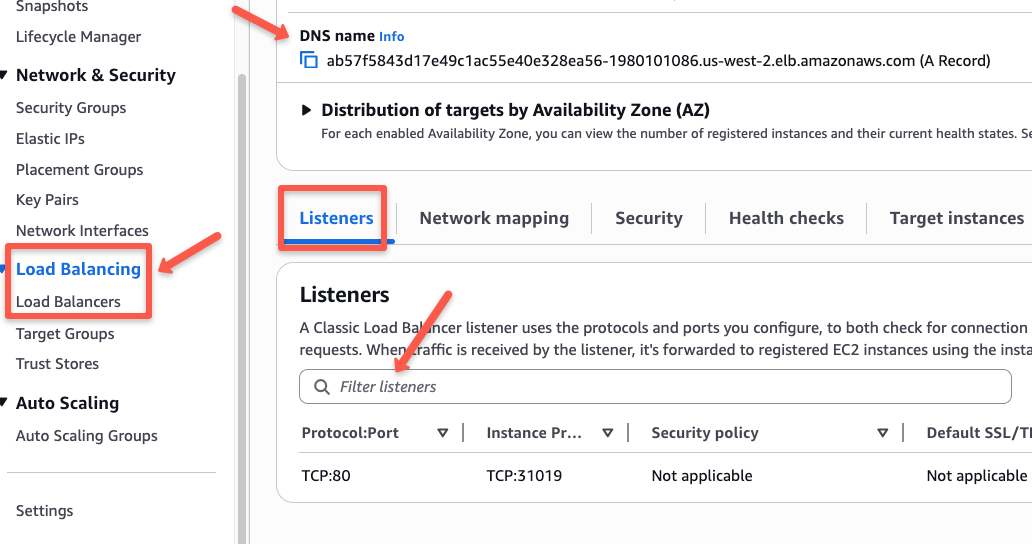
Here, you can see that the Gateway is created a Load balancer because of the default Gateway API Helm configuration and we have deployed in AWS EKS.
To get more detailed information, describe the Gateway
kubectl -n webserver describe gateway web-gateway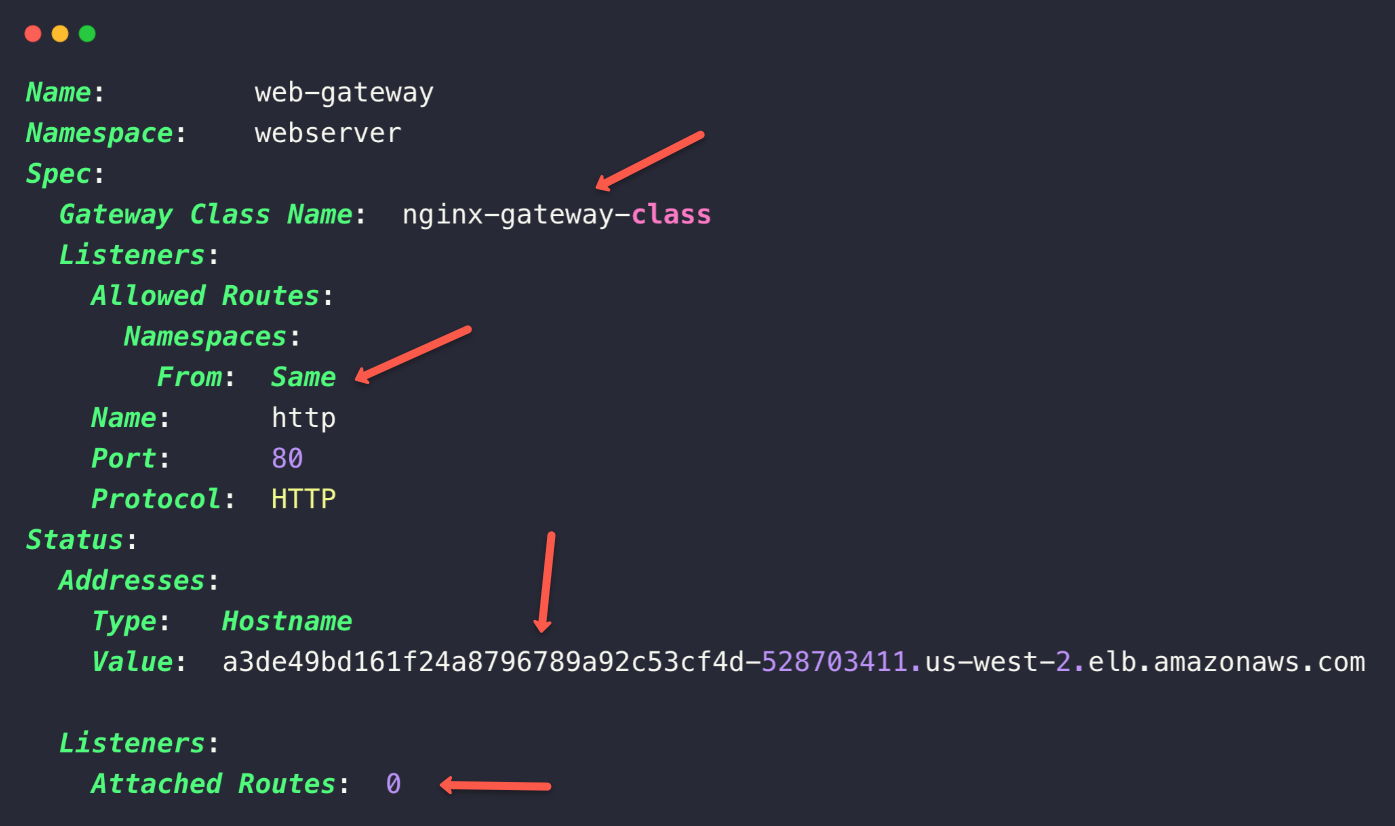
Here, we can see that the GatewayClass is configured with the Gateway and also see the DNS name of the AWS Load Balancer.
No routes are attached in the Listeners section, which we will configure in the next step.
This indicates that we haven't configured any services with the Gateway API.
Create a HTTP Route Object
HTTPRoute is the Custom Resource of the Gateway API, which contains the configurations to route the traffic to the HTTP/HTTPS based applications.
Since the demo application (nginx) is a webserver, which routes the HTTP/HTTPS traffic, so that we are creating this resource.
This Custom Resource can handle functions such as path-based routing, hostname-based routing, custom header routing, and namespace routing.
cat <<EOF > webserver-httproute.yaml
apiVersion: gateway.networking.k8s.io/v1
kind: HTTPRoute
metadata:
  name: webserver-httproute
  namespace: webserver
spec:
  parentRefs:
  - name: web-gateway
  rules:
  - matches:
    - path:
        type: PathPrefix
        value: /
    backendRefs:
    - name: nginx-service
      port: 80
EOF
kubectl apply -f webserver-httproute.yamlTo list the HTTPRoute custom resource, use the following command.
kubectl -n webserver get httprouteDescribe the httproute Custom Resource to get more detailed information.
kubectl -n webserver describe httproute webserver-httproute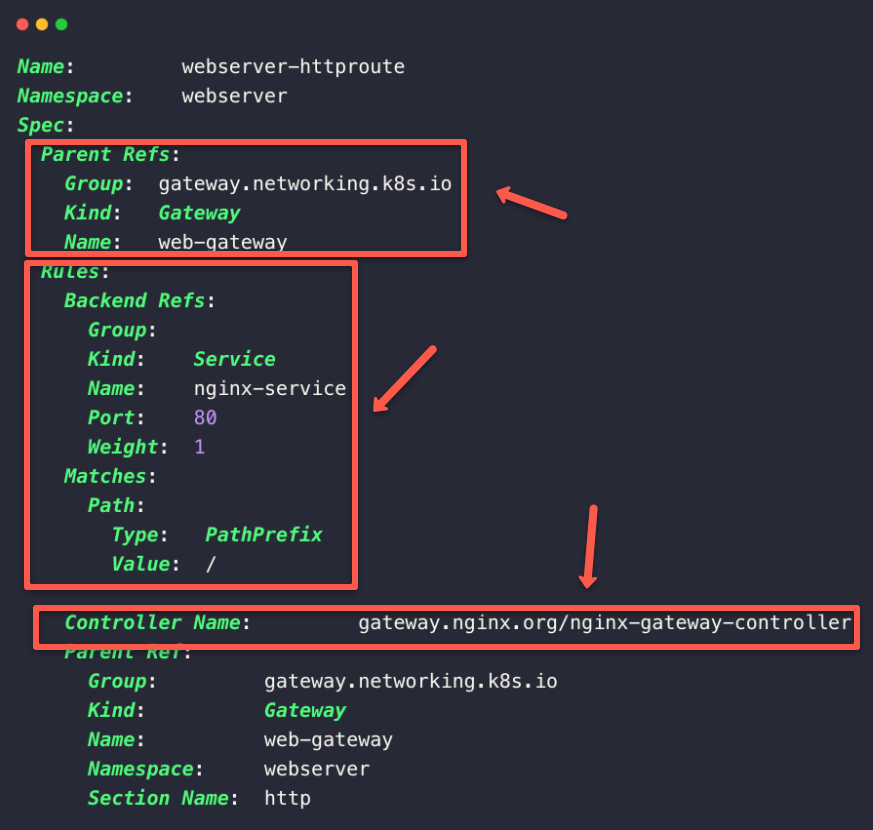
If the configurations are correctly done, we can see the Gateway API Controller, Gateway Class, and Gateway information along with the routing rules.
Before we check our application, we must ensure that the Gateway Custom Resource is updated with the routes.
kubectl -n webserver describe gateway web-gateway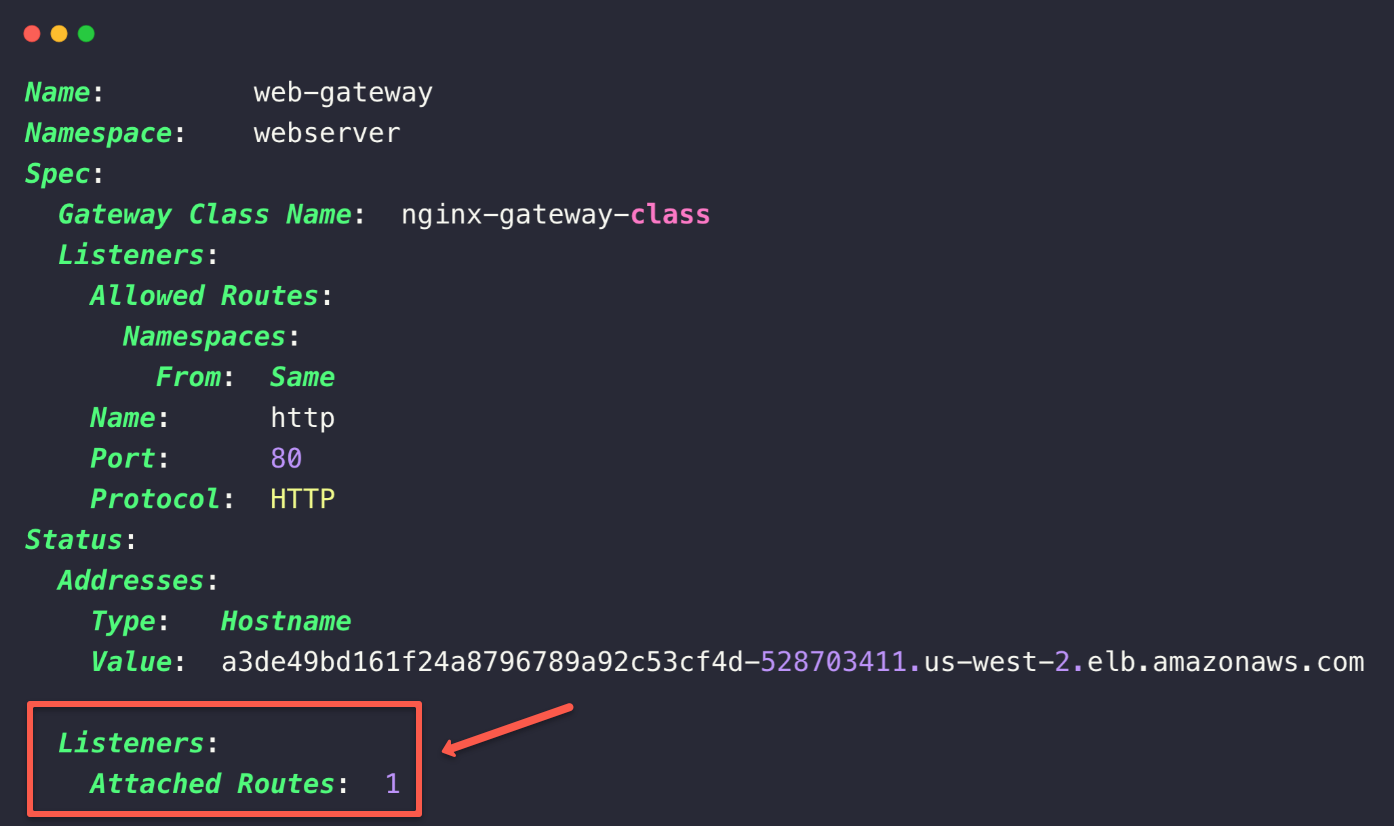
This clearly shows when we create a HTTPRoute Custom Resource, the Gateway resource will automatically be updated.
Now, we can check our application over the browser.
Paste the Load Balancer DNS name as a URL in any web browser.

If you check the Nginx Data Plane Pod configuration, you can see an upstream block with the details of the Pods IPs.
k -n webserver exec -it <CONTROLLER POD NAME> -- nginx -T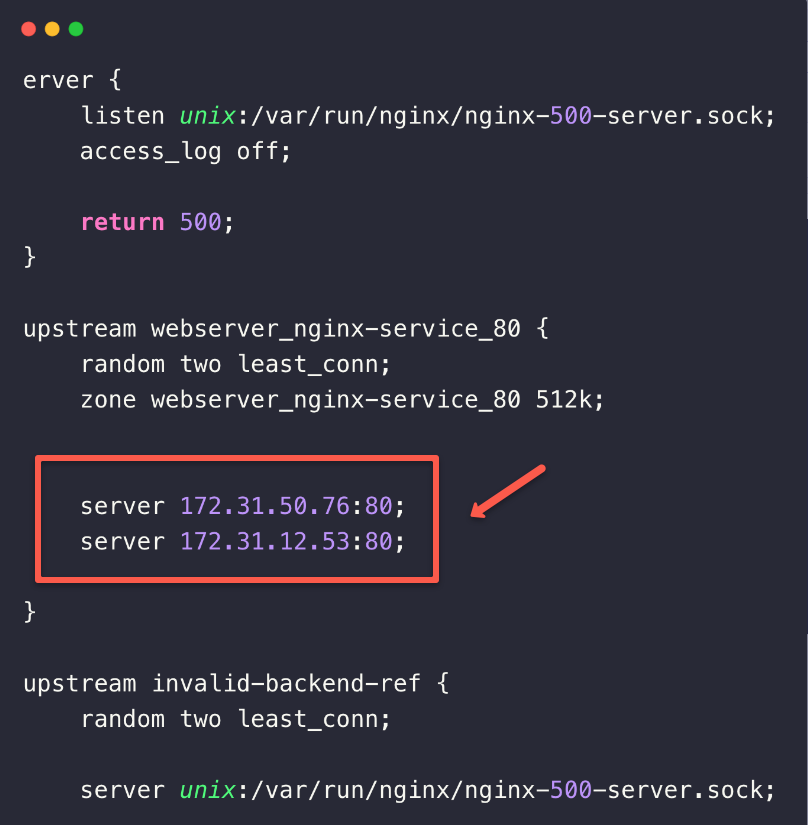
This is how the controller registers the Pods with the internal configuration and routes the traffic to that.
Advanced Traffic Routing Based on Conditions
The Gateway API can do path-based, host-based, header, and method-based routing.
Since this is an introduction to the Gateway API, we covers path and host-based routing.
Step 1: Create a Gateway Custom Resource
Let's start with the Gateway resource, this time also we are creating a Gateway with the same configurations that we have created for earlier demo.
Before creating the Gateway, create a Namespace colors
kubectl create namespace colorsCreate a Gateway in colors namespace.
cat <<EOF > colors-gateway.yaml
apiVersion: gateway.networking.k8s.io/v1
kind: Gateway
metadata:
  name: colors-gateway
  namespace: colors
spec:
  gatewayClassName: nginx-gateway-class
  listeners:
  - name: http
    port: 80
    protocol: HTTP
    hostname: "*.techiescamp.com"
EOF
Here, I have changed the name of the Gateway colors-gateway and Namespace colors
hostname: "*.techiescamp.com": This means, it will only accept traffic coming to domains like,- app.techiescamp.com
- api.techiescamp.com etc
* is a wildcard, so it matches anything before .techiescamp.com.So, why use wildcard DNS?
Because, when you have many services like
app, api, user, etc, you want one Gateway to handle all of them without creating separate listenerskubectl apply -f colors-gateway.yamlAfter the deployment, if we list the Gateways, we can see that the provisioned Load Balancer by the Gateway Controller.
kubectl -n colors get gatewayWe can verify this from the AWS console as well.
We can use the DNS name of the Load Balancer to test our application, but that won't be quite convenient.
So configuring the Local DNS Resolution would make the work easier.
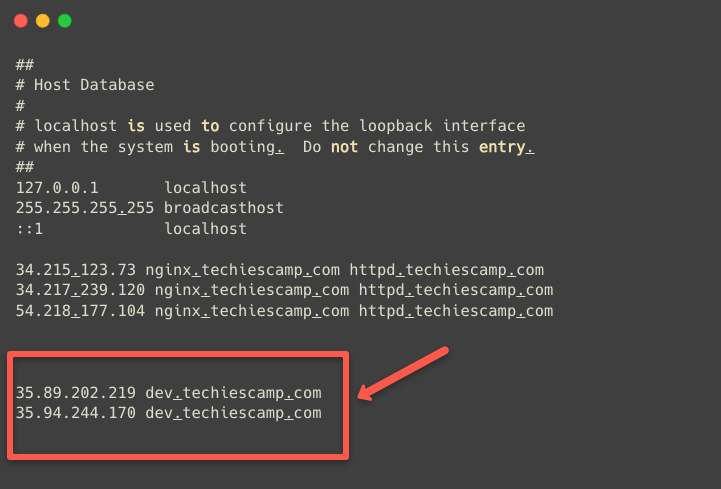
To set the local DNS resolution, get the public IPs of the Load Balancer, choose an intended host name (Ex - dev.techiescamp.com) and configure it on /etc/hosts.
Use the following command to get the public IPs of the Load Balancer.
dig +short <LOAD BALANCER DNS NAME>This will list the public IPs of the Load Balancer.
Open /etc/hosts from your local machine and map the IP address with the hostname dev.techiescamp.com.
sudo vim /etc/hosts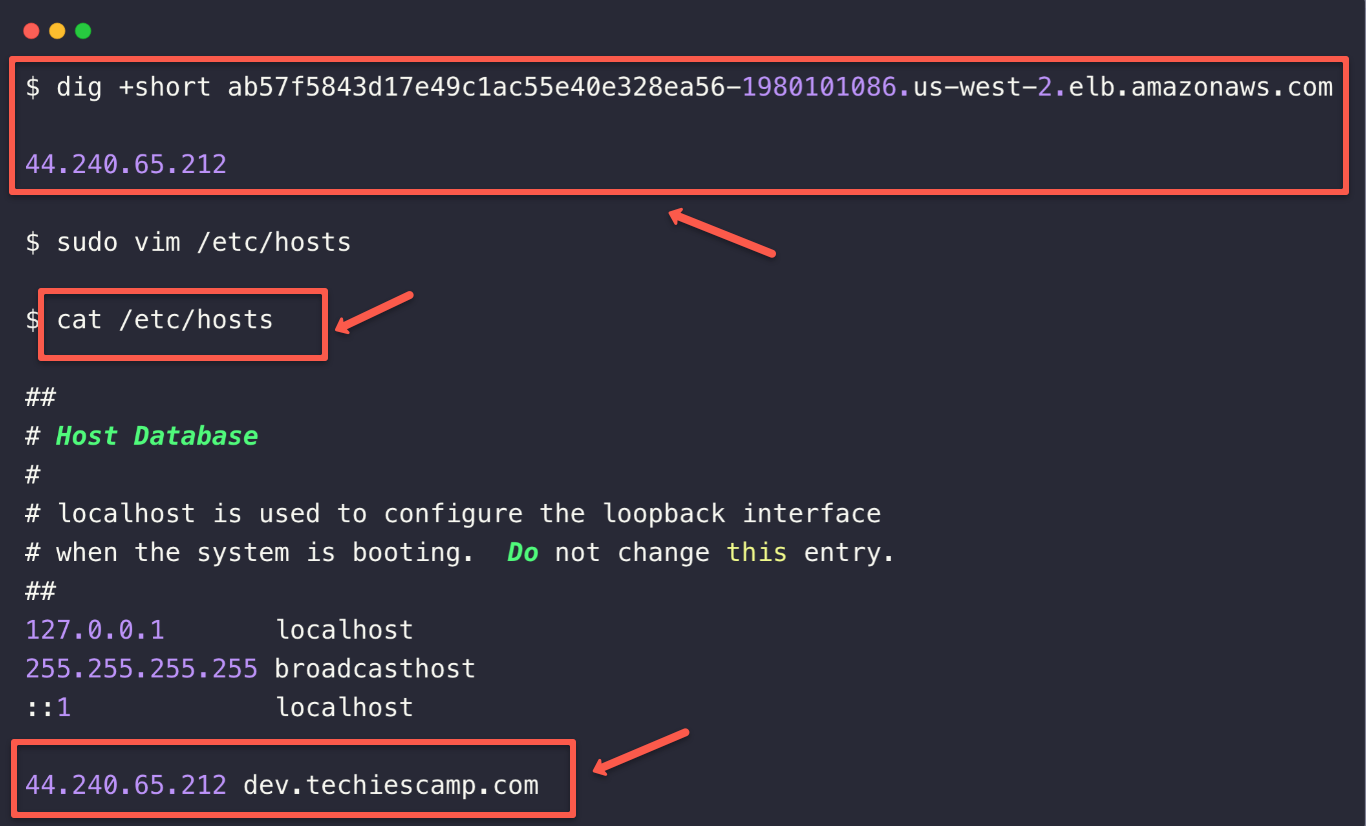
You can give any name instead of dev.techiescamp.com , and this is only resolved on your local machine.
Note: If anyone want to access the application over the internet with a domain name, you have to configure the Load Balancer DNS records with a DNS Server (Example: Route53).Step 2: Deploy Applications for Demo
Deploying two demo applications in the same Namespace to explain the path based routing.
cat <<EOF > colors-deployments.yaml
apiVersion: apps/v1
kind: Deployment
metadata:
  name: orange-app
  namespace: colors
  labels:
    app: orange-app
spec:
  replicas: 3
  selector:
    matchLabels:
      app: orange-app
  template:
    metadata:
      labels:
        app: orange-app
    spec:
      containers:
      - name: color-app
        image: techiescamp/go-color-app:latest
        ports:
        - containerPort: 8080
        env:
        - name: POD_NAME
          valueFrom:
            fieldRef:
              fieldPath: metadata.name
        - name: POD_IP
          valueFrom:
            fieldRef:
              fieldPath: status.podIP

---
apiVersion: apps/v1
kind: Deployment
metadata:
  name: green-app
  namespace: colors
  labels:
    app: green-app
spec:
  replicas: 3
  selector:
    matchLabels:
      app: green-app
  template:
    metadata:
      labels:
        app: green-app
    spec:
      containers:
      - name: color-app
        image: techiescamp/go-color-app:latest
        ports:
        - containerPort: 8080
        env:
        - name: POD_NAME
          valueFrom:
            fieldRef:
              fieldPath: metadata.name
        - name: POD_IP
          valueFrom:
            fieldRef:
              fieldPath: status.podIP
EOF
kubectl apply -f colors-deployments.yamlCreate ClusterIP services for these two applications.
cat <<EOF > colors-svc.yaml
apiVersion: v1
kind: Service
metadata:
  name: orange-app-service
  namespace: colors
  labels:
    app: orange-app
spec:
  selector:
    app: orange-app
  ports:
  - protocol: TCP
    port: 80
    targetPort: 8080
  type: ClusterIP
---
apiVersion: v1
kind: Service
metadata:
  name: green-app-service
  namespace: colors
  labels:
    app: green-app
spec:
  selector:
    app: green-app
  ports:
  - protocol: TCP
    port: 80
    targetPort: 8080
  type: ClusterIP
EOF
kubectl apply -f colors-svc.yamlOur demo applications are ready, now we can check the status and service list of the these two applications.
kubectl -n colors get po,svcThis ensures that the application's deployment and services are correctly done.
Step 3: Create HTTPRoute Resource for Applications.
Till now, the external HTTP traffic can only reach the Gateway.
Now, we need to inform the Gateway to route the traffic to the Green and Orange applications.
We can achieve this by creating a HTTPRoute resource with certain conditions.
cat <<EOF > colors-http-route.yaml
apiVersion: gateway.networking.k8s.io/v1
kind: HTTPRoute
metadata:
  name: colors-httproute
  namespace: colors
spec:
  parentRefs:
  - name: colors-gateway
    sectionName: http
  hostnames:
  - "dev.techiescamp.com"
  rules:
  - matches:
    - path:
        type: PathPrefix
        value: /green
    backendRefs:
    - name: green-app-service
      port: 80
  - matches:
    - path:
        type: PathPrefix
        value: /orange
    backendRefs:
    - name: orange-app-service
      port: 80
EOF
kubectl apply -f colors-http-route.yamlAfter the deployment, we must ensure all the routes are correctly configured.
kubectl -n colors describe httproutes colors-httproute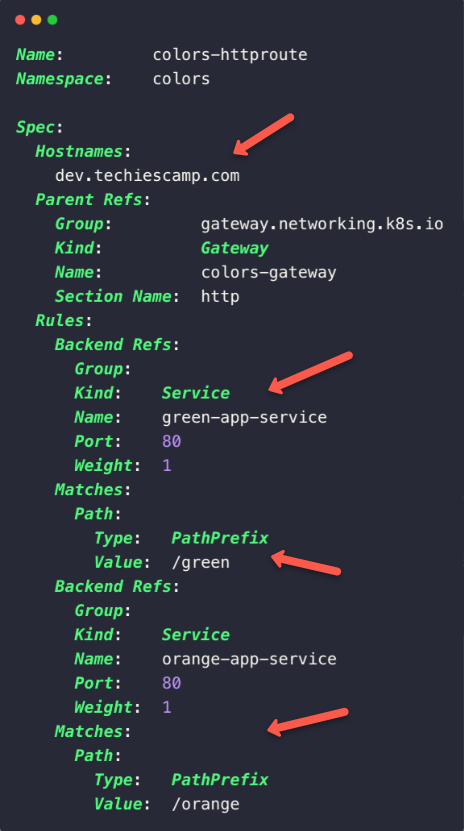
In the marked first section, we can see the host name that we have configured dev.techiescamp.com.
In the Parent Refs section, we can see that the Gateway is configured with the HTTPRoute.
The first part of the rules section indicates the first application (Green) and the condition, which means that if you want to access that application, you have to use /green the path along with the host name dev.techiescamp.com.
The second section is for the second application (Orange), here one condition we have changed is the path, we have to use /orange with the hostname dev.techiescamp.com.
First, we can try to access the first application (Green)
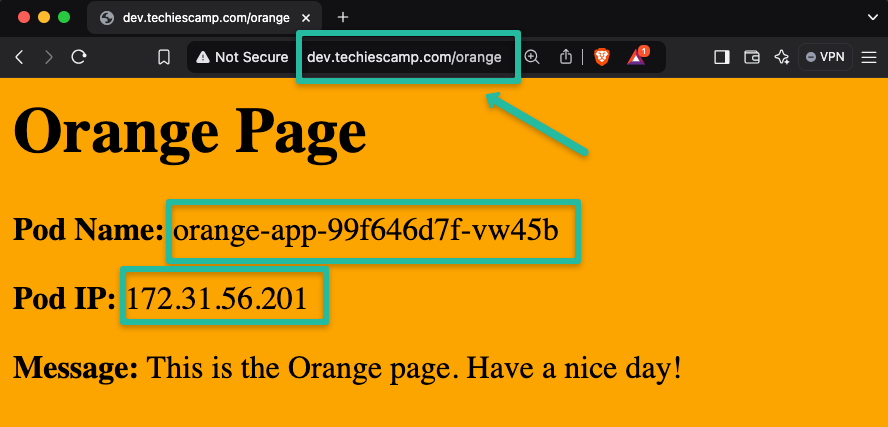
Open any of the web browser and paste the URL dev.techiescamp.com/green
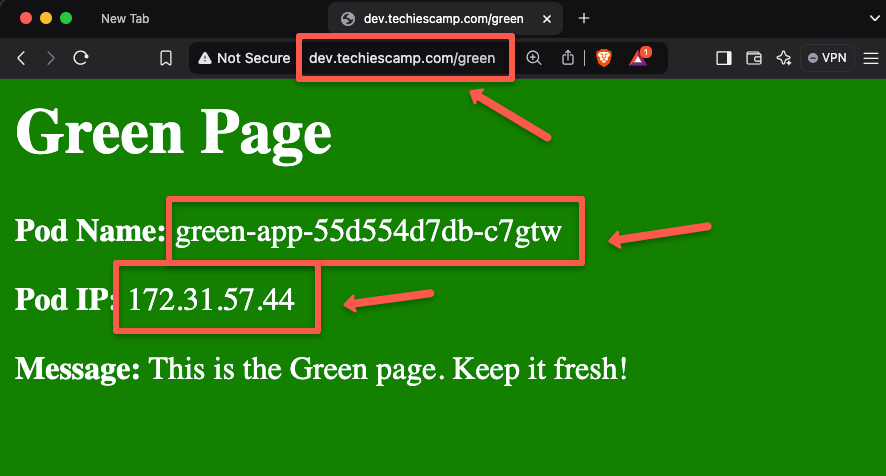
The application I have created for this demo will give the output of the intended Pod name and the IP.
Here, we can see that the traffic has reached the first application (Green), so the routing is configured correctly.
We can check this with CLI as well using the following command.
curl dev.techiescamp.com/greenNow, we can try to access the second application.
The second application is also accessible, ensuring the configured path is done correctly and the Gateway API routs the traffic to the intended services.
Expose Gateway API Controller as Node Port Service
Without the help of any Load Balancer, we can configure to reach the external traffic to the Gateway API Controller Pod with the help of Node Port service.
This is not a proper way to route the traffic, even though if someone wants to try the Gateway API on their local Kubeadm cluster, this method would be helpful.
For this, we have to modify the Gateway API Controller installations.
Note: Assuming, you don't have the GatewayAPI CRDs and Controller on the cluster.Install the Gateway API Custom Resource Definitions.
kubectl apply -f https://github.com/kubernetes-sigs/gateway-api/releases/download/v1.3.0/standard-install.yamlBefore we install the Gateway API Controller (Nginx Fabric Gateway Controller), we need to create a custom Helm values file to customize the installation.
We have already created one with a name of custom-values.yaml
Our intention is to change the controller service type from Load Balancer to Node Port.
Node Ports are linked to listener ports, so we will assign NodePorts for ports 80, 8080, and 443
For example, when we create a Gateway with listener port 80, the Data Plane service will be created with type NodePort of 32000.
Following is the contents of the custom-values.yaml file.
nginx:
  service:
    type: NodePort
    nodePorts:
    - port: 32000
      listenerPort: 80
    - port: 32500
      listenerPort: 8080
    - port: 32443
      listenerPort: 443
This file overrides the default Helm configuration.
This settings tells the Gateway API to use NodePort instead of LoadBalancer. So, this allow us to access the applications using the Node's public IP.
$ helm install ngf . -n nginx-gateway --create-namespace -f custom-values.yamlAfter deployment, each time we create a Gateway, a Node Port service will be created for the Data Plane.
Since there is no Load Balancer, traffic directly reaches the Node first, and then to the Gateway API Data Plane.
In the example deployment, note down the NodePort number (32000) to access the application.
We also need to update the Local DNS configuration.
Instead of using the public IP of the Load Balancer, we use the public IP of the Node.
To get the public IP of the Nodes, use the following command.
kubectl get no -o wide
We are mapping these public IPs in /etc/hosts
Now, we can use the hostname (dev.techiescamp.com) with the Node Port number 32000 to access the application.
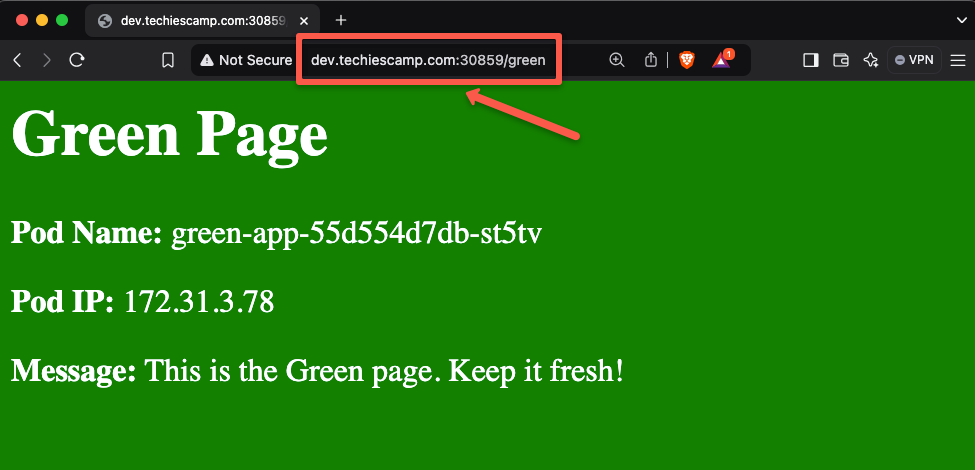
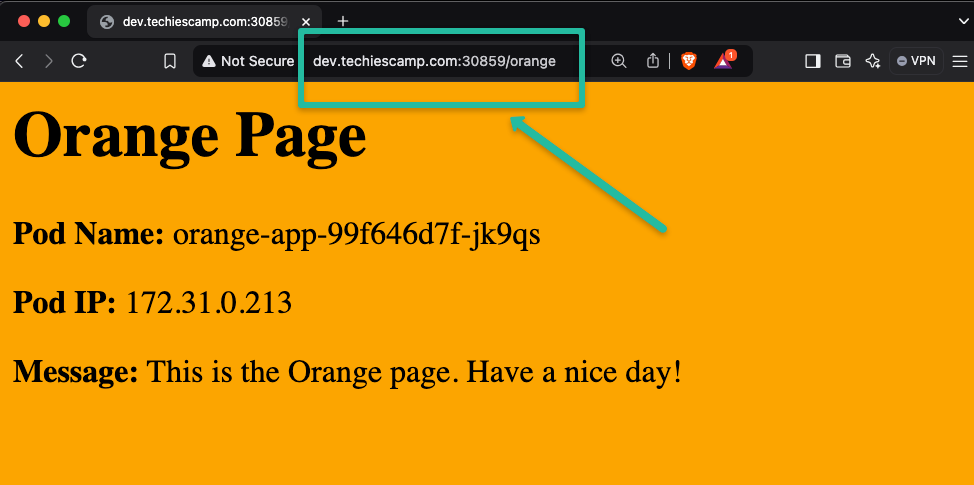
We can use this method to test the Gateway API from the local Kubernetes clusters.
Difference between Kubernetes Ingress and Gateway API
- Ingress primarily supports the HTTP and HTTPS network protocols [Layer 7 protocols], Gateway API as well as supports TCP, UDP, TLS, and gRPC (Example: Databases, Messaging systems).
- In Ingress, only one object
ingresswhere we have to give all our routing configurations, but in Gateway API, dedicated resources for each type of protocol, such ashttproute,tcproute,tlsrouteandudproute. - Ingress is limited to path-based and host-based routing, but the Gateway API can perform the custom HTTP header-based routing, weighted routing, canary and blue-green network routings.
- The Gateway API also required a controller similar to the Ingress, but the list of Gateway API controller is quite extensive.
Conclusion
This is just an introduction to the Kubernetes Gateway API, so we just covered the basic path and host-based routing, which is similar to Ingress. There are many advanced concepts available, and we will explore them on the upcomming blogs.
To learn more about the Gateway API, please refer to the official documentation. If youwant to know what functions the Nginx Fabric Gateway Controller offers, you can refer to this official documentation.
