

In this blog, we will learn how to setup and operate the MySQL operator on a Kubernetes cluster.
In this blog, we will primarily look at,
- What the MySQL Operator is and how it works
- How to install it using Helm
- How to deploy a MySQL InnoDB cluster
- How to test MySQL connectivity and replication
What is MySQL Operator?
Let's say you are managing a MySQL cluster manually on Kubernetes. It can quickly become complex.
For example, you need to provision persistent volumes, configure StatefulSets, handle secrets, and set up replication and failover mechanisms.
MySQL Operator (developed by Oracle) simplifies all these processes.
It automates the MySQL cluster creation using Kubernetes objects (Custom Resources, Statefulset, etc) and manages a MySQL cluster for you.
You can perform the following using the MySQL Operator
- Deploy multi-instance MySQL clusters with automatic replication
- Handle failover and routing with built-in MySQL Router
- Manage backups using custom resources.
How Does the MySQL Operator Work?
Before we move to the setup, let look at how a MySQL Operator Works.
The following image shows the high-level setup of the MySQL Operator on Kubernetes.
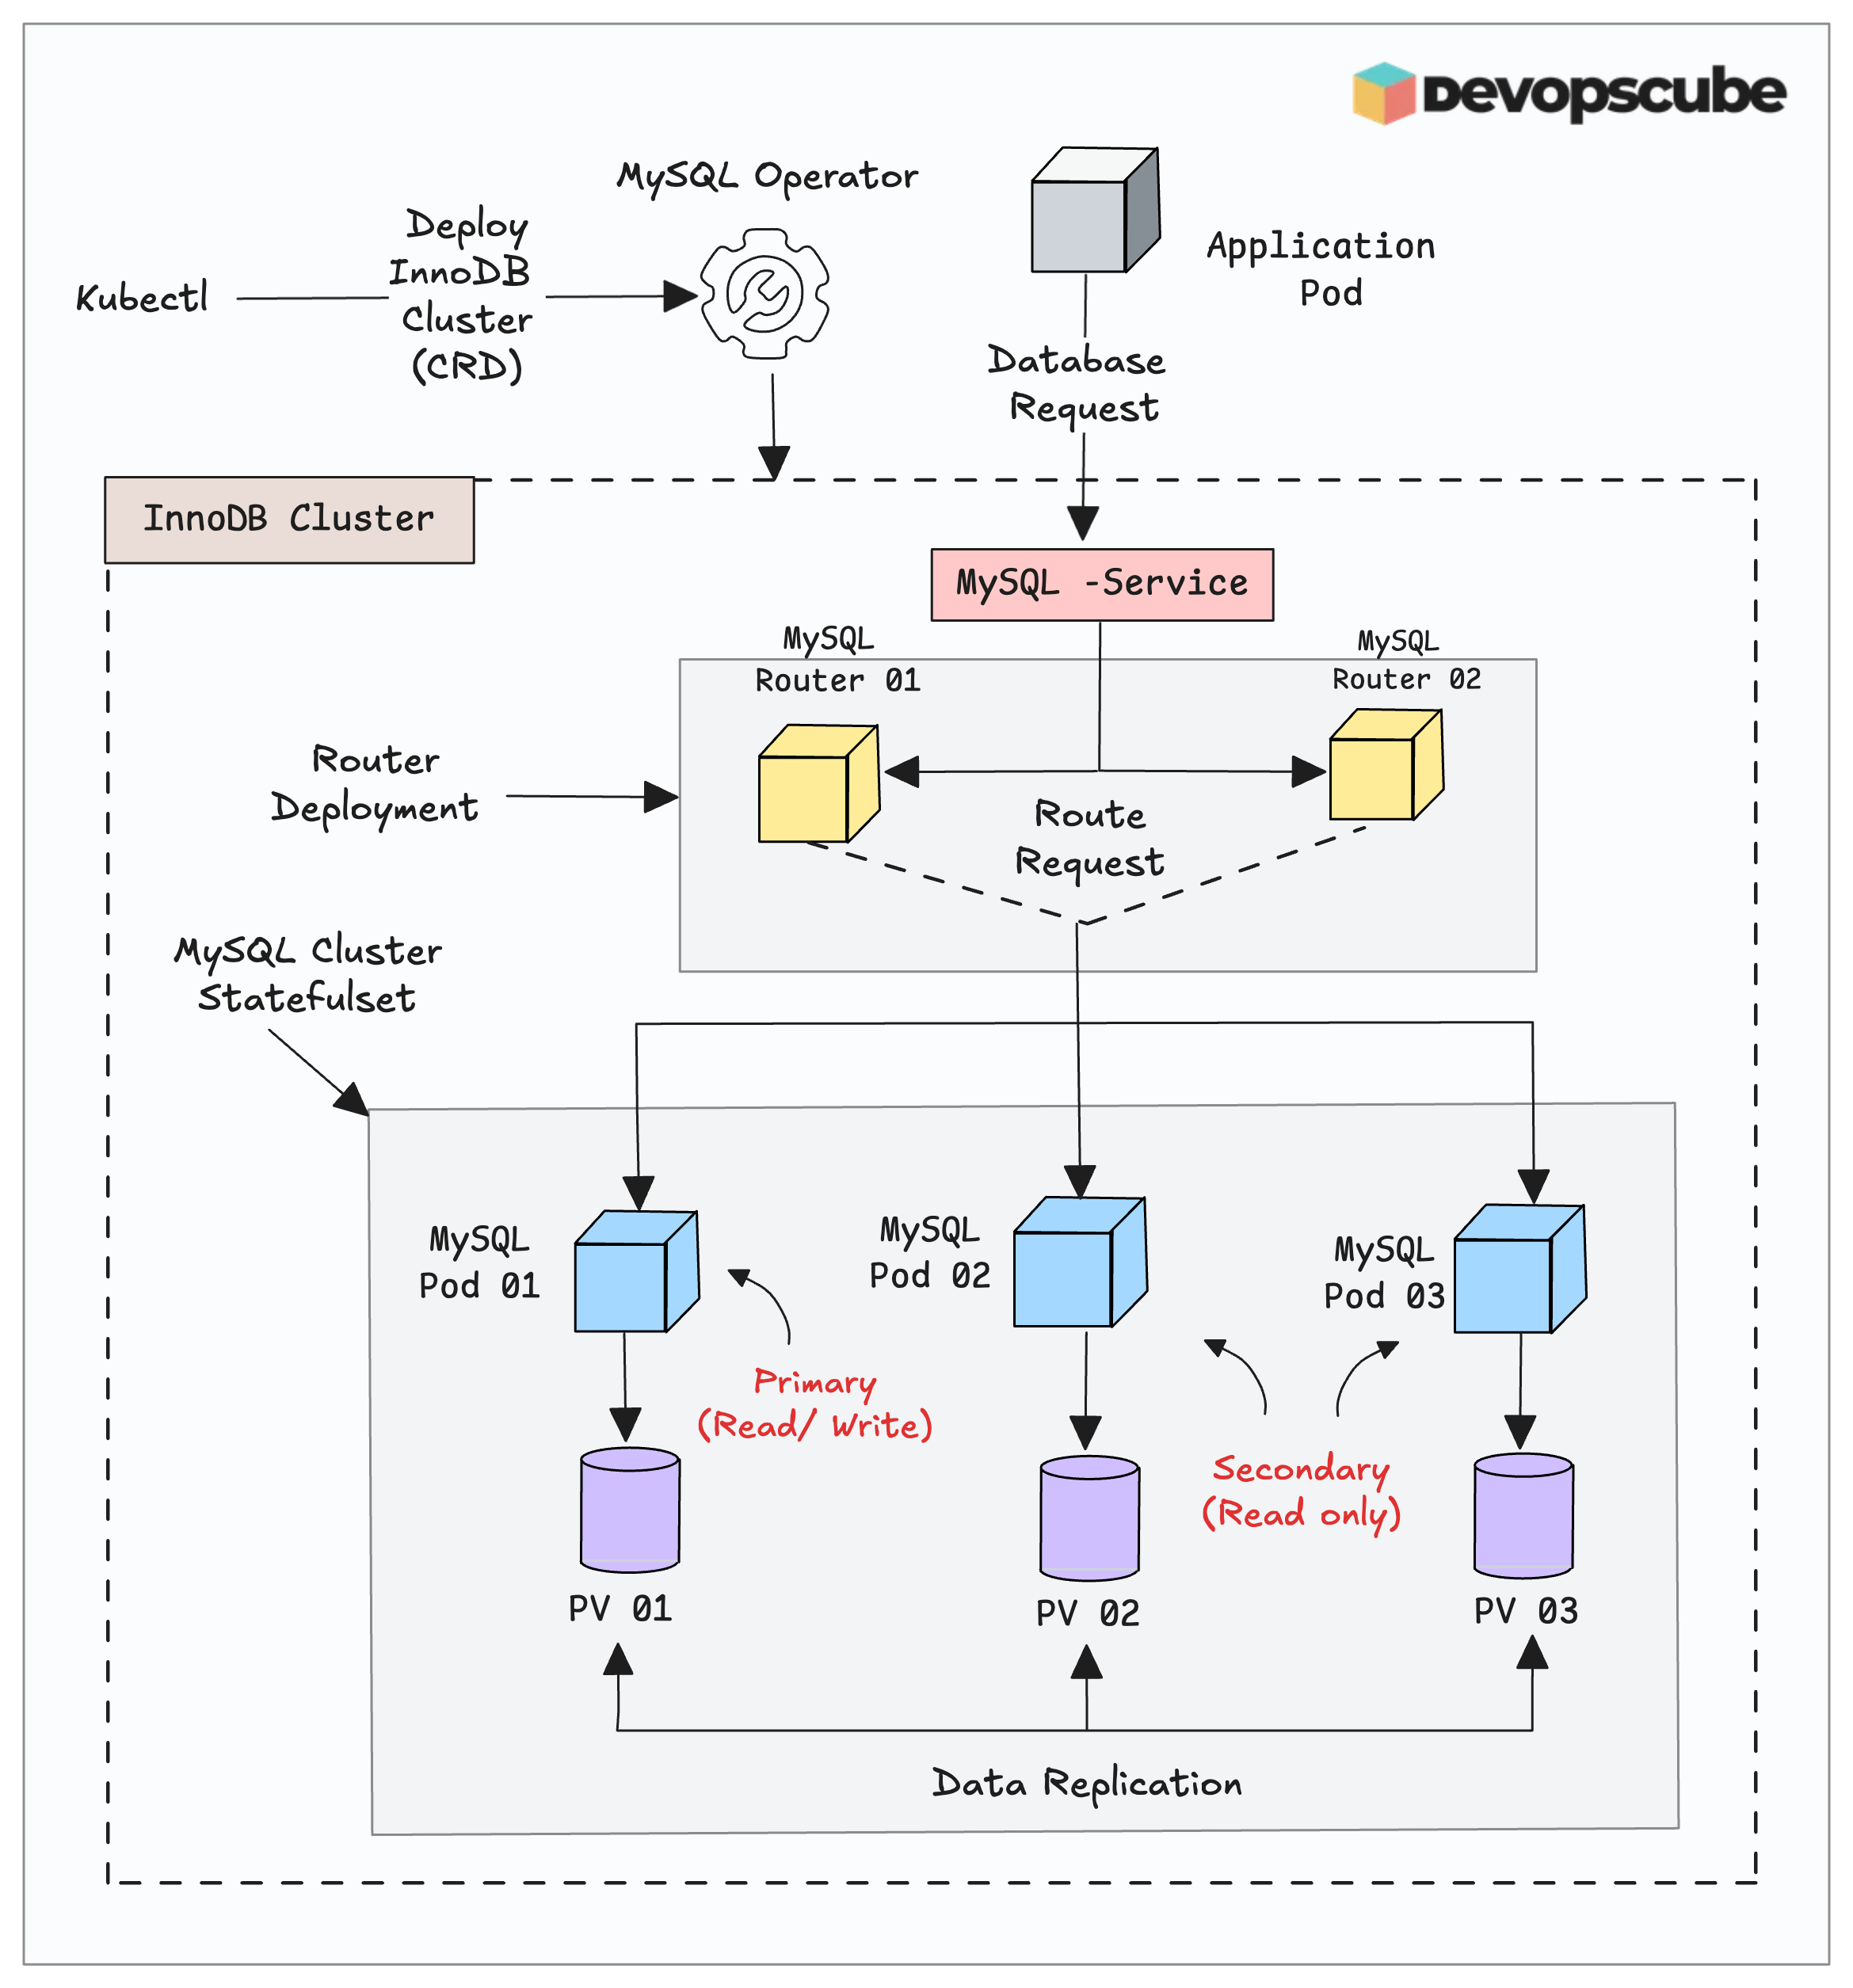
Here is how it works.
- The application pod sends a read/write request to the database.
- The MySQL router pods route the traffic to the correct MySQL server pods.
- The primary MySQL pod only accepts writes to avoid conflicts.
- However, the read request will be accepted by all the pods.
- Once the data is written to the primary persistent storage, MySQL replicates it across all pods to ensure they have the same data.
Setup Prerequisites
The following are the requirements to install the MySQL operator.
- Kubernetes cluster with admin access.
- Kubectl is installed and configured on your local machine.
- Helm is installed on your local machine.
Now, let's begin the installation.
Installing the MySQL Operator via Helm
We will use the official Helm chart to install the MySQL operator on the cluster.
Add and update the Helm repo on local using the following command.
helm repo add mysql-operator https://mysql.github.io/mysql-operator/

helm repo update
Once we update the repo to ensure we have all the available versions, we can install it.
helm install my-mysql-operator mysql-operator/mysql-operator \
   --namespace mysql-operator --create-namespace
Customize the Helm Chart (Optional)
In our deployment, we haven't made any changes in the deployment. But for production use cases, we may have to tweak the default values.
To do that, lets pull the chart locally using the following command.
helm pull mysql-operator/mysql-operator --untarHere is the tree structure of the MySQL Operator Helm chart
mysql-operator
├── Chart.yaml
├── README.md
├── crds
│   └── crd.yaml
├── templates
│   ├── NOTES.txt
│   ├── _helpers.tpl
│   ├── cluster_kopf_keepering.yaml
│   ├── cluster_role_binding_operator.yaml
│   ├── cluster_role_operator.yaml
│   ├── cluster_role_sidecar.yaml
│   ├── deployment.yaml
│   ├── service.yaml
│   └── service_account_operator.yaml
└── values.yaml
The chart uses the following container image.
container-registry.oracle.com/mysql/community-operator:9.4.0-2.2.5 All the customizable configurations are available in the values.yaml file.
So if you want to customize the default settings,
- You can either edit the same
values.yamlfile - Or a recommended approach is to create a new values file (e.g.,
dev-values.yaml) and copy only the parameters that you want to modify from the original file
Validate Operator Installation
Now, we have enough information about the Helm chart, so we can list the deployed Operator and the service using the following command.
$ kubectl -n mysql-operator get deploy,svc

NAME                             READY   UP-TO-DATE   AVAILABLE   AGE
deployment.apps/mysql-operator   1/1     1            1           18m

NAME                     TYPE        CLUSTER-IP    EXTERNAL-IP   PORT(S)    AGE
service/mysql-operator   ClusterIP   10.1.148.89   <none>        9443/TCP   18m
The output ensures that the MySQL operator is up and running without any issues.
Lets validate the Custom Resource Definitions as well.
$ kubectl get crds

innodbclusters.mysql.oracle.com                      2025-08-08T10:26:29Z
mysqlbackups.mysql.oracle.com                        2025-08-08T10:26:29Z
clusterkopfpeerings.zalando.org                      2025-08-16T05:26:43Z
kopfpeerings.zalando.org                             2025-08-16T05:26:43Z
In the above output, you can see two Custom Resource Definitions of the MySQL Operator.
- InnoDB Cluster - To manage the InnoDB clusters
- MySQL Backups - To manage the backups
Till now, we have deployed only the MySQL operator. We haven't created any MySQL clusters yet.
Before we move to the cluster creation step, lets understand what is a InnoDB cluster.
InnoDB Cluster
InnoDB Cluster is MySQL's high-availability clustering solution that lets you run multiple MySQL servers together as one system.
It supports automatic failover, keeps the data the same across all servers, and offers tools to manage the whole cluster.
Deploying MySQL InnoDB Cluster
Let's deploy an InnoDB cluster.
The following Helm command installs the MySQL cluster with a MySQL router. All the required configurations are passed using the --set flag.
helm install devcluster mysql-operator/mysql-innodbcluster \
    --set credentials.root.user='root' \
    --set credentials.root.password='root' \
    --set credentials.root.host='%' \
    --set serverInstances=3 \
    --set routerInstances=1 \
    --set tls.useSelfSigned=true
The above command deploys the router deployment and MySQL cluster Statefulset with PVC's attached to it.
Lets validate the deployments.
$ k get deploy,statefulset,pvc

NAME                                READY   UP-TO-DATE   AVAILABLE   AGE
deployment.apps/devcluster-router   1/1     1            1           10m

NAME                          READY   AGE
statefulset.apps/devcluster   3/3     10m

NAME                                         STATUS   VOLUME                                     CAPACITY   ACCESS MODES   STORAGECLASS       VOLUMEATTRIBUTESCLASS   AGE
persistentvolumeclaim/datadir-devcluster-0   Bound    pvc-a47f104a-97bb-4a55-b9ef-51f110321d26   2Gi        RWO            do-block-storage   <unset>                 10m
persistentvolumeclaim/datadir-devcluster-1   Bound    pvc-4944fa31-3d88-42de-b7c0-159b85e1a240   2Gi        RWO            do-block-storage   <unset>                 10m
persistentvolumeclaim/datadir-devcluster-2   Bound    pvc-462985ea-35e4-4f51-b756-d00cef7096c4   2Gi        RWO            do-block-storage   <unset>                 10m
In the output you can see three MySQL stateful pods, its PVC's and one Router deployment.
Also, we deployed this as a Custom Resource, so let's check the innodbcluster bject as well.
$ kubectl get innodbclusters

NAME         STATUS   ONLINE   INSTANCES   ROUTERS   TYPE      AGE
devcluster   ONLINE   3        3           1         UNKNOWN   3m31s
Now that our MySQL cluster is ready, we can go ahead and test the connection from a client.
Testing the InnoDB Cluster
To test the connection, we need to create a temporary client MySQL pod and use the MySQL shell to connect to the database with the root user.
kubectl run --rm -it myshell --image=container-registry.oracle.com/mysql/community-operator -- mysqlsh root@devcluster --sql
Once the shell is open, it will prompt you to provide the root password, in our case it is root.
Now we can list the existing databases.
SHOW DATABASES;
 MySQL  devcluster:3306 ssl  SQL > SHOW DATABASES;
+-------------------------------+
| Database                      |
+-------------------------------+
| information_schema            |
| mysql                         |
| mysql_innodb_cluster_metadata |
| performance_schema            |
| sys                           |
+-------------------------------+
5 rows in set (0.0049 sec)
 MySQL  devcluster:3306 ssl  SQL >
To check the hostname, use the following command.
SELECT @@hostname: MySQL devcluster:3306 ssl SQL > SELECT @@hostname;
+--------------+
| @@hostname |
+--------------+
| devcluster-0 |
+--------------+
1 row in set (0.0010 sec)
MySQL devcluster:3306 ssl SQL > For testing, we are creating a custom database in it.
CREATE DATABASE devopscube;Now, we can list the databases again to see the newly created database.
 MySQL  devcluster:3306 ssl  SQL > SHOW DATABASES;
+-------------------------------+
| Database                      |
+-------------------------------+
| devopscube                    |
| information_schema            |
| mysql                         |
| mysql_innodb_cluster_metadata |
| performance_schema            |
| sys                           |
+-------------------------------+
6 rows in set (0.0022 sec)
 MySQL  devcluster:3306 ssl  SQL >
If you want to quit, press control+d,.
Note: If you want to check the replicated data, you can open each pod and list the databases.Backup Using MySQL Operator
To back up the database, the MySQL operator provides a Custom Resource called mysqlbackups.mysql.oracle.com
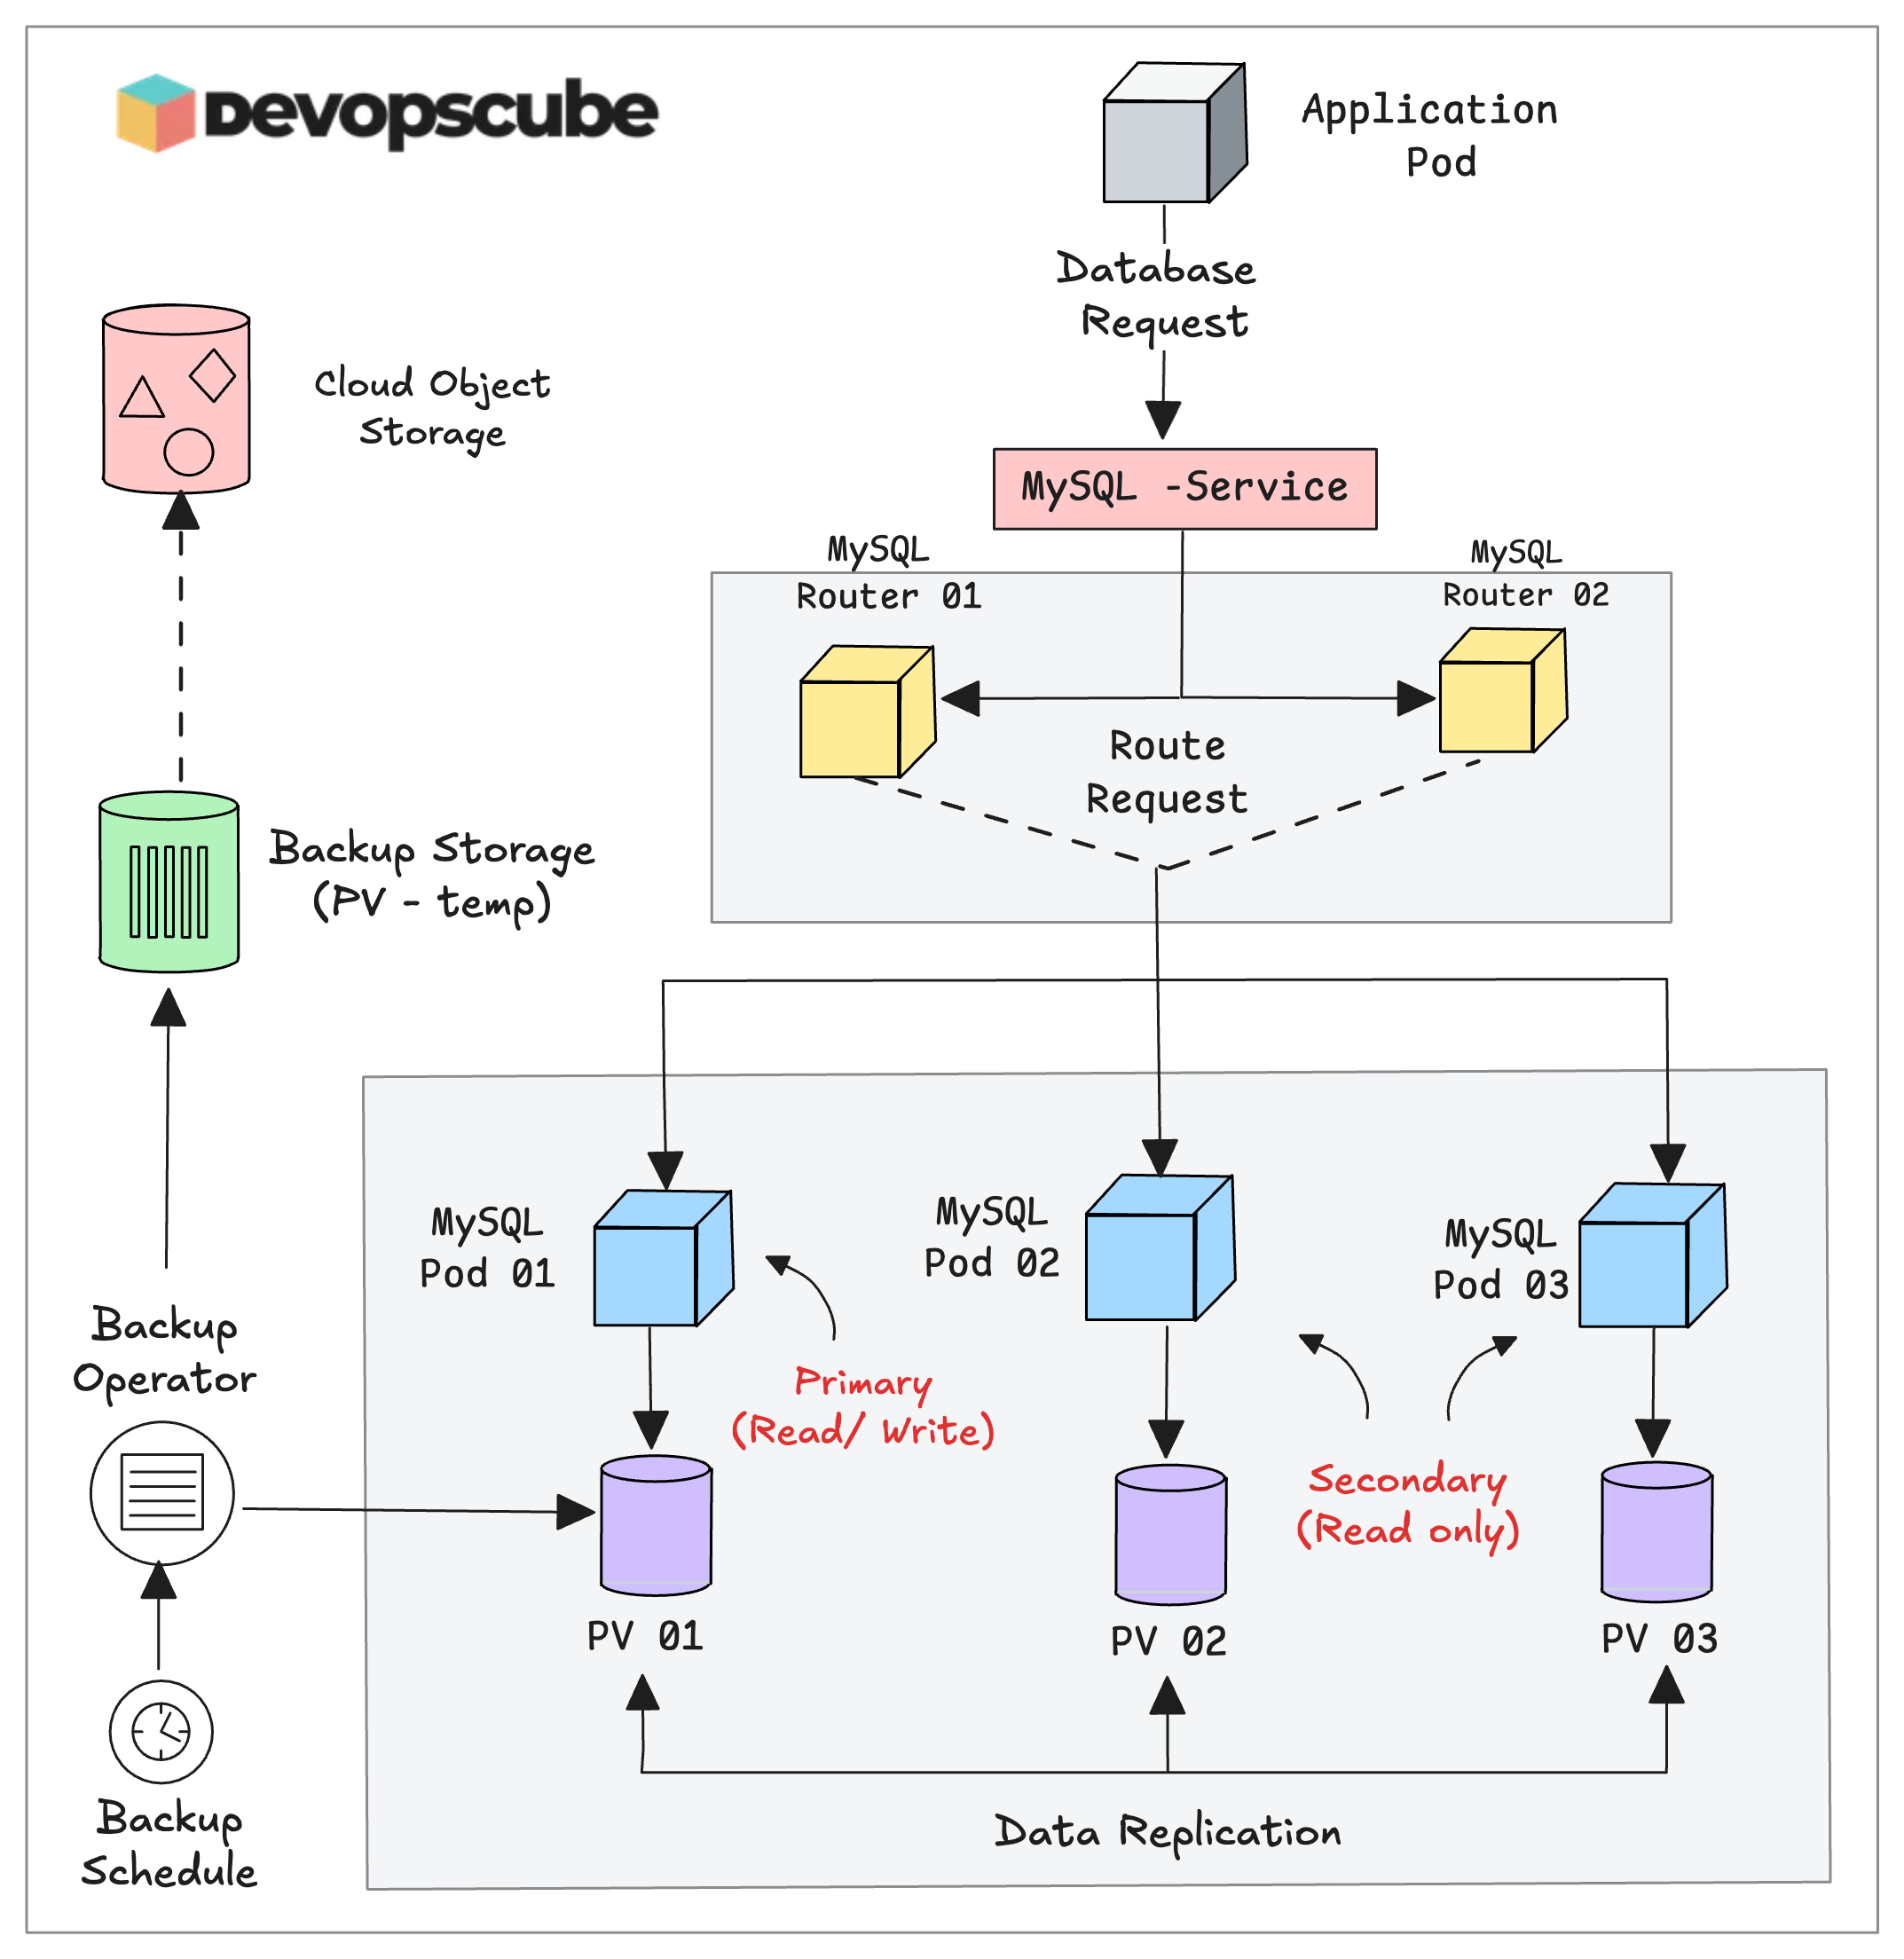
Before creating the backup configuration, we need a Persistent Volume (PV) to store the backup.
To create a PV, use the following contents.
cat <<EOF > backup-pv.yaml
apiVersion: v1
kind: PersistentVolume
metadata:
  name: backup-pv
  labels:
    type: local
spec:
  storageClassName: gp2
  capacity:
    storage: 2Gi
  accessModes:
    - ReadWriteOnce
  hostPath:
    path: /tmp
---
apiVersion: v1
kind: PersistentVolumeClaim
metadata:
  name: backup-pvc
spec:
  storageClassName: gp2
  accessModes:
    - ReadWriteOnce
  resources:
    requests:
      storage: 2Gi
EOF
To apply
kubectl apply -f backup-pv.yamlOnce the PV is created, we can configure the backup.
The following manifest is to configure the backup. The InnoDBCluster object in the manifest is responsible for the backup. We have mapped the previously created backup-pvc under backupProfiles parameter.
Create the backup.yaml manifest
---
apiVersion: v1
kind: ServiceAccount
metadata:
  name: devcluster-sa
  namespace: default
---
apiVersion: v1
kind: Secret
metadata:
  name: devcluster-cluster-secret
  namespace: default
stringData:
  rootUser: "root"
  rootHost: "%"
  rootPassword: "root"
---
apiVersion: mysql.oracle.com/v2
kind: InnoDBCluster
metadata:
  name: devcluster
spec:
  instances: 3
  router:
    instances: 1
  secretName: devcluster-cluster-secret
  tlsUseSelfSigned: true

  backupProfiles:
    - name: backupprofile
      dumpInstance:
        dumpOptions:
        storage:
          persistentVolumeClaim:
            claimName: backup-pvc
  backupSchedules:
    - name: fiveminbackup
      schedule: "*/5 * * * *"
      backupProfileName: backupprofile
      enabled: true
For this demo, I have configured it to take backups every five minutes.
spec.backupProfiles - Defines how the backup should be taken. Here, we specify the PVC to store the backups and dump options to include or exclude specific databases.
spec.backupSchedules - Defines when the backup should be taken. Here, we specify the cronjob to periodically take the backup.
Now, deploy the backup manifest.
$ kubectl apply backup.yamlOnce the configurations are applied, we can list the backup custom resources created by the operator.
$ kubectl get mysqlbackups

NAME                                   CLUSTER      STATUS      OUTPUT                                 AGE
devcluster-fiveminbackup250816054003   devcluster   Completed   devcluster-fiveminbackup250816054003   7h8m
devcluster-fiveminbackup250816054502   devcluster   Completed   devcluster-fiveminbackup250816054502   7h3m
devcluster-fiveminbackup250816055002   devcluster   Completed   devcluster-fiveminbackup250816055002   6h58m
The output shows that the backup has been taken every five minutes as we configured.
The next section covers the things we need to consider when we setup the MySQL operator on a multi-zone Kubernetes cluster.
Availability Zone Considerations for Cloud Deployments
The main problem most of the time with the StatefulSets is the persistent storage.
For example, when we use AWS EBS as a storage, it is zone-specific. So a pod from one zone cannot write to a volume in another zone.
But in the MySQL operator, the data replication occurs on the MySQL application layer over the network, so the data will be shared on all the pods, even in multiple zones.
And one common doubt is that, what if a Pod is deleted and recreated in another zone?
When a StatefulSet pod is deleted and re-created, the Kubernetes scheduler doesnt try to place it on the same node. However, itt respects the volumes AZ via “volume node affinity.”
With storage classes using volumeBindingMode: WaitForFirstConsumer, the PV is created/bound in the AZ of the node that first schedules the pod and future reschedules must stay in that AZ.
This way when a pod is deleted, it is recreated in the same AZ.
Also, what you need to consider is the data transfer costs because the cross-zone transfer cost is higher than the same zone.
And the second one is latency, because the distance between one zone to another will slow down the transfer speed.
The primary instance shares the data with others, and then the other nodes send back the acknowledgment to confirm that they received the data.
Split Brain Scenario
In a MySQL cluster, the primary instance will be decided by voting, so we always need to keep the instance count in odd numbers (e.g., 3, 5, 7), which is called the Quorum.
In mutti-az setup, during a AZ unavailability, split-brain scenarios can occur when Network partitions cause multiple MySQL instances to think they are the primary.
Cleanup
To cleanup the setup, we need to remove the InnoDB cluster before uninstalling the operator.
To delete the InnoDB cluster, use the following command.
helm -n default uninstall devclusterNow, we can uninstall the MySQL operator.
helm -n mysql-operator uninstall my-mysql-operator To delete the namespace, use the following command.
kubectl delete ns mysql-operatorPossible Issues
If you are facing any issues with cluster domain error, you need to set the MYSQL_OPERATOR_K8S_CLUSTER_DOMAIN variable in the operator deployment and restart the pods using the following commands.
kubectl -n mysql-operator set env deploy/mysql-operator \
  MYSQL_OPERATOR_K8S_CLUSTER_DOMAIN=cluster.local

kubectl -n mysql-operator rollout restart deploy/mysql-operator
Conclusion
Manually creating and managing a MySQL Cluster is quite complex, but with an operator we can easily manage it.
We have shown you how to deploy the MySQL operator on kubernetes and mange it effectively.
Try this setup on your Kubernetes cluster to explore more about the MySQL operators and their features so that you can modify them as per your requirements.
