

In this blog, we will look into setting up AWS S3 in Loki for storing its logs.
We will not just configure Loki S3, but we will also make use of S3's features like lifecycle policy and bucket policy.
In the end, you will get a clear understanding of how to configure AWS S3 for Loki log storage.
s3 As Loki External Log Storage
Configuring an external object storage is important for data persistence in Loki, because if you don't configure an external object storage, it stores logs on its pod's filesystem.
In this case, if a pod restarts or gets deleted, you will loose all the data.
With the help of external objects storage like s3, you can store large volume of log data. Also the storage can scale according to the data size.
Loki also supports GCS, Azure blog etc,.You can also refer to the official documentation for available storage options.
How does Loki Integrate with S3?
The workflow diagram shows how Loki integrates with S3 for logs storage.
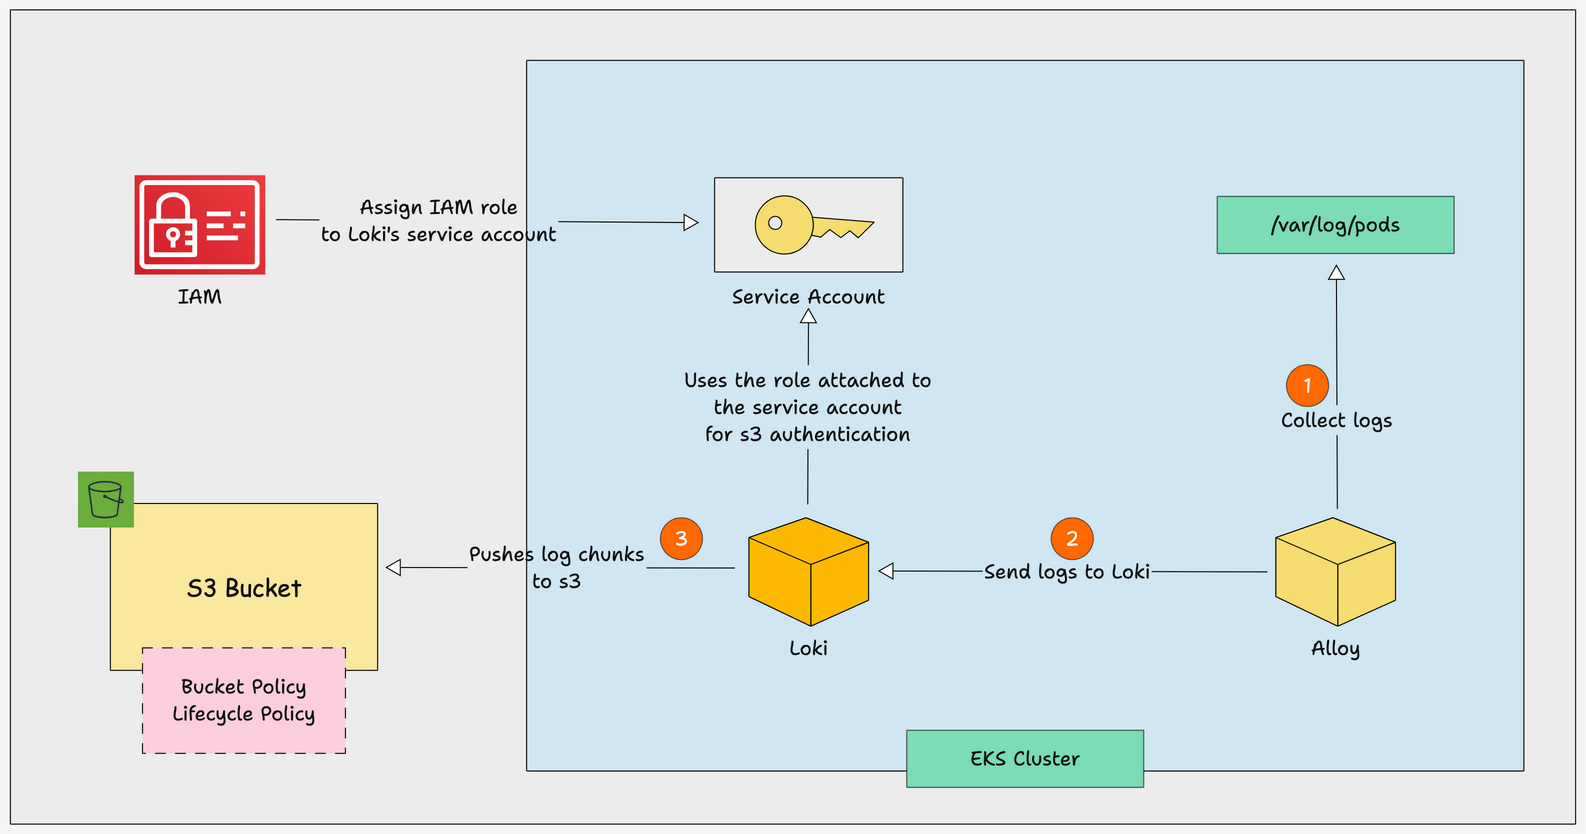
Here is how the log flow works when you configure s3 for Loki.
Alloycollects logs from/var/log/podsand sends them to Loki.- Once
Lokigets the logs, it compresses and stores as chunks with its index in the local. - The chunks and indexes stored on the local is pushed to S3 based on certain conditions. If there is a pre-defined time when data should be pushed, the system waits until that time and then uploads the chunks to S3.
- Also, each chunk has a time limit, and once that limit is reached, it gets pushed to S3 automatically.
- Loki pushes the log chunks and indexes to S3 using the IAM role attached to the kubernetes service account. It should have s3 permissions like get, put, delete etc,.
- Also, the S3 has a bucket policy is configured in such a way that it gives access only the IAM role we attach to the Kubernetes service account.
- Now, if you dont want the logs to be retained for long, you can configure s3 lifecycle policies. It deletes the logs after the specified time, e.g., 30 days that you specify in the policy.
- You can also choose to move to services like Glacier for log retention compliance based on your organization policies.
Setup Prerequisites
The following are the prerequisites for this setup.
- Helm installed in your system
- Kubernetes Cluster
- OIDC enabled on your cluster (Required for IAM role to K8s Service account mapping)
- Kubectl
- AWS CLI with access to create IAM roles and S3 bucket
- Loki setup in your cluster
Steps to Configure Loki S3 for Log Storage
Below are the steps for configuring AWS S3 in Loki to store its logs.
Step 1: Create a S3 Bucket
Let's start with creating an S3 bucket, we can create an S3 bucket using a single command.
Run the following command to create the S3 bucket.
aws s3api create-bucket \
--bucket <bucket-name> \
--region us-west-2 \
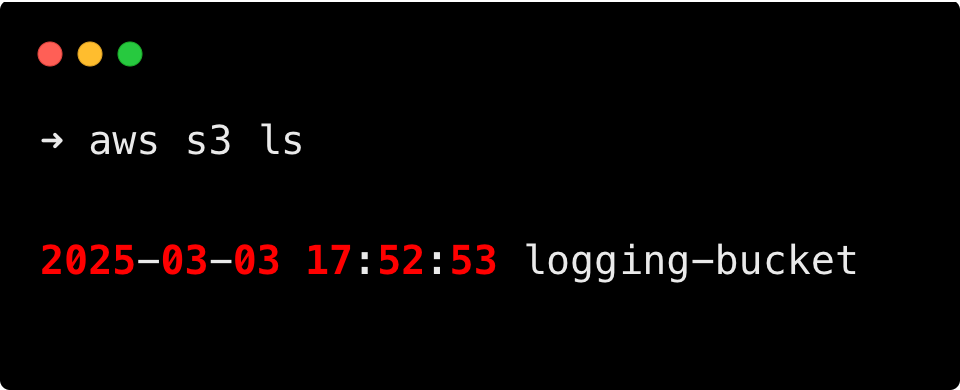
--create-bucket-configuration LocationConstraint=us-west-2Then, run the following command to check if your bucket is created.
aws s3 lsYou will get your bucket name as shown below if it's created.
This improves security by preventing overwriting and data conflict between environments, and it is easy to manage.
Step 2: Create IAM Policy for Loki
The next step is to create an IAM policy for Loki to push logs to S3.
Run the following command to create a file with the required policy.
cat << EOF | envsubst > loki-policy.json
{
    {
        "Version": "2012-10-17",
        "Statement": [
            {
                "Effect": "Allow",
                "Action": [
                    "s3:ListBucket",
                    "s3:GetObject",
                    "s3:PutObject",
                    "s3:DeleteObject"
                ],
                "Resource": [
                    "arn:aws:s3:::<bucket-name>",
                    "arn:aws:s3:::<bucket-name>/*"
                ]
            }
        ]
    }
}
Give a bucket name in the above command before running it.
This policy will give Loki to list, get, put, and delete permission to all the objects inside the specified bucket.
Now, run the following command to create the policy.
aws iam create-policy \
    --policy-name loki_bucket_policy \
    --policy-document file://loki-policy.json
Then run the following command to get the ARN of the policy, which will be needed in upcoming steps.
export POLICY_ARN=$(aws iam list-policies --query "Policies[?PolicyName=='loki_bucket_policy'].Arn" --output text)Step 3: Create IAM Role for Loki
Before creating the role, get the OIDC ID attached to the cluster using the following command.
aws eks describe-cluster --name <cluster-name> --query "cluster.identity.oidc.issuer" --output textUpdate the cluster name before running the above command.
Now, run the following command to create a file with the roles trustpolicy.
cat << EOF | envsubst > trust-policy.json
{
    {
        "Version": "2012-10-17",
        "Statement": [
            {
                "Effect": "Allow",
                "Action": "sts:AssumeRoleWithWebIdentity",
                "Principal": {
                    "Federated": "arn:aws:iam::<account-id>:oidc-provider/<oidc-id>"
                },
                "Condition": {
                    "StringEquals": {
                        "<oidc-id>:aud": [
                            "sts.amazonaws.com"
                        ]
                    }
                }
            }
        ]
    }
}
In the above command, update your account ID and OIDC ID. Add the OIDC ID without the https:// on it.
Now, run the following command to create the role.
aws iam create-role \
    --role-name loki_bucket_role \
    --assume-role-policy-document file://trust-policy.json
Then, run the following command to attach the policy to the role.
aws iam attach-role-policy \
    --role-name loki_bucket_role \
    --policy-arn $POLICY_ARN
Once it is created, run the following command to get the ARN of the role.
aws iam get-role --role-name loki_bucket_role --query "Role.Arn" --output textNote the ARN of the role from the output, we need that while creating the bucket policy and updating the Loki configuration.
Step 4: Add Bucket Policy to your S3 Bucket
Adding bucket policy to the bucket is a security best practice to limit the access to the bucket.
In this setup, we will use the bucket policy to allow access only to a specific role attached to the service account.
Run the following command to create a policy file.
cat << EOF | envsubst > s3-bucket-policy.json
{
    {
        "Version": "2012-10-17",
        "Statement": [
            {
                "Effect": "Allow",
                "Principal": {
                    "AWS": "<role-arn>"
                },
                "Action": [
                    "s3:GetObject",
                    "s3:PutObject",
                    "s3:DeleteObject"
                ],
                "Resource": "arn:aws:s3:::<buckt-name>/*"
            },
            {
                "Effect": "Allow",
                "Principal": {
                    "AWS": "<role-arn>"
                },
                "Action": "s3:ListBucket",
                "Resource": "arn:aws:s3:::<buckt-name>"
            }
        ]
    }
}
Update your role arn and bucket name in the above command.
Then, run the following command to add the bucket policy to the bucket.
aws s3api put-bucket-policy --bucket <bucket-name> --policy file://s3-bucket-policy.jsonAdd the bucket name before running the command.
Step 5: Add LifeCycle Policy to your S3 Bucket
The next step is to add a lifecycle policy to your bucket for automatically deleting the objects in the bucket after a certain time.
Run the following command to create a policy file.
cat << EOF | envsubst > lifecycle-policy.json
{
    {
        "Rules": [
            {
                "ID": "DeleteObjectsAfter30Days",
                "Status": "Enabled",
                "Prefix": "",
                "Expiration": {
                "Days": 30
                }
            }
        ]
    }
}
This policy will delete the object once it becomes 30 days old.
Here is an example policy to move objects to Glacier after 30 days.
cat << EOF | envsubst > lifecycle-glacier-policy.json
{
    "Rules": [
        {
            "ID": "MoveToGlacierAfter30Days",
            "Status": "Enabled",
            "Prefix": "",
            "Transitions": [
                {
                    "Days": 30,
                    "StorageClass": "GLACIER"
                }
            ],
            "Expiration": {
                "Days": 365
            }
        }
    ]
}
EOF
Now, run the following command to add the policy to the bucket.
aws s3api put-bucket-lifecycle-configuration --bucket <bucket-name> --lifecycle-configuration file://lifecycle-policy.jsonUpdate the bucket name in the above command before running it.
Step 6: Update Loki Configuration
The final step is to update the Loki configuration. If you have deployed Loki using this guide, update the helm values file as follows. It includes all the s3 configurations.
loki:
  image:
    registry: docker.io
    repository: grafana/loki
    tag: 3.4.2
  commonConfig:
    replication_factor: 1
  schemaConfig:
    configs:
      - from: "2024-04-01"
        store: tsdb
        object_store: s3
        schema: v13
        index:
          prefix: loki_index_
          period: 24h
  limits_config:
    allow_structured_metadata: true
    retention_period: 168h
    split_queries_by_interval: 15m
    volume_enabled: true

  storage:
    type: s3
    bucketNames:
      chunks: <bucket-name>
      ruler: <bucket-name>
    s3:
      region: <region>
      insecure: false

  auth_enabled: false

storage_config:
  aws:
    region: <region>
    bucketnames: <bucket-name>
    s3forcepathstyle: false
  tsdb_shipper:
    active_index_directory: /data/tsdb-index
    cache_location: /data/tsdb-cache
    cache_ttl: 12h
    flush_interval: 1m
    object_store: s3
    bucket: <bucket-name>

serviceAccount:
  create: true
  annotations:
    "eks.amazonaws.com/role-arn": "<role-arn>"

minio:
  enabled: false

deploymentMode: SingleBinary

singleBinary:
  replicas: 1
  persistence:
    storageClass: gp2
    accessModes:
      - ReadWriteOnce
    size: 20Gi

  resources:
    requests:
      cpu: "1"
      memory: "2Gi"
    limits:
      cpu: "2"
      memory: "4Gi"

sidecar:
  image:
    repository: kiwigrid/k8s-sidecar
    tag: 1.30.0
  resources:
    requests:
      cpu: 50m
      memory: 50Mi
    limits:
      cpu: 100m
      memory: 100Mi

backend:
  replicas: 0
read:
  replicas: 0
write:
  replicas: 0

chunksCache:
  allocatedMemory: 500
In the above YAML file, update the region, bucket name, and role arn before using the helm upgrade command.
The additional lines and changes made are given below.
  schemaConfig:
    configs:
      - from: "2024-04-01"
        store: tsdb
        object_store: s3

  limits_config:
    allow_structured_metadata: true
    retention_period: 168h
    split_queries_by_interval: 15m
    volume_enabled: true

  storage:
    type: s3
    bucketNames:
      chunks: <bucket-name>
      ruler: <bucket-name>
    s3:
      region: <region>
      insecure: false
storage_config:
  aws:
    region: <region>
    bucketnames: <bucket-name>
    s3forcepathstyle: false
  tsdb_shipper:
    active_index_directory: /data/tsdb-index
    cache_location: /data/tsdb-cache
    cache_ttl: 12h
    flush_interval: 1m
    object_store: s3
    bucket: <bucket-name>

serviceAccount:
  create: true
  annotations:
"eks.amazonaws.com/role-arn": "<role-arn>"- Under the
schemaConfigtheobject_storeis changed to S3 from the filesystem. - The
limits_configsection contains the options like retention period, query timeout, etc. - The
storagesection contains the information about the bucket type, which is S3, and the bucket name. - The s
torage_configblock specifies theS3 bucketand thetsdb_shipperoption, like the time interval for pushing chunks to S3. - And, in the serviceAccount block we will specify the ARN of the role we created in the previous step.
Loki may not push the chunks to S3 within the specified time, it may change based on the no of chunks collected, chunk size reached the limit, etc.Once the values file is updated, run the following command to upgrade the changes.
helm upgrade --install loki grafana/loki -n loki -f loki.yamlStep 7: Verify if Log Chunks are Pushing to S3
Now, the Loki is configured to push logs to S3, let's verify if the chunks are pushing to S3.
Loki will not push the log chunks immediately once it is configured; it pushes depending on the time interval specified or during chunks reaching a certain size, etc.
Loki only pushes the chunks with a time interval; it may take hours for you to see the log chunks on S3.
Once the chunks and index are pushed to S3, you can see the objects in S3.
Common Loki s3 Config Issues
The common issues you may face during the configuration are given below.
The common issues you may face during the configuration are given below.
- If the pod is in pending or
crashloopbackstate,- check if the cluster has the required CPU and Memory for the pod to deploy.
- check if the PV is created and attached to the pod.
- Getting S3 permission denied error on Loki pod log, :
- check if the policy you created has the required S3 permissions like list, get, put, and delete.
- Check if the policy is added to the role.
- Check OIDC is enabled on the cluster and the correct OIDC ID is specified in the roles trustpolicy.
- Correct role ARN is attached to the service account.
- Loki pod is using the correct service account.
- If the log Chunks not pushing to S3, :
- Check if the bucket name you specified is correct.
- Check if the role arn specified on the bucket policy is the same as the role you attached to Loki's service account.
Conclusion
In this blog, you have learned about configuring S3 for Loki log storage.
Also, you have learned about S3 security best practices using bucket policy and lifecycle policy.
During the setup if you face any issues, do comment below. We will take a look.
Hope this guide was helpful.
