


In this blog, you will learn to set up Rancher on your Kubernetes cluster to manage your multiple Kubernetes clusters.
By the end of this blog, you will have learned.
- Understand key Rancher features
- The installation of Rancher on Kubernetes
- Adding Kubernetes clusters on Rancher
What is Rancher?
Lest say you are working in a project that runs applications on Kubernetes.
At first, you might have just one Kubernetes cluster. But as the project grows, you may have clusters in different environments for development, testing, and production
Also, you might have clusters spread across different cloud providers (AWS, Azure, Google Cloud) for multi-cloud strategy. Some clusters might be running in your own data centers.
Now, how do you manage all these clusters? How do you plan the upgrades? How do you enforce security policies for all the clusters?
Well, here is where Rancher comes in to play.
Rancher is a free management platform that acts as a "control center" for all your Kubernetes clusters. You can manage all your clusters from a single interface, whether they are in AWS, Azure, on-premises, or at the edge.
When we say Rancher helps "manage" clusters, here is what you can actually do with it.
- Cluster Operations: You can create a new Kubernetes cluster with a few clicks. You can connect clusters you already have running anywhere. You can even safely upgrade kubernetes versions across all clusters without downtime.
- Application Management: You can deploy apps to any cluster from a catalog (like an app store for Kubernetes). Also you can move, update applications across multiple clusters simultaneously.
- Security & Compliance: You can create security policies like "no containers can run as root user". You can also scan for vulnerabilities in your running containers.
- Day-to-Day Operations: You can view logs from all your applications in one place. Also, you can debug pods by performing SSH into containers without complex kubectl commands.
Now that you have a high level idea of what Rancher is, lets get our hands dirty with a practical setup. So that it will all make sense for you.
Prerequisites
- Kubernetes cluster (v1.33 +)
- Nginx Ingress Controller [Kubernetes]
- Certmanager [Kubernetes]
- Helm [Local Workstation]
- Kubectl [Local Workstation]
If you want to know more about the hardware requirements, please refer to this official documentation.
Once you ensure all the prerequisites are available, we can pull the Helm chart to begin the installation.
Note: At the time of writing this blog, Rancher is not supported for Kubernetes v1.34.Set up Nginx Controller (Prerequisite)
Ingress controller and Cert Manager are two important components that are needed for the Rancher setup.
The Rancher needs the Nginx Ingress Controller to route incoming traffic.
To set up the Nginx Ingress Controller on your Kubernetes cluster, follow the guide "Setup Nginx Ingress Controller On Kubernetes"
But in real production, you should use the LoadBalancer service type so the Ingress Controller creates a real Load Balancer to route the traffic.
Setup Cert Manager (Prerequisite)
Rancher also needs Cert Manager to create TLS certificates for secure communication between the clusters you add.
To set up a cert manager on a Kubernetes cluster, follow the guide "Set up Cert Manager in a Kubernetes cluster"
But in production, you should use Cert Manager with a trusted Certificate Authority to generate valid certificates.
Set Up Rancher using Helm
The setup begins with the requirements to install Rancher.
Step 1: Add the Rancher Repo
First, we need to add the entire Rancher Helm repo on our local machine and update the repo to ensure we have the latest chart.
helm repo add rancher-stable https://releases.rancher.com/server-charts/stable

helm repo update
You can now directly install Rancher, though you can pull this chart on your local machine if you want.
To pull the chart, use the following command.
helm pull rancher-stable/rancher --untarThe following is the directory structure of the Helm chart.
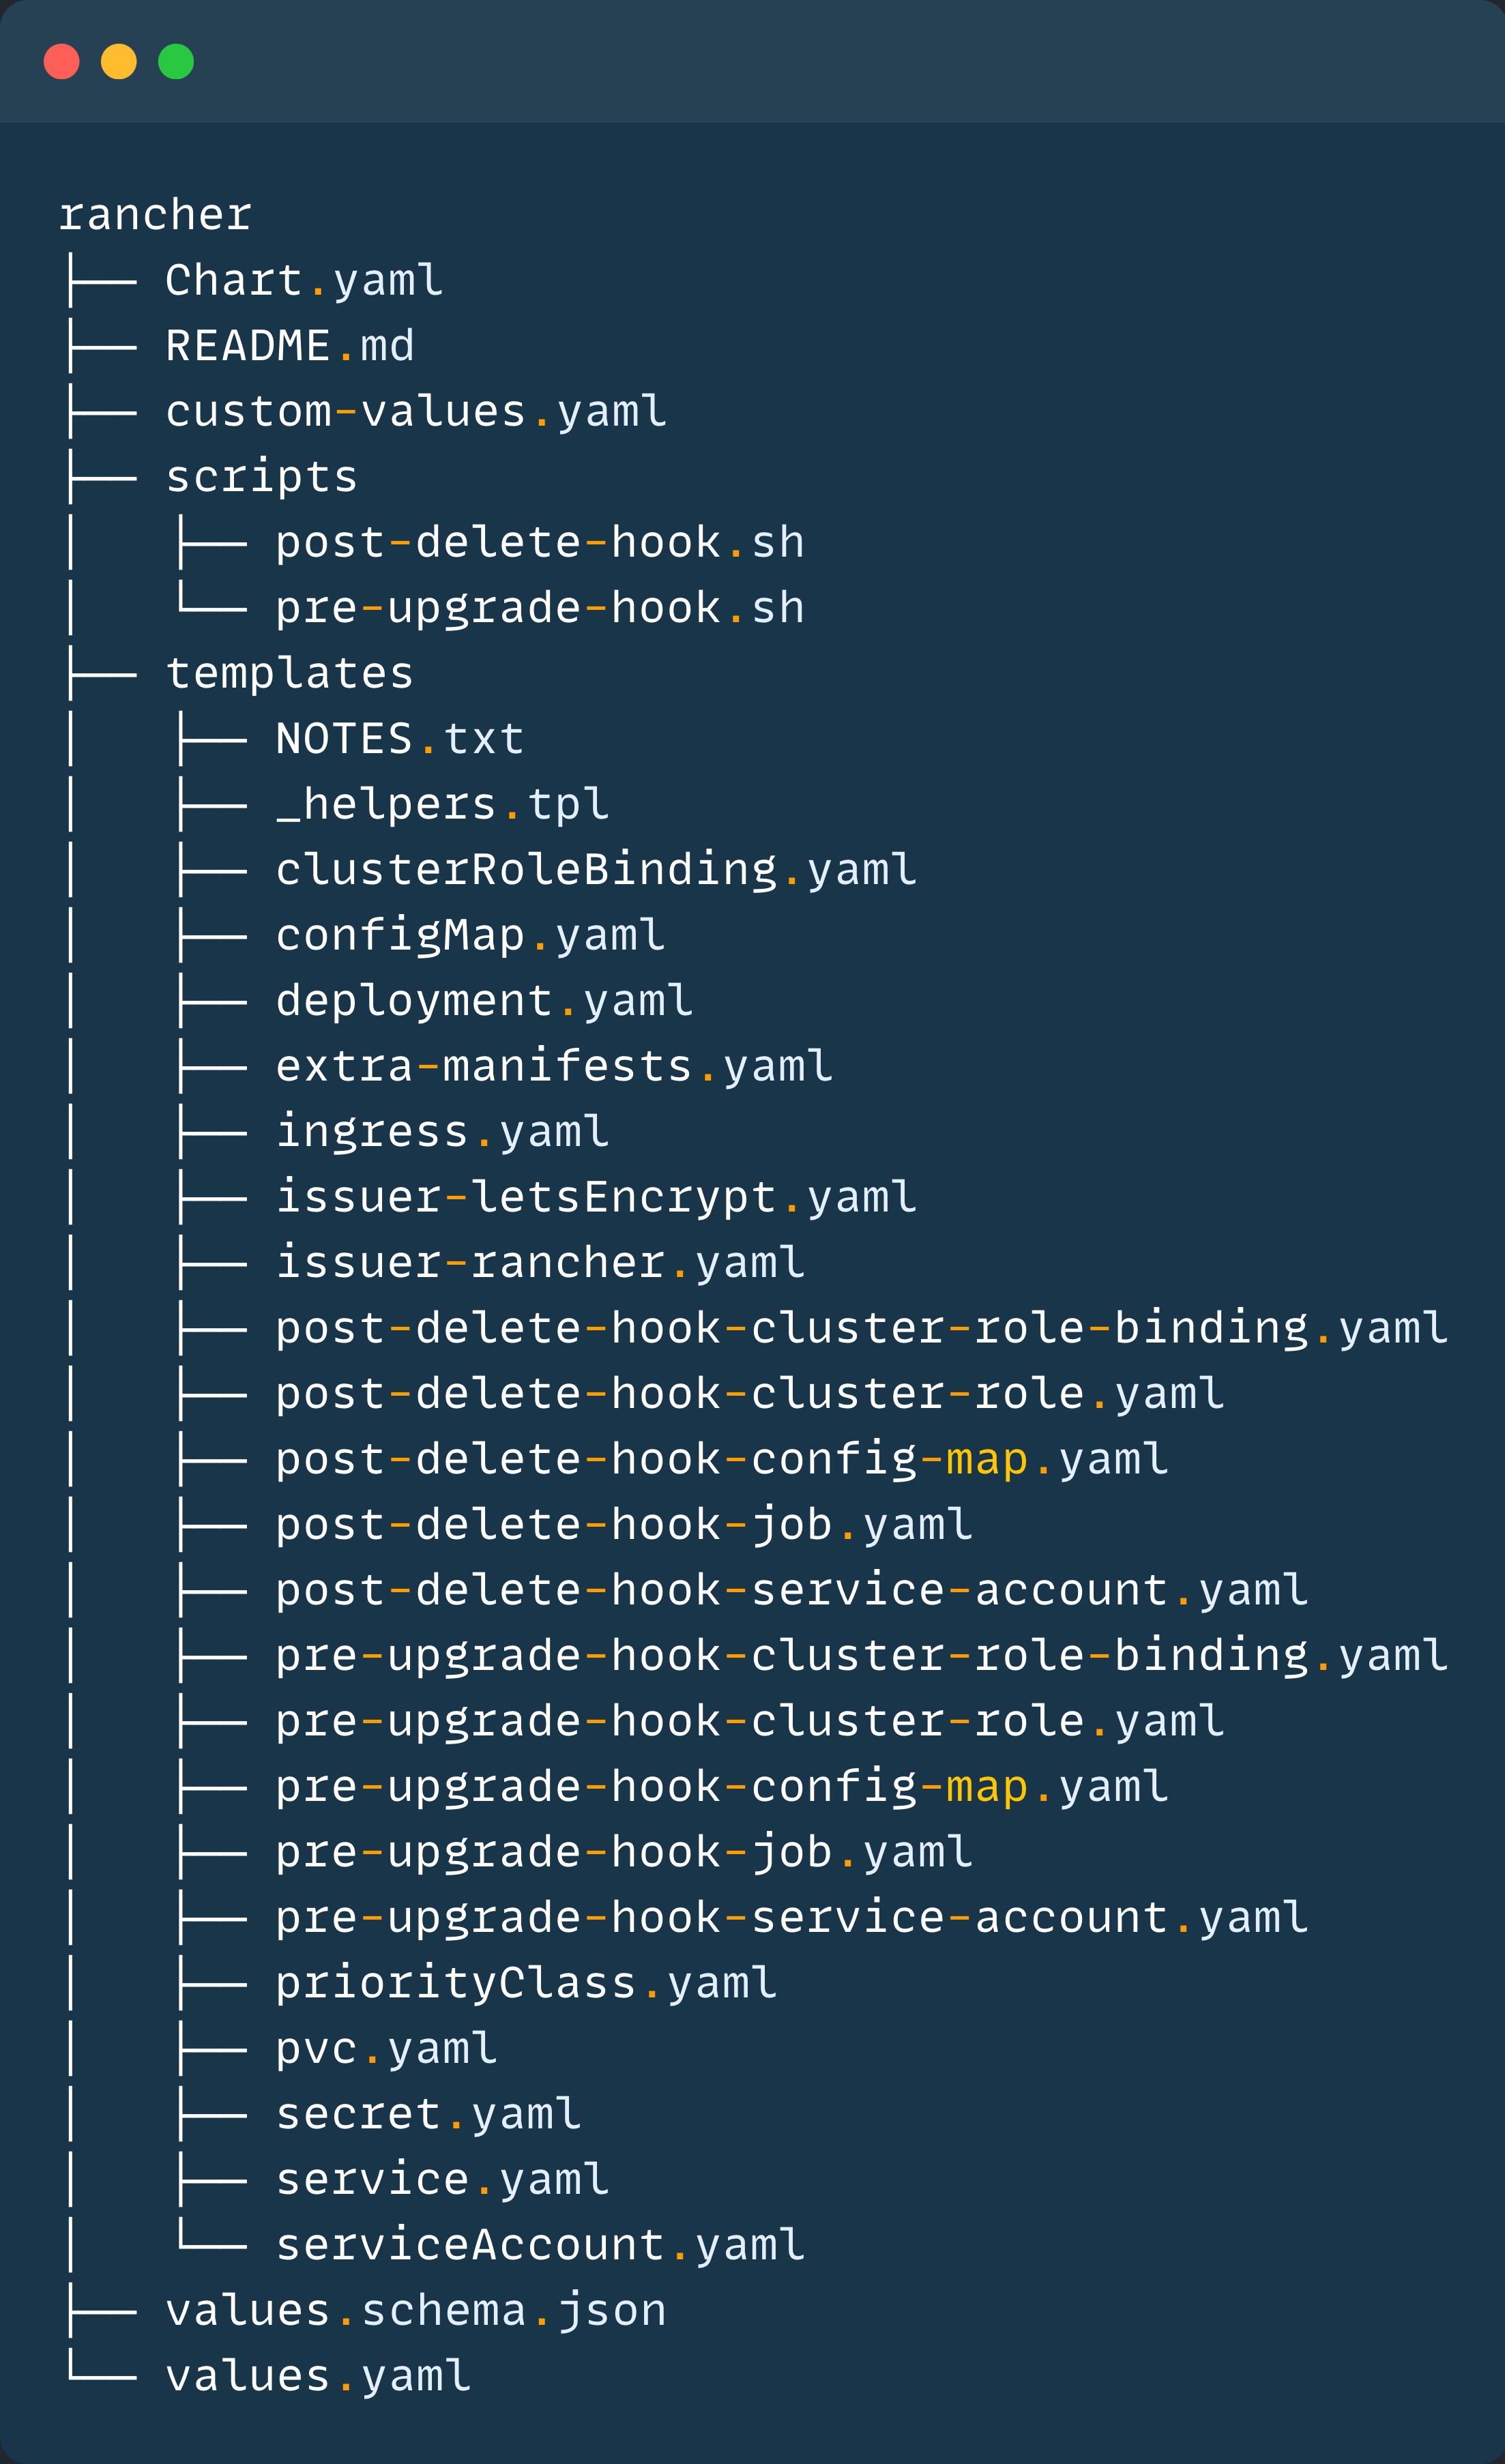
Here, you can see the values file (values.yaml) that has all the modifiable parameters.
The following are the container images used on this chart.
docker.io/rancher/rancherrancher/shell:v0.5.0rancher/mirrored-bci-micro:15.6.24.2
We are going to do a custom installation so that anyone can try on any type of Kubernetes cluster.
Step 2: Create Custom Values File
The customization we used to give a hostname to access the Rancher and give a custom password to access the Rancher dashboard.
To do this, create a file called custom-values.yaml with the following settings.
hostname: 4.246.120.68.sslip.io

ingress:
  ingressClassName: "nginx"

  tls:
    source: rancher

bootstrapPassword: "devops123"
In the above configuration, we have added
- Hostname - Change the IP with your node's public IP or the DNS name of the Load Balancer created by the Ingress Controller.
- Ingress Class - Name of the Ingress Class
- TLS Certificate source - Source to create TLS certificates for Ingress
- Password - Custom login password for Rancher
The *.sslip.io is the wildcard DNS name and is required because, in Ingress, to attach TLS certificates, a domain name is required. This is only required for the testing environment.
rancher.techiescamp.com if we already have a domain name and DNS service like Route53.Using "rancher" as TLS source means that we are telling Rancher to use self-signed certificates.
Step 3: Install Rancher
Now, we are ready for the installation with the custom values file.
Use the following command to install Rancher on a Kubernetes cluster.
helm install rancher rancher-stable/rancher \
  --namespace cattle-system \
  --create-namespace \
  -f custom-values.yaml
Once the installation is completed, you can see the instructions on the terminal on how to log in to Rancher.
Note: The Rancher pods will take 5 to 10 minutes to completly up and runningBefore we login, we can check the status of the Rancher Pods.
kubectl -n cattle-system get poBy default, Rancher will deploy with three replications for high availability.
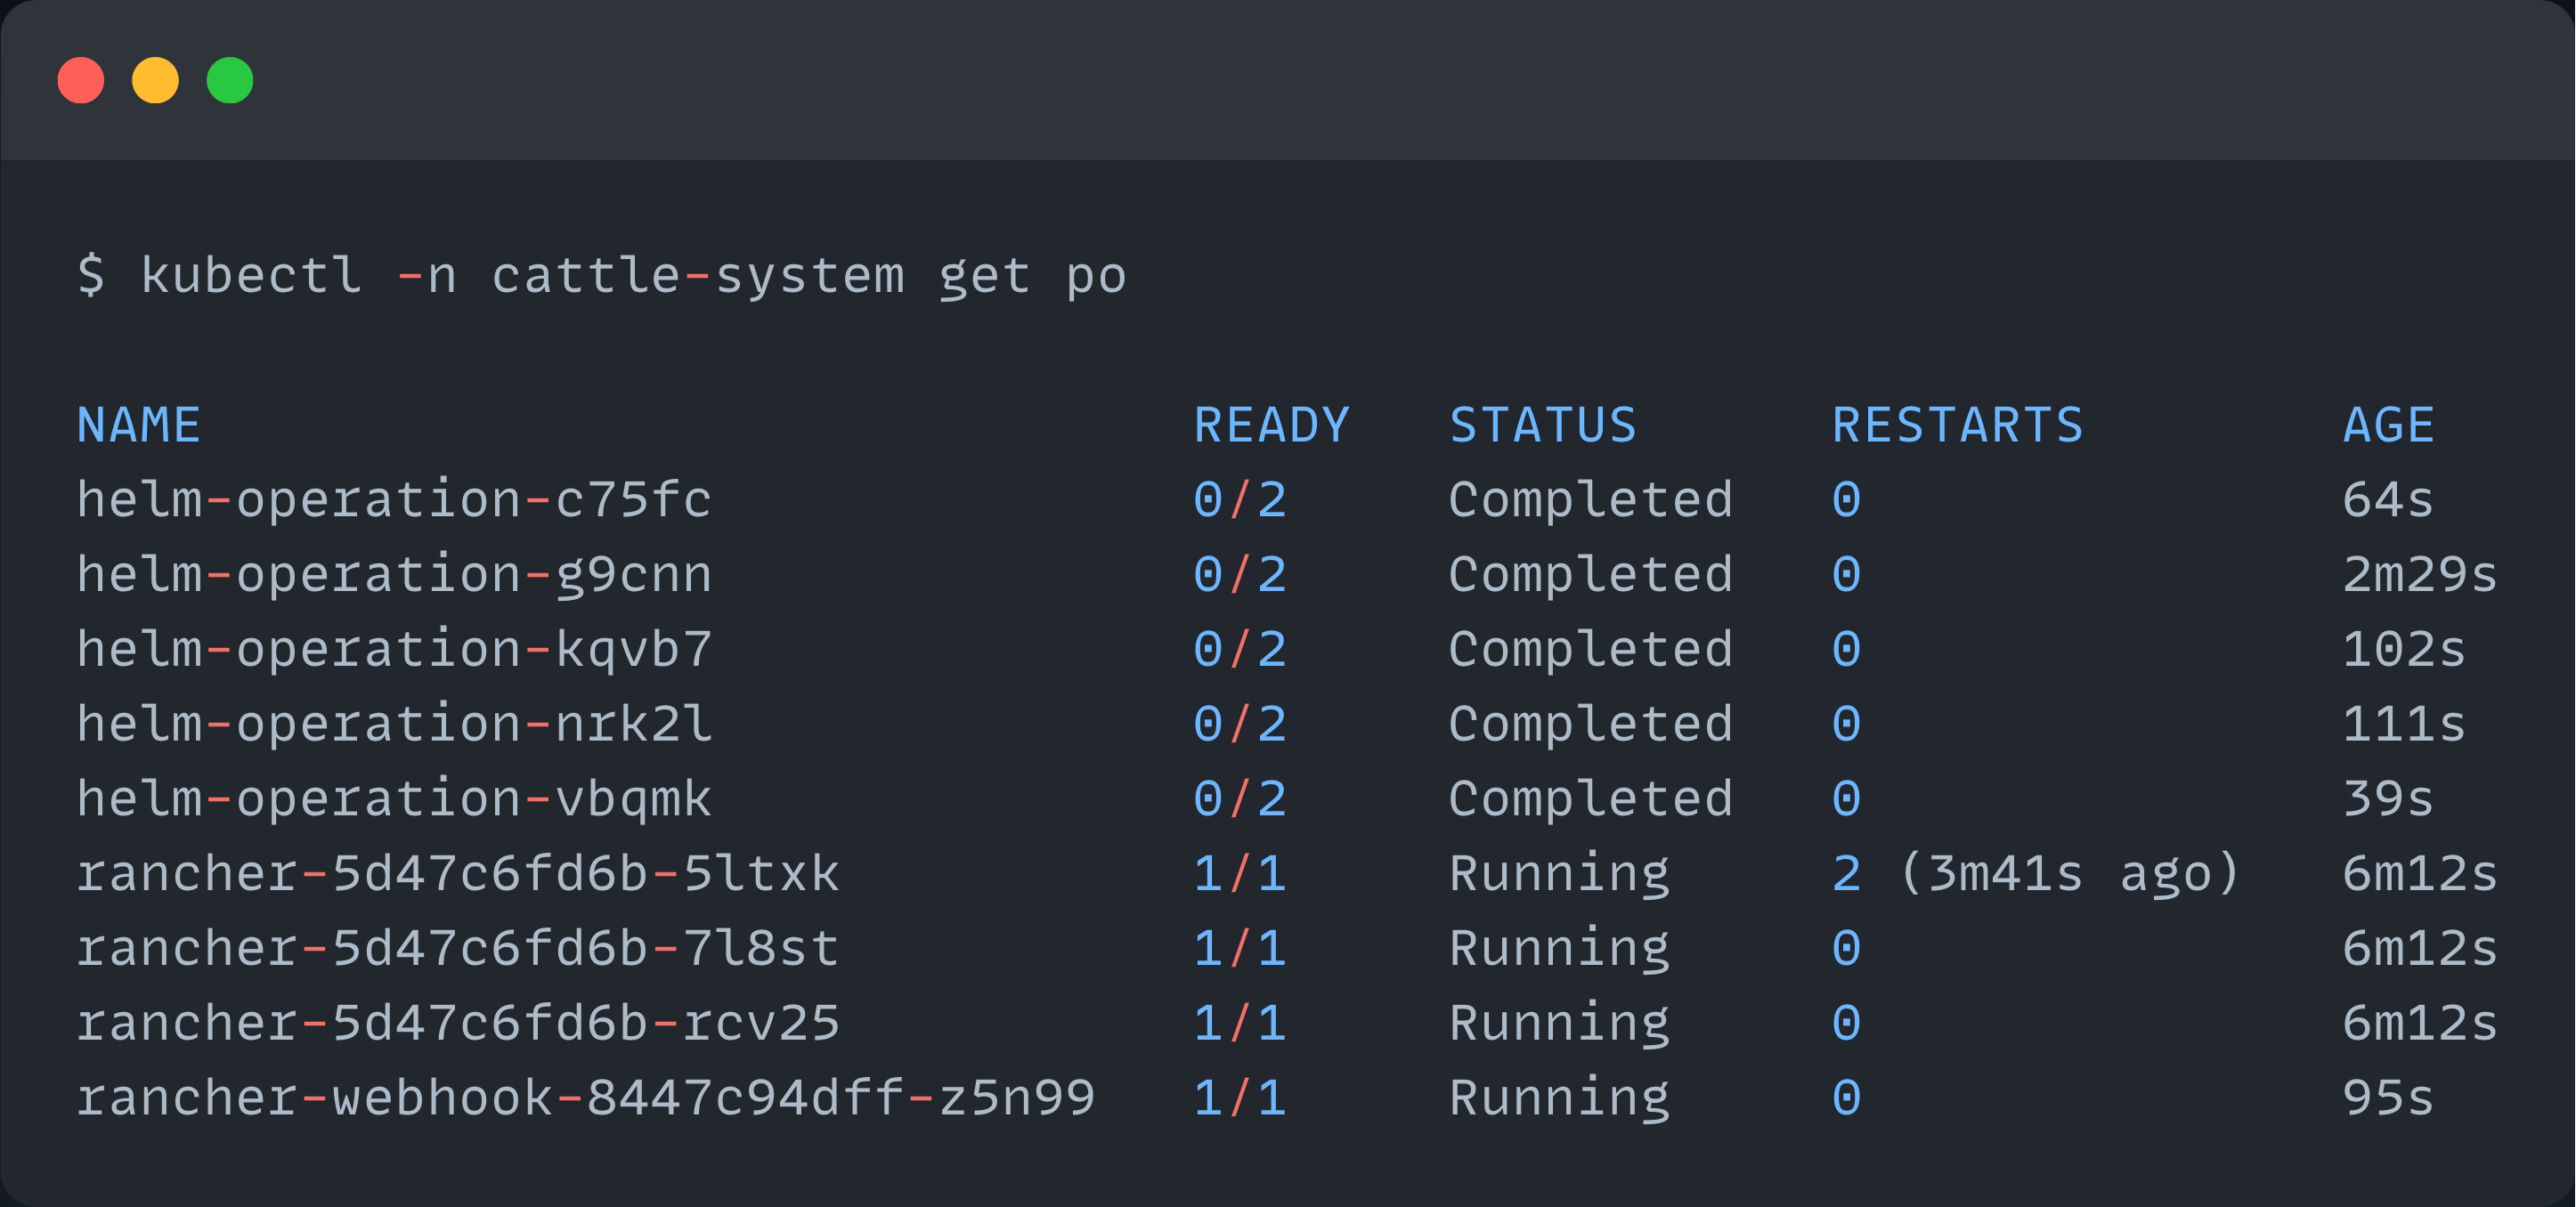
This confirms that all the Rancher pods are running without any issues.
Step 6: Access Rancher UI
Open any web browser and paste the URL https://4.246.120.68.sslip.io:32001, You will see a login page where you need to enter the password.
32001 is the nodeport number of the Nginx Ingress controller service. If you are using Load Balancer, the Node Port number is not required.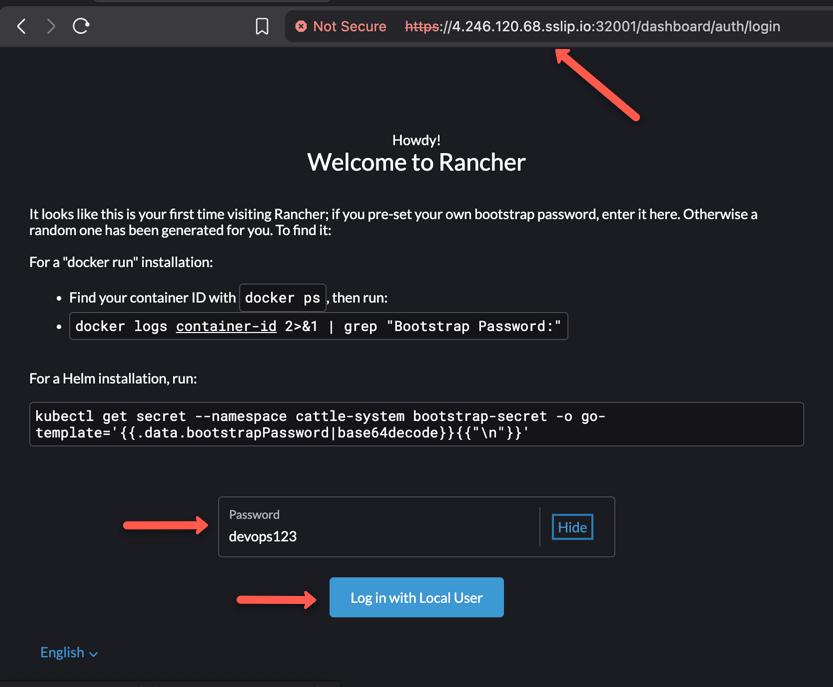
Since we use the HTTPS URL, it is showing as "Not secure" because we have used an untrusted SSL certificate created by Rancher.
On the next page, you will need to confirm the Rancher server URL.
Since we are not using DNS, we can give the Node's IP address as the server URL.
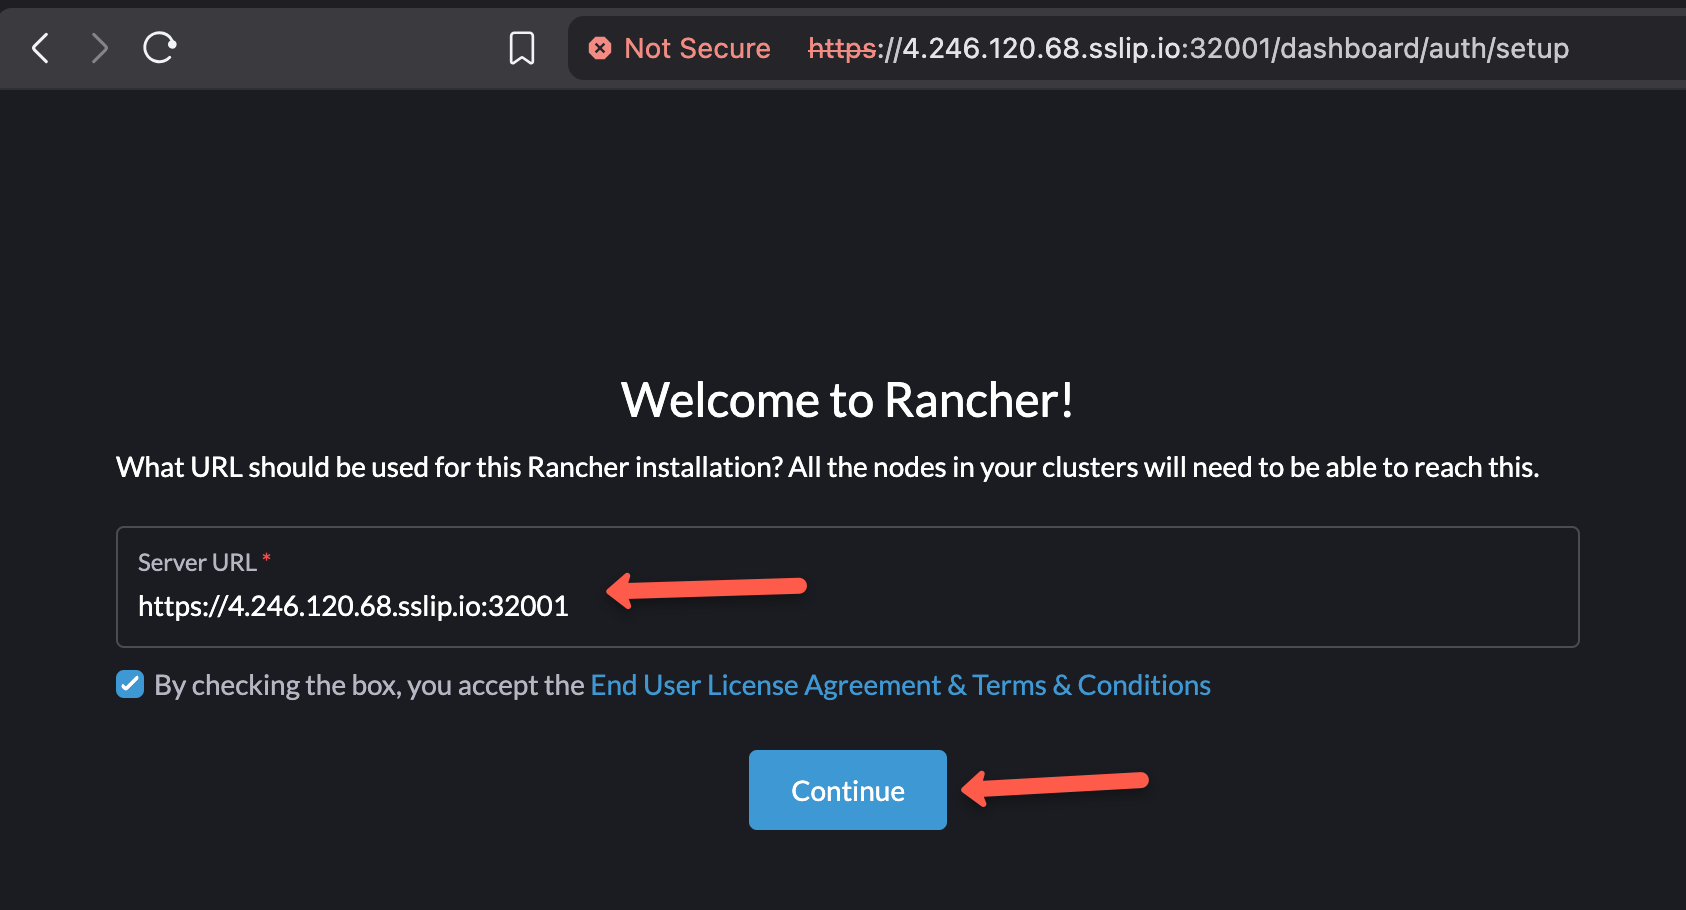
After clicking the "Continue" button, we can see the dashboard.
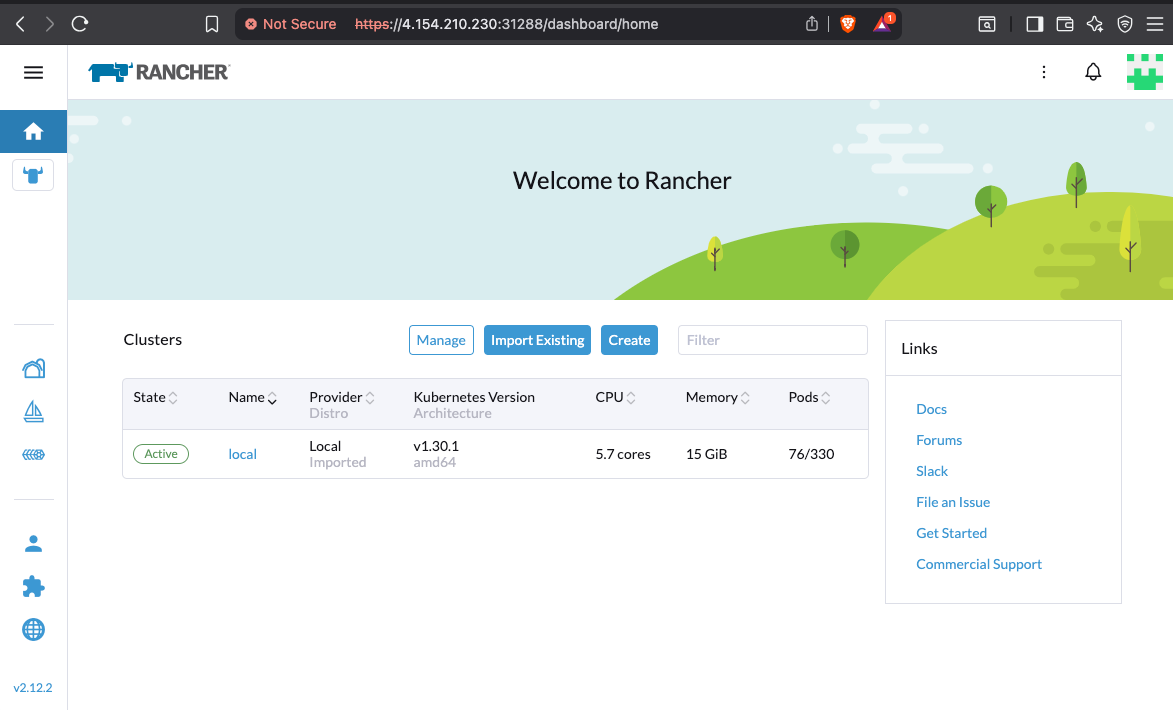
By default, we can see that a cluster is added to Rancher. This is a cluster where we install the Rancher.
Now, we are ready to add clusters to Rancher to manage them.
Adding Kubernetes Clusters to Rancher
For this demo, I am using a Kind cluster, but you can use any Kubernetes cluster, even managed clusters like EKS, AKS, and GKE as well.
Assuming you already have a cluster, and if you want to set up a Kind cluster, you can refer to this blog --> Kubernetes Kind Cluster Tutorial.
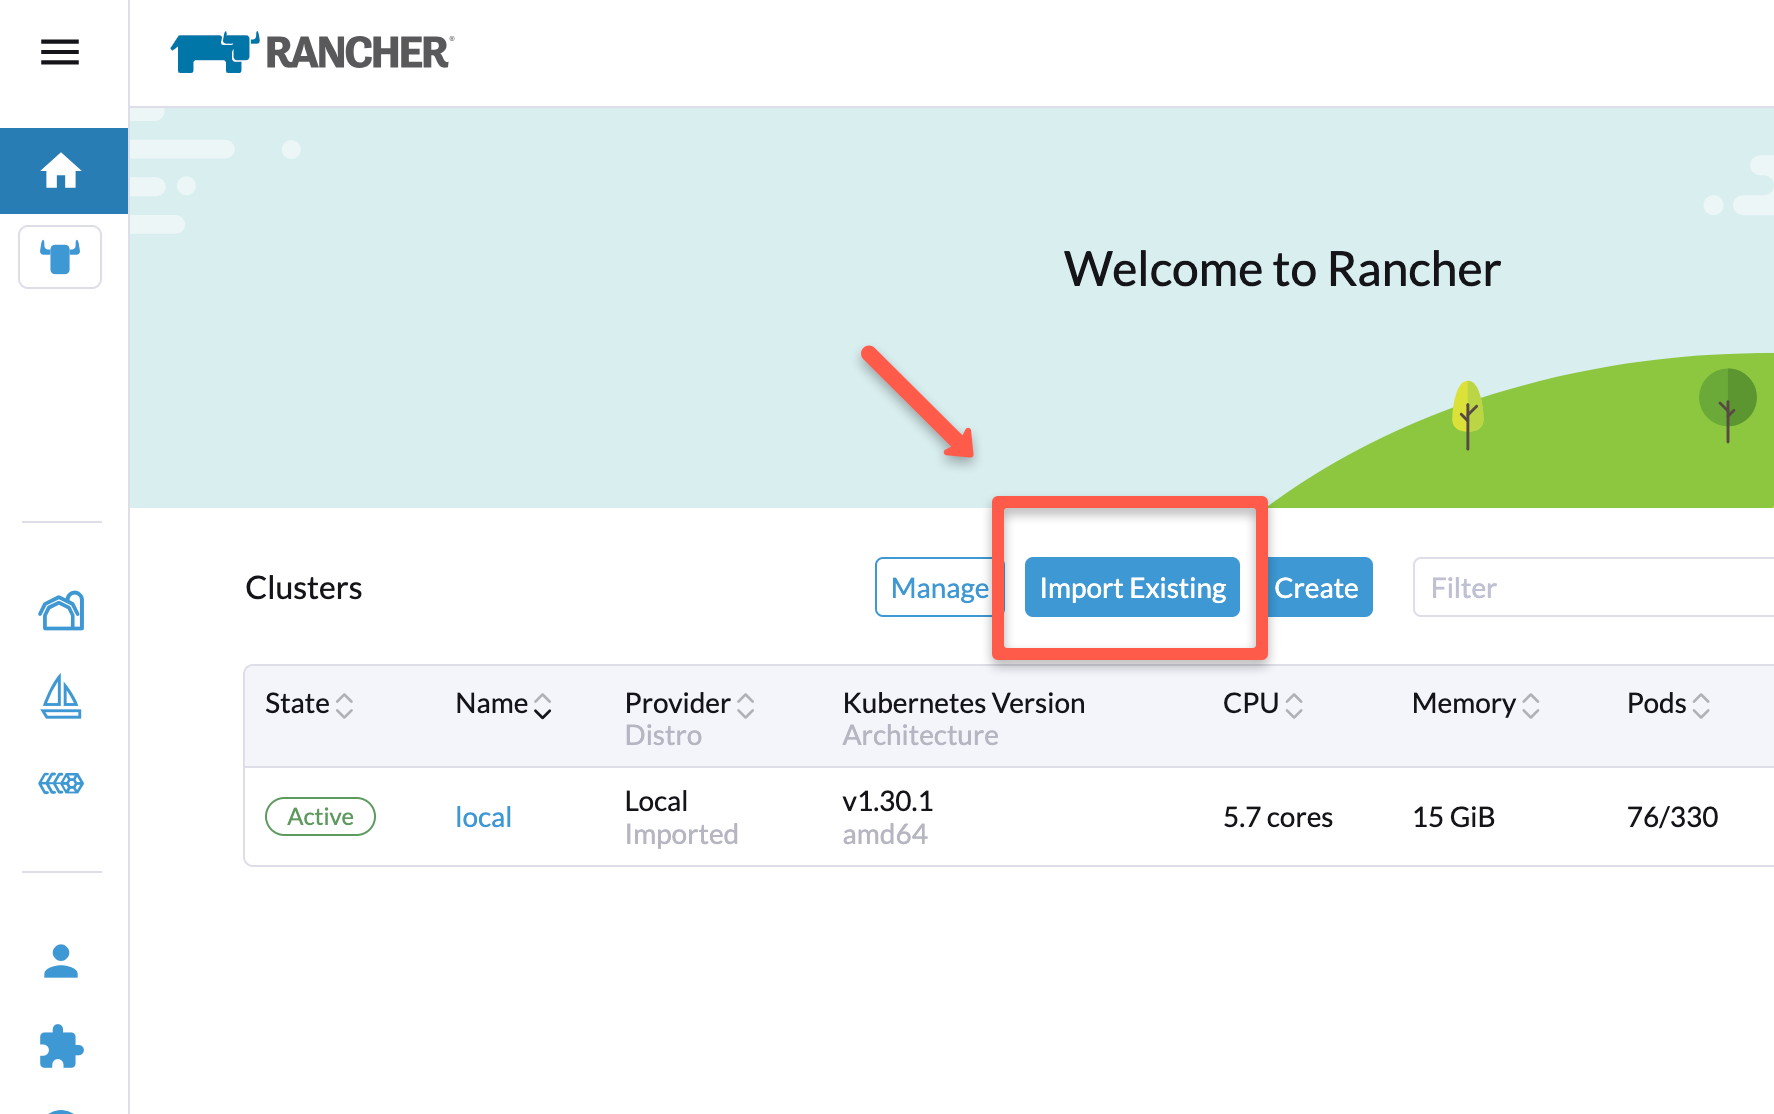
From the dashboard, click the "Import Existing" button to add a cluster.
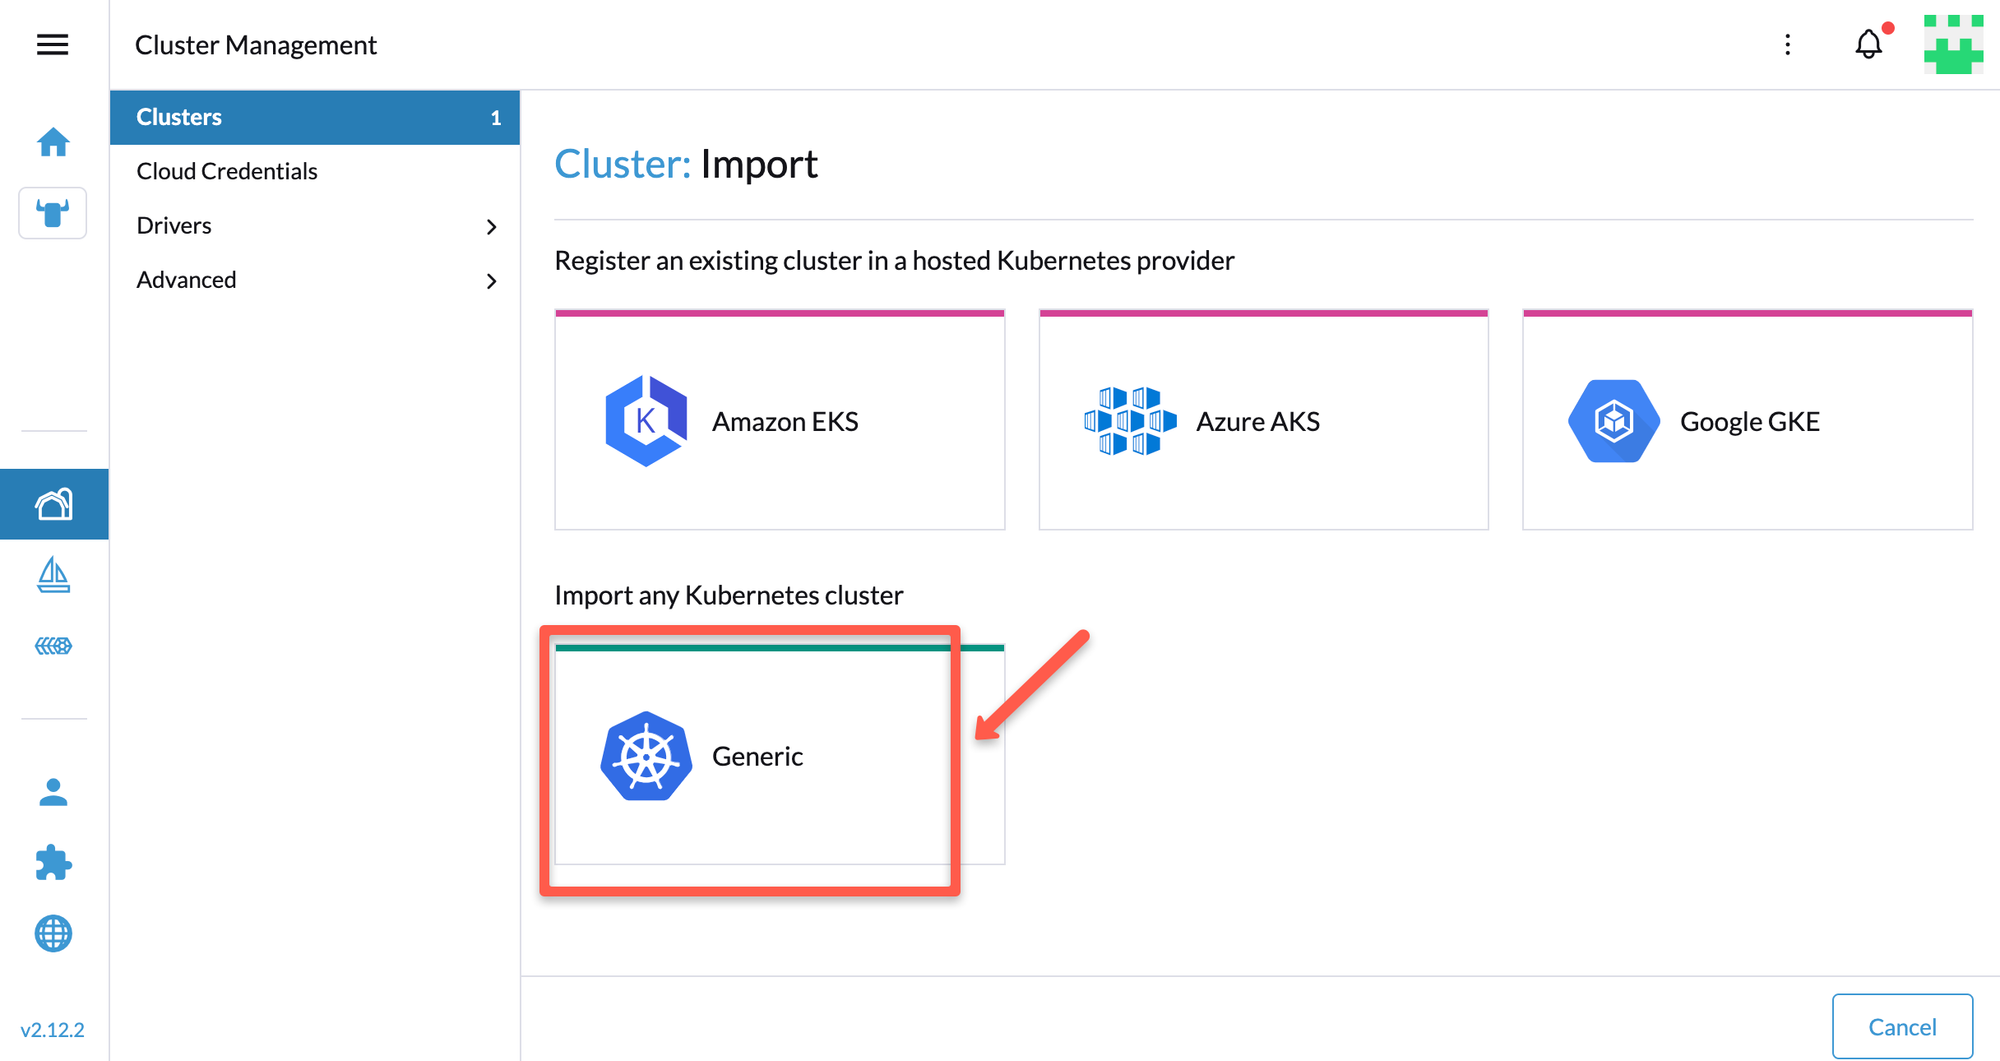
If the cluster is not a managed cluster, such as EKS, AKS, or GKE, choose the "Generic"
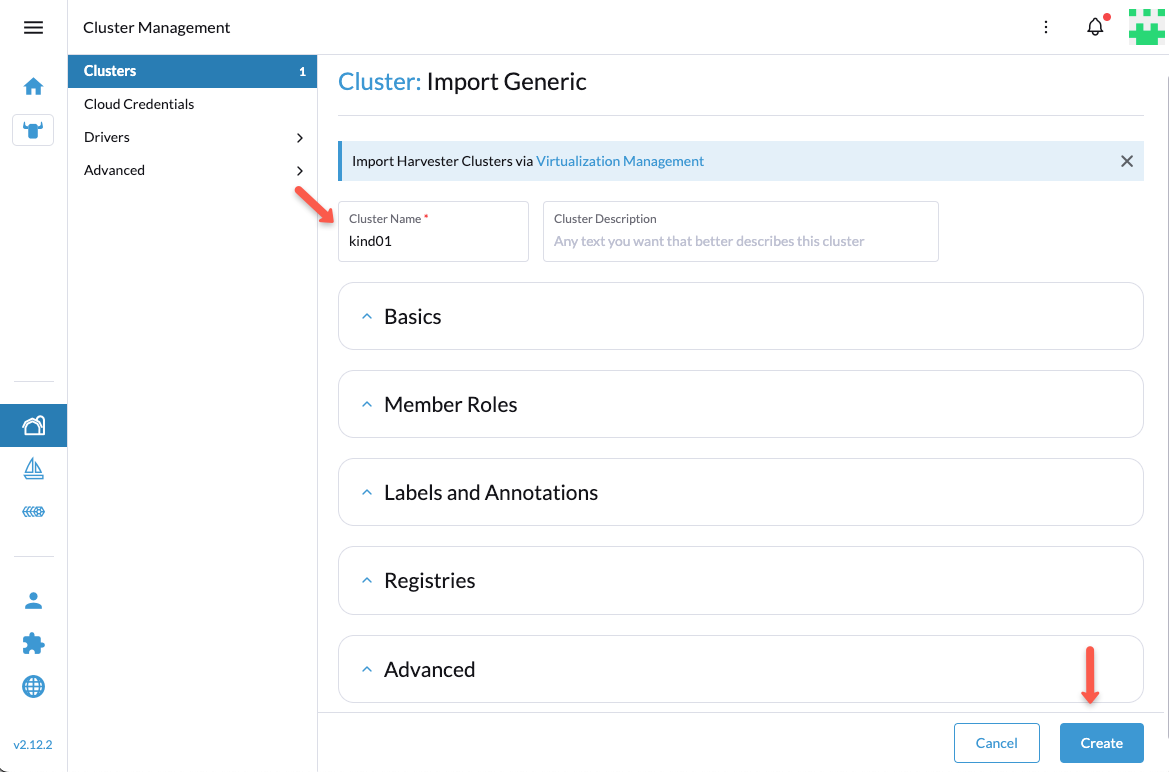
A "Cluster Management" page will open. Here, you need to provide a name for the cluster that you are going to add.
This page has some other settings that we can configure, such as.
Basic - Cluster version management settings
Members Roles - Controls who can access the cluster with the defined level of permission (By default, the Admin user will be added)
Labels & Annotations - Adding labels to clusters to identify and organize them (e.g., environment: production)
Registries - Configure the registries to pull images on a private environment (JFrog, Harbor, or Private Docker Hub)
Advanced - Settings for the Rancher Agent (Configure as variables).
On the next page, we will get instructions to deploy the Rancher agent on the cluster that we want to add to the Rancher.
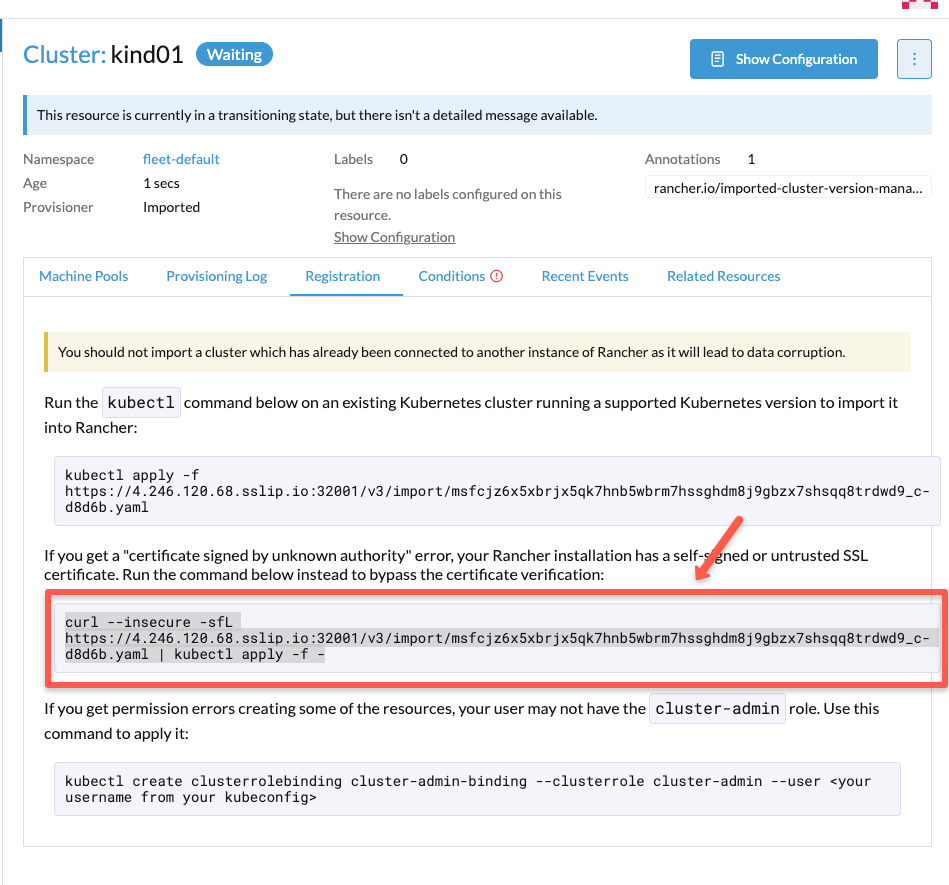
Here, we have chosen the second command to install the Rancher agent on the Kind cluster because we have not used a valid SSL for the Rancher.
To ensure that the Rancher agent is deployed in the cluster, use the following command.
kubectl -n cattle-system get poYou will get the following output.
NAME                                   READY   STATUS      RESTARTS   AGE

cattle-cluster-agent-c4655cd8d-4zr9s   1/1     Running     0          48m
cattle-cluster-agent-c4655cd8d-ptp5q   1/1     Running     0          49m
helm-operation-fr6fl                   0/2     Completed   0          46m
helm-operation-vgnhz                   0/2     Completed   0          46m
rancher-webhook-6ddf589c5d-l4qsm       1/1     Running     0          46m
Once the agent starts running, we can see the same UI page turn with the information of the added cluster.
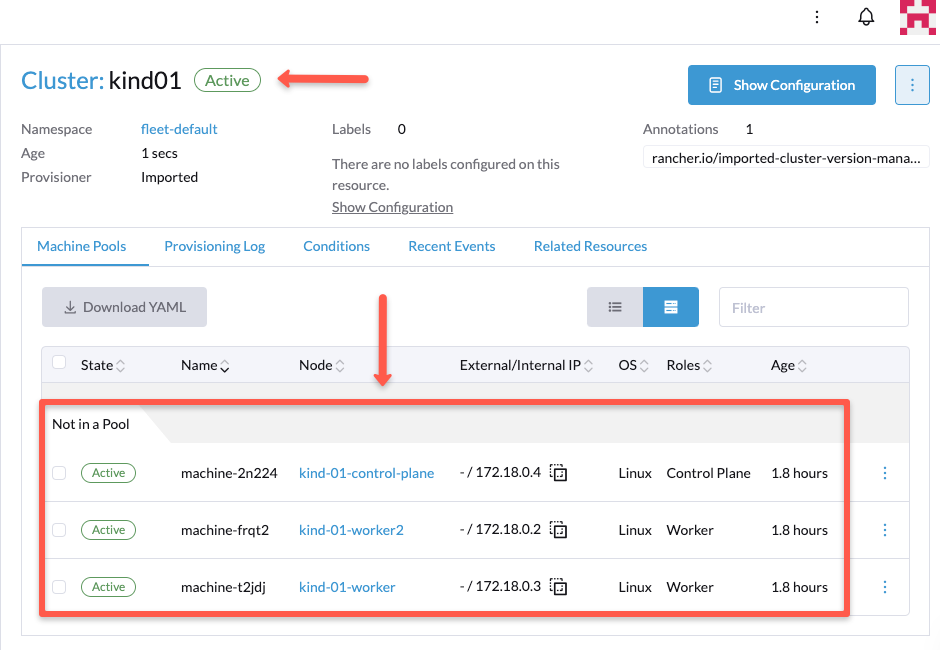
Here, you can see all the nodes of the Kind cluster. If you want to see the detailed information of a particular node, click on the node name.
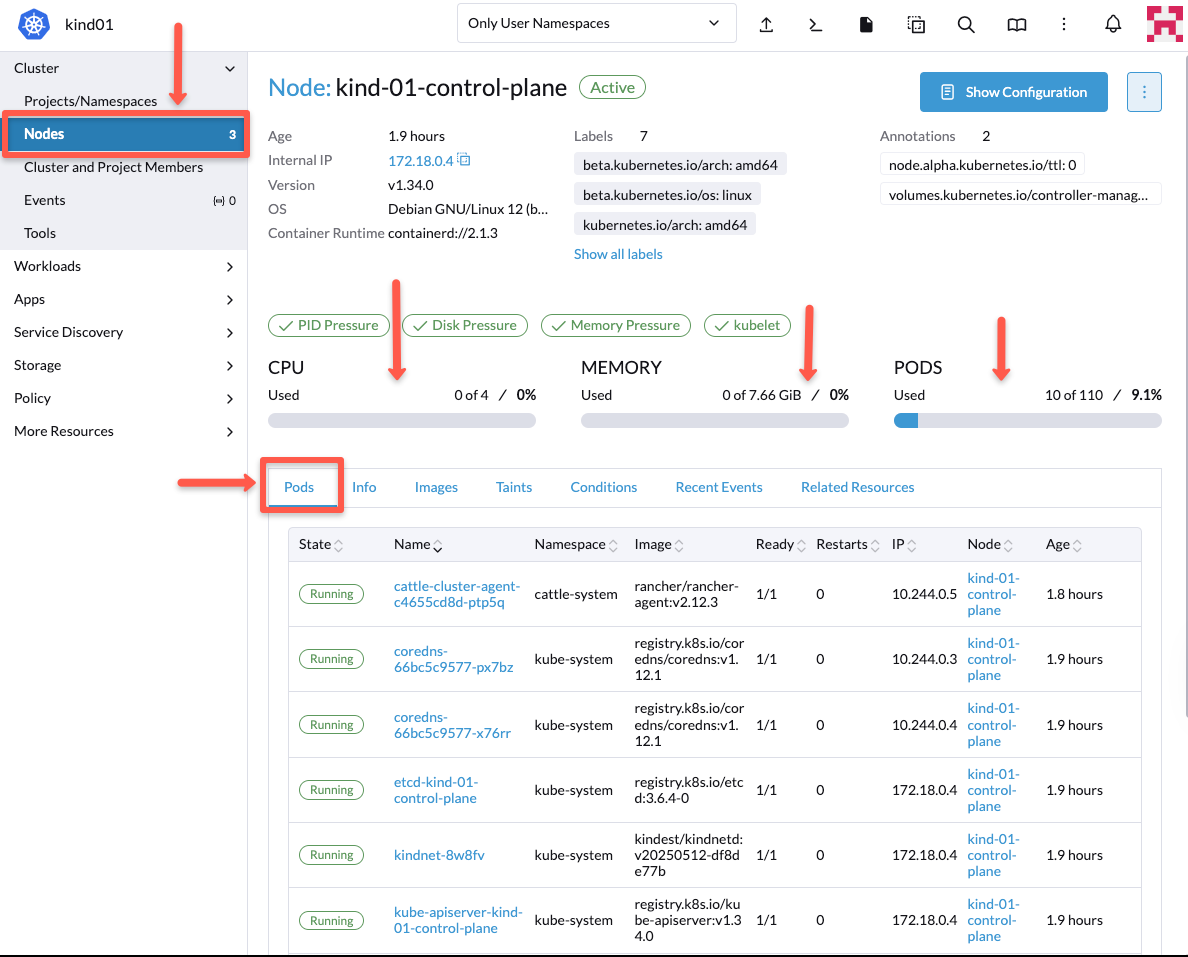
In the next section, we perform a simple operation of deploying a Pod via Rancher.
Testing a Deployment from Rancher
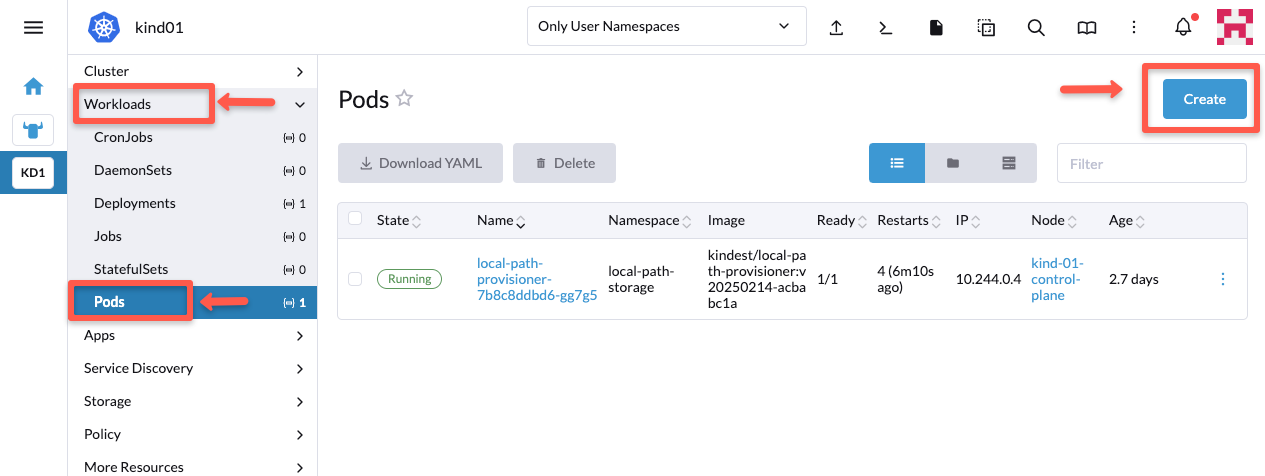
For testing, we are deploying an Nginx pod on a Kind cluster from the Rancher dashboard.
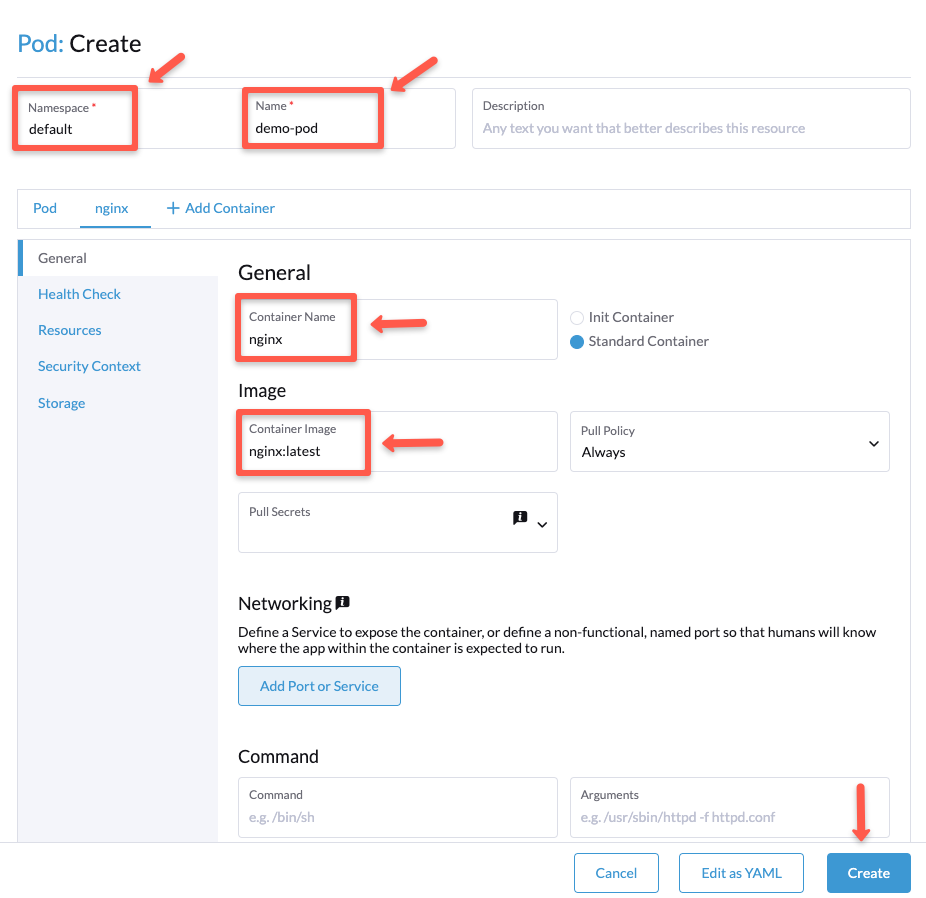
Navigate to Workloads --> Pods --> Click the "Create" button.
On the next page, you need to fill a form of Pod details such as pod name, container name, image name, etc then click "Create" button.
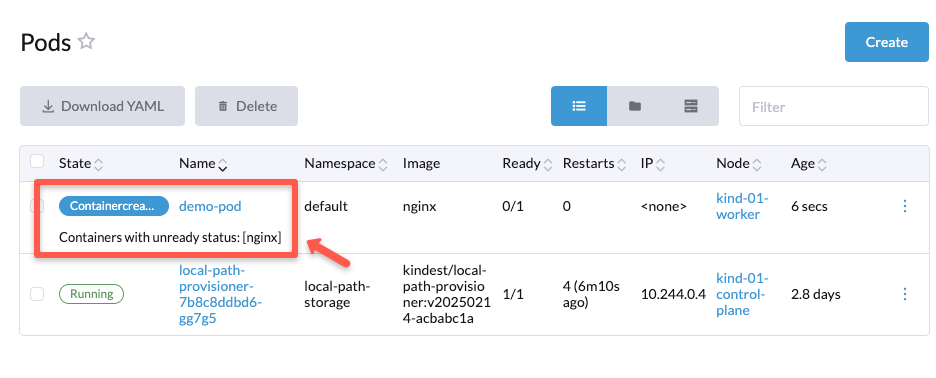
You can see the status of the Pod creation as well as the information.
Once the creation is successfully completed, you can see the following output.
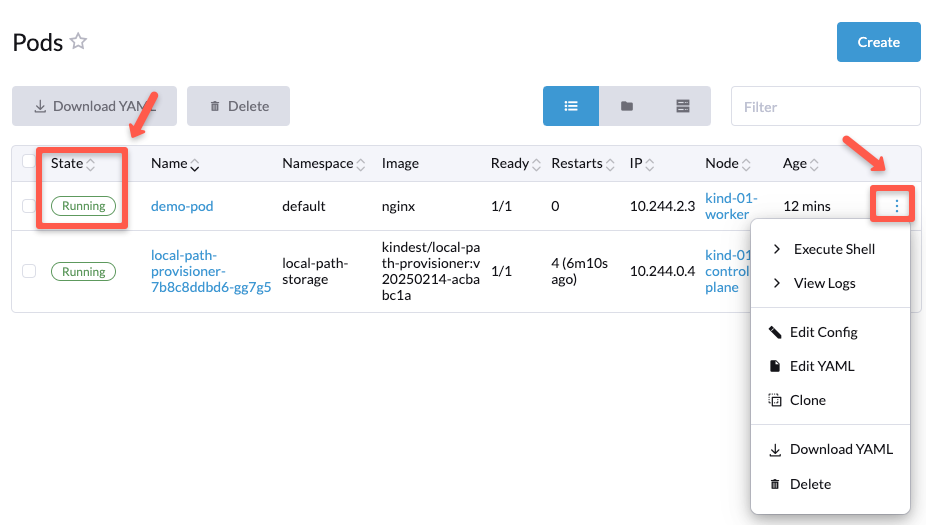
If you click the three dots, you will see options like opening the pod shell, viewing logs, editing the configuration, cloning, downloading the pod's YAML file, or deleting the pod.
Rancher Operations
Rancher is not only a dashboard to view all your cluster, deploy pods or troubleshoot.
- We can set a certralized authentication for all clusters by integrating systems like active directory, LDAP, GitHub, SAML or Okta
- We can directly deploy tools like Prometheus and Istio from the Rancher's Apps & Marketplace using helm charts.
- We can group namespaces across clusters for the multi cluster project management. We can also set quotas, permissions and policies for these groups.
- We can create Kubernetes clusters using cluster templates, and even create new Rancher managed clusters.
- Rancher Fleet is a GitOps method to manage applications across clusters like ArgoCD. It keeps on sync with the version contorl systems such as GitHub.
Rancher Case Studies
Rancher is already using by many organizations. Here are the few examples.
- World Wide Technologs (WWT) uses Rancher to quickly spin up Kubernetes clusters so that their development team can test a new features and applications.
- Inventx is a financial and insureence provider using Rancher to manage their multi cluster hybrid setup also to manage certrailzed compliance for the clusters.
Clean up the Rancher Setup
If you want to clean the reancher setup, you can run the following YAML.
kubectl create -f https://raw.githubusercontent.com/rancher/rancher-cleanup/main/deploy/rancher-cleanup.yaml
This will run a Kubernetes Job to clean all the Rancher-related resources. To watch the cleanup, use the following command.
kubectl -n kube-system logs -l job-name=cleanup-job -f
This will take a bit of time to complete the cleanup. Once it is completed, use the following command to verify
# Check namespaces
kubectl get namespaces | grep cattle
kubectl get namespaces | grep fleet

# Check CRDs
kubectl get crd | grep cattle.io
Once verified, we need to remove the job as well.
kubectl delete -f https://raw.githubusercontent.com/rancher/rancher-cleanup/main/deploy/rancher-cleanup.yaml
Conclusion
This blog covered the setup of Rancher on a Kubernetes cluster and a demo of how to add a cluster and perform operations on it from the Rancher dashboard.
There is more you can do with the Rancher like authentication, upgradation or even create Rancher Kubernetes clusters.
Explore them, and we will also cover those topics in the upcoming blogs.
