

In this blog, you will learn to Setup OpenVPN Server in EC2 instance.
By the end of this guide, you will:
- Have a fully working OpenVPN server
- Validate the connection from your workstation to the OpenVPN server
- Set up split tunneling to separate internet traffic from AWS access
- Test application access to private subnets using SSH and HTTP connections
So if you are looking for a simple poor mans solution, a custom client to server VPN solution like OpenVPN can help.
OpenVPN Server Types
There are two types of OpenVPN implemention.
- OpenVPN Community Edition (CE): This is the free, open-source version of OpenVPN. It requires manual setup and configuration using command-line tools. Also, it does not have a UI for configuration. However, there is a open source project that provides UI for community edition.
- Self-hosted Access Server(AS): This is a commercial product from OpenVPN, that is built upon the open source version.
- It offers only two free users and you can use it free forever. For more users, you can checkout the pricing here.
- It provides user-friendly web-based GUI for easier management and configuration.
- It also supports multiple authentication methods such as LDAP, SAML etc.
- OpenVPN CloudConnexa: This is the cloud offering of the OpenVPN.
- It provides a user friendly approach for the configuration with the networks and applications.
- It has integrated security features like contentent filtering and IDS/IPS (Intrusion Detection Systetem and Intrusion Prevention System) to protect from the cyber attacks.
- Highly scalable approach for growing projects, for more information, refer to this offical documentation.
In short, the Community Edition is ideal for someone looking for a free VPN setup that supports multiple users.
Access Server is for organizations looking for an easier setup process and additional management features.
Setup Prerequisites
- Public subnets for the OpenVPN server
- Private subnets with NAT attached - Only for testing the workloads via VPN (Optional)
- OpenVPN client in the local machine to establish the authentication between the client and the VPN server
Architecture & OpenVPN Workflow
The OpenVPN server will help to access the other AWS private resources securely.
The OpenVPN server will create a secure HTTP tunnel over the Internet between the AWS network and our local machine so we can securely access the private AWS resources from the local machine.
The below is the workflow of the OpenVPN server and the access to the private AWS resource.
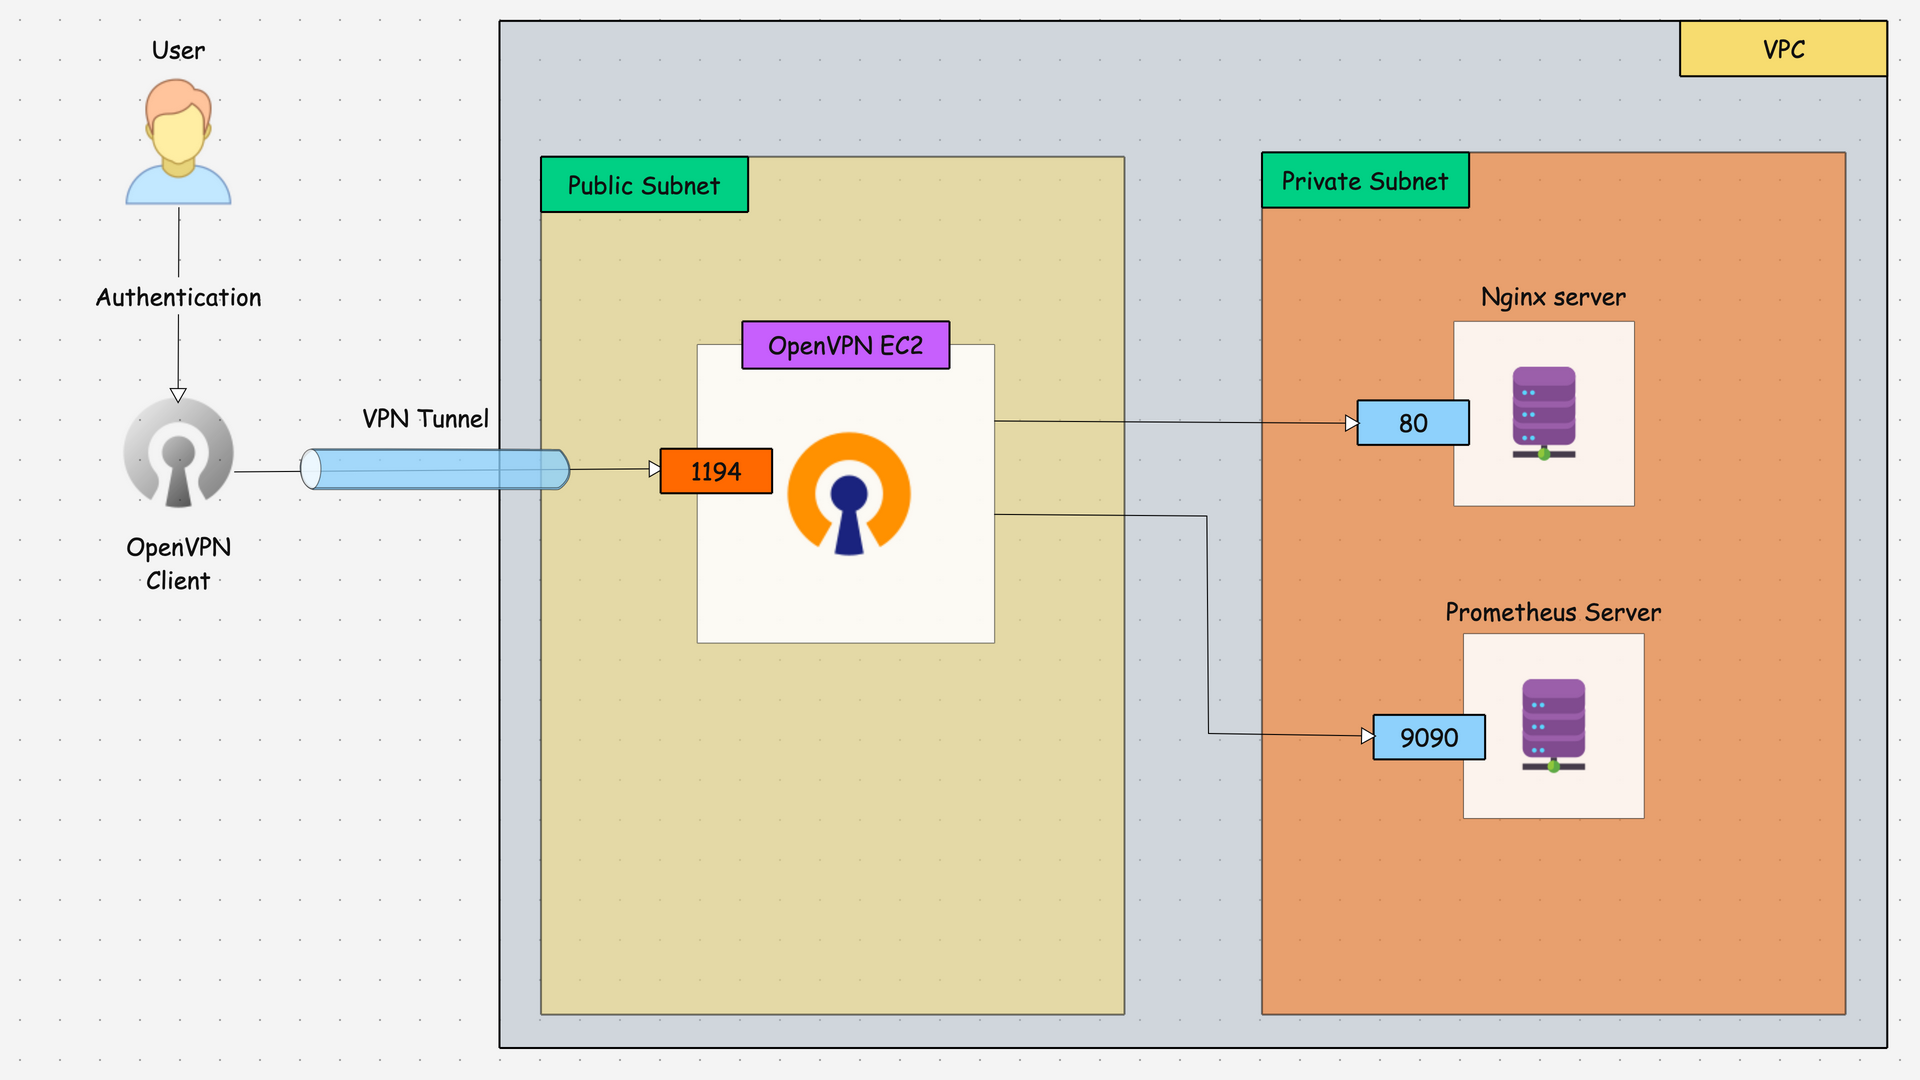
- The OpenVPN server will generate the client certificate and key for the authentication.
- Once the user gets the credentials and the OpenVPN client configuration file, that user can authenticate with the OpenVPN server with the help of the OpenVPN client application (Client app should be available on the local machine).
- After authentication, a secure encrypted tunnel will be created between the client machine and the OpenVPN server.
- During this process, the VPN server will assign a virtual IP to the user's machine for the remote communication and traffic will reach the VPN server over the 1194 port.
- The VPN server will route the traffic from the user to the AWS VPC (Private subnets).
- VPC will route the traffic to a particular destination based on the security group's rules.
How to Setup OpenVPN Server in EC2?
The steps below explain the OpenVPN server setup on an EC2 instance.
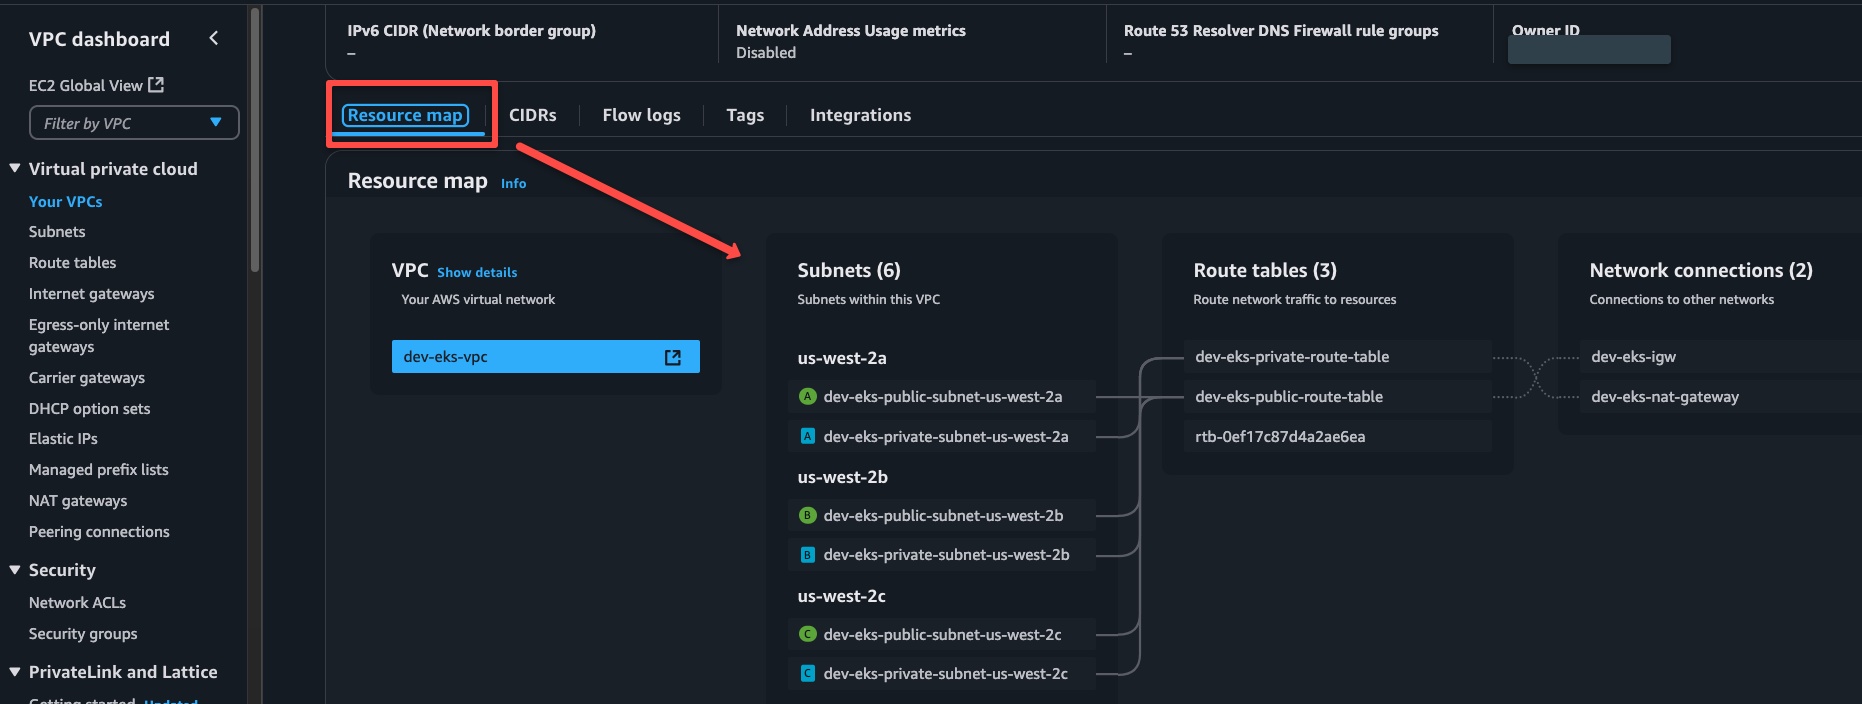
Step 1: Create a Virtual Private Network
We need at least one private and a public subnet in the VPC to demonstrate this setup.
The public subnet should be attached to the Internet Gateway for the inbound and outbound communication ( This is for the VPN Server).
The private subnet has to be attached to the NAT Gateway to get the outbound internet access ( This is not mandatory, only for the testing purposes).
I already have a VPC setup. If you want to see the creation of the VPC, you can refer to this blog.
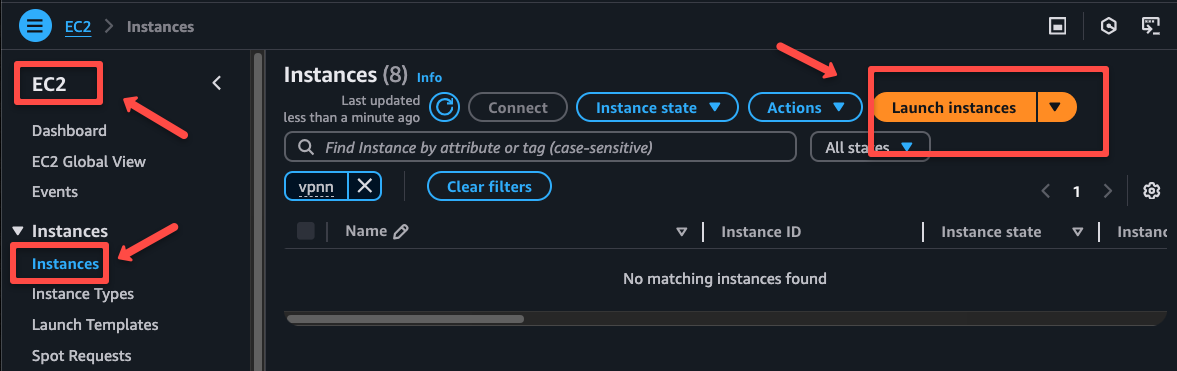
Step 2: Create an EC2 instance for the OpenVPN
To create an OpenVPN server, we need to use the public subnet, because it needs inbound and outbound internet access.
I am choosing an Amazon Linux 2 AMI, t2-micro instance for this.
Note: Currently we are using the Amazon Linux 2, so the installation steps might differ in other distros.
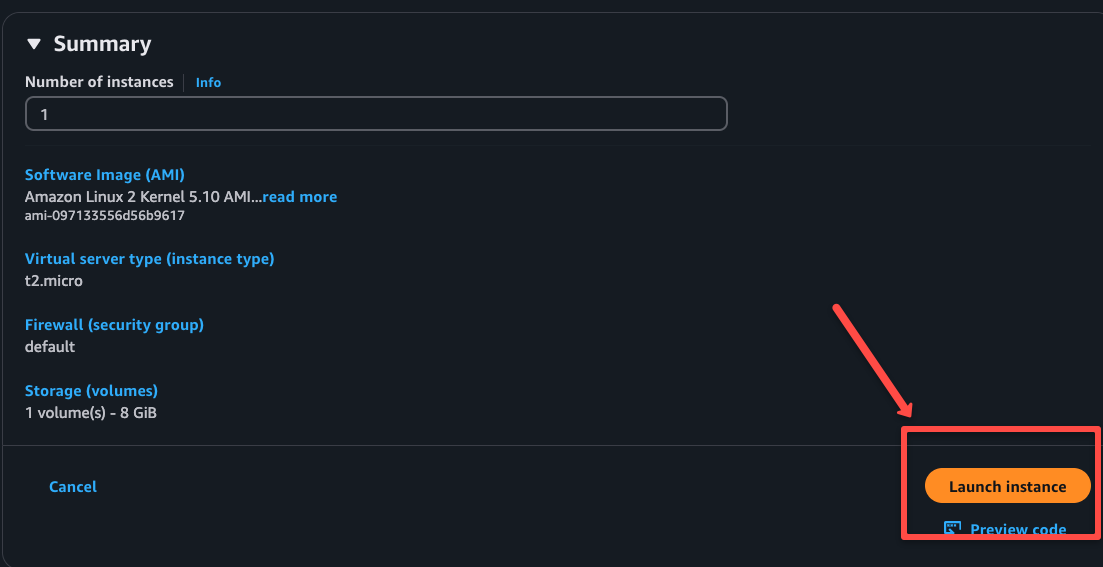
Navigate to the EC2 console and click Launch instances button.
Give a name for the instance and select Amazon Linux as well as the AMI.
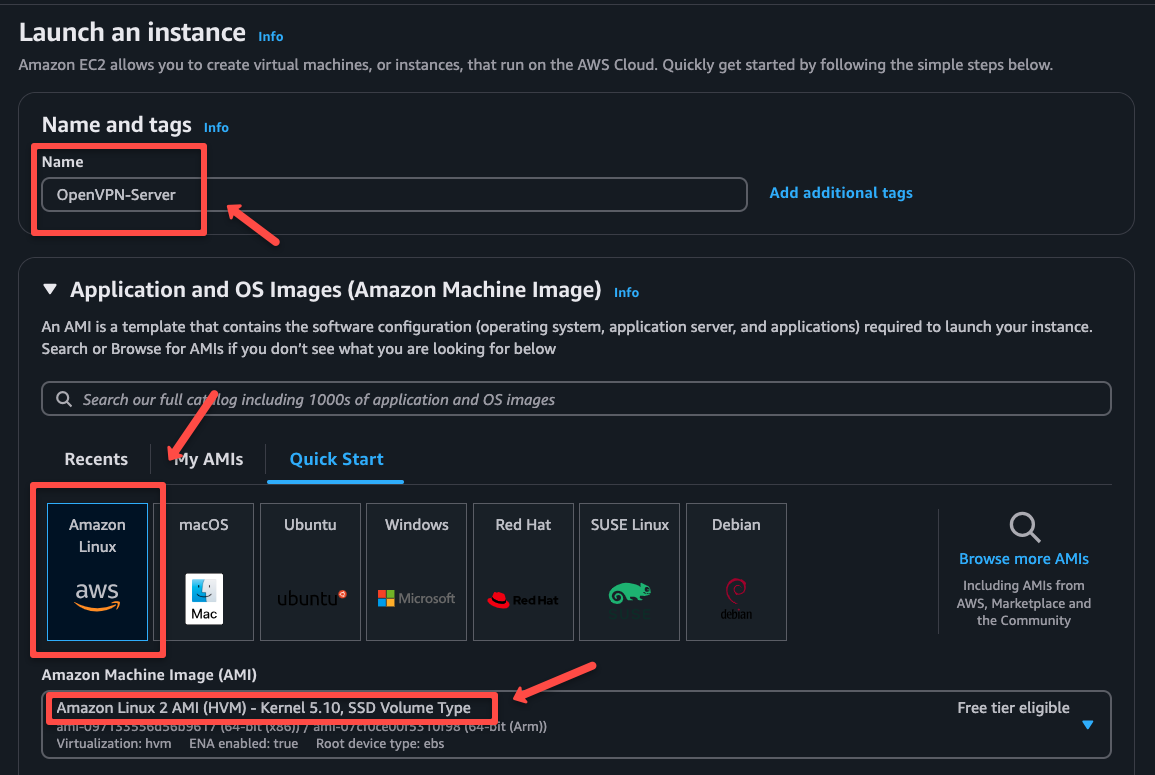
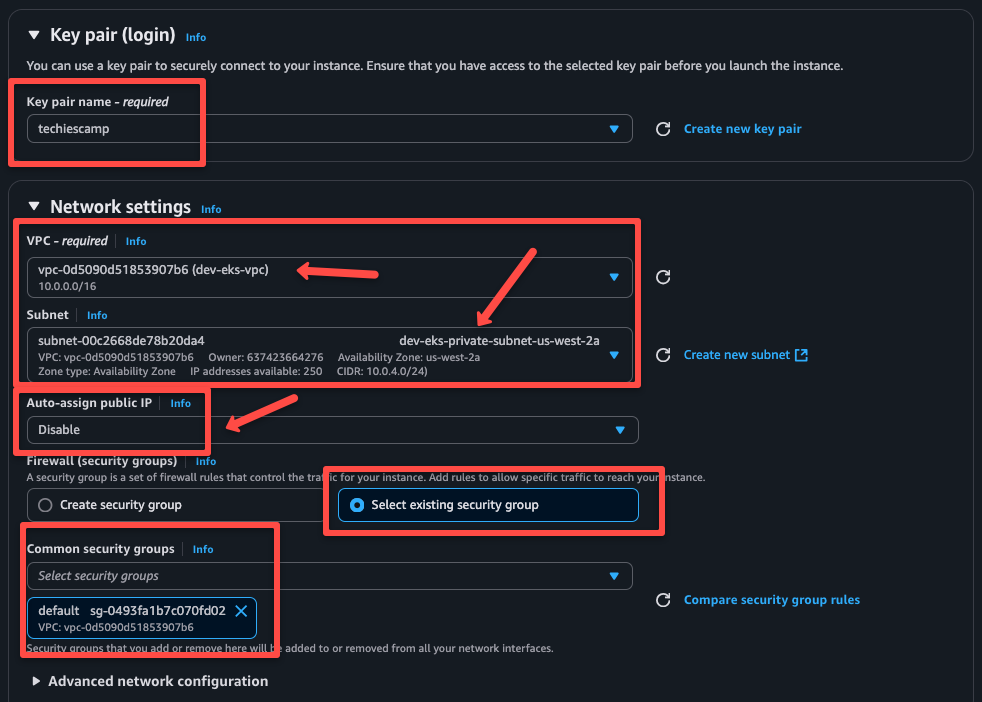
Select an instance type. I am choosing t2.micro, but you can choose any. If you already have a key pair, select it or create a new one.

Select the VPC you have created, select the public subnet, enable public IP to access the server, and select the default security group, or you can create a new one for the OpenVPN server.
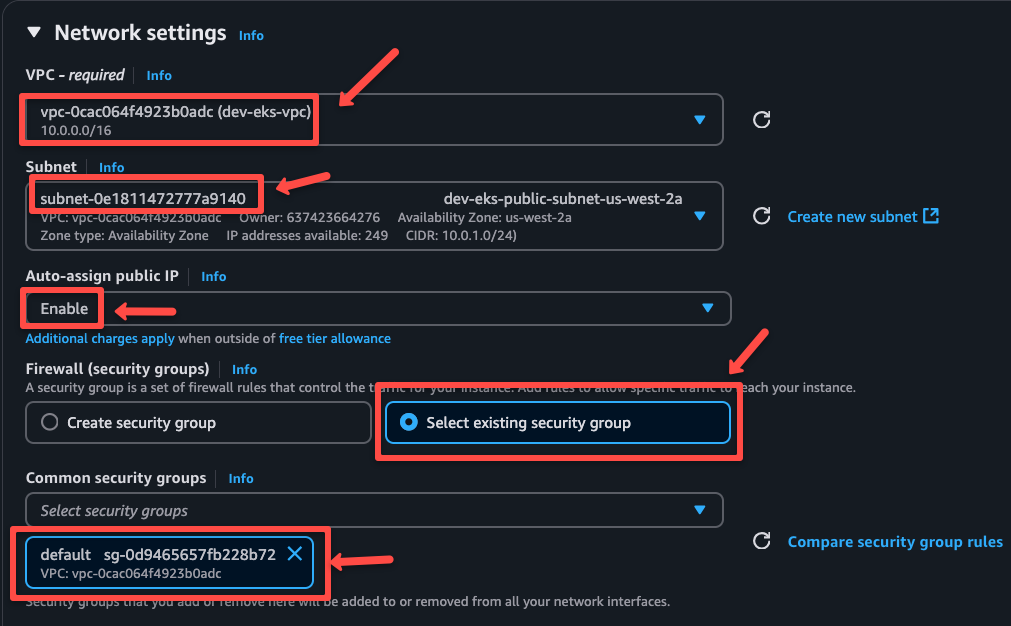
For now, I am using the default configuration for the rest of the settings, but you can modify it if you want.
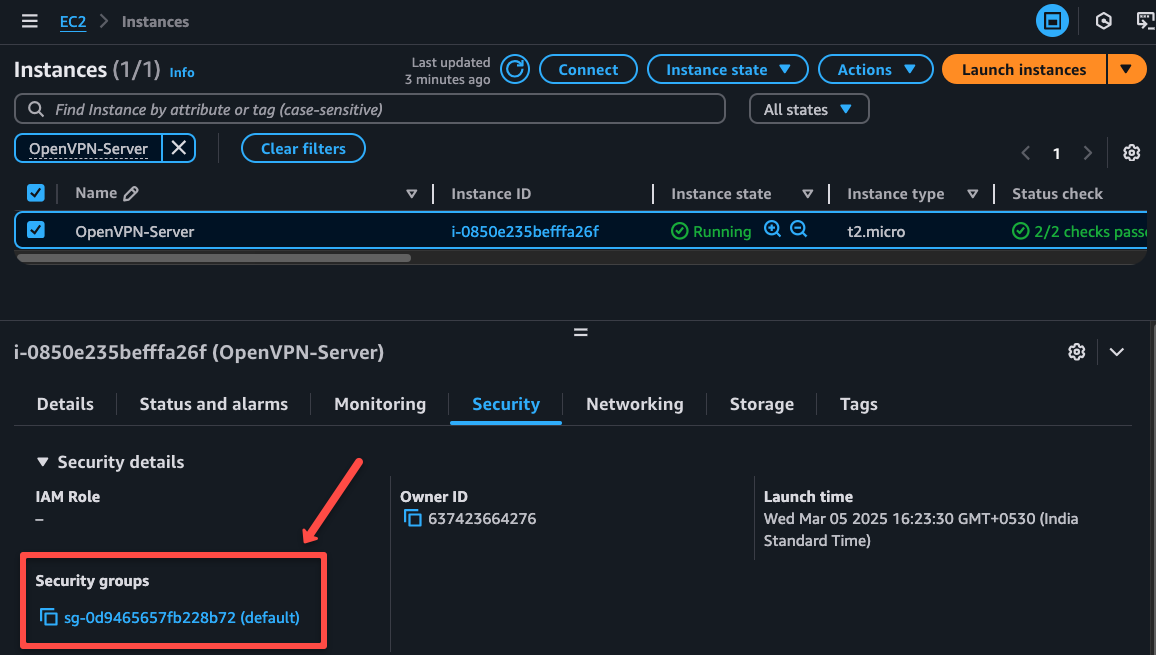
Step 3: Update Security Group Rules
We have attached the default security group to this server, but need to know what protocols need to be enabled for the incoming traffic.
Navigate to the attached security group.
Clicking the security group will open a new page, there you need to click the Edit inbound rules button to add or remove rules.
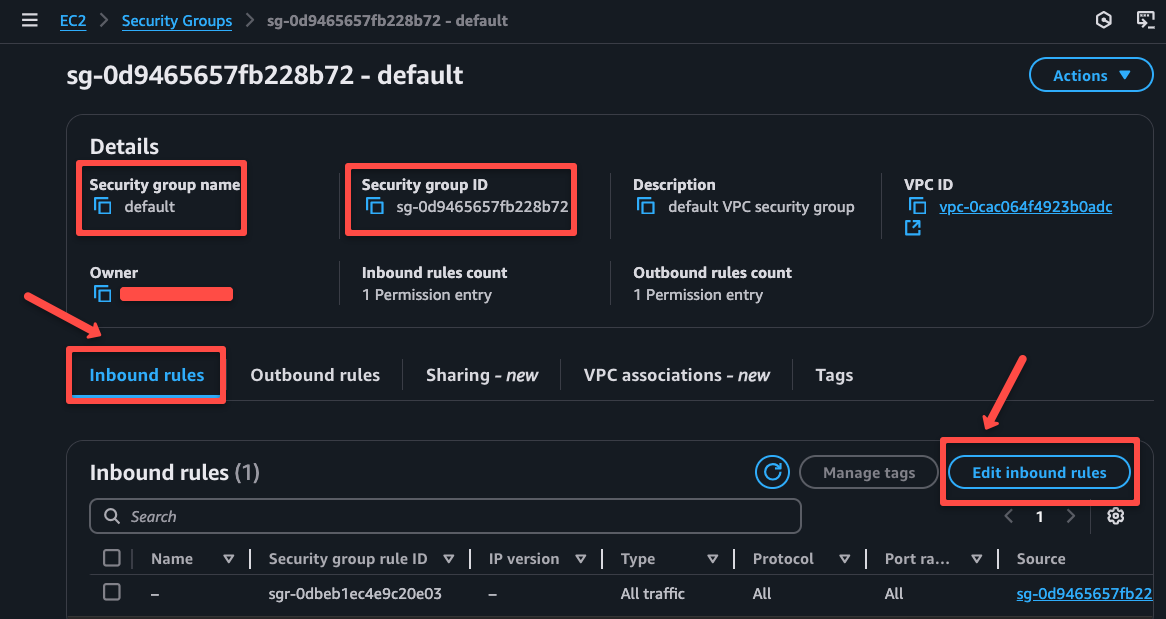
I will add a rule for SSH, then we can access this EC2 instance, and add a custom UDP port for the OpenVPN, which is 1194.
I am adding one more port, which is 9090, to demonstrate a private AWS resource access, so that is optional.
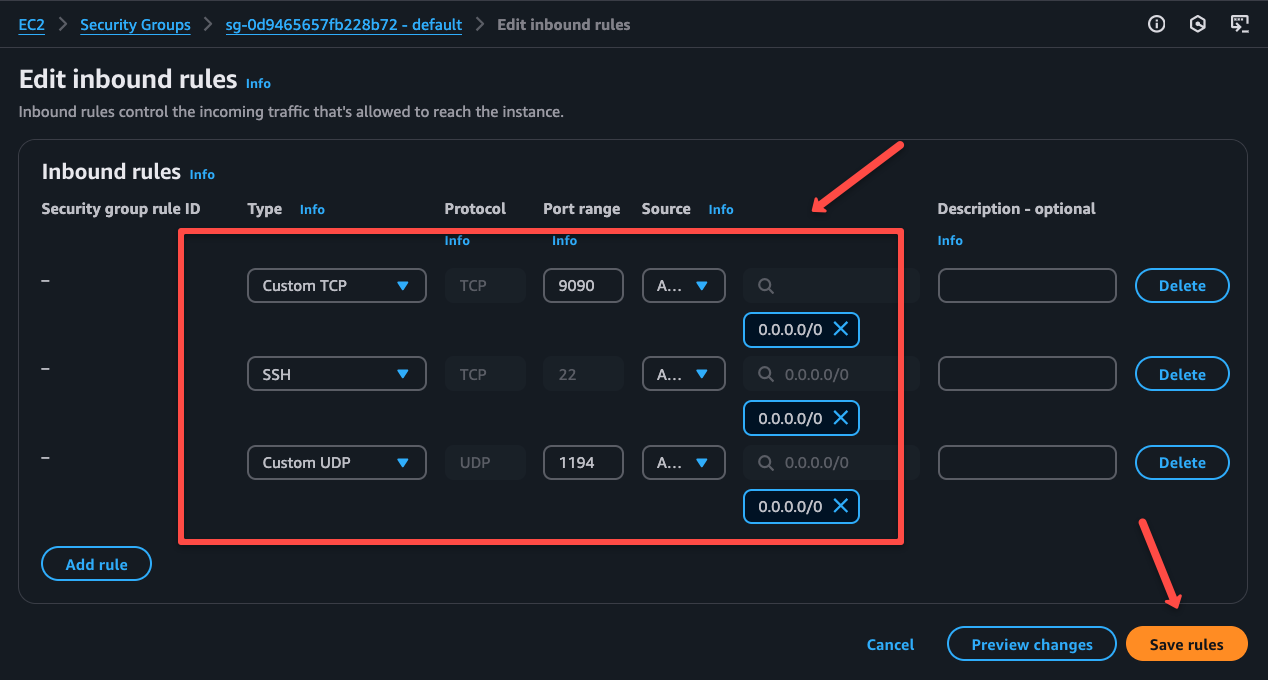
Once the security group rules are properly added, we can access the instance.
Step 4: Access the OpenVPN EC2 Instance
The instance will take a few minutes to prepare. Once the health checks are completed and the state is running, we can log in to the shell.
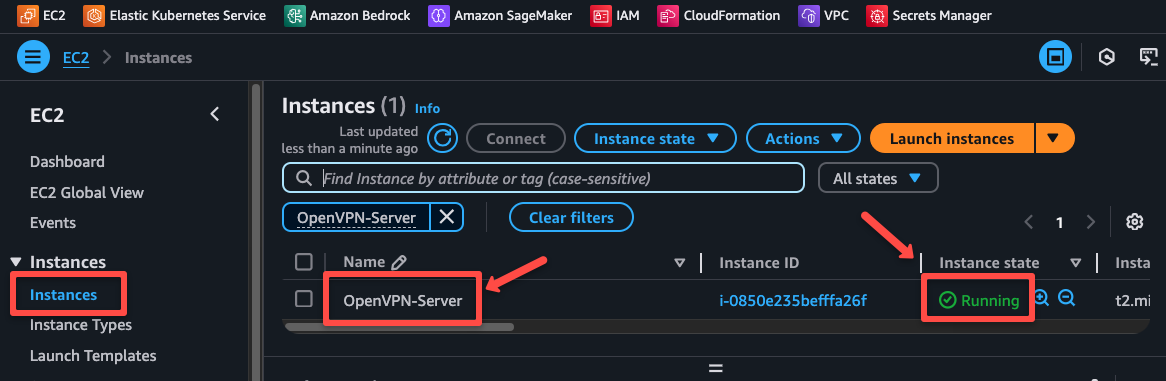
If you click the instance ID, you can see the option to connect and note down the server's public IP for the upcoming configuration.
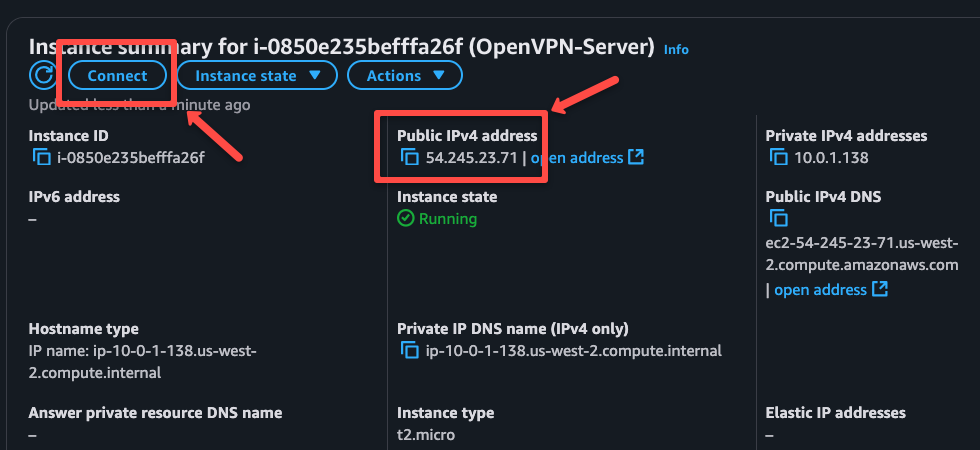
You can use the EC2 Instance Connect method to connect the server, or can use the SSH method with the key from the local machine.
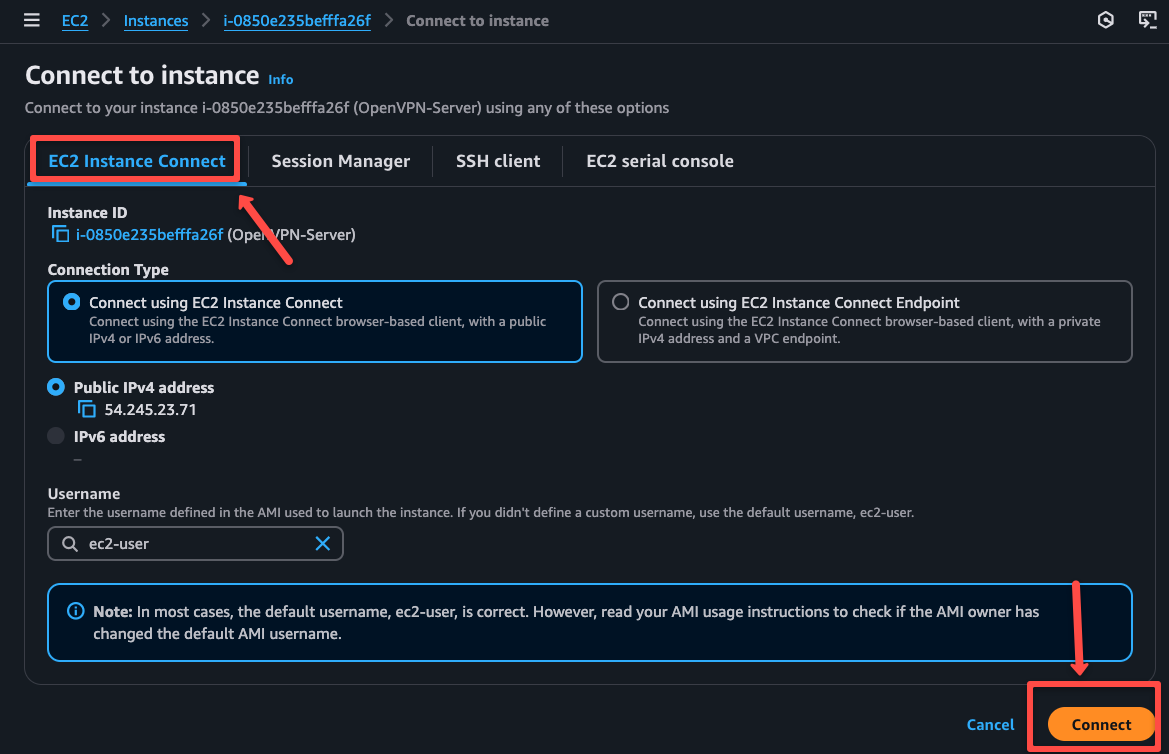
To access from the local machine, use the following command.
ssh -i <KEY> ec2-user@<PUBLIC_IP>Setting up OpenVPN in Amazon Linux EC2 Instance
Follow the below steps to install the OpenVPN server on an EC2 instance.
Step 1: Install OpenVPN and EasyRSA
Enable the EPEL repository for the additional software packages.
sudo amazon-linux-extras enable epelInstall EPEL release package, OpenVPN and Easy-RSA
sudo yum install -y epel-release
sudo yum install -y openvpn easy-rsa
Step 2: Configure OpenVPN
Initialize the Easy-RSA and generate certificates
Easy-RSA is a tool for creating certificates for various use cases. It provides a framework with necessary components for generating certificates.
cd /etc/openvpn
sudo mkdir easy-rsa
cd easy-rsa
Download the Easy-RSA package from the GitHub and extract it
sudo wget -O easy-rsa.tar.gz https://github.com/OpenVPN/easy-rsa/releases/download/v3.2.2/EasyRSA-3.2.2.tgz
sudo tar -xvf easy-rsa.tar.gz
cd EasyRSA-3.2.2
Initialize the Public Key Infrastructure (PKI)
sudo ./easyrsa init-pki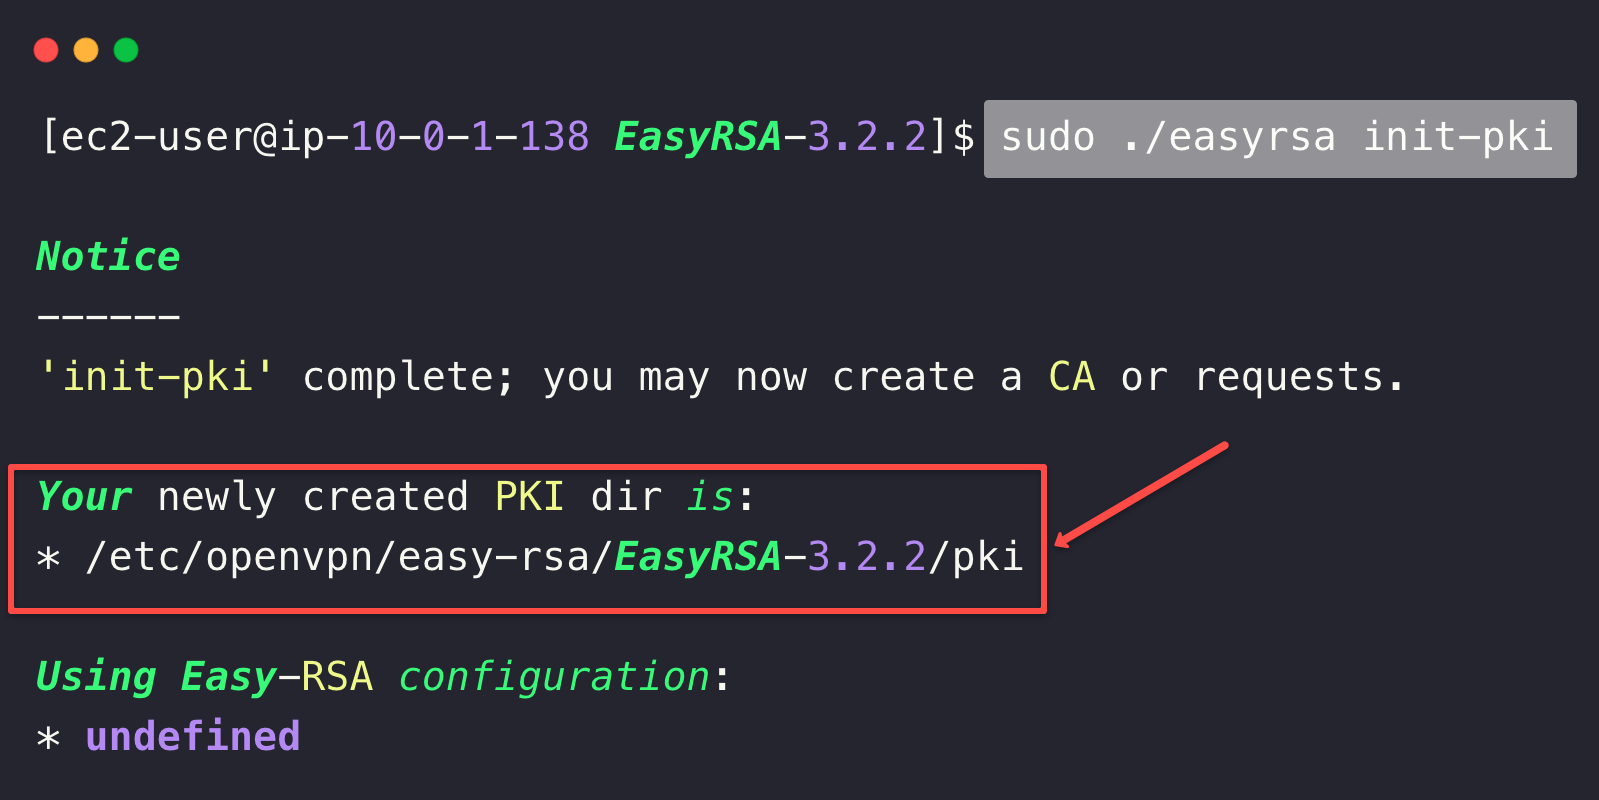
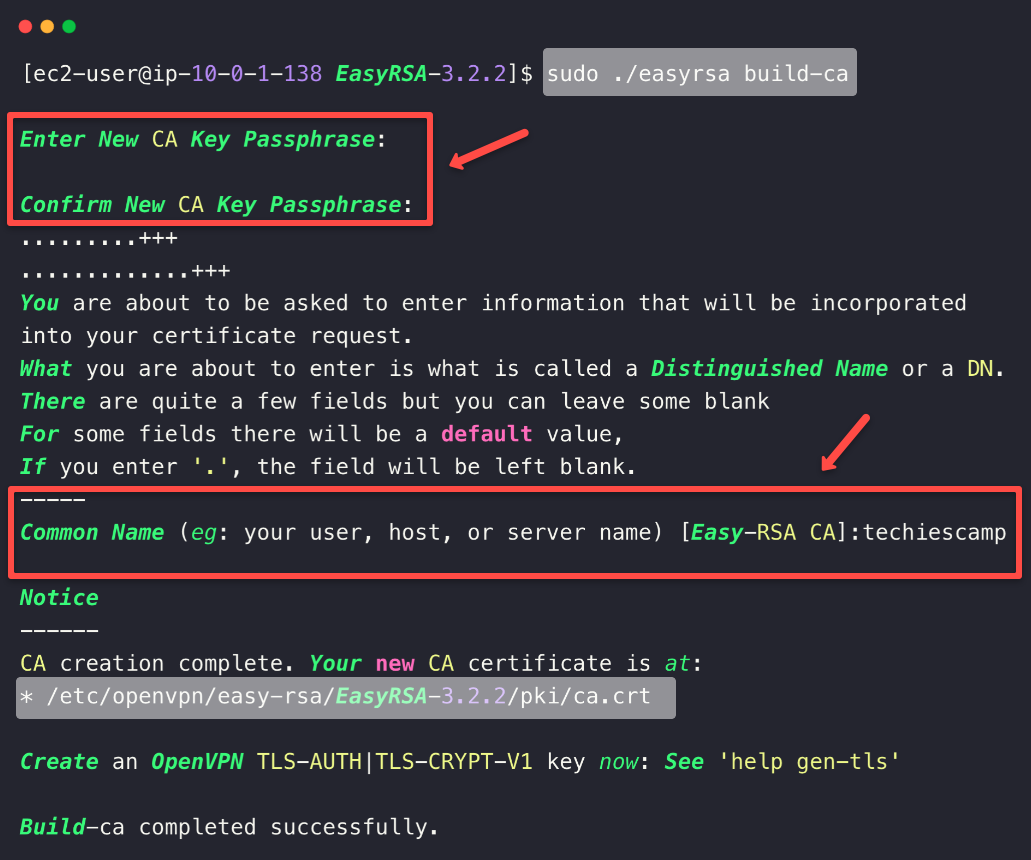
Create a Certificate Authority (CA)
The Certificate Authority is a trusted entity that is capable of issuing and managing certificates.
sudo ./easyrsa build-caYou will be prompted to give the passphrase, which is actually a password, and also will be asked to provide a common name; you can give any name.
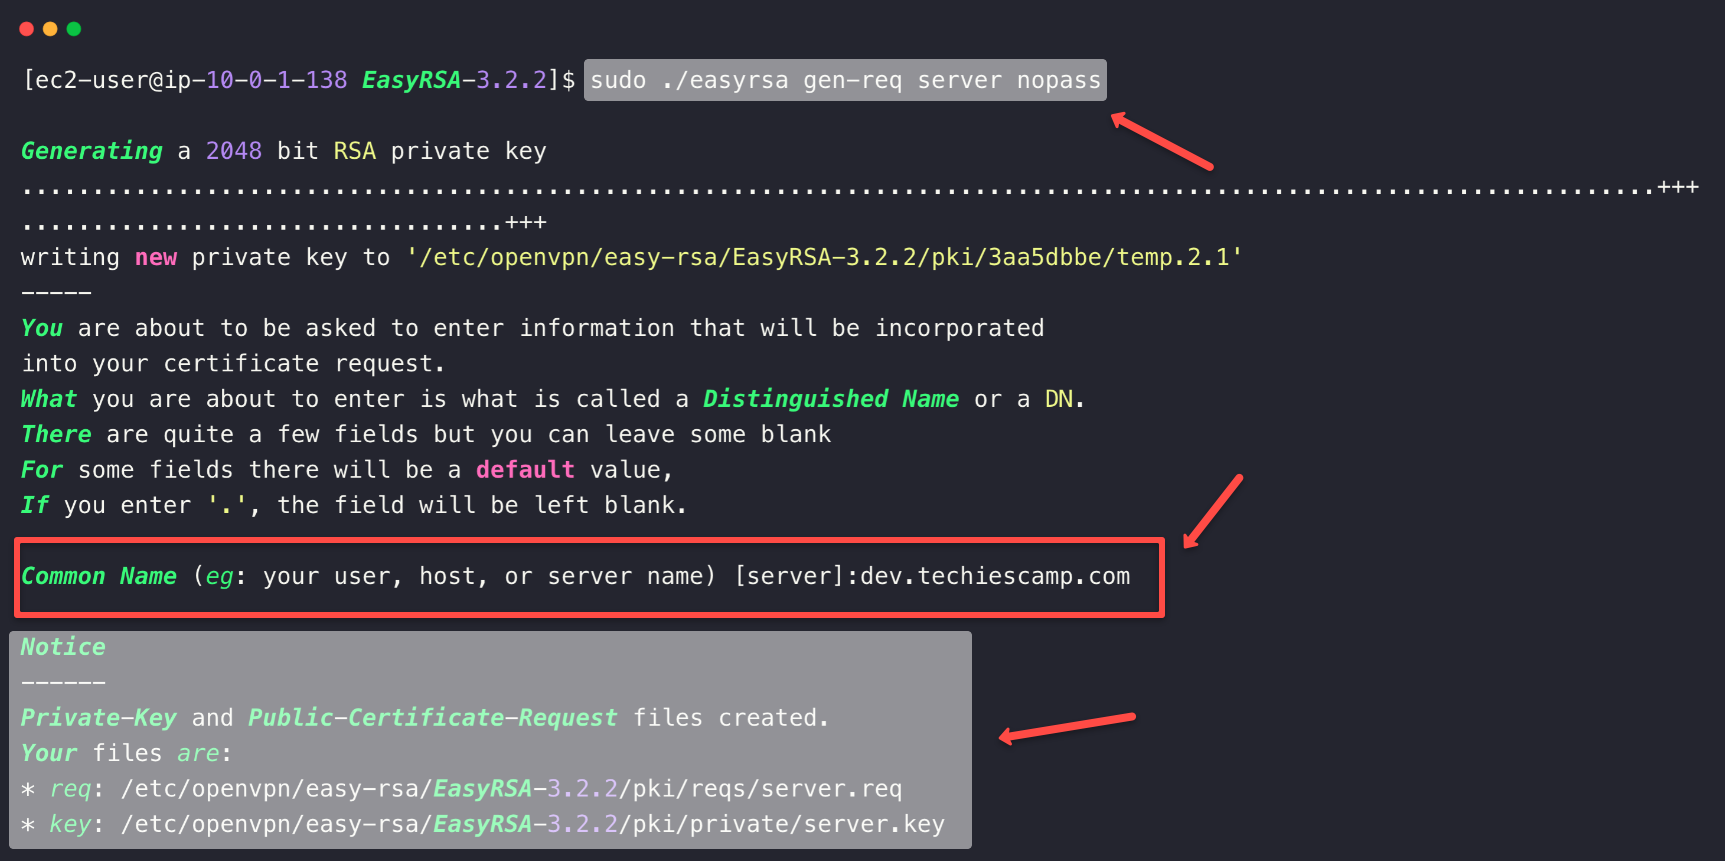
Create a request for a server key
sudo ./easyrsa gen-req server nopassWill prompt to provide a common name, you can just press enter or provide a hostname like dev.techiescamp.com
To sign the server certificate request, use the following command.
sudo ./easyrsa sign-req server serverWill prompt for yes and needs to provide the CA passphrase
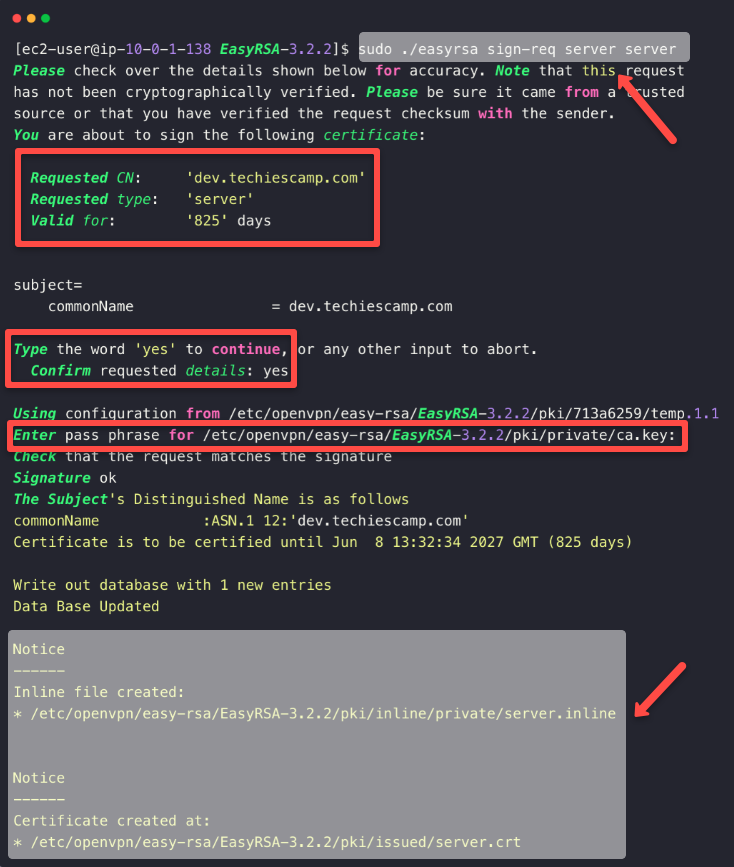
The output will give the validity and other related information.
Generate the Diffie-Hellman (DH) key exchange file
The Diffie-Hellman protocol secures communication protocols such as SSL/TLS, SSH, and IPsec.
sudo ./easyrsa gen-dh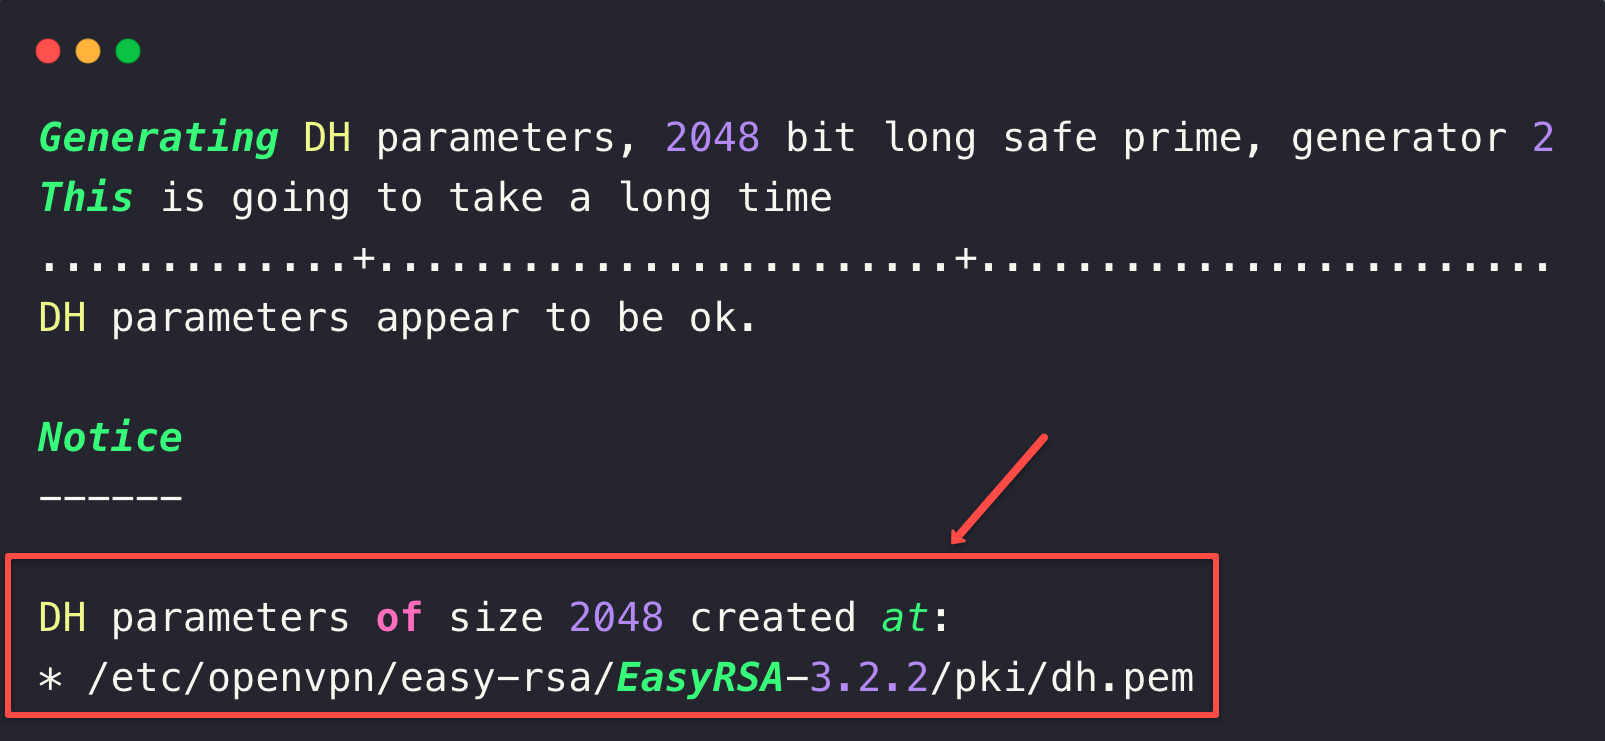
Step 3: Configure OpenVPN Server
Create a configuration file for the OpenVPN server
sudo vim /etc/openvpn/server.confAdd the following configurations
port 1194
proto udp
dev tun
ca /etc/openvpn/easy-rsa/EasyRSA-3.2.2/pki/ca.crt
cert /etc/openvpn/easy-rsa/EasyRSA-3.2.2/pki/issued/server.crt
key /etc/openvpn/easy-rsa/EasyRSA-3.2.2/pki/private/server.key
dh /etc/openvpn/easy-rsa/EasyRSA-3.2.2/pki/dh.pem
server 10.8.0.0 255.255.255.0
keepalive 10 120
persist-key
persist-tun
status /var/log/openvpn-status.log
verb 3
push "route 10.0.4.0 255.255.255.0"
Port 1194, is the default listening port of the OpenVPN and UDP is the protocol, which is faster than the TCP protocol.
dev tun --> Indicating that the OpenVPN to use tunnel device, (Layer 3 IP based tunneling)
ca /etc/openvpn/easy-rsa/EasyRSA-3.2.2/pki/ca.crt --> Certificate Authority certificate
cert /etc/openvpn/easy-rsa/EasyRSA-3.2.2/pki/issued/server.crt --> Server's SSL certificate
key /etc/openvpn/easy-rsa/EasyRSA-3.2.2/pki/private/server.key --> The private key of the server certificate
dh /etc/openvpn/easy-rsa/EasyRSA-3.2.2/pki/dh.pem --> Diffie-Hellman exchange key
server 10.8.0.0 255.255.255.0 --> Virtual IP for the VPN clients
keepalive 10 120 --> Sends ping request for each 10 seconds to ensure that connection is active and if there is no response in 120 seconds, it will restart the server.
persist-key --> This will avoid reloading the private key each time the OpenVPN server restarts.
persist-tun --> Keep the tunnel persistently.
status /var/log/openvpn-status.log --> Stores the OpenVPN logs in the specific path.
verb 3 --> The verbosity level for the logs.
push "route 10.0.4.0 255.255.255.0" --> Route to connect the VPN clients and 10.0.4.0 is the private network the clients can securely access.
Enable and start the OpenVPN service
sudo systemctl enable openvpn@server
sudo systemctl start openvpn@server
To check the OpenVPN service status.
sudo systemctl status openvpn@server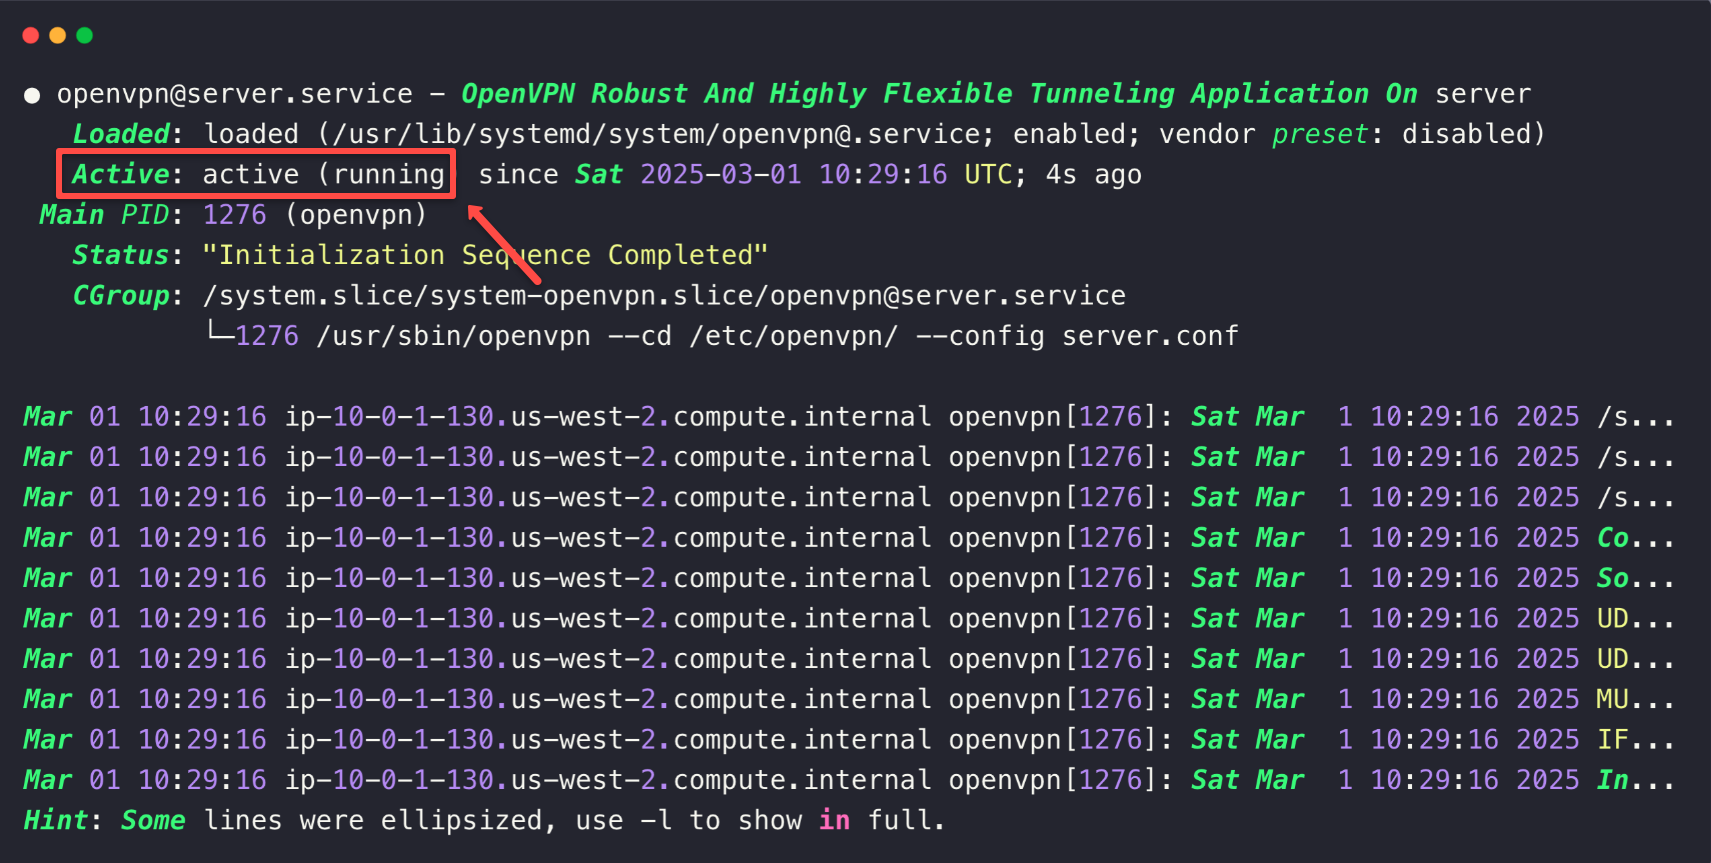
Step 4: Enable Split Tunnel (NAT) for Internet Access
Now, if you establish the VPN connection from the local machine, you can only access the particular AWS private network.
This is quite secure because all the traffic will go through the secured VPN tunnel, which is called the full-tunnel method.
But the problem is that we can't access anything besides the AWS private network, even Google.
So, we need only the secure connection for the AWS network, but we also need to use the other networks. This method is called split tunnel.
For that we need to enable NAT.
To allow the clients to access the internet,
sudo sysctl -w net.ipv4.ip_forward=1
sudo iptables -t nat -A POSTROUTING -o eth0 -j MASQUERADE
To make the configuration persistent
echo "net.ipv4.ip_forward = 1" | sudo tee -a /etc/sysctl.conf
sudo iptables-save | sudo tee /etc/iptables/rules.v4
Restart the OpenVPN service.
sudo systemctl restart openvpn@serverThe OpenVPN Server setup is completed.
Generate a client key
Next step is to create the client key for a user. This is required to authenticate from the VPN client with the sever for a specific user.
Navigate to the EasyRSA-3.2.2 directory.
/etc/openvpn/easy-rsa/EasyRSA-3.2.2Generate a client key without password.
sudo ./easyrsa gen-req client nopassThis will prompt you to give a client name. It will create the client.req and client.key files.

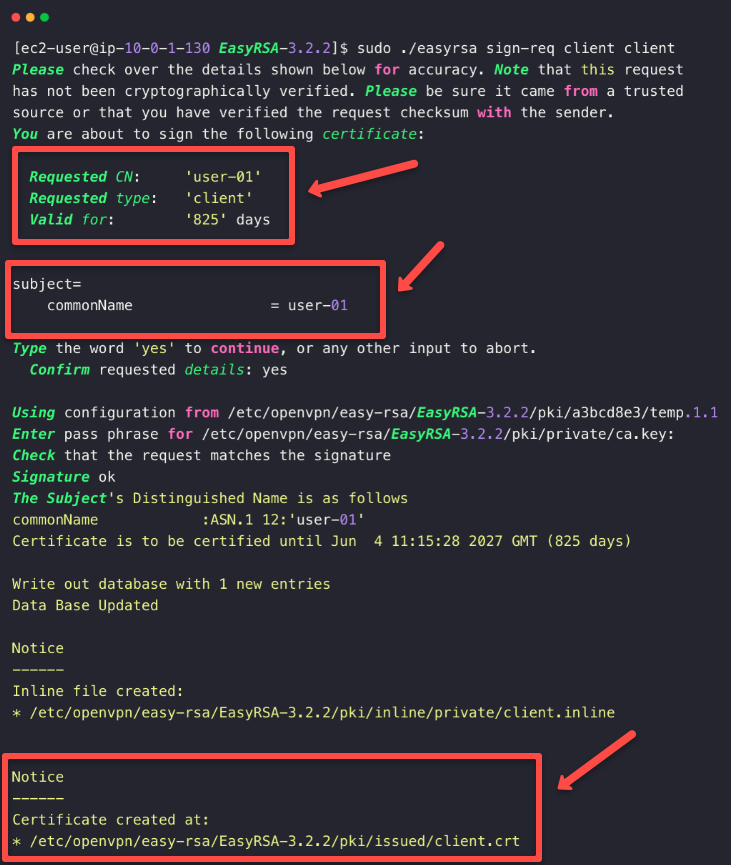
Sign the client certificate request using the OpenVPN CA.
sudo ./easyrsa sign-req client clientThis will prompt you to type yes. Also you need to provide a passphrase. It will create the client certificates.
Move Certificates to Local Workstation
Now that we have the certificates generated, we need to copy it to our local workstation for validation.
You can find the certs and key in the following locations.
/etc/openvpn/easy-rsa/EasyRSA-3.2.2/pki/ca.crt/etc/openvpn/easy-rsa/EasyRSA-3.2.2/pki/issued/client.crt/etc/openvpn/easy-rsa/EasyRSA-3.2.2/pki/private/client.key
Use cat command to manually copy and paste.
Or you use scp to directly copy from the OpenVPN server to the local machine via SSH.
Once you have the files copied, move on to the next step.
Generate a VPN Client Configuration File
Once the above files are present in the local machine, we need to create a OpenVPN Client configuration file.
Make sure all files are in the same directory.
vim client.ovpnAdd the following configurations in the file.
client
dev tun
proto udp
remote 34.209.222.65 1194
resolv-retry infinite
nobind
persist-key
persist-tun
ca ca.crt
cert client.crt
key client.key
route 10.0.4.0 255.255.255.0
Here 34.209.222.65 is the OpenVPN Server's public IP so replace it with yours.
Add redirect-gateway def1 to route all traffic through the VPN, this might affect the regular internet access.
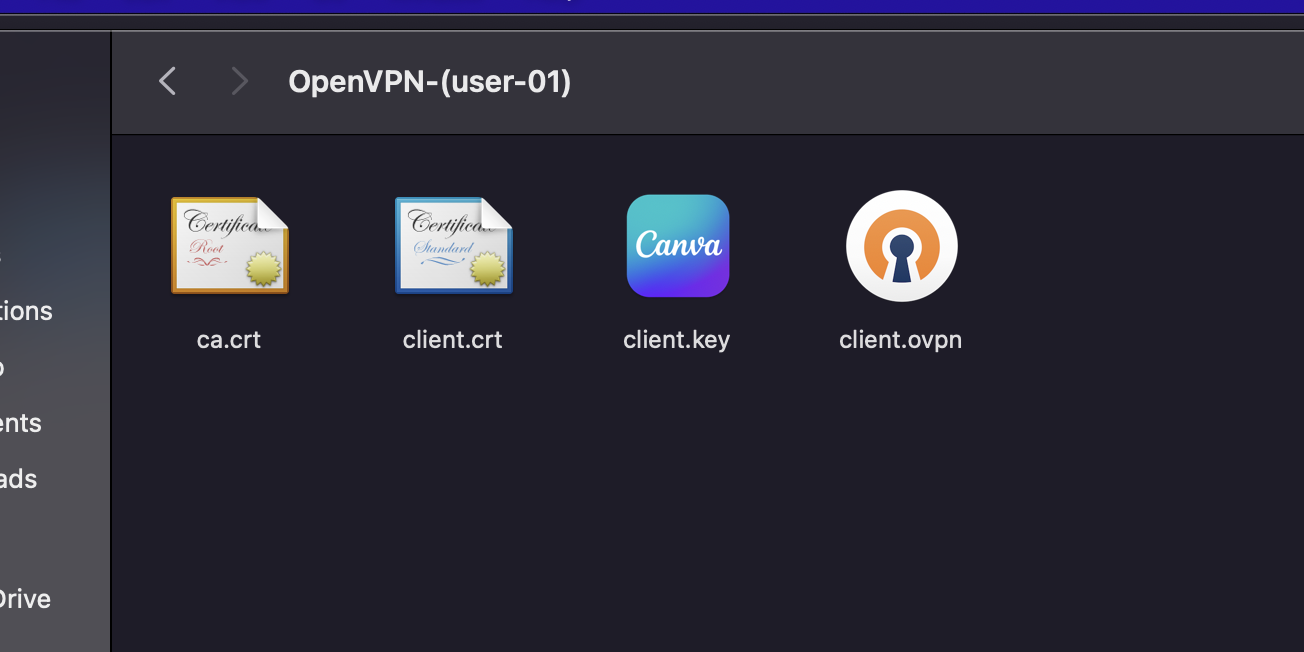
Now you should have the following files in your local workstation.
Install & Configure OpenVPN Client
Now that we have the necessary certs and config files for client authentication, we can configure the OpenVPN client application.
First, need to install the OpenVPN client.
You can follow this official downloads page to download the client based on your platform.
After the installation, if you open the client, you can see a + button to add a configuration.

On the next step, you need to upload the .ovpn file that we have configured earlier.
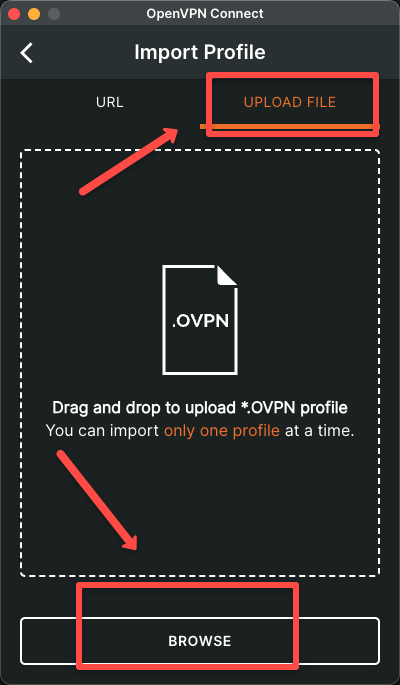
Once you uploaded the OpenVPN Configuration file, you can see a connect button to establish the connection
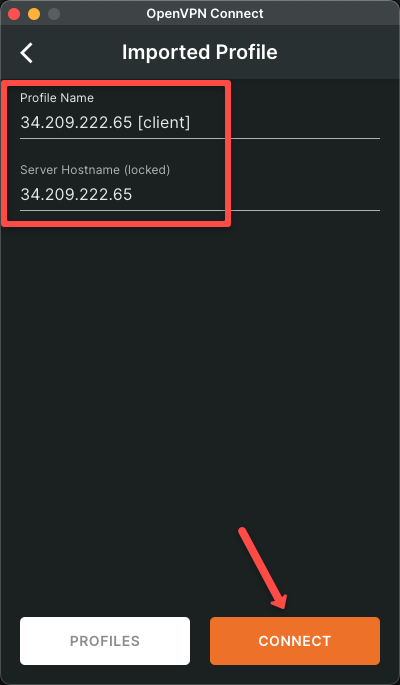
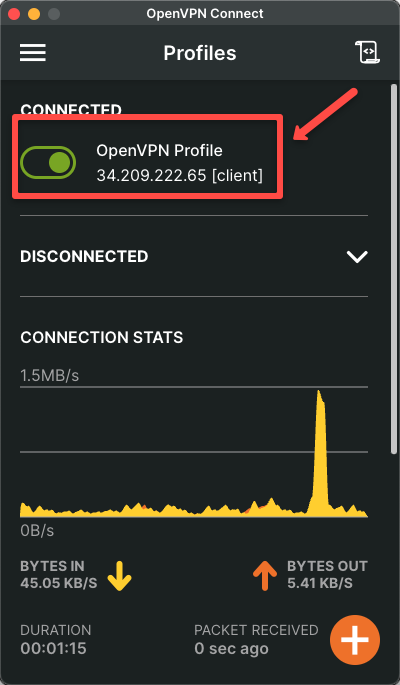
Once the connection is successfully established, we can see the green mark on the radio button.
VPN Validation Using Private ec2 Instance
Now, we need to check whether we can access the private AWS resources.
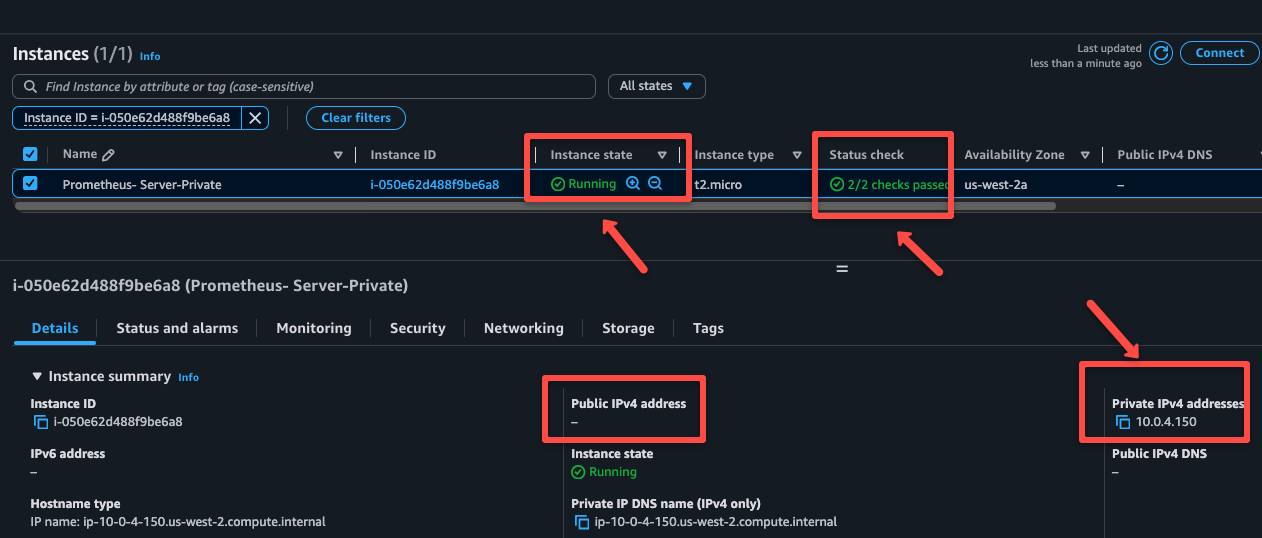
For that, I am creating an EC2 instance within private subnet and deploying a Prometheus application inside it.
I am choosing Amazon Linux as AMI.
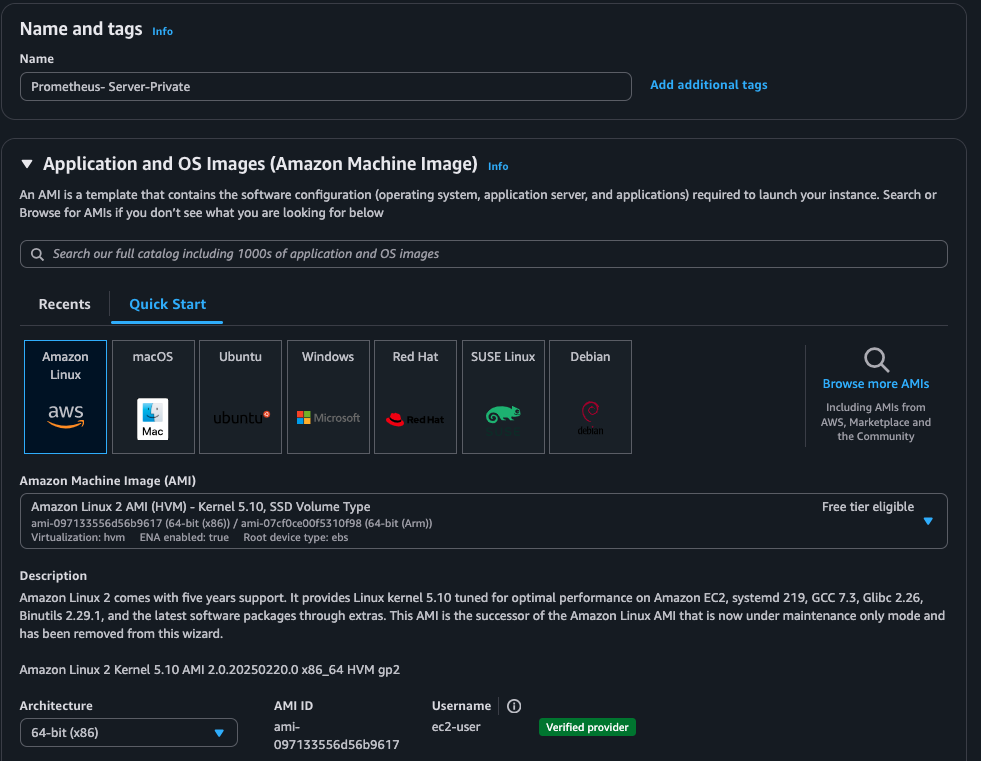
Select the keypair and choose the VPC and private Subnet.
Wait until the state and status are ready and note down the private IP of the server.
Now, I am getting in the private server through SSH from the VPN Server, because the VPN server is public and on the same network as the private server.
We can also SSH to the private server from the local machine as well because the VPN connection is established between local workstation and the VPC network.
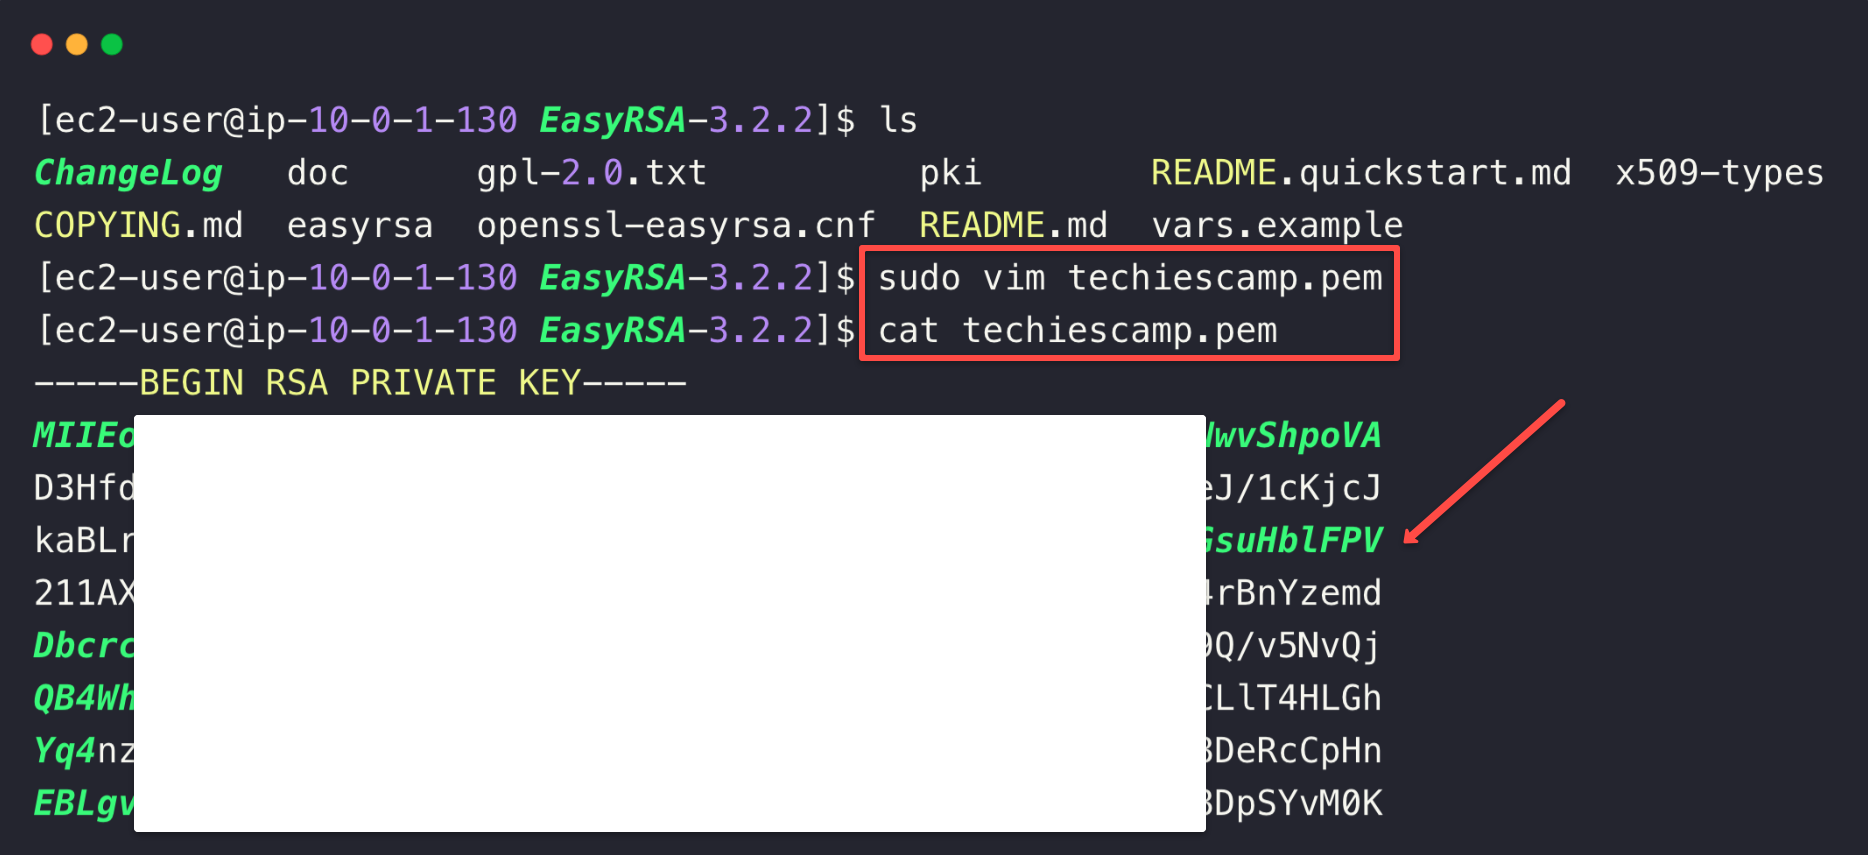
Copy the keypair to the VPN server and change the permission.
sudo chmod 400 techiescamp.pemTo SSH to the private server, use the following command.
sudo ssh -i techiescamp.pem ec2-user@<PRIVATE_SERVER_IP>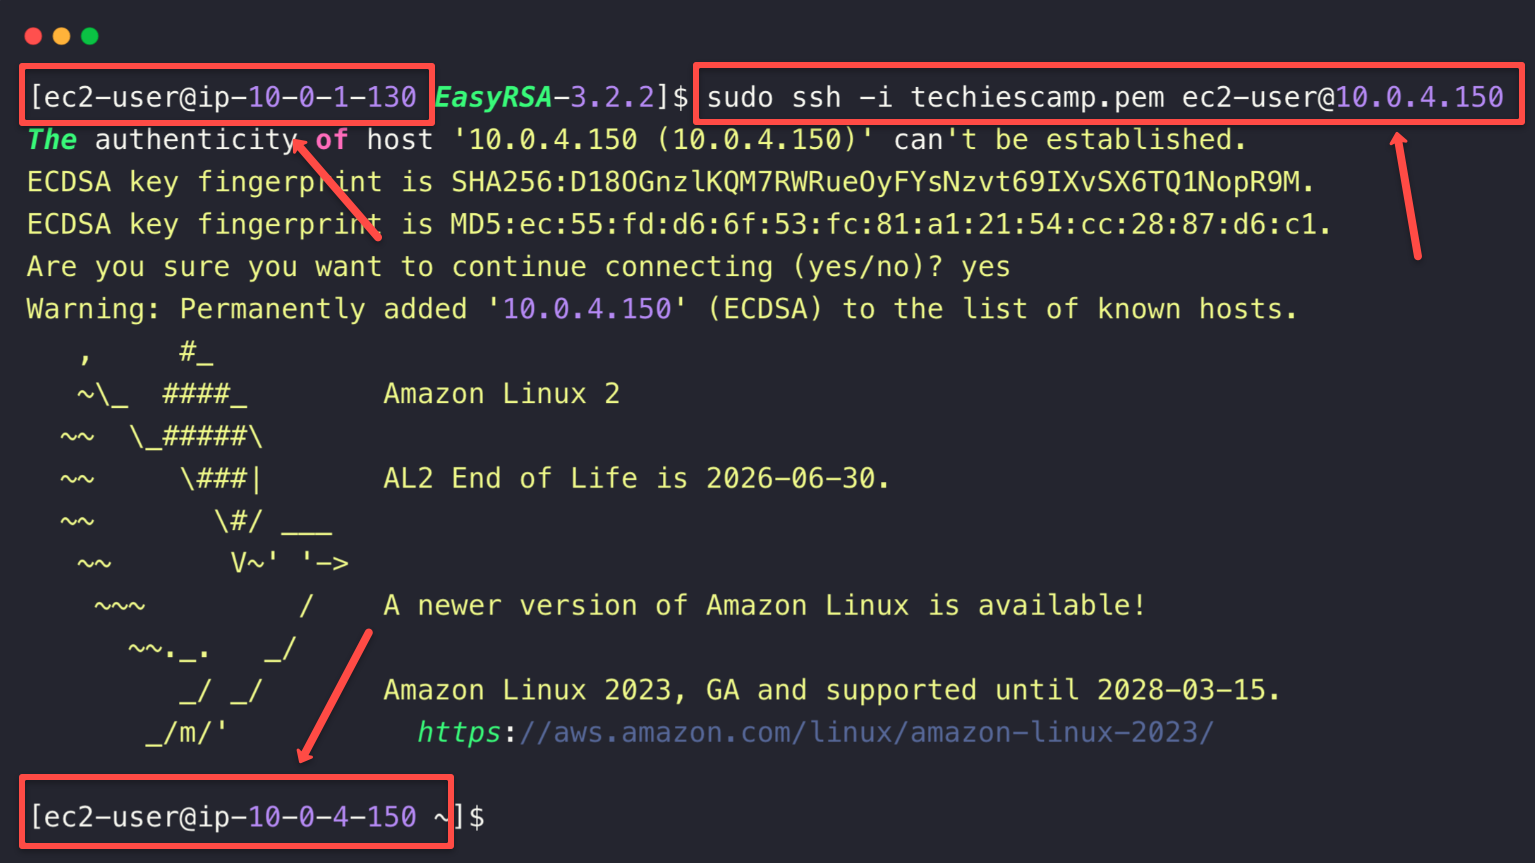
Deploy Application in Private ec2 Instance
We are installing Prometheus on a private server to demonstrate access from a local machine but you can try with any application even a simpe nginx server also enough for the testing.
You can follow this blog for the Prometheus installation.
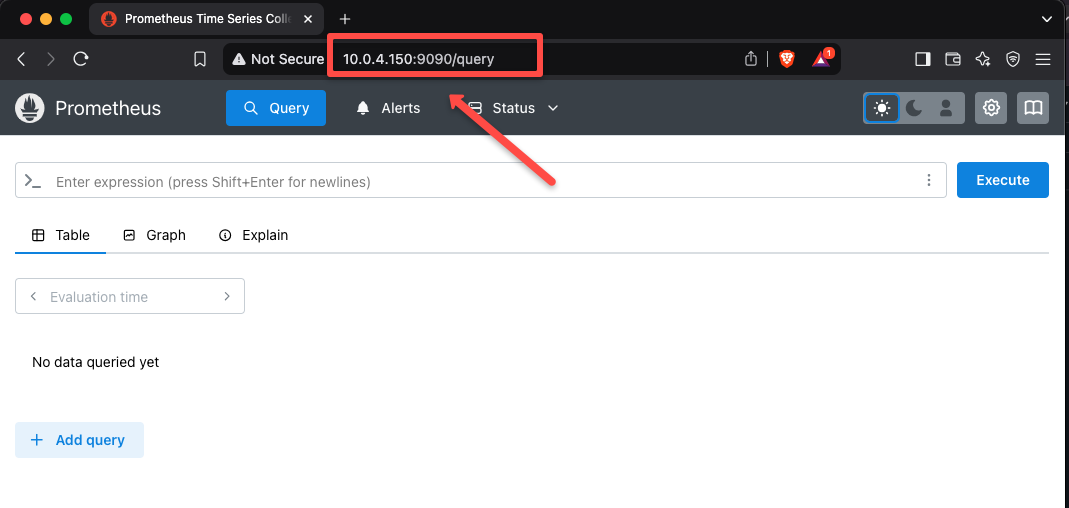
Now, we can try to access the Prometheus dashboard from our local machine with its private IP securely.
Conclusion
This blog mainly covers setting up the OpenVPN server on the EC2 instance and accessing private AWS resources.
There is a managed service available in AWS, AWS Client VPN Endpoint. We don't need a server to deploy for the OpenVPN, and it will automatically scale based on the user connection.
If you want to see the AWS Client VPN Endpoint setup, refer to this blog.
The next blog will cover access to the AWS EKS private cluster resources.
