

This is a step-by-step tutorial on AWS Client VPN Endpoint setup to achieve secure, scalable, and highly available remote VPC connectivity.
We all know local network communication is more secure than public network communication. AWS Client VPN is a method to access ec2 servers and other AWS resources remotely using its private network as if we are connecting it locally.
Need for VPN
To access the resources security, big organisations primarily use site-site VPN or AWS direct connect services. It helps in setting up a hybrid cloud network with secure access to Cloud resources from the data center/office network.
These options are quite expensive and only organizations with good project budget can implement these solutions as it requires a physical VPN device.
The next option is to have a client to site VPN connectivity. You can implement this using solutions like OpenVPN on a ec2 instance. Custom implementation requires expertise in managing a secure and highly available VPN service.
Or use AWS managed AWS Client VPN Endpoint service where you dont have the administrative overhead of managing the VPN server on AWS. All the patching and VPN high availability are taken care by AWS.
What is AWS Client VPN?
AWS Client VPN is a fully managed VPN service that helps remote users securely access AWS resources.
This service will create an encrypted SSL connection between the client (PC, and mobile devices) and the AWS servers. It means the data transferred between your devices and AWS services is secure and protected.
The endpoint is managed by AWS and the users establish the connection using a client VPN application (OpenVPN).
Following are the key features of AWS Client VPN.
- Remote Access: Provides an encrypted TLS connection between the client and the remote server. This ensures the secure communication between the servers.
- Multi-Platform VPN Clients: Client application supports various operating systems such as Windows, Mac OS, Linux, Android, etc.
- Authentication: Mutual authentication and User-based authentication enables enhanced access control security.
- Certificate Management: The Client VPN Endpoint can utilize certificates from the AWS Certificate Manager.
- Client Configuration: The client VPN endpoint provides a multi-platform supported client configuration file to connect to VPN endpoint.
- Scalability and Availability: Supports automatic scaling based on the client connections.
- Tunneling Types: The client endpoint supports two types of tunneling methods such as split tunneling and full tunneling.
AWS Client VPN Workflow

In this setup, we build our own Certificate Authority (CA) to generate digitally signed SSL certificates for clients and servers using the OpenVPN Easy-RSA tool.
Both the generated certificates, client and server, will be stored in AWS Certificate Manager, and only the client certificates will be given to the client.
The client VPN Endpoint has to be configured using client and server certificates. The endpoint will produce a client configuration file with VPN endpoint details such as the hostname of the VPN server, port, transport protocol, encryption type, and more.
This configuration file will be given to the clients. Then, the clients include the client certificate and key contents in the configuration file and import it to the OpenVPN client application.
The client and server will complete the mutual authentication with their certificates. Then, a secure connection will be established between them and allow the remote users to access the particular private subnet.
Client VPN Endpoint Setup
Follow the steps given below to setup a AWS Client VPN.
Step 1: Create client and server certificates and keys.
We use the Ubuntu instance to generate the credentials. Additionally, we build our own Certificate Authority (CA) using the OpenVPN Easy-RSA tool to generate the client and server certificates.
Easy-RSA is a good option to create and manage Public Key Infrastructure (PKI) for the OpenVPN server.
Create a copy of the OpenVPN Easy-RSA repository
git clone https://github.com/OpenVPN/easy-rsa.gitcd easy-rsa/easyrsa3Run easyrsa script in the PKI environment
./easyrsa init-pkiTo create a certificate authority (CA), use the following command. You will have to provide a name for the CA.
./easyrsa build-ca nopassTo generate the server certificate and key, use the following command.
./easyrsa build-server-full server nopassTo generate the client certificate and key, use the following command.
./easyrsa build-client-full clients.devopscube nopassThe name given for the first client is clients.devopscube. If you want to create multiple clients, change the name and repeat the command.
Now, Create a certs directory and copy all the client and server certificates using the following commands.
mkdir ~/certs
cp pki/ca.crt ~/certs
cp pki/issued/server.crt ~/certs
cp pki/private/server.key ~/certs
cp pki/issued/clients.devopscube.crt ~/certs
cp pki/private/clients.devopscube.key ~/certs
Step 2: Store the certificates to the Amazon Certificate Manager (ACM)
AWS Certificate Manager (ACM) is used to store the SSL/TLS certificates and can be used with AWS internal resources.
Note: Before importing the certificates, make sure you installedaws-cliin your workstation and necessary IAM permissions available to import the certificate. Or you can manually import the certificates.
The import region should be same in which you want to create the endpoint.
Open the certificate directory
cd ~/certsTo import the server certificate, key, and CA public key, use the following command.
aws acm import-certificate --certificate fileb://server.crt --private-key fileb://server.key --certificate-chain fileb://ca.crtTo import the client certificate, key, and CA public key, use the following command.
aws acm import-certificate --certificate fileb://clients.devopscube.crt --private-key fileb://clients.devopscube.key --certificate-chain fileb://ca.crtNow, if you check the ACM dashboard, you can view the imported certificates as shown below.
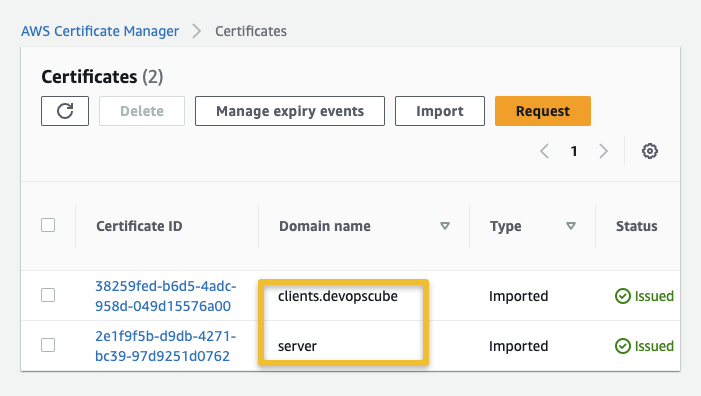
If you are generating server and client certificates from a same Certificate Authority (CA), you can use the server certificate ARN for both server and client when you create a Client VPN Endpoint.
Step 3: Setup Client VPN Endpoint
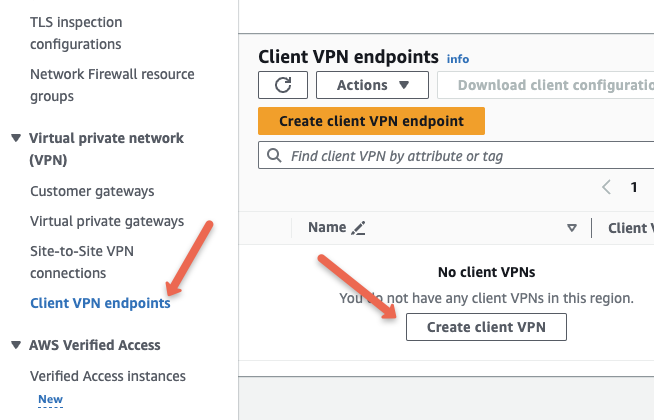
Head over to AWS Console --> VPC . Under Virtual Private Network option, you will find the Client VPN Endpoints option. Click Create Client VPN.
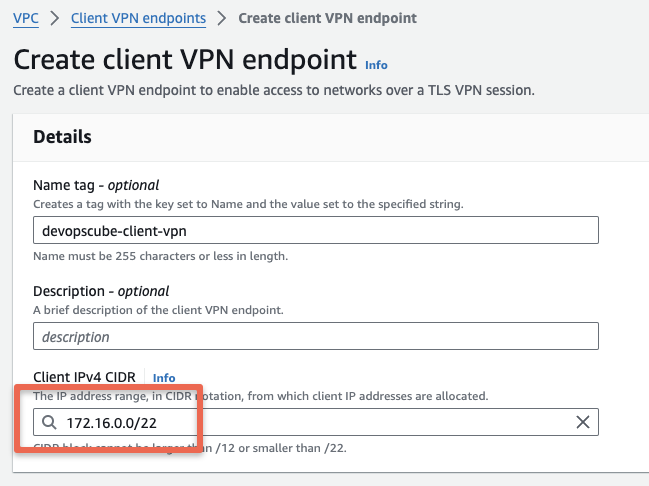
Provide name and description for the endpoint, and in the Client IPv4 CIDR, choose any CIDR value, that is different from the CIDR of the VPC in which you want to create the VPN endpoint. This is a specific range of IPv4 addresses that AWS will give to devices when they connect to your VPN
In our case, our VPC IPv4 CIDR is 10.0.0.0/16, and the client IPv4 CIDR we are providing 172.16.0.0/22 to avoid IP conflict.
Under Authentication information, select the mutual authentication and select the appropriate server and client certificates we created in ACM.
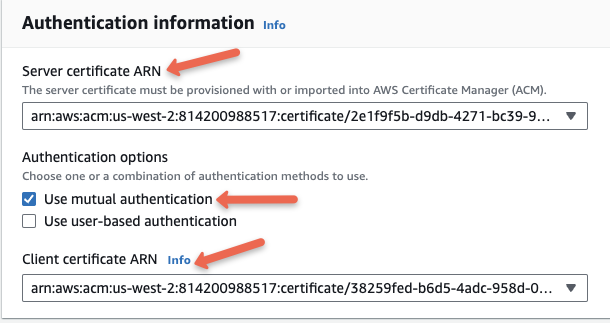
Client VPN Endpoint allows to combine mutual authentication and user-based authentication to improve security. User based authentication requires Active directory integration which is typically used in big organizations.
Optional Settings
In Other parameters, we can configure DNS server details, Transport protocol types, Tunneling types, and more.
In real-world projects, there might be private DNS servers running on AWS environment. The details of these servers need to be added to the configuration so that you can access services running on AWS using the private DNS endpoint through a client VPN.
For protocol we will choose UDP. Towards the end, I have added information regarding TCP vs UDP.
Towards the end, we have added the difference between two tunnelling options. For the setup we will not change anything in tunnelling.
Security group association
Associating a security group acts as the default target security group of the client VPN endpoint. For example, we can provide this security group as the source of our server's security group. So the traffic from the Client VPN Endpoint only can reach the server.
We will select the default security group. You can assign more than one security group. In real world setup, you should add a custom security group with only required port access to the environment.
Also, enable the split tunnel option if you dont want to route all the traffic through VPN. Otherwise you will not be able to access internet while connected to the VPN
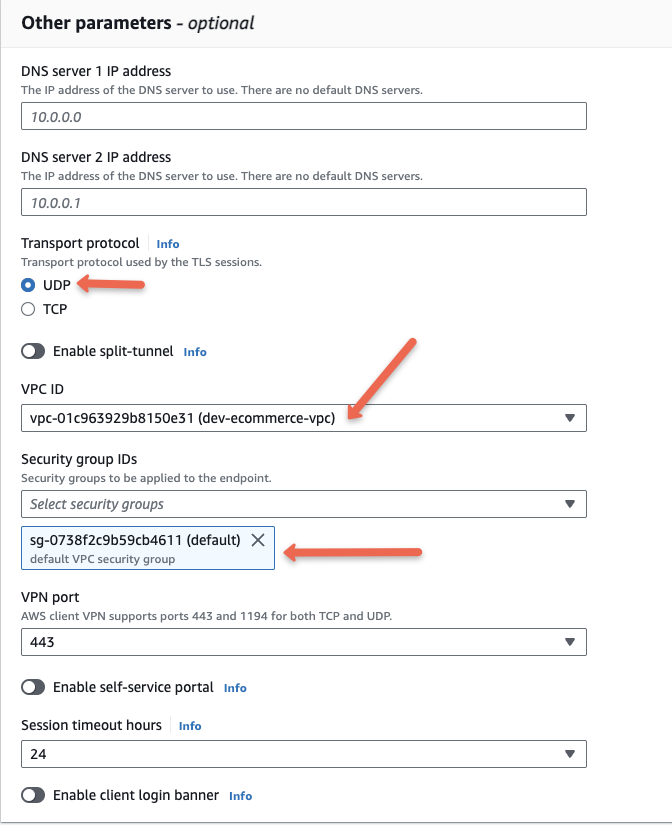
Enabling a self-service portal will help the clients download the client VPN endpoint configuration file and the client application from the browser. This feature is only applicable to user-based authentication.
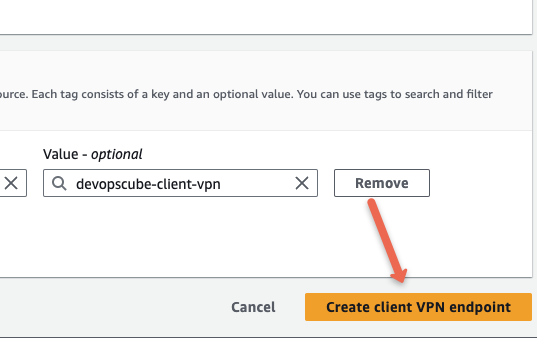
Now click the Create client VPN endpoint option to create the endpoint.
Step 4: Associate the target network with the client VPN endpoint
We have create an endpoint for the VPC.
Now we must add at least one subnet from the VPC as a target network. The VPN connection from the client network will be established through this subnet.
Here we are providing the subnet is 10.0.11.0/24. If you are providing more than one subnet, make sure each subnet is from different availability zones.
It will automatically create a route table entry for the target subnet 10.0.11.0/24 to the VPC 10.0.0.0/16.
The following Gif shows the process of attaching a target subnet.
(Click to Enlarge the Gif)
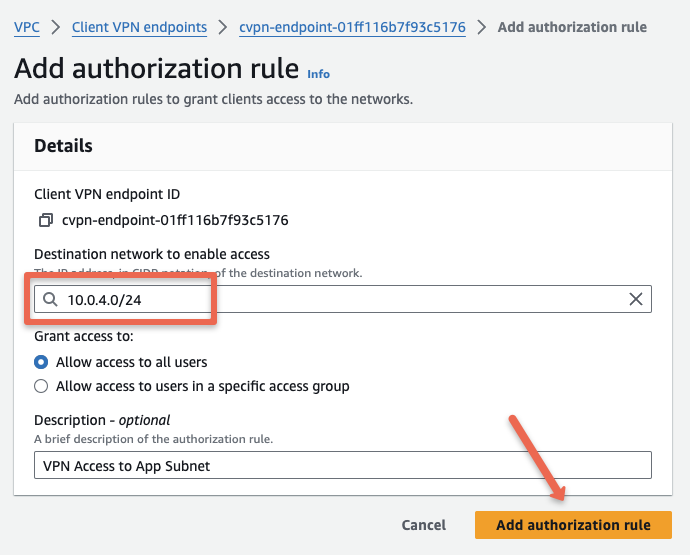
Step 5: Configure the authorization rule for the client VPN endpoint.
Creating authorization rules will help to control the client's access to the network. We can specify which subnets and their resources that clients can access.
Here we providing only 10.0.4.0/24 subnet for client's access from the VPC 10.0.0.0/16.
To authorize a network, Select the VPN endpoint --> Under Authorization rules --> Click the "Add authorization rule" button.
Step 6: Client configuration file modifications.
Once the configurations are completed, download the client configuration file from the option as shown below.
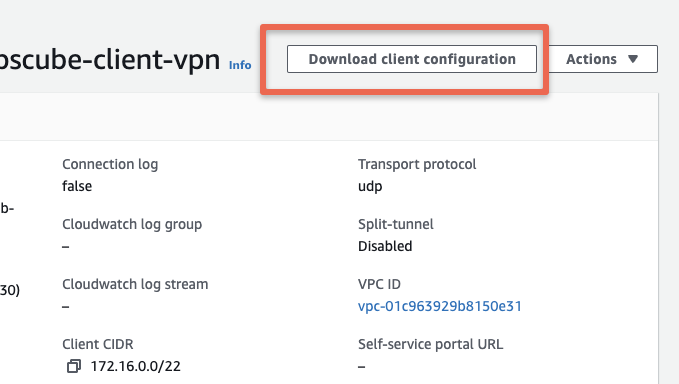
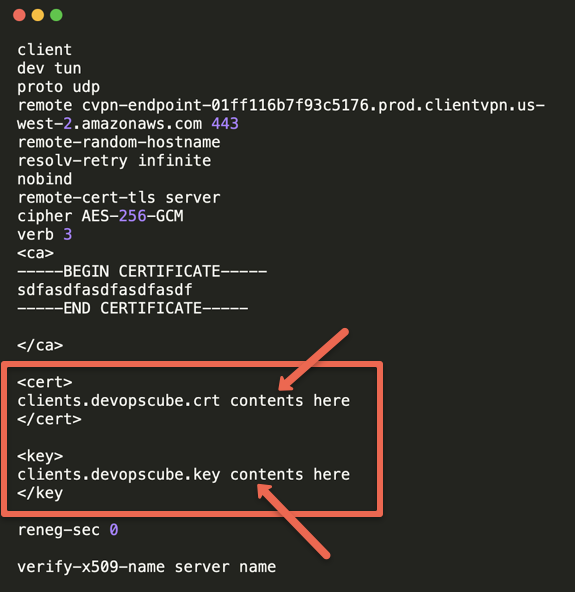
Open the downloaded configuration file in a text editor. We need to add the client certs, ie clients.devopscube.key and clients.devopscube.crt we created in the first step in the ~/certs folder. This is required becuase we opted for mutual SSL based VPN connectivity.
The cert and key has be added under <cert> and <key> tags as shown below. You just need to add the certificate and private key content from the files.
Step 7: Download and install the client VPN application.
Use the link to download the OpenVPN client for your operating system.
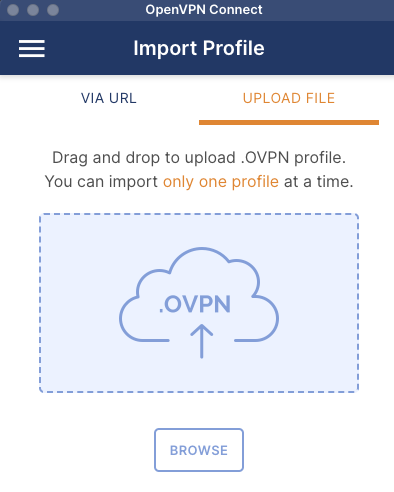
When you open the OpenVPN client you will get the option to upload the .opvn configuration file as shown below. The UI might be different for different operating systems.
Import the Client VPN Endpoint configuration file in the OpenVPN GUI.
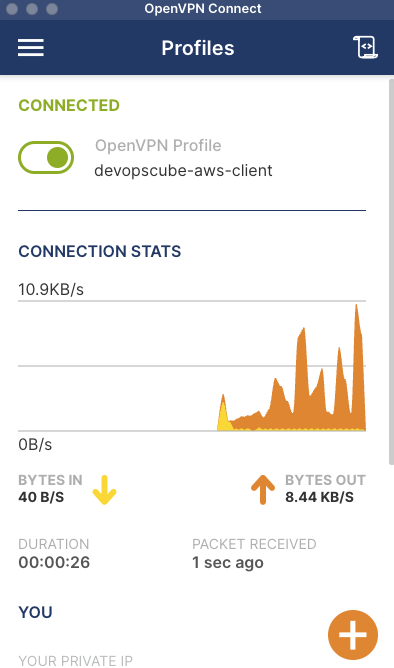
On a successful connection, you will see the connection stats as shown below.
Step 8: Test the Client VPN Endpoint.
For testing purposes, I have created an EC2 instance from the subnet which the clients can access 10.0.4.0/24.
It is a ec2 instance without a public IP and part of the private subnet. I had added SSH, HTTP and ICMP rules to the security group from anywhere for testing the access through VPN.
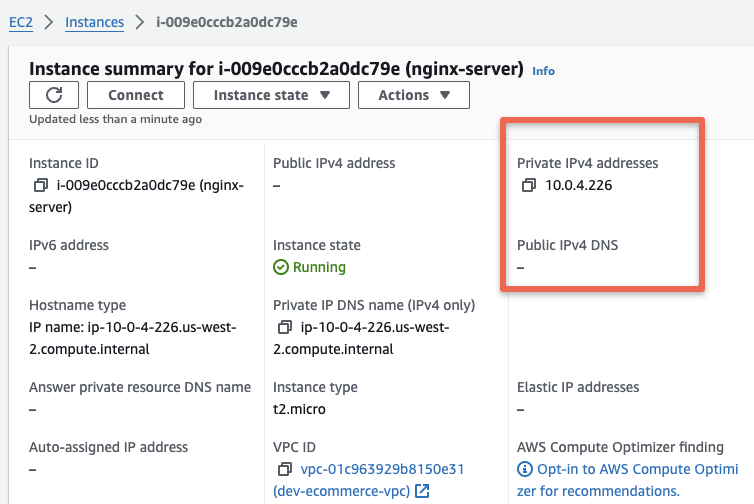
When I tested I am able to ping and SSH in to the VM from my workstation using the Private IP.
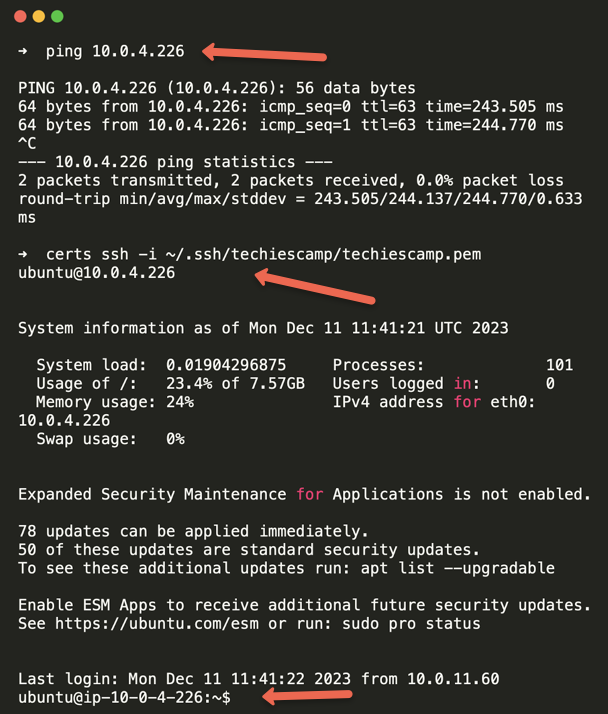
To validate HTTP access, I have installed Nginx app on the server and I am able to access it over private IP from my workstation.
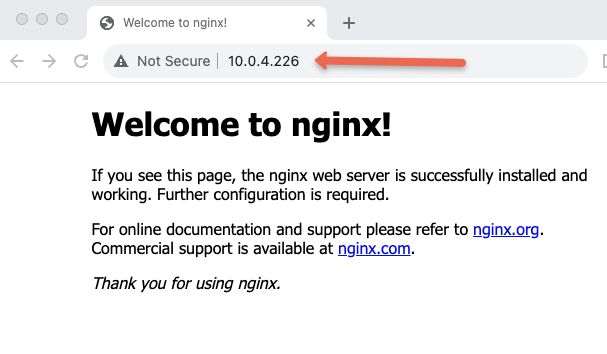
Now, we can communicate the remote server with its private IP address, as if we are connecting locally.
Note: We have authorized only one subnet for client access. If you want to deploy apps in different subnets and access them over VPN, you need to add those subnets to the authorization rule. Alternatively, you can provide a range that covers all the subnets you need access to.
AWS Client VPN Concepts
Now that we have looked at the setup practically, lets dive in to some of the key concepts behind AWS client VPN.
These concepts are very important for DevOps engineers in terms of knowledge as well as during DevOps interviews.
Mutual TLS authentication (mTLS)
We have used mutual SSL authentication for VPN.
What does it exactly mean?
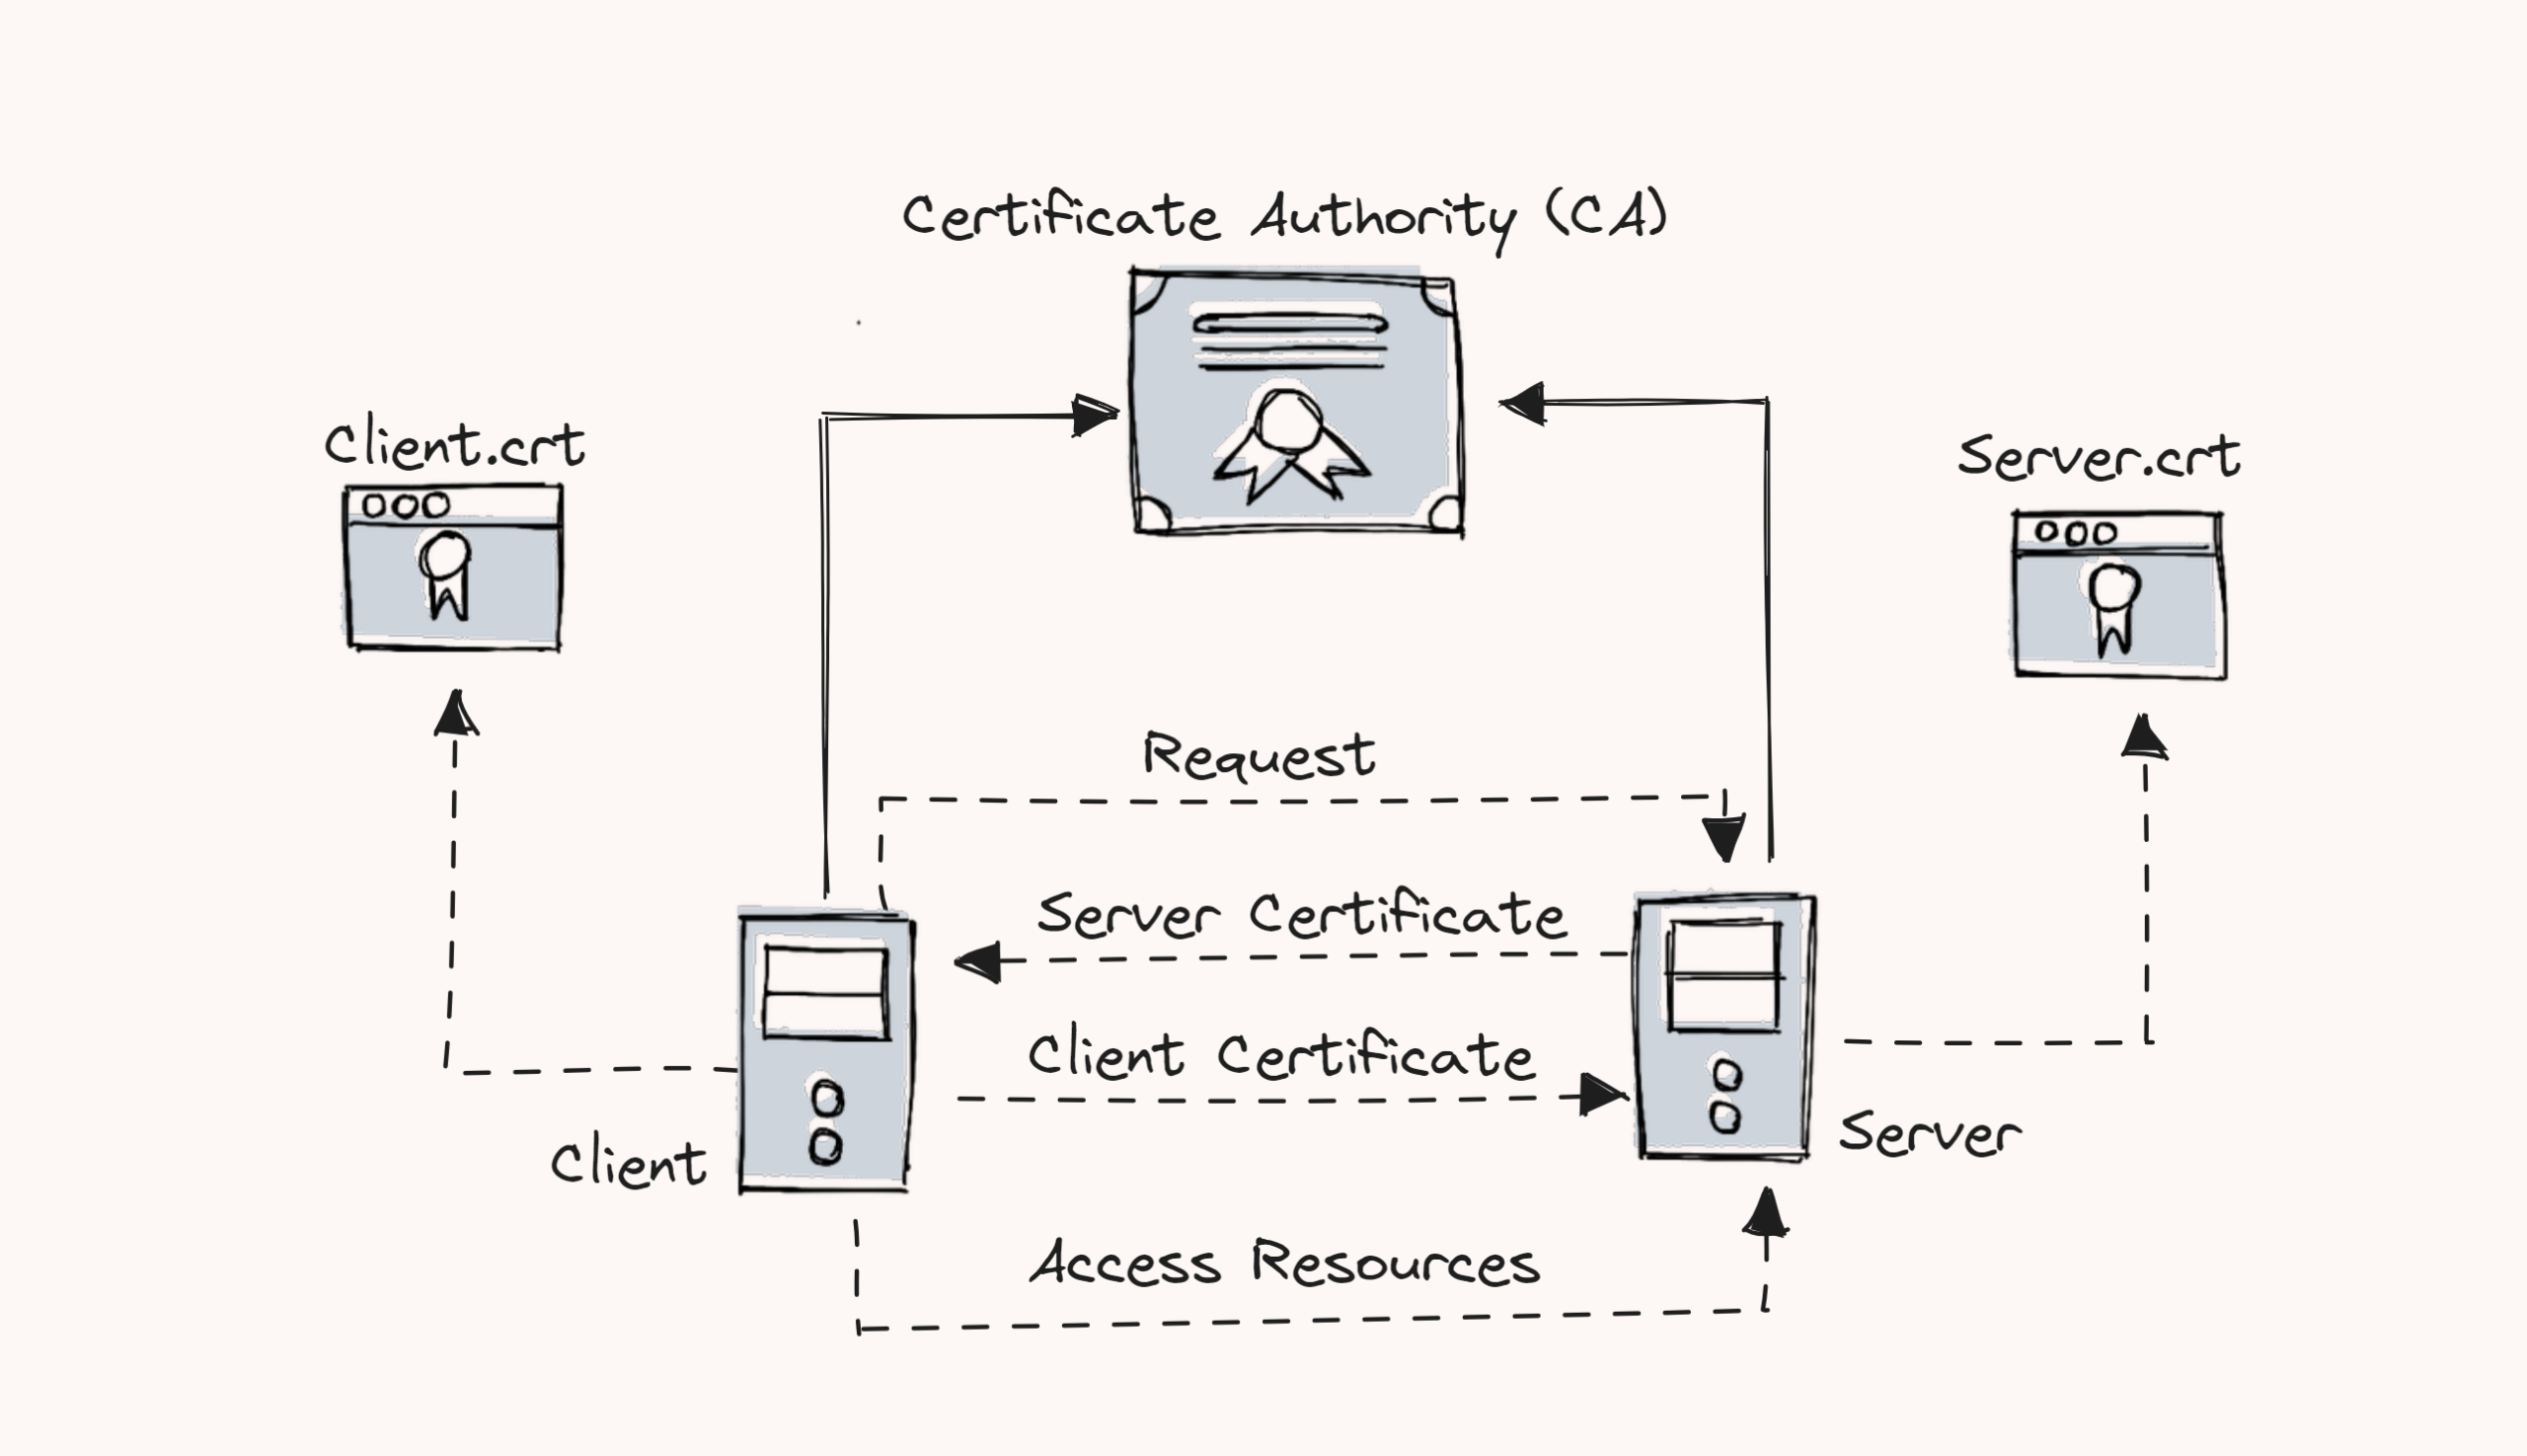
mTLS is a certificate-based two-way authentication. client and server will verify their identities with each other and it is more secure than traditional one-way authentication.
- The client requests the server to provide a server certificate.
- The server provides and the client verifies it with Certificate Authority (CA).
- The client then provides a client certificate to the server.
- The server verifies the certificate with the Certificate Authority (CA).
- The Server will accept the connection request once the verification is completed.
In our setup we have used the same CA to create client and server certificates.
Note: Client VPN Endpoint only supports 1024 and 2048-bit RSA keys. In this we are using 2048-bit RSA keys
User-based authentication
Two types of user-based authentication support client VPN endpoint.
- Active Directory Authentication: An active directory contains all user's information. To access the endpoint, users must provide the username and password, and the active directory will verify the user's credentials against its database. This is typically implemented in big organizations that has an active directory.
- Federated Authentication: Federated authentication means the users can access multiple resources or tools in a cloud environment with a single login credential.
Single sign-on SAML 2.0 supports user-based federated authentication. configuring user credentials with SAML 2.0 will provide identity providers (IdPs). Service Providers (SP) will have the information on the allocated resources that the user can access. When the user tries to access the resources, IdP will verify the user credentials and make an encrypted communication between IdP and SP.
Transport Protocol (TCP/UDP)
This is the second and fourth layer of the OSI and TCP/IP models. This layer is used to transfer data between sender and receiver with the help of TCP and UDP protocols. Client VPN Endpoint supports both protocols for transmitting data over networks.
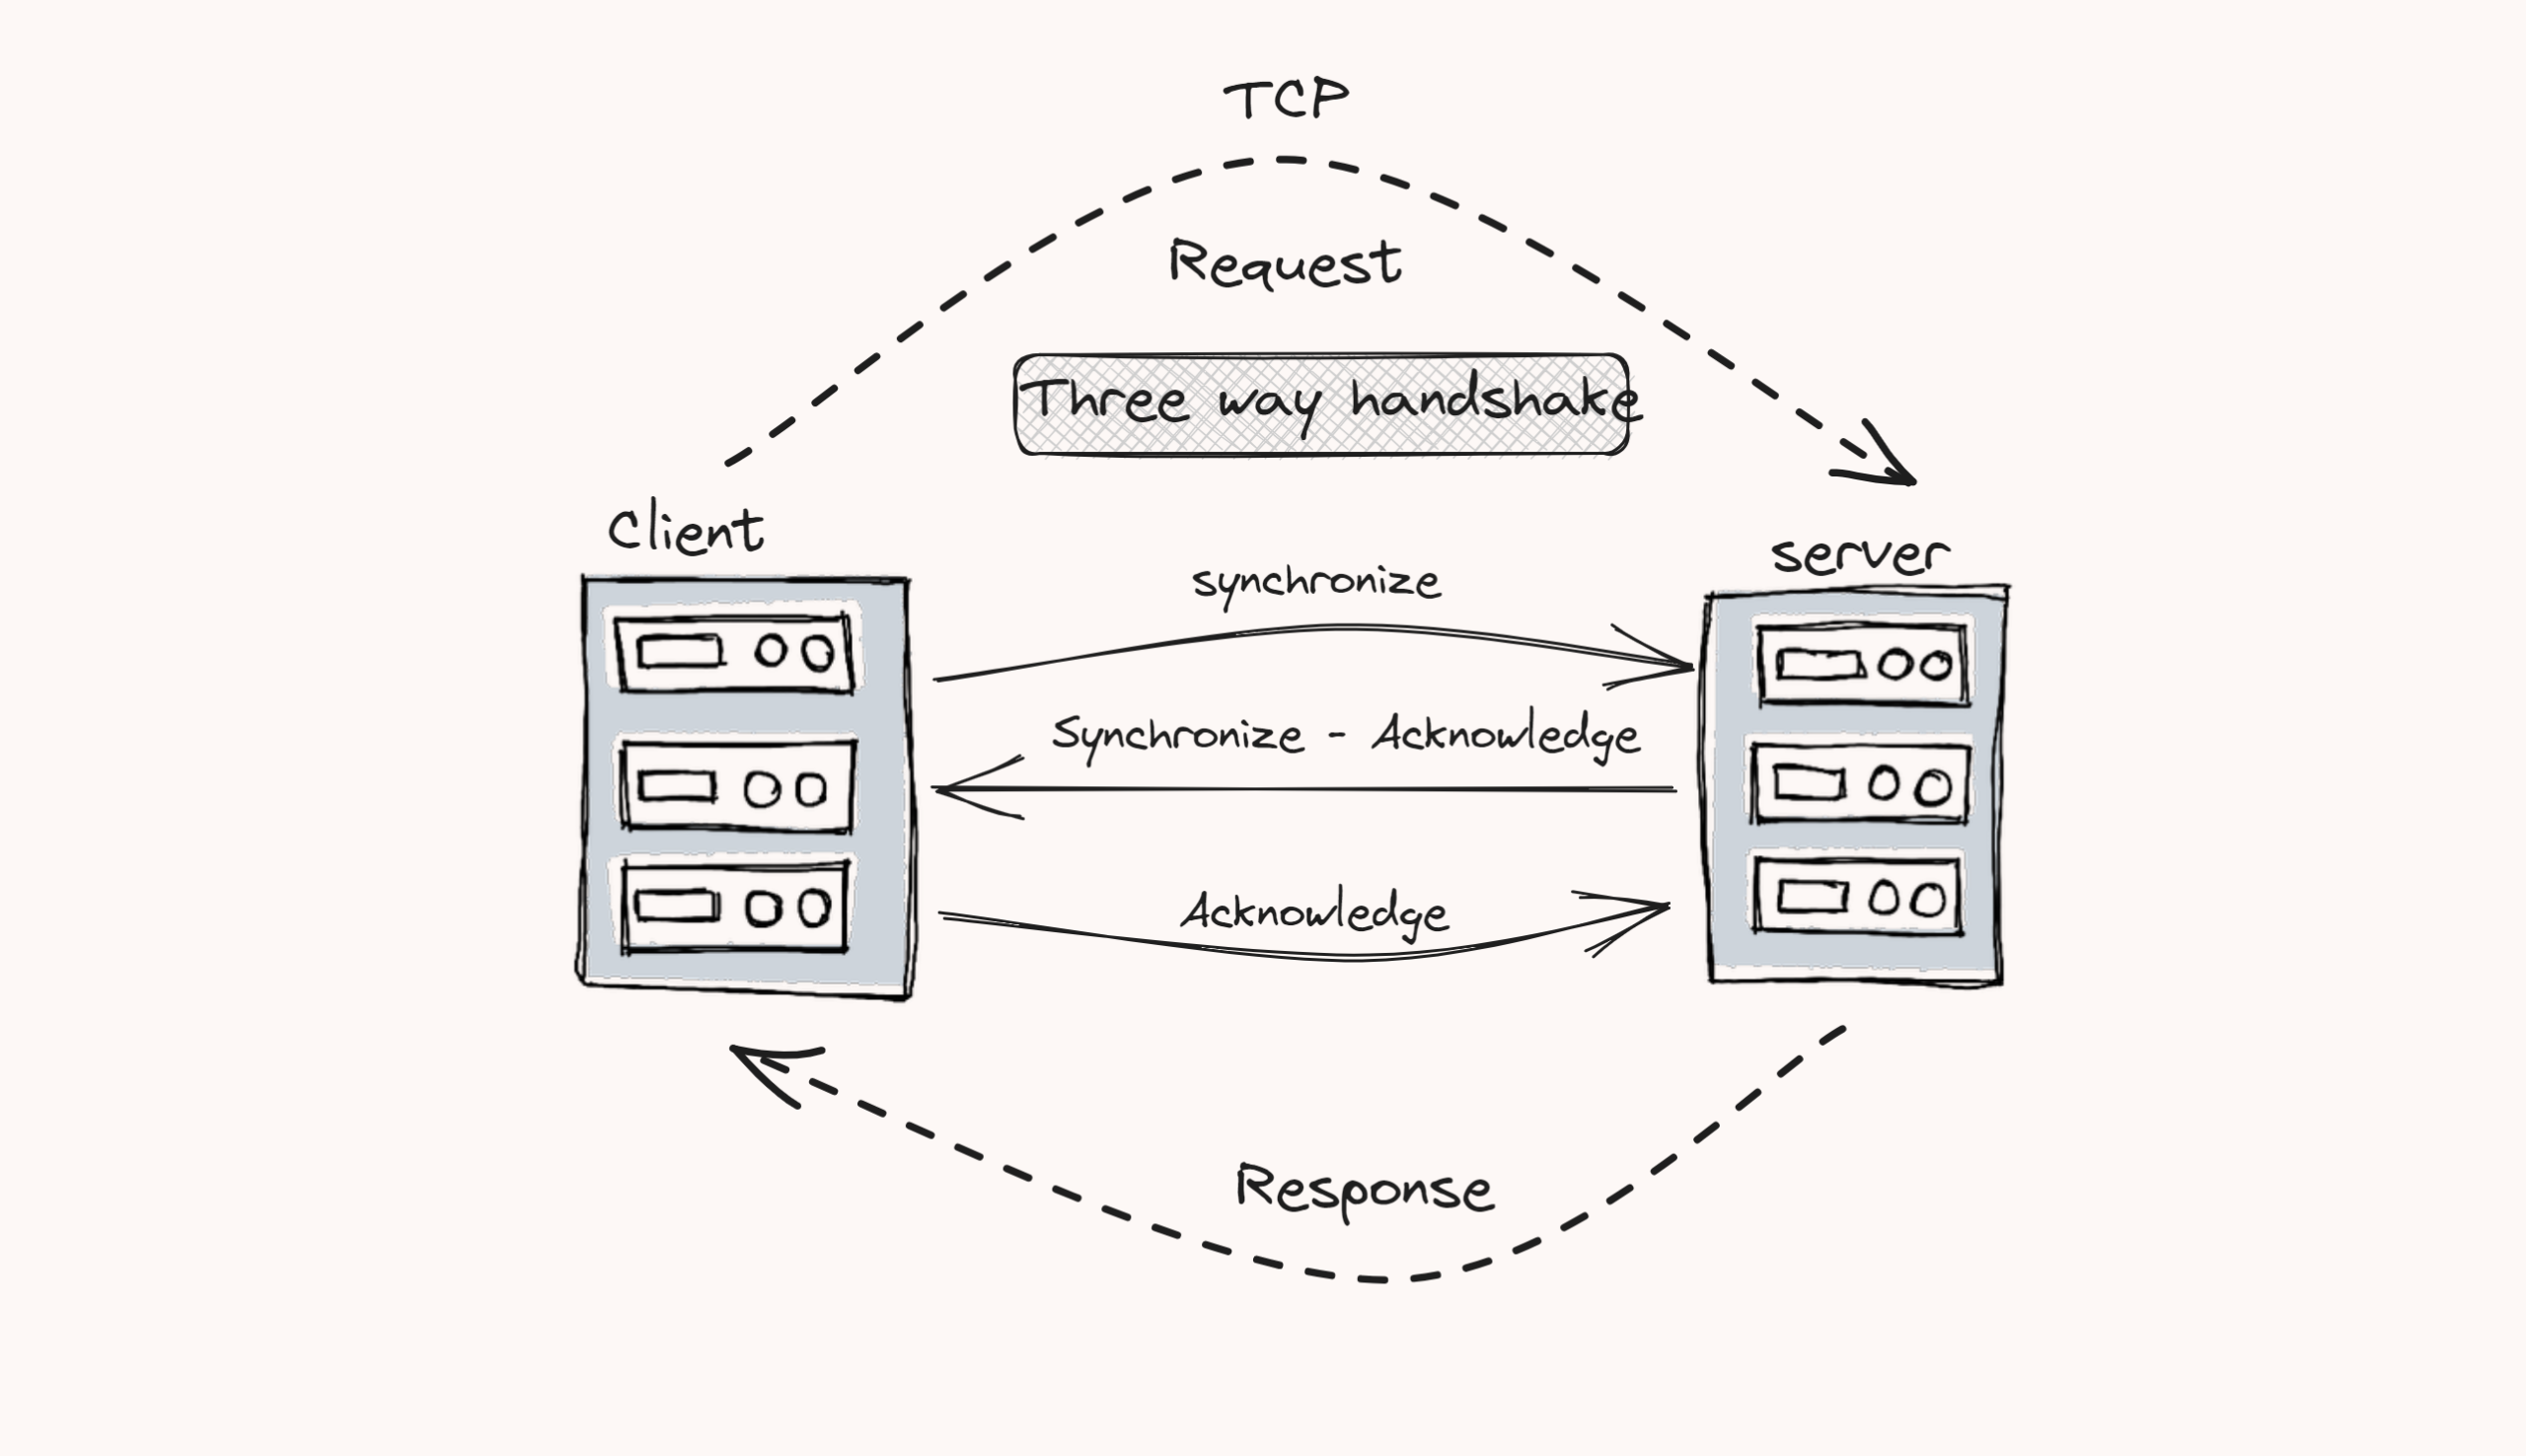
TCP Protocol: TCP is a connection-oriented protocol. It tracks the segments while transmitting the data. It will ensure the connection between the client and server before transmission starts. Therefore, the reliability is much better than UDP.
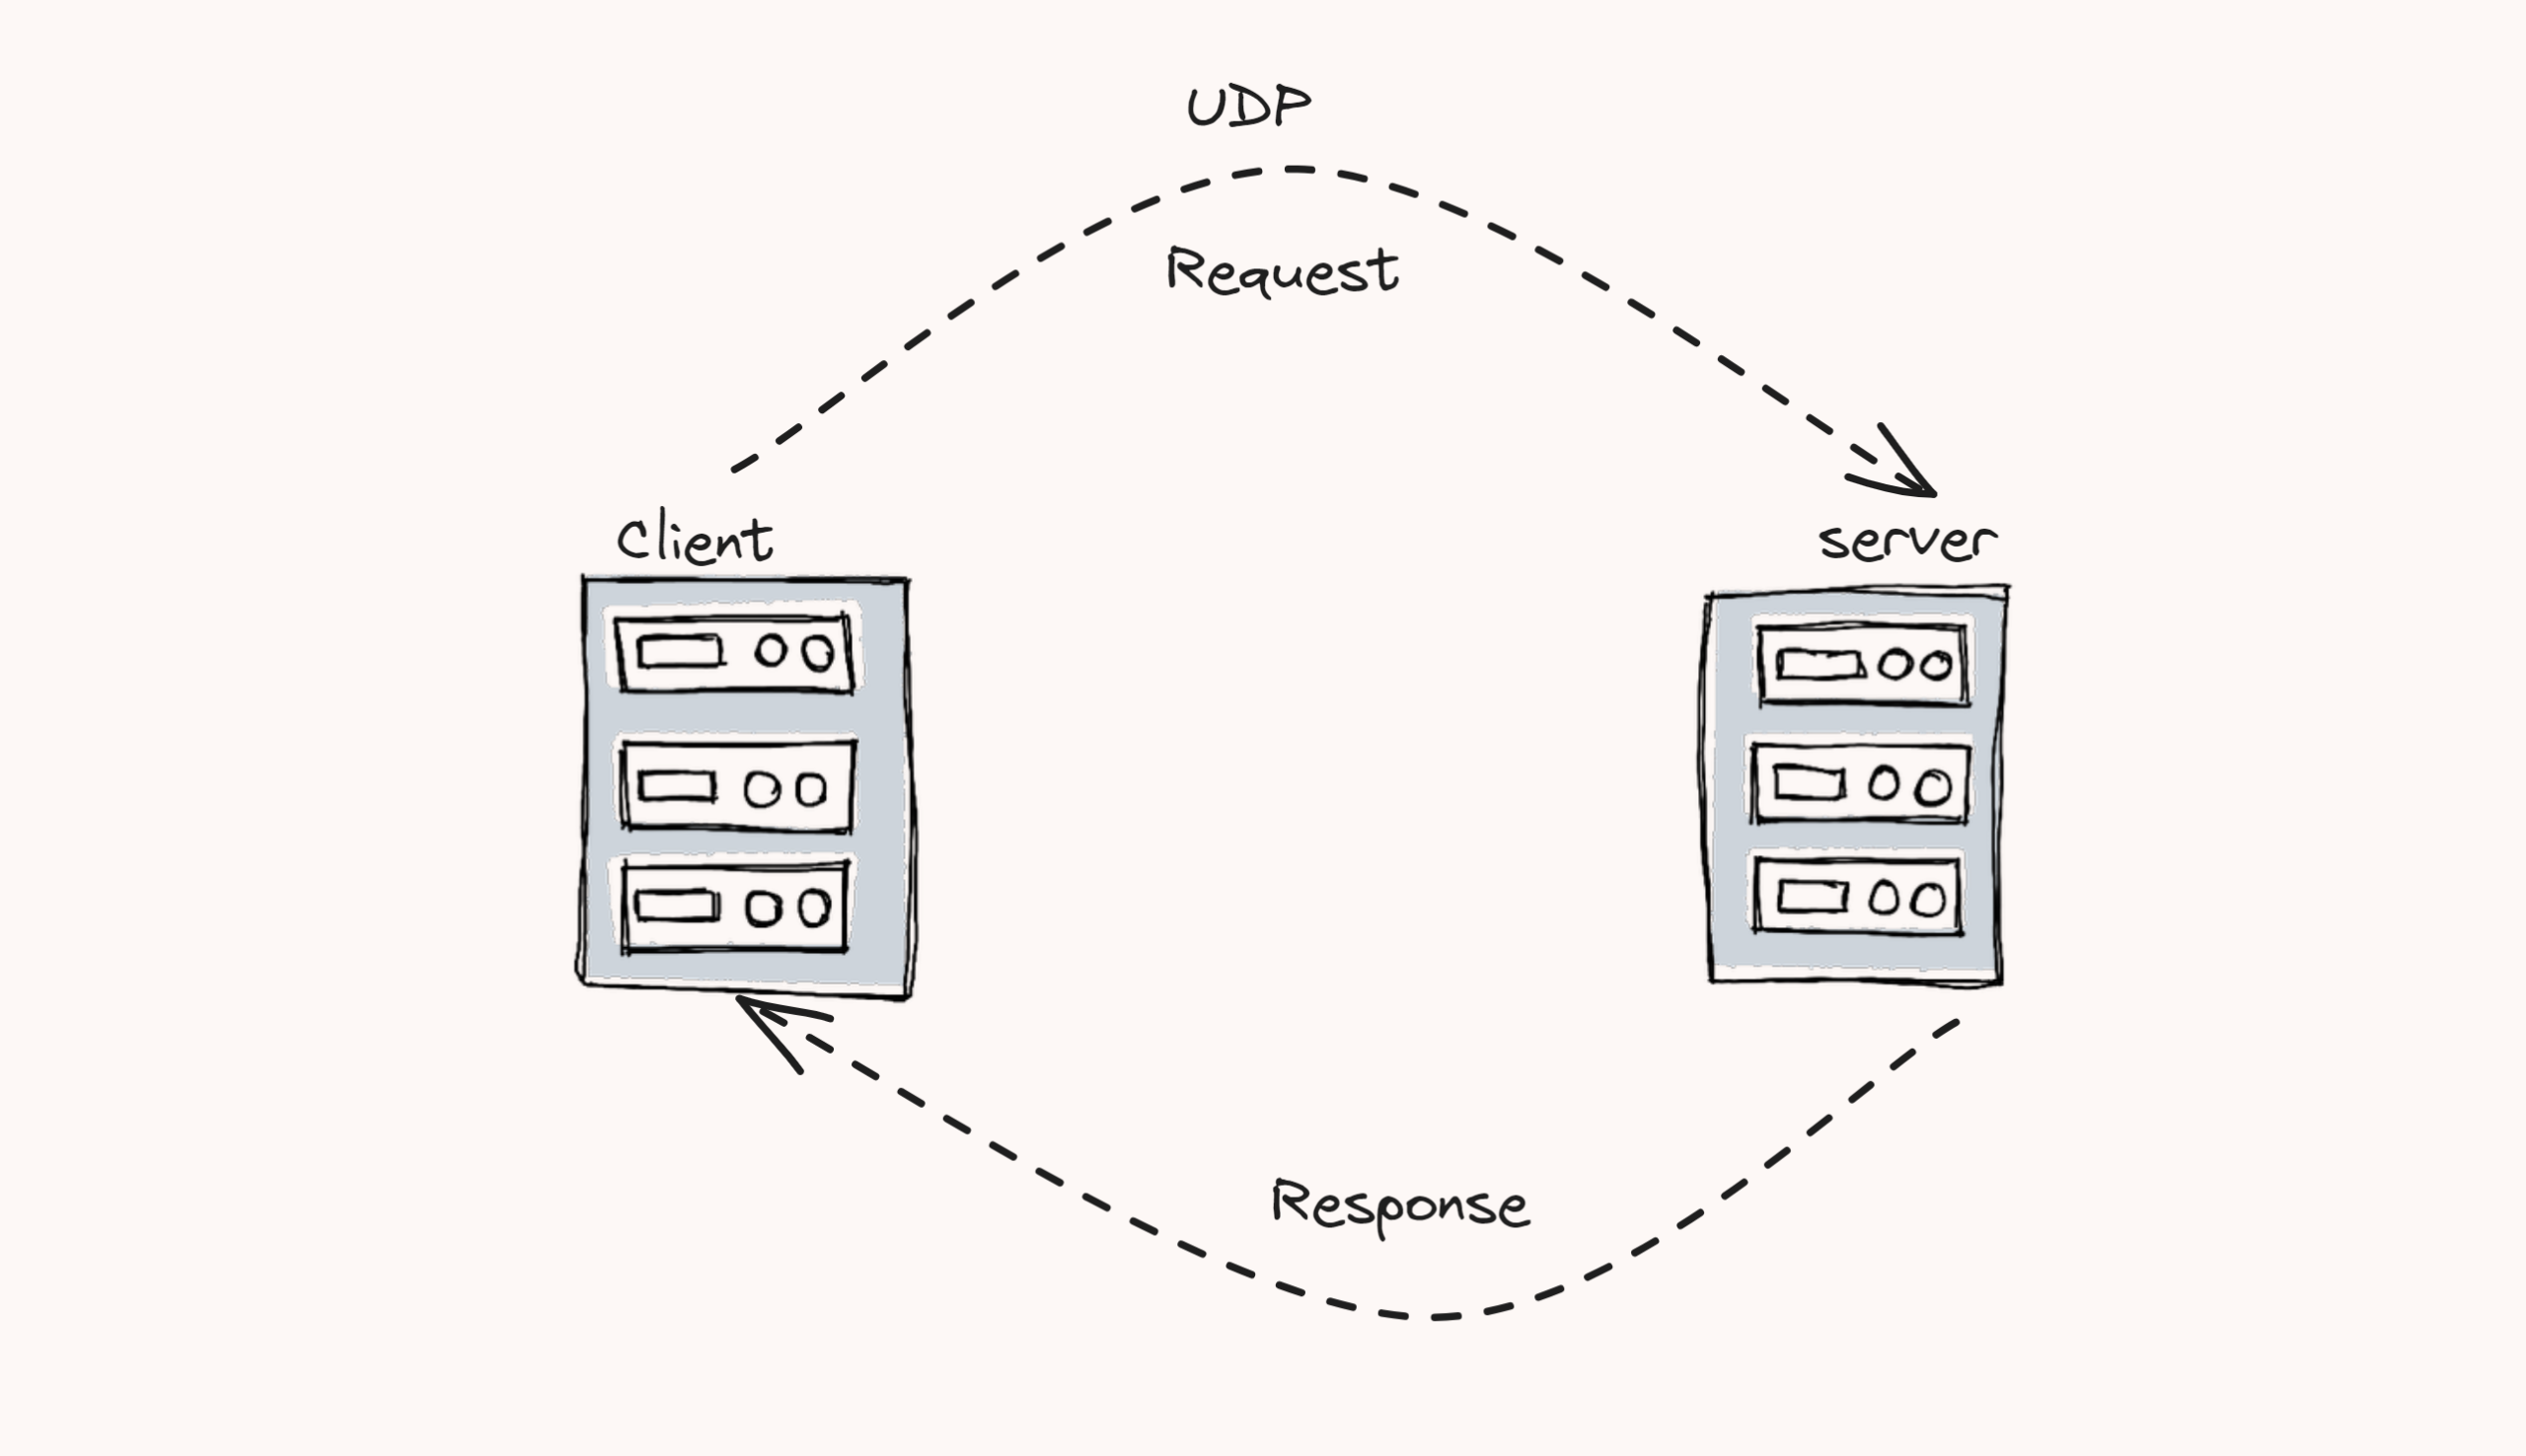
UDP Protocol: UDP is a connectionless protocol and the latency is very low. This will provide much faster data transferring capabilities between client and server. UDP doesn't have any system to track the data segments. Therefore, the reliability is very low compared to TCP.
VPN Tunnelling types
By default, full tunneling is enabled. We can also enable a split tunnel for our VPN endpoint.
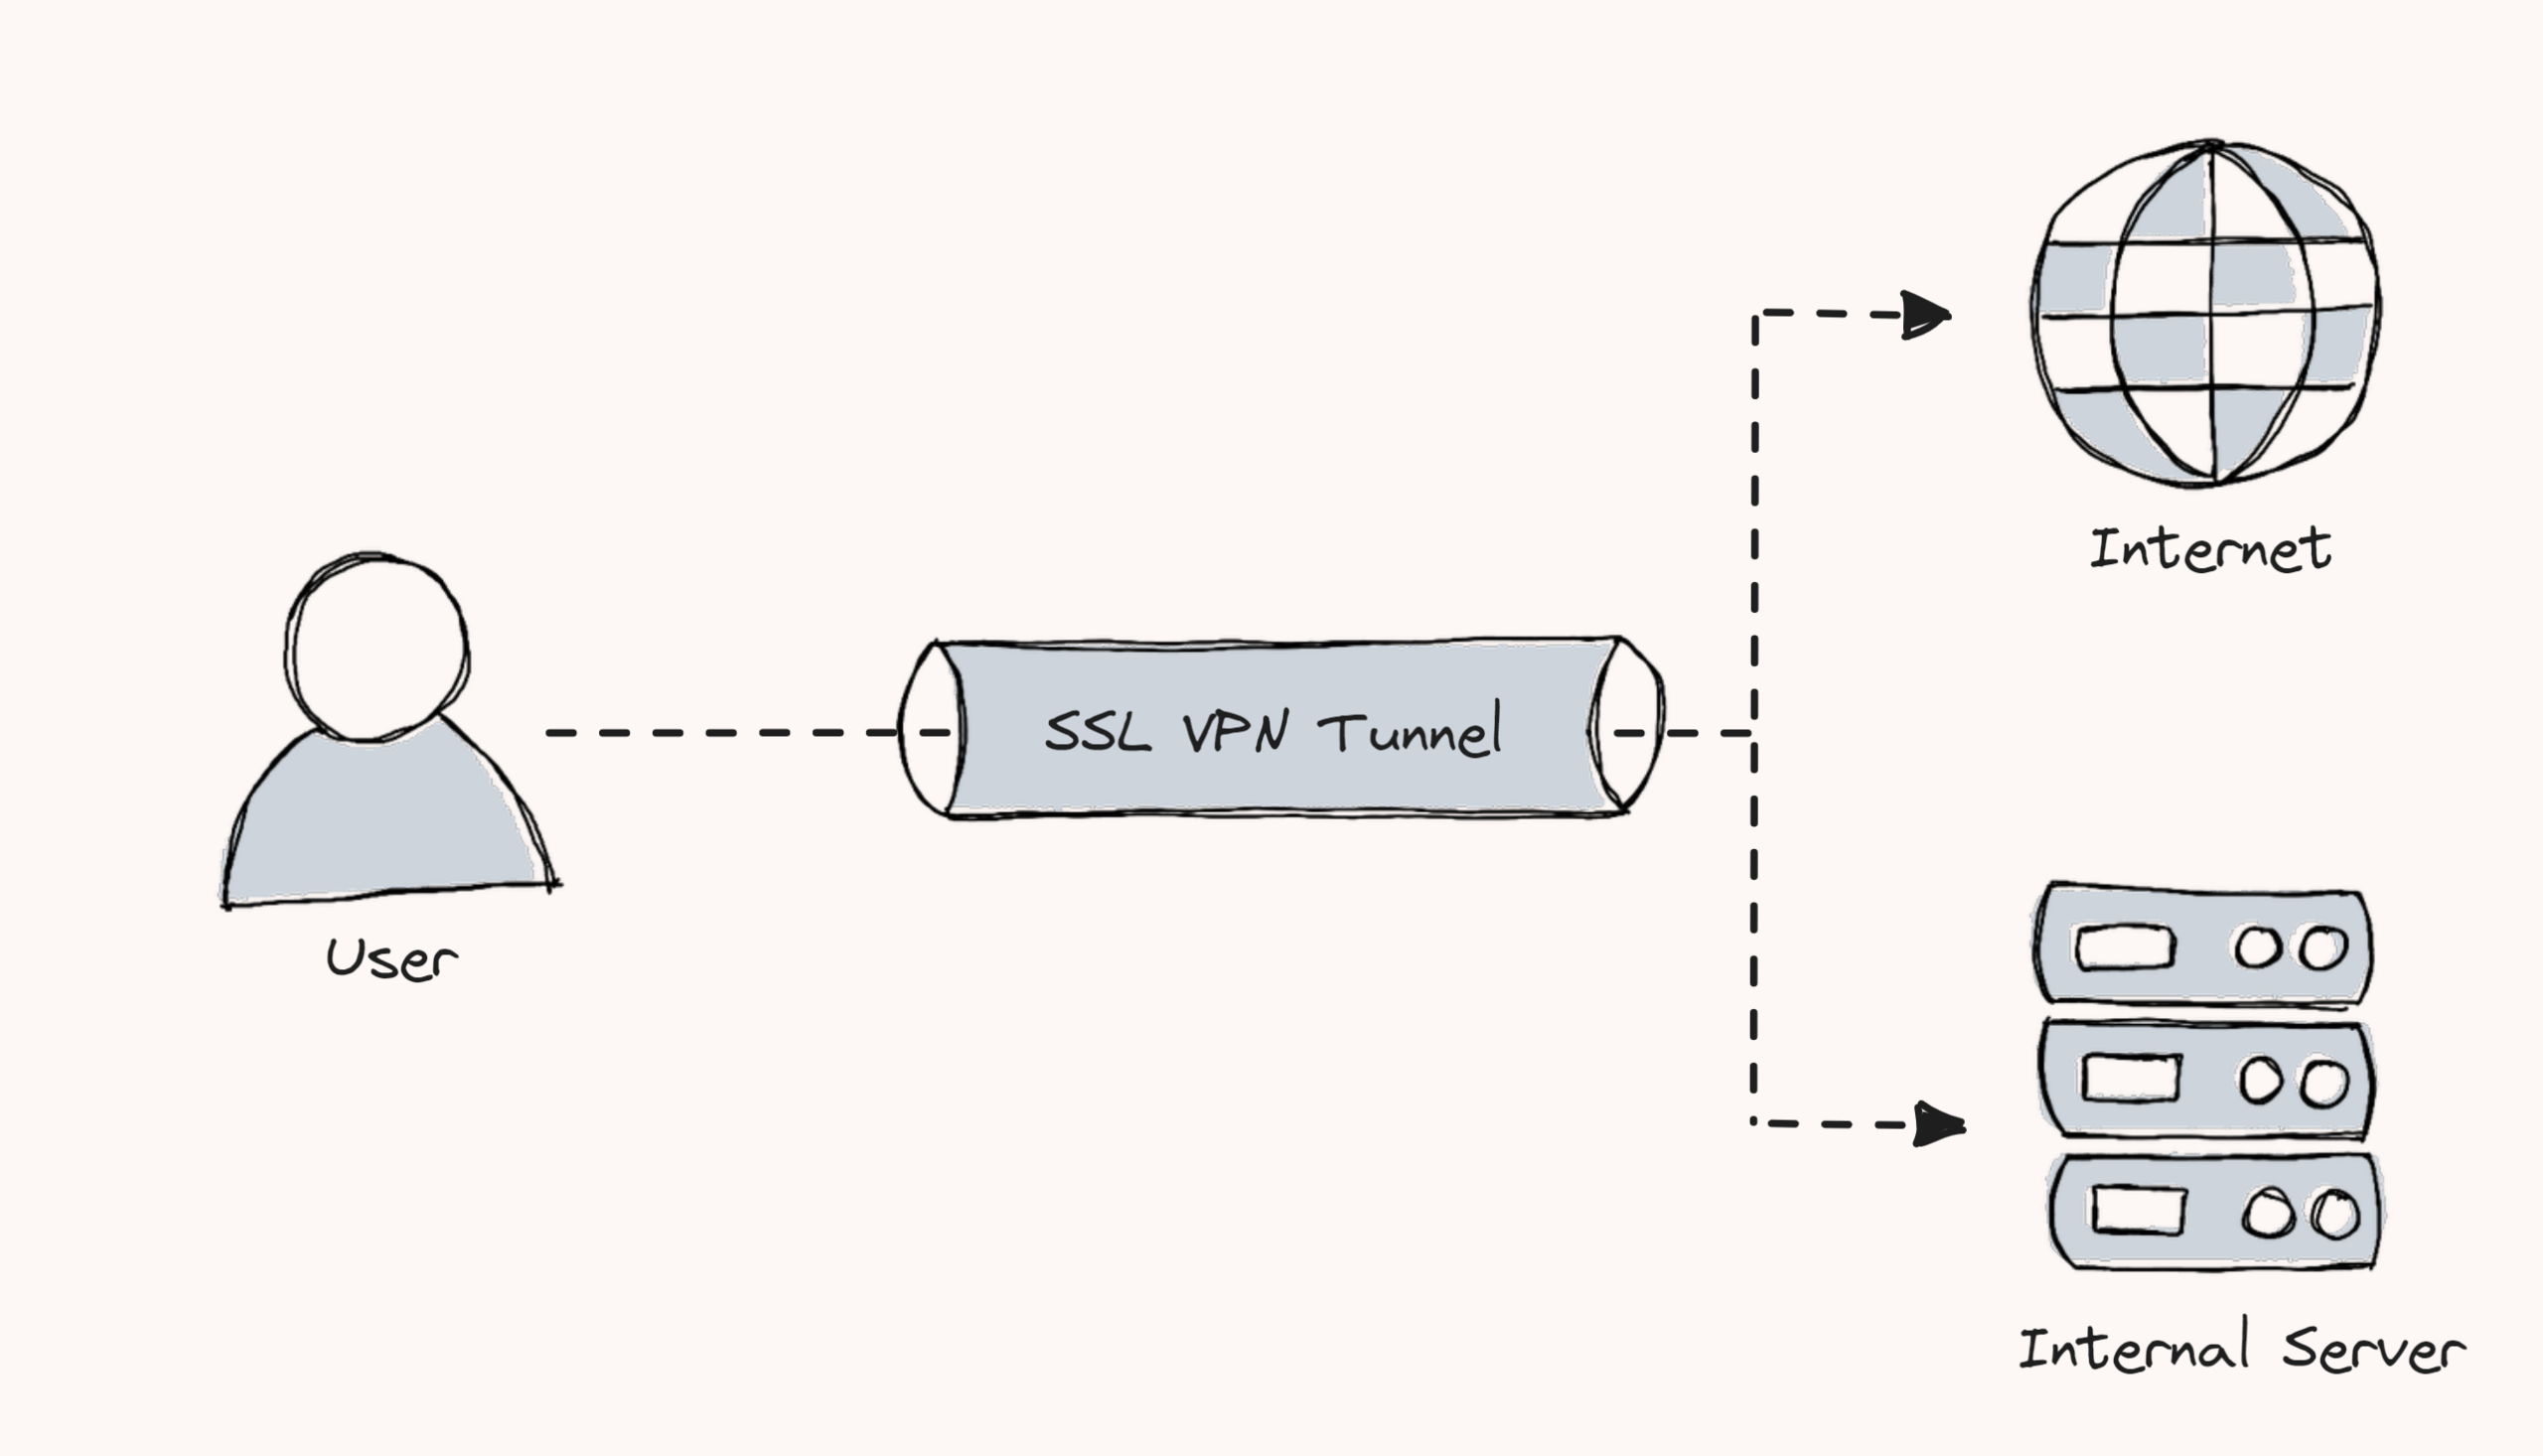
Full tunnel: All your traffic goes through the VPN tunnel when you connect and use a VPN. This is more secure than the split tunnel. Even though, this could make your connection slow. Because all your traffic has to be encrypted.
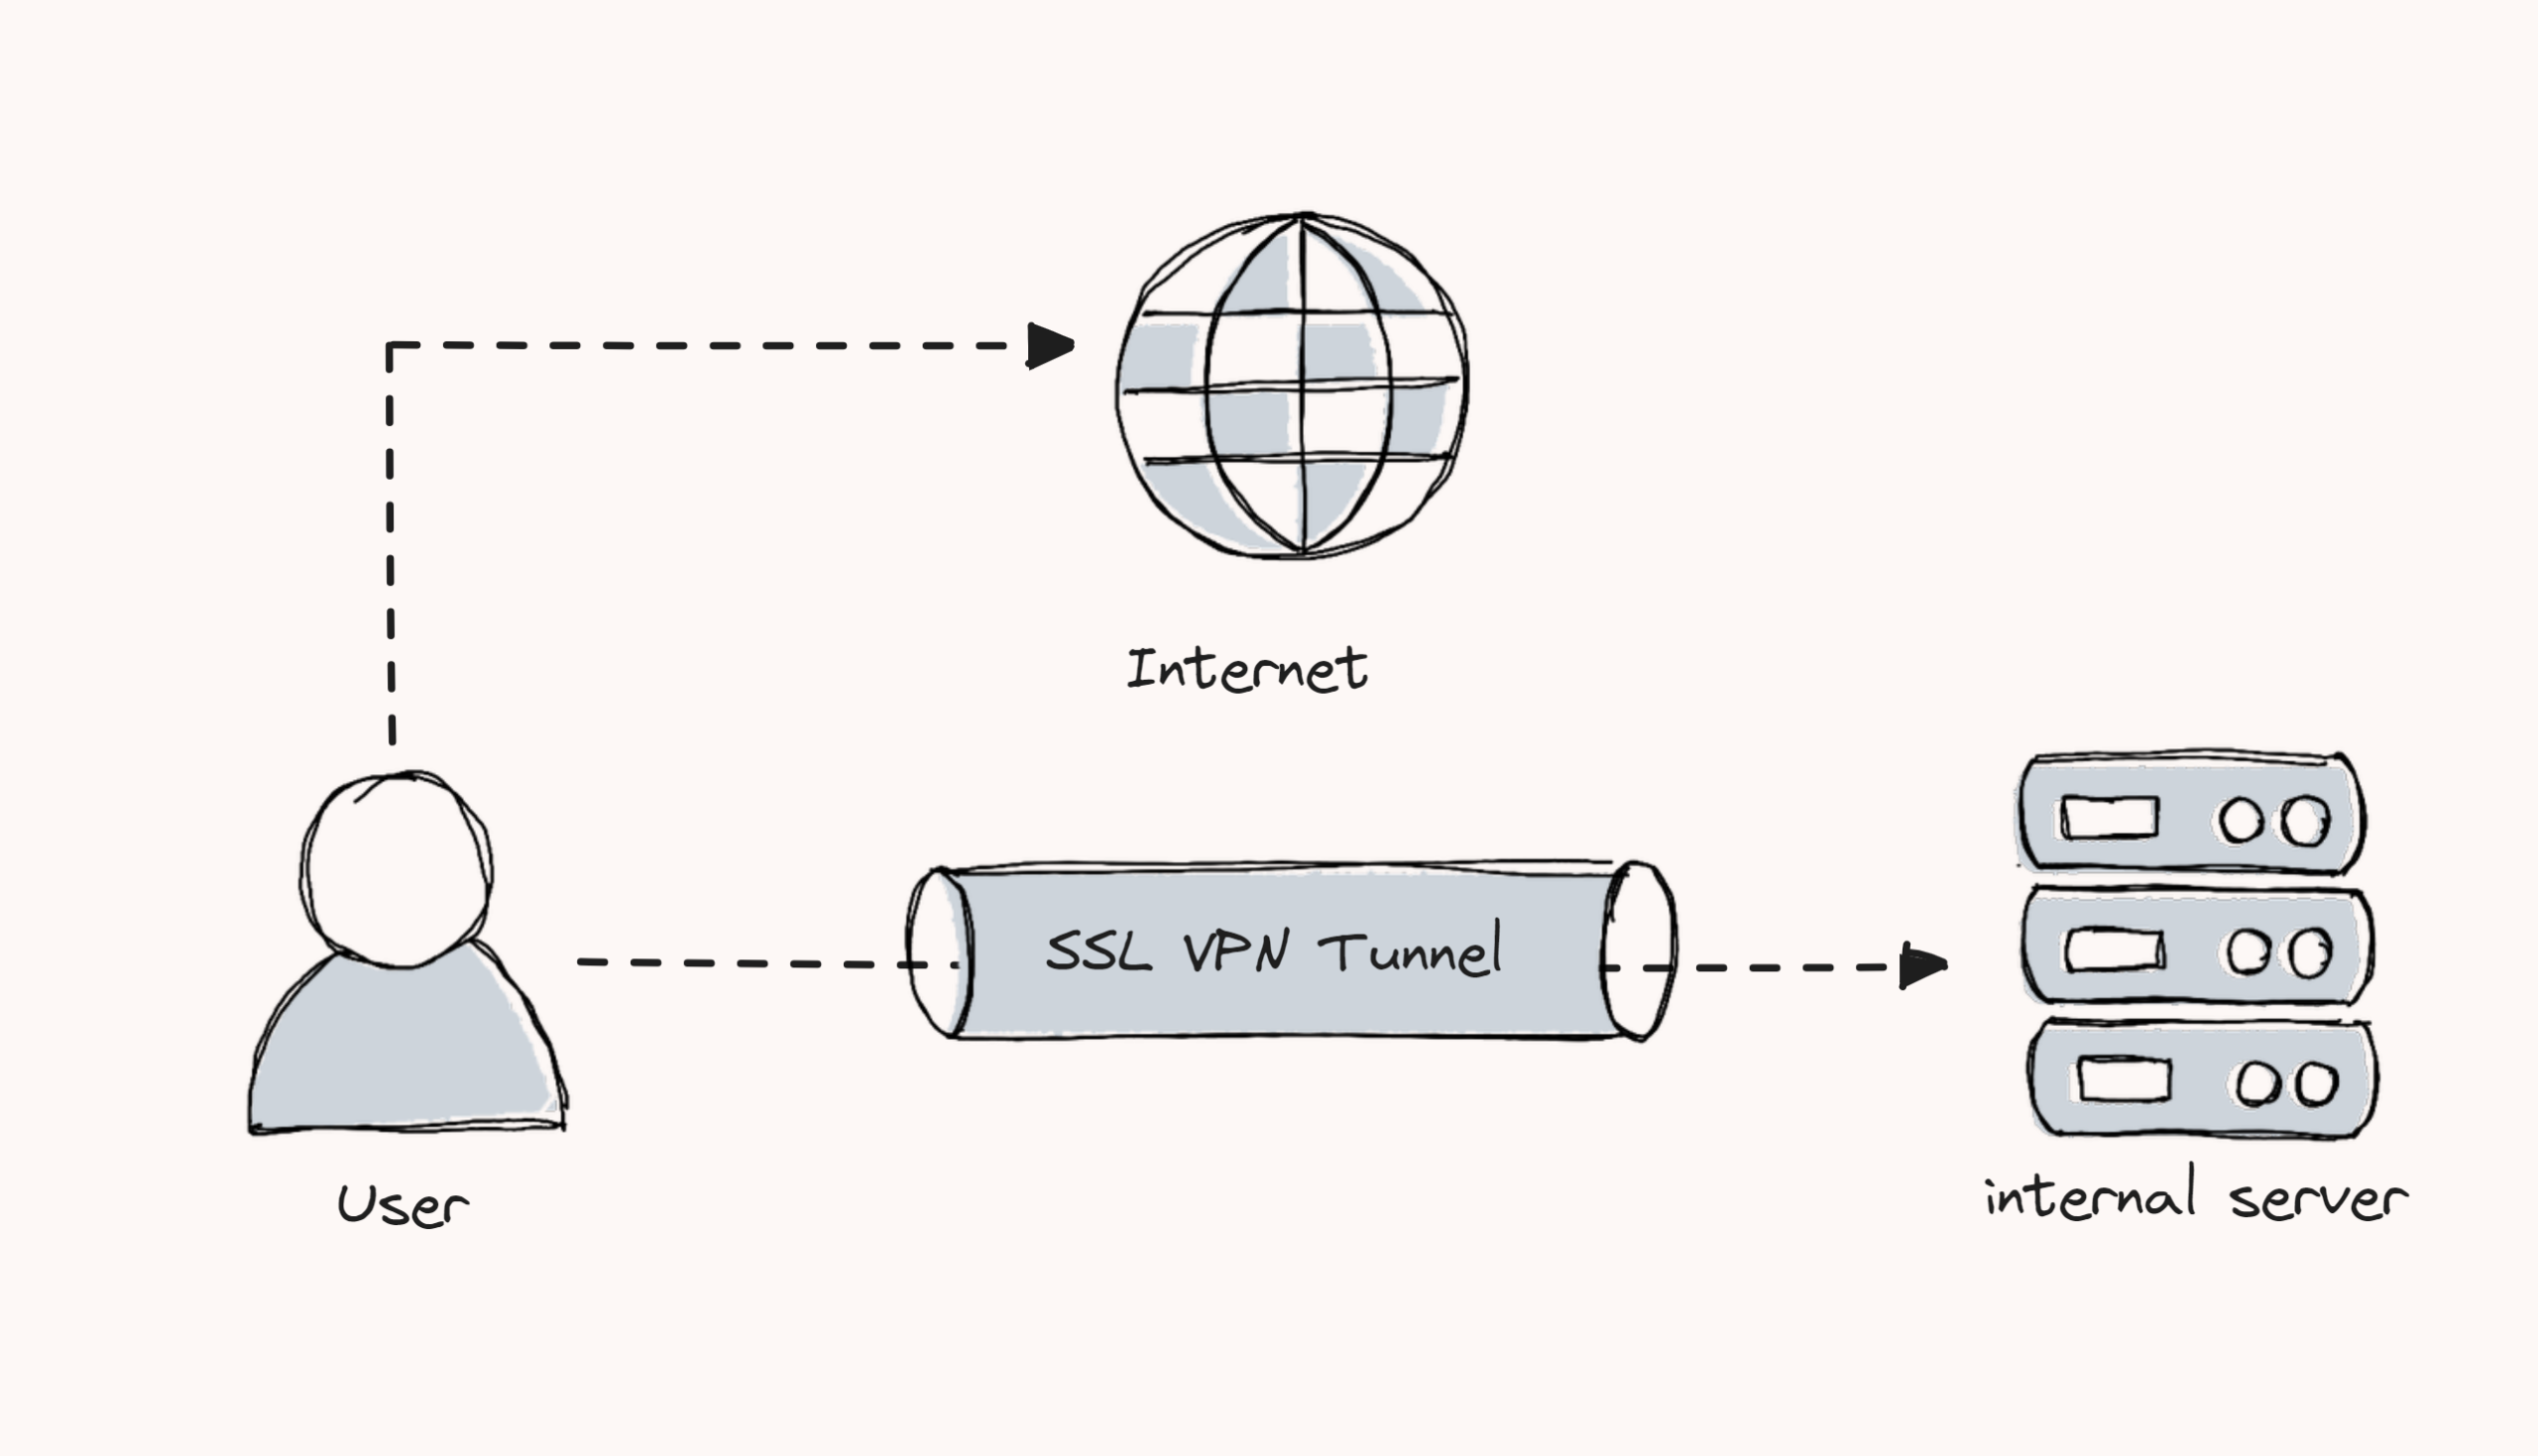
Split tunnel: In this method, only configured communication will go through the secure VPN tunnel, and the remaining communication will occur directly over the internet. This will give more flexibility and speed when compared to the full tunnel.
Use Cases
Following are the key use cases for AWS Client VPN
- Remote users can securely access the organization's resources, such as application servers and database servers.
- Client VPN endpoint is a good option to avoid the cost and maintenance of the WAN network.
- It helps to maintain a secure connection to cloud resources, such as Amazon Web Services (AWS), Microsoft Azure, and Google Cloud.
- Provide authorized users only access the specific networks, such as development networks and testing networks.
Conclusion
Allocated service quotas for Client VPN Endpoint mostly depend on region. By default, authorization rules for a Client VPN Endpoint are 50 and the endpoints per region are 5. Even though, these services are adjustable as per your requirements.
Client connections depend on the number of subnets associated with the endpoint. For one subnet, the maximum connection is 7,000. To know more about the quotas, please refer to the official documentation.
Hour-based cost will be calculated to the Client VPN Endpoint. It depends on the number of active connections and the number of subnets associated with the endpoint.
The cost of the Client VPN Endpoint is based on the active number of connections per hour to your endpoint and the number of subnets associated with the endpoint.
For subnet association, per hour cost will be $0.10, and for active connections per hour cost will be $0.05.
