

In this guide, we have given step-by-step guides on how to create self-signed certificates using the OpenSSL utility. You can create self-signed certificates using commands or automate them using a shell script by following this guide.
Openssl is a handy utility to create self-signed certificates. You can use OpenSSL on all the operating systems such as Windows, MAC, and Linux flavors.
What is a Self Signed Certificate?
A self-signed certificate is an SSL/TSL certificate not signed by a public or private certificate authority. Instead, it is signed by the creator's own personal or root CA certificate.
Here is what we do to request paid SSL/TLS certificate from a well-known Certificate Authority like Verisign or comodo.
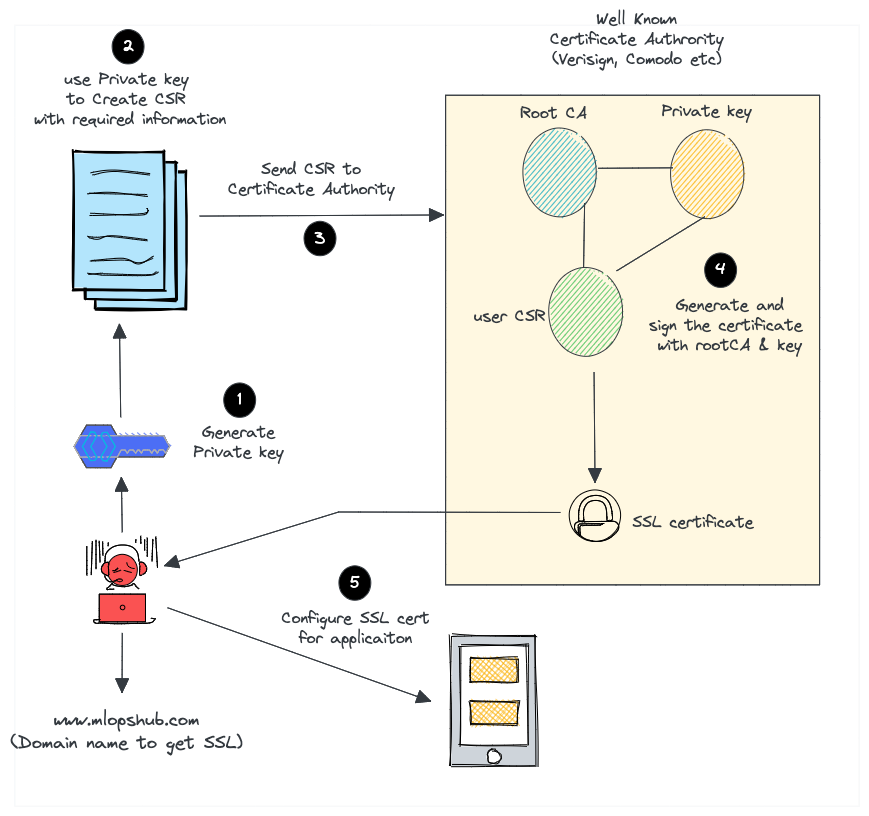
- Create a certificate signing request (CSR) with a private key. A CSR contains details about location, organization, and FQDN (Fully Qualified Domain Name).
- Send the CSR to the trusted CA authority.
- The CA authority will send you the SSL certificate signed by their root certificate authority and private key.
- You can then validate and use the SSL certificate with your applications.
But for a self-signed certificate, here is what we do.
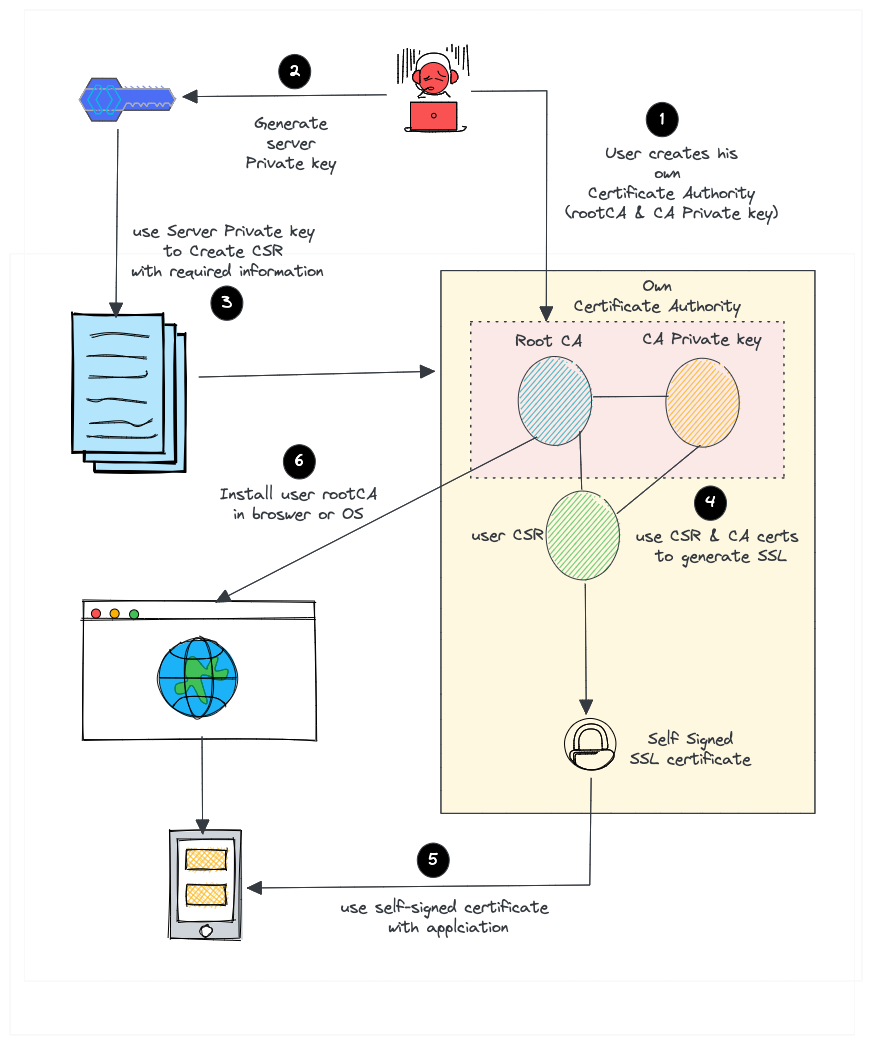
- Create our own root CA certificate & CA private key (We act as a CA on our own)
- Create a server private key to generate CSR
- Create an SSL certificate with CSR using our root CA and CA private key.
- Install the CA certificate in the browser or Operating system to avoid security warnings.
Need For Our Own Certificate Authority
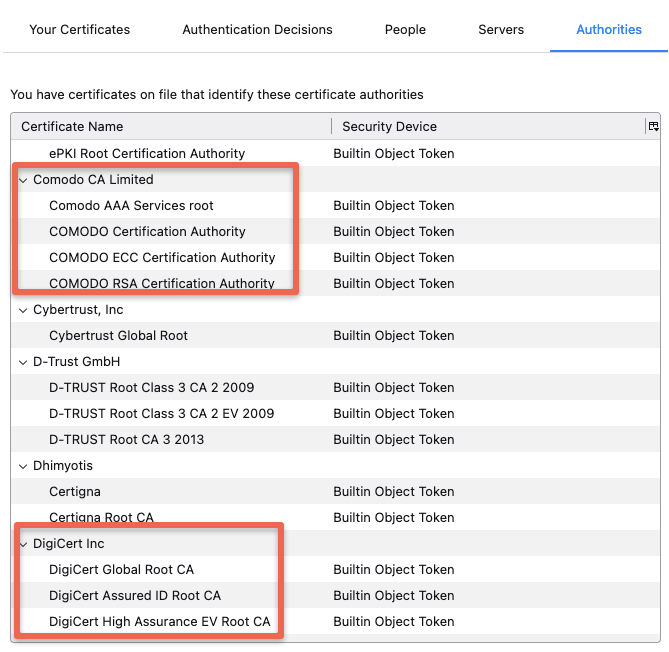
Most browsers & operating systems hold a copy of root CA certificates of all the trusted certified Certificated Authorities. That's the reason the browsers won't show any security messages when you visit standard websites that use SSL from a trusted and well-known commercial Certificate authority.
The following image shows the root CA present in the Firefox browser by default.
At the same time, if you use a self-signed certificate, your browser will throw a security warning. The reason is browsers only trust SSL from a trusted Certificate authority. For example,
Your connection is not private
Attackers might be trying to steal your information from demo.apps.mlopshub.com (for example, passwords, messages or credit cards)
But you can force browsers & operating systems to accept our own certificate authority. So you won't see the security warning once you install the CA certificate and add it to the trusted list. You can also share the CA certificate with your development team to install in their browsers as well.
Also, you can use this CA to create more than one SSL certificate.
Create Certificate Authority
As discussed earlier, we need to create our own root CA certificate for browsers to trust the self-signed certificate. So let's create the root CA certificate first.
Let's create a directory named openssl to save all the generated keys & certificates.
mkdir openssl && cd opensslExecute the following openssl command to create the rootCA.keyand rootCA.crt. Replace demo.mlopshub.com with your domain name or IP address.
openssl req -x509 \
            -sha256 -days 356 \
            -nodes \
            -newkey rsa:2048 \
            -subj "/CN=demo.mlopshub.com/C=US/L=San Fransisco" \
            -keyout rootCA.key -out rootCA.crt
We will use the rootCA.keyand rootCA.crt to sign the SSL certificate.
Note: If you get the following error, comment RANDFILE = $ENV::HOME/.rnd line in /etc/ssl/openssl.cnf
Can't load /home/vagrant/.rnd into RNGCreate Self-Signed Certificates using OpenSSL
Follow the steps given below to create the self-signed certificates. We will sign out certificates using our own root CA created in the previous step.
1. Create the Server Private Key
openssl genrsa -out server.key 20482. Create Certificate Signing Request Configuration
We will create a csr.conf file to have all the information to generate the CSR. Replace demo.mlopshub.com with your domain name or IP address.
cat > csr.conf <<EOF
[ req ]
default_bits = 2048
prompt = no
default_md = sha256
req_extensions = req_ext
distinguished_name = dn

[ dn ]
C = US
ST = California
L = San Fransisco
O = MLopsHub
OU = MlopsHub Dev
CN = demo.mlopshub.com

[ req_ext ]
subjectAltName = @alt_names

[ alt_names ]
DNS.1 = demo.mlopshub.com
DNS.2 = www.demo.mlopshub.com
IP.1 = 192.168.1.5
IP.2 = 192.168.1.6

EOFFor example, if you are using DNS use:
DNS.1 = demo.mlopshub.com
DNS.2 = www.demo.mlopshub.com
If you are using IP, use:
IP.1 = 192.168.1.5
IP.2 = 192.168.1.6
3. Generate Certificate Signing Request (CSR) Using Server Private Key
Now we will generate server.csr using the following command.
openssl req -new -key server.key -out server.csr -config csr.confNow our folder should have three files. csr.conf, server.csr and server.key
4. Create a external file
Execute the following to create cert.conf for the SSL certificate. Replace demo.mlopshub.com with your domain name or IP address.
cat > cert.conf <<EOF

authorityKeyIdentifier=keyid,issuer
basicConstraints=CA:FALSE
keyUsage = digitalSignature, nonRepudiation, keyEncipherment, dataEncipherment
subjectAltName = @alt_names

[alt_names]
DNS.1 = demo.mlopshub.com

EOFIP.1 = 192.168.1.5
Instead of:
DNS.1 = demo.mlopshub.com
5. Generate SSL certificate With self signed CA
Now, execute the following command to generate the SSL certificate that is signed by the rootCA.crt and rootCA.key created as part of our own Certificate Authority.
openssl x509 -req \
    -in server.csr \
    -CA rootCA.crt -CAkey rootCA.key \
    -CAcreateserial -out server.crt \
    -days 365 \
    -sha256 -extfile cert.conf
The above command will generate server.crt that will be used with our server.key to enable SSL in applications.
For example, the following config shows the Nginx config using the server certificate and private key used for SSL configuration.
server {

listen   443;

ssl    on;
ssl_certificate    /etc/ssl/server.crt;
ssl_certificate_key    /etc/ssl/server.key;

server_name your.domain.com;
access_log /var/log/nginx/nginx.vhost.access.log;
error_log /var/log/nginx/nginx.vhost.error.log;
location / {
root   /home/www/public_html/your.domain.com/public/;
index  index.html;
}

}
Install Certificate Authority In Your Browser/OS
You need to install the rootCA.crt in your browser or operating system to avoid the security message that shows up in the browser when using self-signed certificates.
Installing self-signed CA certificates differs in Operating systems. For example, in MAC, you can add the certificate by double-clicking it and adding it to the keychain. Check the respective Operating system guide on installing the certificate.
Shell Script To Create Self-Signed Certificate
If you want to create self-signed certificates quite often, you can make use of the following shell script. You just need to execute the script with the domain name or IP that you want to add to the certificate.
Save the following shell script as ssl.sh
#! /bin/bash

if [ "$#" -ne 1 ]; then
  echo "Error: No domain or IP address provided"
  echo "Usage: $0 <domain_or_ip>"
  exit 1
fi

DOMAIN=$1

# Create root CA & Private key

openssl req -x509 \
            -sha256 -days 356 \
            -nodes \
            -newkey rsa:2048 \
            -subj "/CN=${DOMAIN}/C=US/L=San Fransisco" \
            -keyout rootCA.key -out rootCA.crt

# Generate Private key

openssl genrsa -out ${DOMAIN}.key 2048

# Detect if input is IP
if [[ $DOMAIN =~ ^[0-9]+\.[0-9]+\.[0-9]+\.[0-9]+$ ]]; then
  ALT_NAMES="[ alt_names ]
IP.1 = ${DOMAIN}
IP.2 = 192.168.1.5
IP.3 = 192.168.1.6"
else
  ALT_NAMES="[ alt_names ]
DNS.1 = ${DOMAIN}
DNS.2 = www.${DOMAIN}"
fi

# Create csf conf

cat > csr.conf <<EOF
[ req ]
default_bits = 2048
prompt = no
default_md = sha256
req_extensions = req_ext
distinguished_name = dn

[ dn ]
C = US
ST = California
L = San Fransisco
O = MLopsHub
OU = MlopsHub Dev
CN = ${DOMAIN}

[ req_ext ]
subjectAltName = @alt_names

$ALT_NAMES
EOF

# create CSR request using private key

openssl req -new -key ${DOMAIN}.key -out ${DOMAIN}.csr -config csr.conf

# Create a external config file for the certificate

cat > cert.conf <<EOF

authorityKeyIdentifier=keyid,issuer
basicConstraints=CA:FALSE
keyUsage = digitalSignature, nonRepudiation, keyEncipherment, dataEncipherment
subjectAltName = @alt_names

$ALT_NAMES

EOF

# Create SSl with self signed CA

openssl x509 -req \
    -in ${DOMAIN}.csr \
    -CA rootCA.crt -CAkey rootCA.key \
    -CAcreateserial -out ${DOMAIN}.crt \
    -days 365 \
    -sha256 -extfile cert.conf
Set the script executable permission by executing the following command.
chmod +x ssl.shExecute the script with the domain name or IP. For example,
./ssl.sh demo.mlopshub.comThe script will create all the certificates and keys we created using the individual commands. The SSL certificate and private keys get named with the domain name you pass as the script argument. For example, demo.mlopshub.com.key & demo.mlopshub.com.crt
What are the benefits of using a self-signed certificate?
There are several benefits of using a self-signed certificate:
- You don't need to rely on a third party to sign your certificate.
- You can create and use your own certificate authority.
- You don't have to pay for a certificate from a CA.
- You have more control over your certificates.
What are the drawbacks of using a self-signed certificate?
There are also several drawbacks of using a self-signed certificate:
- Your users will need to install the certificate in their browsers or applications.
- Your users will need to trust your certificate authority manually.
- They unsafe for public facing applications.
- None of the browsers or operating systems trust the self-signed certificates unless the user installs them.
- Prone to man-in-the-middle attacks.
In general, self-signed certificates are a good option for applications in which you need to prove your own identity. They're also a good option for development and testing environments. However, they shouldn't be used for production applications.
Self-Signed Certificates in Organizations
Many organizations use self-signed certificated for their internal applications that are not internet-facing. These certificates are generated using the organization's internal PKI infrastructure.
DevOps teams and developers can request SSL certificates from the PKI infrastructure to be used in applications.
Self-Signed Certificate FAQ's
Following are the frequently asked questions about self-signed certificate.
How to create self-signed certificated on Windows?
You can create a self-signed certificate on windows using Openssl. The OpenSSL commands are the same for all operating systems. You can follow this guide to create a self-signed certificate on windows using this guide.
How do I get a self-signed certificate?
Self-signed certificate can be generated by you using tools like openSSL or CDSSL PKI toolkit.
Conclusion
In this guide, we have learned how to create self-signed SSL certificates using OpenSSL.
For production use cases, if you don't want to spend money on SSL certificates, you can try out Letsencrypt.
Hope this self-signed SSL guide was helpful with the script to automate the certificate generation. Do let us know if you face any issues.
Also, SSL/TLS is one of the important topics in DevOps. You can check out the how to become a devops engineer blog to know more.
