

Hosting Jenkins on a Kubernetes cluster is beneficial for Kubernetes-based deployments and dynamic container-based scalable Jenkins agents.
In this guide, I have explained the step-by-step process for setting up Jenkins on a Kubernetes cluster.
Setup Jenkins On Kubernetes Cluster
For setting up a Jenkins cluster on Kubernetes, we will do the following.
- Create a Namespace
- Create a service account with Kubernetes admin permissions.
- Create local persistent volume for persistent Jenkins data on Pod restarts.
- Create a deployment YAML and deploy it.
- Create a service YAML and deploy it.
- Access the Jenkins application on a Node Port.
Note: This tutorial doesn't use local persistent volume as this is a generic guide. For using persistent volume for your Jenkins data, you need to create volumes of relevant cloud or on-prem data center and configure it.
Jenkins Kubernetes Manifest Files
All the Jenkins Kubernetes manifest files used in this blog are hosted on Github. Please clone the repository if you have trouble copying the manifest from the blog.
git clone https://github.com/scriptcamp/kubernetes-jenkinsUse the Github files for reference and follow the steps in the next sections
Kubernetes Jenkins Deployment
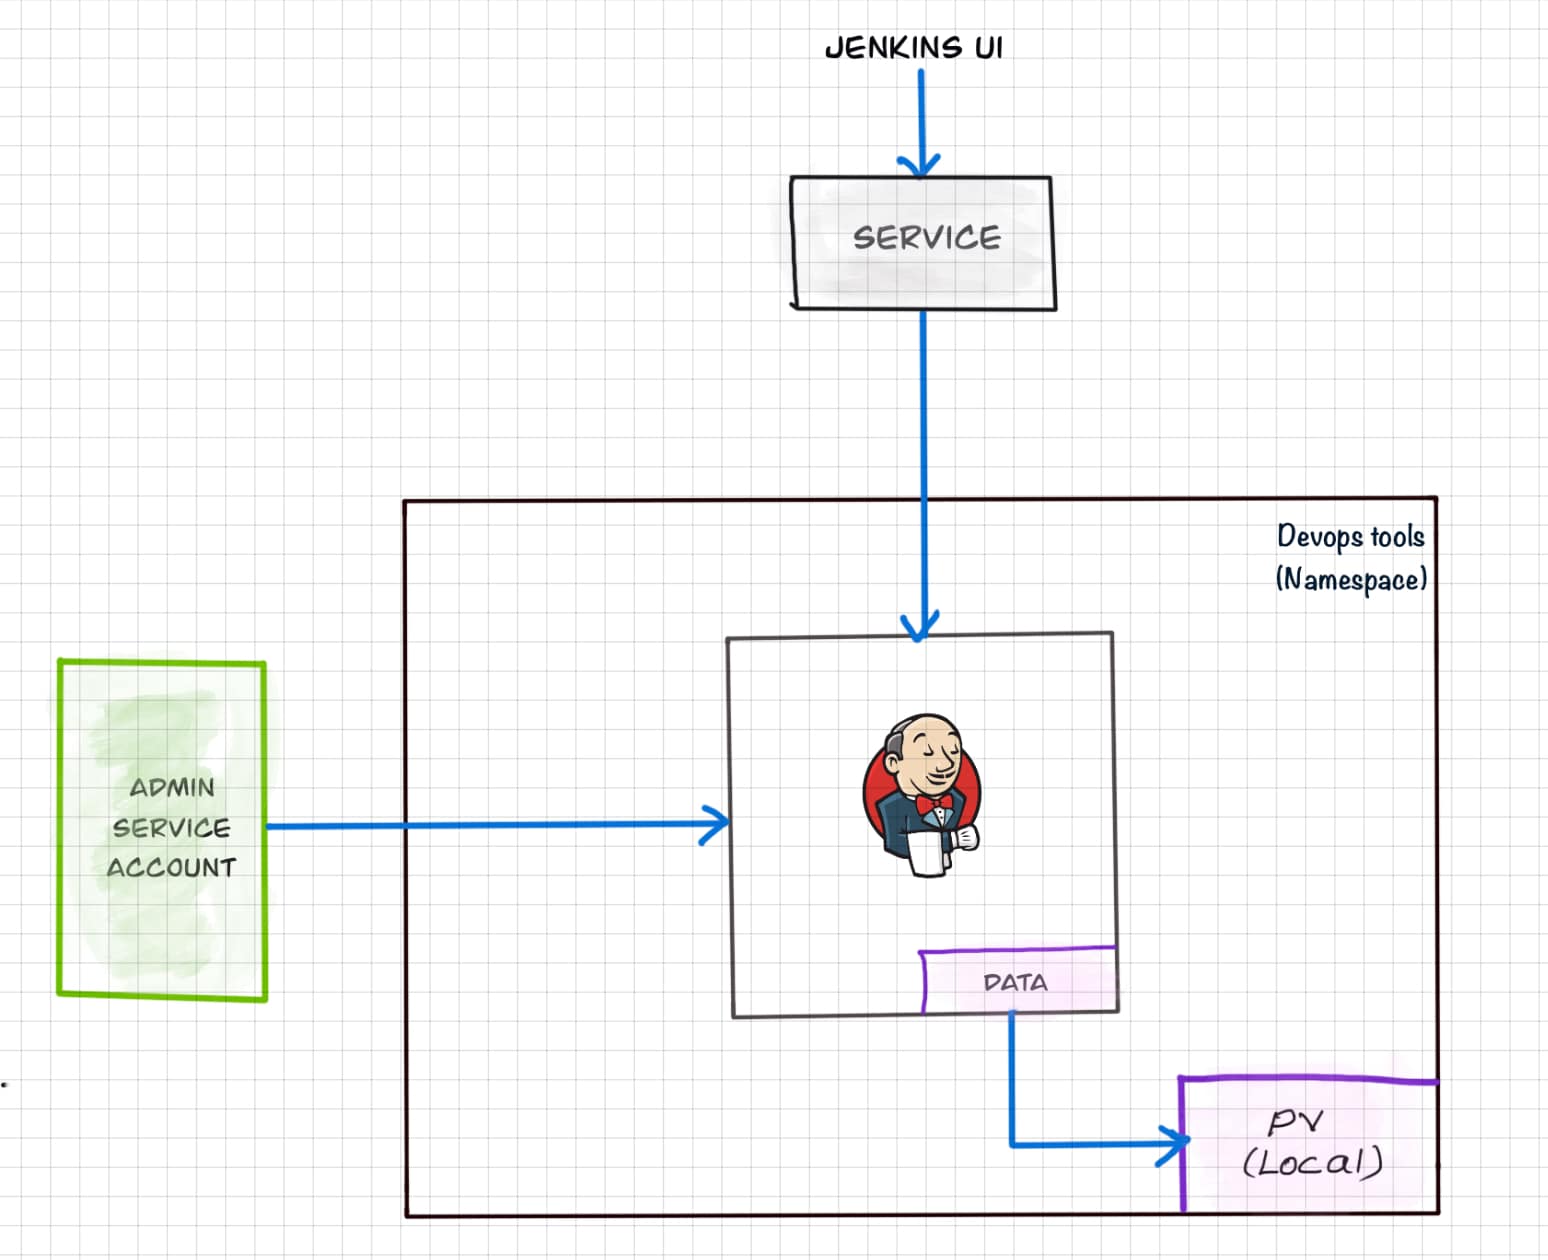
Here is a high-level view of what we are going to do.
Let's get started with deploying Jenkins on Kubernetes.
Step 1: Create a Namespace for Jenkins. It is good to categorize all the devops tools as a separate namespace from other applications.
kubectl create namespace devops-toolsStep 2: Create a serviceAccount.yaml file and copy the following admin service account manifest.
---
apiVersion: rbac.authorization.k8s.io/v1
kind: ClusterRole
metadata:
  name: jenkins-admin
rules:
  - apiGroups: [""]
    resources: ["*"]
    verbs: ["*"]

---
apiVersion: v1
kind: ServiceAccount
metadata:
  name: jenkins-admin
  namespace: devops-tools

---
apiVersion: rbac.authorization.k8s.io/v1
kind: ClusterRoleBinding
metadata:
  name: jenkins-admin
roleRef:
  apiGroup: rbac.authorization.k8s.io
  kind: ClusterRole
  name: jenkins-admin
subjects:
- kind: ServiceAccount
  name: jenkins-admin
  namespace: devops-tools
The serviceAccount.yaml creates a jenkins-admin clusterRole, jenkins-admin ServiceAccount and binds the clusterRole to the service account.
The jenkins-admin cluster role has all the permissions to manage the cluster components. You can also restrict access by specifying individual resource actions.
Now create the service account using kubectl.
kubectl apply -f serviceAccount.yamlStep 3: Create volume.yaml and copy the following persistent volume manifest.
kind: StorageClass
apiVersion: storage.k8s.io/v1
metadata:
  name: local-storage
provisioner: kubernetes.io/no-provisioner
volumeBindingMode: WaitForFirstConsumer

---
apiVersion: v1
kind: PersistentVolume
metadata:
  name: jenkins-pv-volume
  labels:
    type: local
spec:
  storageClassName: local-storage
  claimRef:
    name: jenkins-pv-claim
    namespace: devops-tools
  capacity:
    storage: 10Gi
  accessModes:
    - ReadWriteOnce
  local:
    path: /mnt
  nodeAffinity:
    required:
      nodeSelectorTerms:
      - matchExpressions:
        - key: kubernetes.io/hostname
          operator: In
          values:
          - worker-node01

---
apiVersion: v1
kind: PersistentVolumeClaim
metadata:
  name: jenkins-pv-claim
  namespace: devops-tools
spec:
  storageClassName: local-storage
  accessModes:
    - ReadWriteOnce
  resources:
    requests:
      storage: 3Gi
Important Note: Replace worker-node01 with any one of your cluster worker nodes hostname.You can get the worker node hostname using the kubectl.
kubectl get nodes
For volume, I have used the local storage class for the purpose of demonstration. Meaning, it creates a PersistentVolume volume in a specific node under /mnt location.
As the local storage class requires the node selector, you need to specify the worker node name correctly for the Jenkins pod to get scheduled in the specific node.
If the pod gets deleted or restarted, the data will get persisted in the node volume. However, if the node gets deleted, you will lose all the data.
Ideally, you should use a persistent volume using the available storage class with the cloud provider or the one provided by the cluster administrator to persist data on node failures.
Let's create the volume using kubectl
kubectl create -f volume.yamlStep 2: Create a Deployment file named deployment.yaml and copy the following deployment manifest.
Here we are using the latest Jenkins LTS docker image from the Docker hub.
apiVersion: apps/v1
kind: Deployment
metadata:
  name: jenkins
  namespace: devops-tools
spec:
  replicas: 1
  selector:
    matchLabels:
      app: jenkins-server
  template:
    metadata:
      labels:
        app: jenkins-server
    spec:
      securityContext:
            fsGroup: 1000
            runAsUser: 1000
      serviceAccountName: jenkins-admin
      containers:
        - name: jenkins
          image: jenkins/jenkins:lts
          resources:
            limits:
              memory: "2Gi"
              cpu: "1000m"
            requests:
              memory: "500Mi"
              cpu: "500m"
          ports:
            - name: httpport
              containerPort: 8080
            - name: jnlpport
              containerPort: 50000
          livenessProbe:
            httpGet:
              path: "/login"
              port: 8080
            initialDelaySeconds: 90
            periodSeconds: 10
            timeoutSeconds: 5
            failureThreshold: 5
          readinessProbe:
            httpGet:
              path: "/login"
              port: 8080
            initialDelaySeconds: 60
            periodSeconds: 10
            timeoutSeconds: 5
            failureThreshold: 3
          volumeMounts:
            - name: jenkins-data
              mountPath: /var/jenkins_home
      volumes:
        - name: jenkins-data
          persistentVolumeClaim:
              claimName: jenkins-pv-claim
In this Jenkins Kubernetes deployment we have used the following.
securityContextfor Jenkins pod to be able to write to the local persistent volume.- Liveliness and readiness probe.
- Local persistent volume based on local storage class that holds the Jenkins data path
/var/jenkins_home
Note: The deployment file uses local storage class persistent volume for Jenkins data. For production use cases, you should add a cloud-specific storage class persistent volume for your Jenkins data. See the sample implementation of persistent volume for Jenkins in Google Kubernetes Engine
If you don't want the local storage persistent volume, you can replace the volume definition in the deployment with the host directory as shown below.
volumes:
      - name: jenkins-data
        emptyDir: {}
Create the deployment using kubectl.
kubectl apply -f deployment.yamlCheck the deployment status.
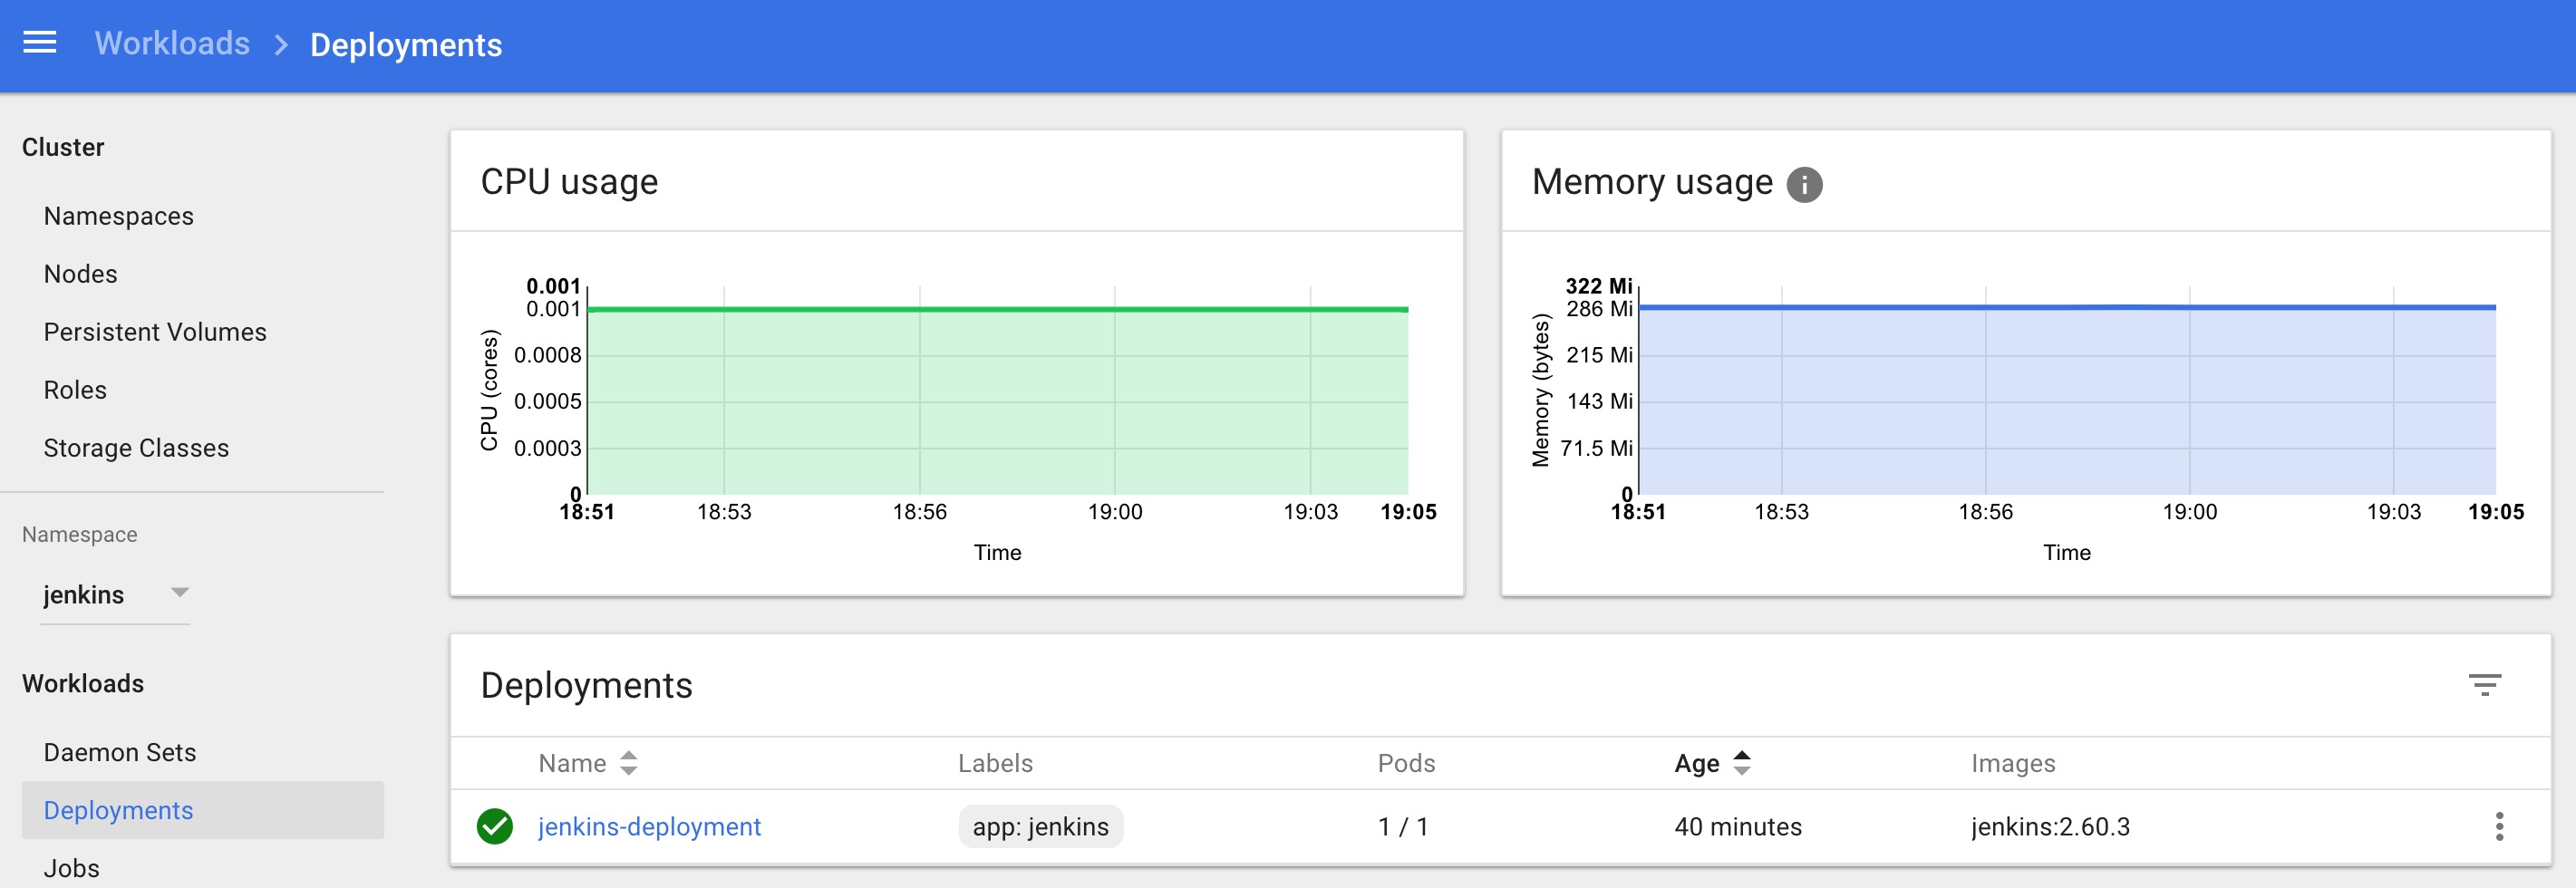
kubectl get deployments -n devops-toolsNow, you can get the deployment details using the following command.
kubectl describe deployments -n devops-toolsAlso, You can get the details from the kubernetes dashboard as shown below.
Accessing Jenkins Using Kubernetes Service
We have created a deployment. However, it is not accessible to the outside world. For accessing the Jenkins deployment from the outside world, we should create a service and map it to the deployment.
Step 1: Create service.yaml and copy the following service manifest.
apiVersion: v1
kind: Service
metadata:
  name: jenkins-service
  namespace: devops-tools
  annotations:
      prometheus.io/scrape: 'true'
      prometheus.io/path:   /
      prometheus.io/port:   '8080'
spec:
  selector:
    app: jenkins-server
  type: NodePort
  ports:
    - port: 8080
      targetPort: 8080
      nodePort: 32000
Note: Here, we are using the type as NodePort which will expose Jenkins on all kubernetes node IPs on port 32000. If you have an ingress setup, you can create an ingress rule to access Jenkins. Also, you can expose the Jenkins service as a Loadbalancer if you are running the cluster on AWS, Google, or Azure cloud.Create the Jenkins service using kubectl.
kubectl apply -f service.yamlNow if you browse to any one of the Node IPs on port 32000, you will be able to access the Jenkins dashboard.
http://<node-ip>:32000Jenkins will ask for the initial Admin password when you access the dashboard for the first time.
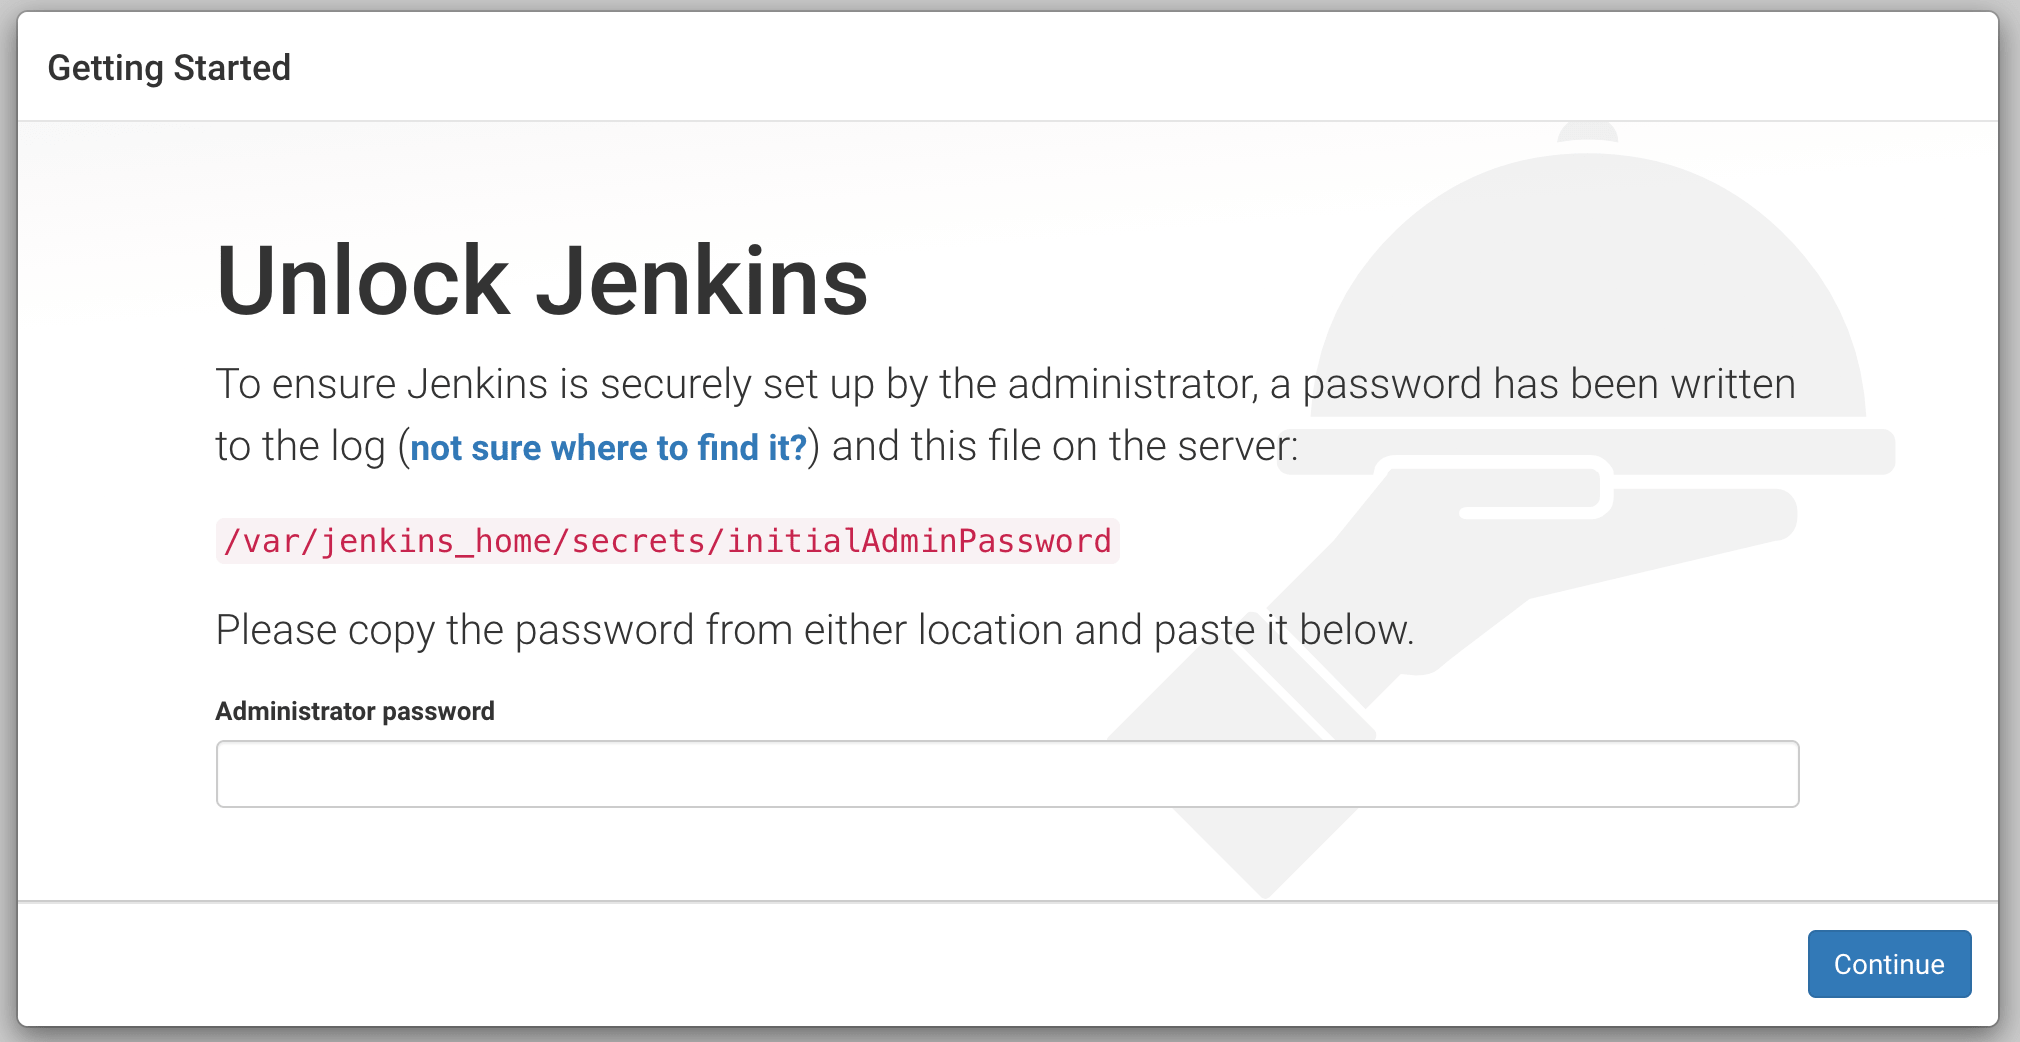
You can get that from the pod logs either from the kubernetes dashboard or CLI. You can get the pod details using the following CLI command.
kubectl get pods -n devops-toolsAnd with the pod name, you can get the logs as shown below. replace the pod name with your pod name.
kubectl logs jenkins-deployment-2539456353-j00w5 -n devops-toolsThe password can be found at the end of the log as shown below.
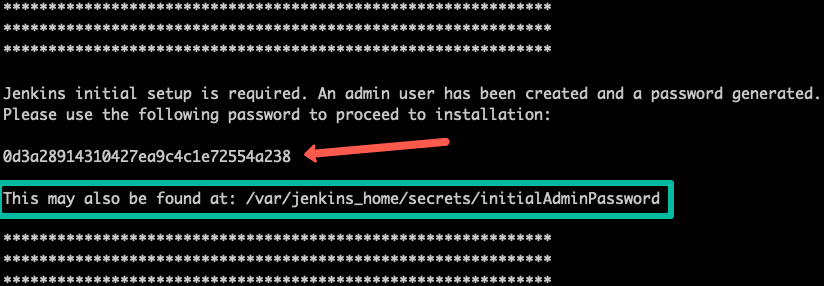
Alternatively, you can run the exec command to get the password directly from the location as shown below.
kubectl exec -it jenkins-559d8cd85c-cfcgk cat /var/jenkins_home/secrets/initialAdminPassword -n devops-toolsOnce you enter the password you can proceed to install the suggested plugin and create an admin user. All these steps are self-explanatory from the Jenkins dashboard.
Conclusion
When you host Jenkins on Kubernetes for production workloads, you need to consider setting up a highly available persistent volume to avoid data loss during pod or node deletion.
A pod or node deletion could happen anytime in Kubernetes environments. It could be a patching activity or a downscaling activity.
Hope this step-by-step guide helps you to learn and understand the components involved in setting up a Jenkins server on a Kubernetes cluster.
If you are looking for setting up container-based agents on Kubernetes, check out my guide on setting up Kubernetes pod as Jenkins build agents.