

In this blog, you will learn how to setup Persistent Volume For the GKE Kubernetes cluster.
If you want to preserve the data even after a pod deletion or pod failures, you should use persistent volumes.
About GKE Persistent Volumes
In GKE, you can provision a Google Cloud Persistent disk (Compute Engine Disks) to be used as a persistent volume in the Kubernetes cluster.
You can dynamically provision the persistent volumes on demand using the Kubernbetes persistent volume claim manifests.
Based on the type of persistent disk storage class, GKE will ensure the volume is provisioned and makes it available for use in the cluster.
Following are some important concepts you need to be aware of when using persistent volumes with GKE.
- You can use both google persistent disk and Google Filestore (NFS) as persistent volumes for GKE.
- Persistent disks can be regional (offers high durability) or zonal based on the requirements.
- You can also use a pre-existing persistent disk with data as a GKE persistent volume.
- By default, dynamic provisioning uses the
pd-standarddisk type as a storage class. It is one of the four standard persistent disk types offered by Google Cloud. - You can back up the persistent volumes using a Volume snapshot. This feature works only if you have the Compute Engine persistent disk CSI Driver enabled in the cluster.
Setup Persistent Volume For GKE
We will do the following.
- Create a storage class
- Provision a Persistent volume using the storage class.
- Test a deployment with the persistent volume.
Lets gets started with the setup.
Create a storage class for GKE
Storage class is a simple way of segregating the storage options.
To put simply, a storage class defines what type of storage to be provisioned.
For example, we can classify our storage class as gold and silver. These names are arbitrary and use a name that is meaningful to you.
Gold storage class uses the pd-ssd persistent disk type for high IOPS applications (to be used with databases). While silver storage class uses the pd-standard volume type to be used for backups and normal disk operations.
These storage class segregations are completely based on the project requirements.
pd-standard disks. If you don't specify a storage class while provisioning a PV, the default storage class is considered.Lets create a gold storage class.
Save the following manifest as storage-class.yaml.
apiVersion: storage.k8s.io/v1
kind: StorageClass
metadata:
  name: gold
provisioner: kubernetes.io/gce-pd
volumeBindingMode: Immediate
allowVolumeExpansion: true
reclaimPolicy: Delete
parameters:
  type: pd-standard
  fstype: ext4
  replication-type: none
Create the storage class.
kubectl apply -f storage-class.yamlA little explanation about the parameters.
- Type: supports
pd-standard&pd-ssd. If you don't specify anything, it defaultspd-standard - fstype: supports
ext4andxfs. Defaults toext4. - replication-type: This decides whether the disk is zonal or regional. If you don't specify
regional-pd, it defaults to a zonal disk. - allowVolumeExpansion: With this parameter, you can expand the persistent volume if required.
- volumeBindingMode: There are two modes.
ImmediateandWaitForFirstConsumer. In cases where the storage is not accessible from all the nodes, useWaitForFirstConsumerso that volume binding will happen after the pod gets created.
Create a Persistent Volume using PVC on GKE
To create a persistent volume you need to create a Persistent Volume claim.
persistentVolumeClaim is the way to request storage based on a storage class and use it with a pod. The pod to Persistent volume mapping happens through PVC.
Meaning, when you request for a PVC, a persistent volume (google persistent disk) will be dynamically provisioned based on the pd-standard or pd-ssd the parameter you specified in the storage class.
So PVC (Request) --> Storage Class (Defines Type of disk) --> Persistent Volume (Google Persistent Disk)
The accessModes in persistentVolume defines how a volume should be mounted. There are 4 access modes available:
ReadWriteOnce(RWO): This access mode allows the volume to be mounted as read-write by a single worker node at a time. All the pods on that specific node can access the volume.ReadWriteMany(RWX): It defines that the volume can be concurrently mounted to multiple worker nodes with read-write access for any Pod.ReadOnlyMany(ROX): This access mode allows multiple worker nodes to mount the volume simultaneously, but only in read-only mode.ReadWriteOncePod(RWOP): Only a single pod in the entire cluster can gain access to the volume.
In our example, we are creating a PVC using gold storage class with 50GB storage in the default namespace. You can also assign a custom namespace under metadata
Save the manifest as pvc.yaml
apiVersion: v1
 kind: PersistentVolumeClaim
 metadata:
   name: webapps-storage
 spec:
   storageClassName: gold
   accessModes:
     - ReadWriteOnce
   resources:
     requests:
       storage: 50Gi
Now, create the PVC.
kubeactl apply -f pvc.yamlYou can check the pv and pvc using the following commands.
kubectl get pv
kubectl get pvc
If you check the compute engine disks, you will see a 50GB disk created as shown below.
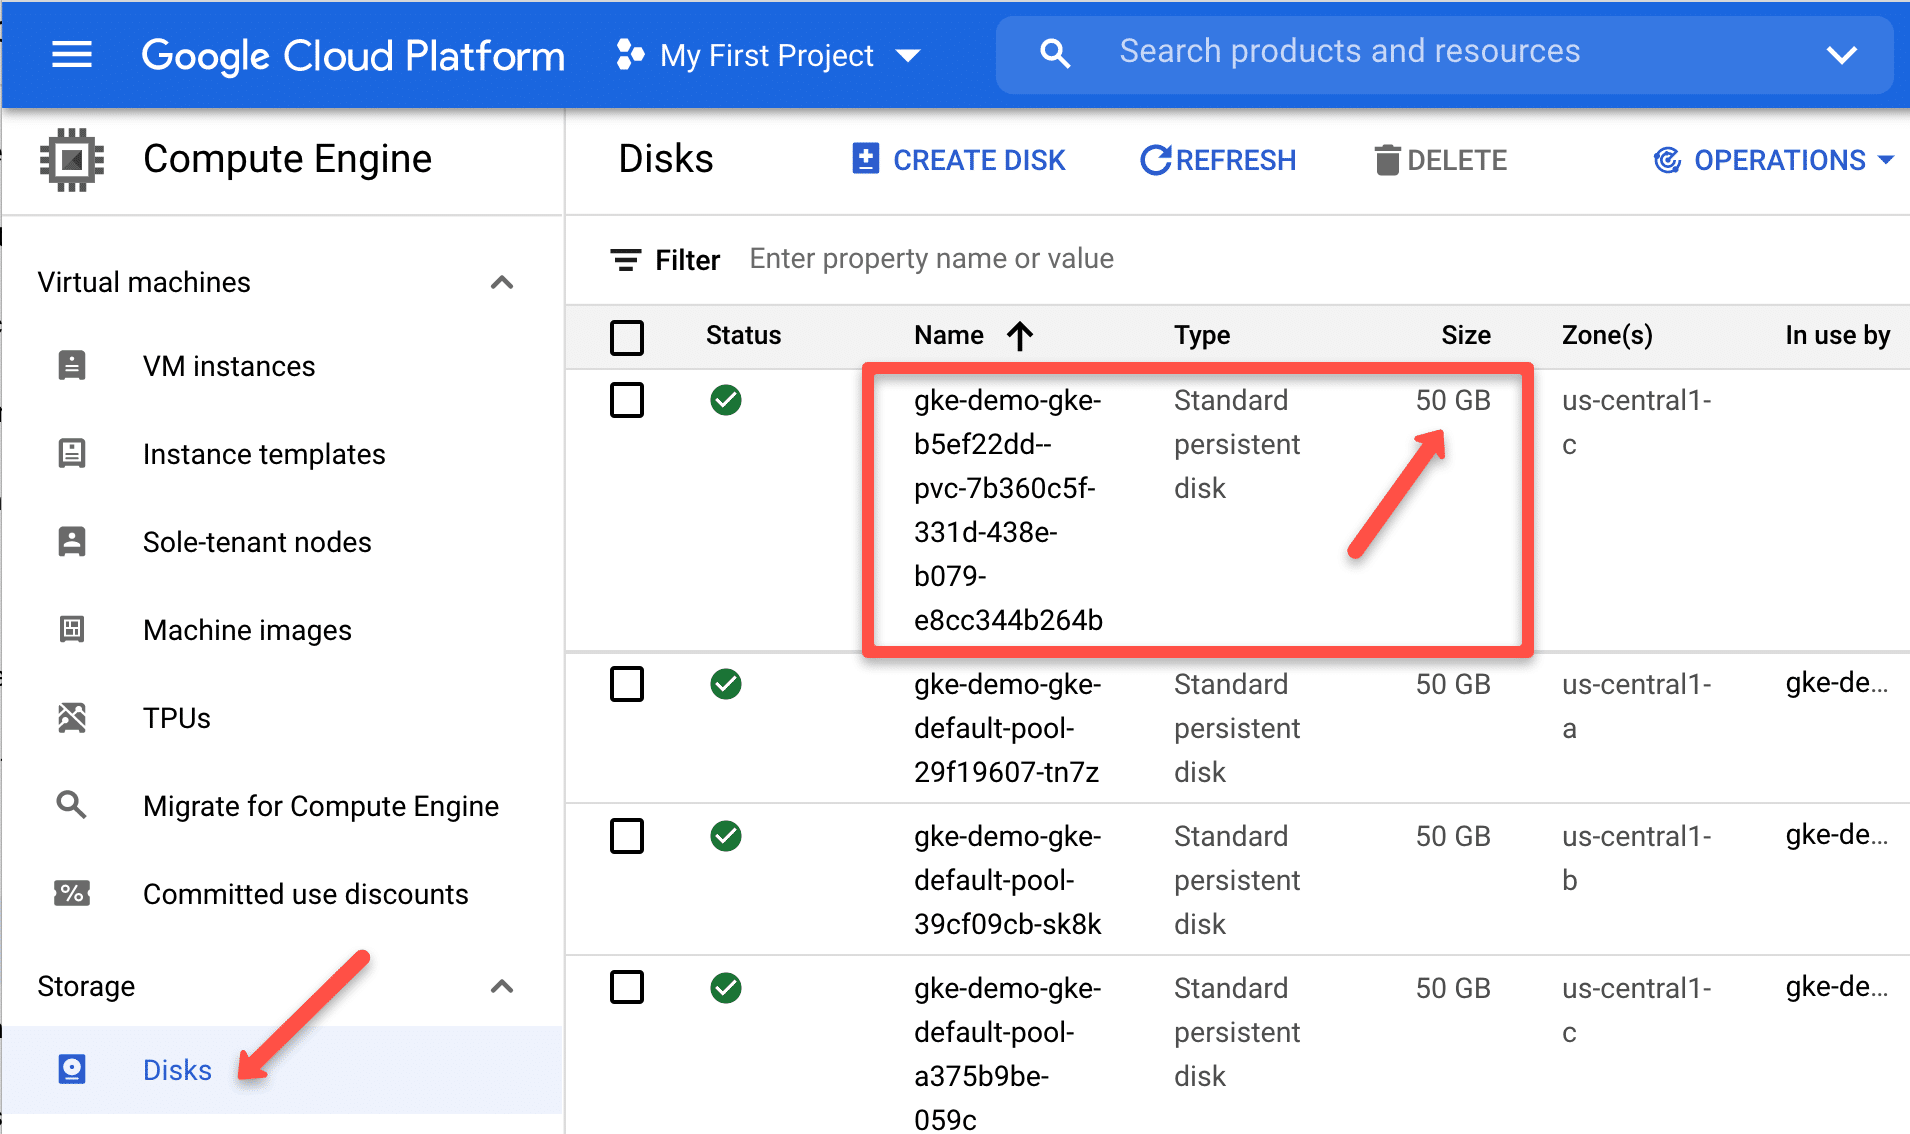
Since the gold storage class volumeBindingMode is immediate, you will see the volume provisioned and the claim available for pods to use.
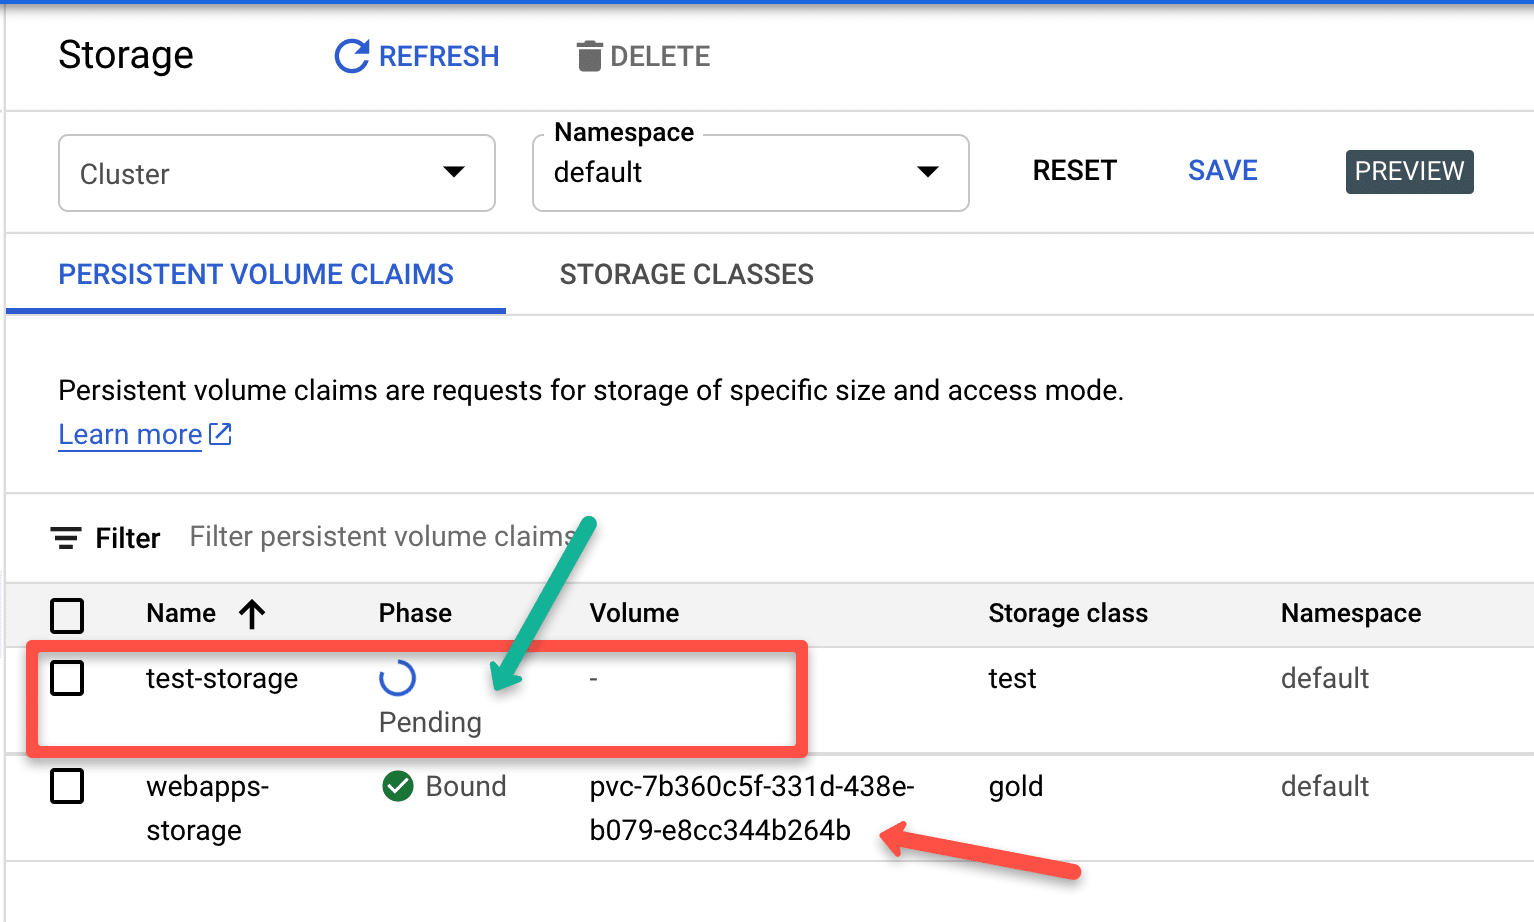
If your storage class binding mode is WaitForFirstConsumer , after deploying the PVC, you will see PVC status in a pending state. Because only after a pod is created with a PVC request, kubernetes creates the persistent volume
The following image shows the difference between immediate and WaitForFirstConsumer modes.
Creating Persistent Volumes From Existing Google Compute Disks
You can create persist volumes volumes from existing google compute disks.
For demonstration purpose, I am creating a compute disk named gke-pv of size 50GB
gcloud compute disks create gke-pv --zone=us-central1-a --size=50GBNow we have a disk available to be used as PV in GKE.
Next step is to,
- Create a Persistent volume named
app-storagefrom thegke-pvdisk - To use the persistent volume with the pod, we will create a persistent volume claim with the same name we use in the PV
claimRef, ieapp-storage-claim
Save the following manifest as disk-pv.yaml
apiVersion: v1
kind: PersistentVolume
metadata:
  name: app-storage
spec:
  storageClassName: "apps"
  capacity:
    storage: 50
  accessModes:
    - ReadWriteOnce
  claimRef:
    namespace: default
    name: app-storage-claim
  gcePersistentDisk:
    pdName: gke-pv
    fsType: ext4
---
apiVersion: v1
kind: PersistentVolumeClaim
metadata:
  name: app-storage-claim
spec:
  storageClassName: "apps"
  accessModes:
    - ReadWriteOnce
  resources:
    requests:
      storage: 50
Create the PV & PVC.
kubectl apply -f disk-pv.yamlYou can check the pv and pvc using the following commands.
kubectl get pv
kubectl get pvc
Example GKE Pod With Persistent Volume
Now that we know the two ways to use google persistent disk as GKE persistent volumes, we will look at using the persistent volume in a pod.
To mount a persistent volume to the pod, we use the Persistent volume claim name in the volumes section, and we use the volume name in the volumeMounts section with the container path to mount.
In out example, we will be mounting the /usr/share/nginx/html path to the persistent volume.
apiVersion: v1
kind: Pod
metadata:
  name: nginx-app-pod
spec:
  volumes:
    - name: app-storage
      persistentVolumeClaim:
        claimName: app-storage-claim
  containers:
    - name: nginx-app-container
      image: nginx
      ports:
        - containerPort: 80
          name: "http-server"
      volumeMounts:
        - mountPath: "/usr/share/nginx/html"
          name: app-storage
Example GKE Deployment With Persistent Volume Claim
Lets try using the persistent volume on a Jenkins delployment.
This Jenkins deployment creates a pod with all its data mounted to the persistent volume. So, even if you delete the pod, a new pod will come up and mount itself to the persistent volume keeping the same old state of Jenkins.
Here is a little explanation about the deployment
- Create a Persistent volume claim with the
goldstorage class. - In deployment, Create a
Volumesdefinition namedjenkins-dataand add thejenkins-pv-claimto be added as a volume to the container - In container
spec, undervolumeMounts, we define the volume name and mount path/var/jenkins_homefor the container. - A service will expose Jenkins on NodePort
32000
Save the following manifest as jenkins.yaml. It has the PVC, deployment and service definitions.
# Persistent Volume Claim
apiVersion: v1
kind: PersistentVolumeClaim
metadata:
  name: jenkins-pv-claim
spec:
  storageClassName: gold
  accessModes:
    - ReadWriteOnce
  resources:
    requests:
      storage: 50Gi

# Deployment Config
---
apiVersion: apps/v1
kind: Deployment
metadata:
  name: jenkins-deployment
spec:
  replicas: 1
  selector:
    matchLabels:
      app: jenkins
  template:
    metadata:
      labels:
        app: jenkins
    spec:
      securityContext:
            fsGroup: 1000
            runAsUser: 1000
      containers:
        - name: jenkins
          image: jenkins/jenkins:lts
          resources:
            limits:
              memory: "2Gi"
              cpu: "1000m"
            requests:
              memory: "500Mi"
              cpu: "500m"
          ports:
            - name: httpport
              containerPort: 8080
            - name: jnlpport
              containerPort: 50000
          livenessProbe:
            httpGet:
              path: "/login"
              port: 8080
            initialDelaySeconds: 90
            periodSeconds: 10
            timeoutSeconds: 5
            failureThreshold: 5
          readinessProbe:
            httpGet:
              path: "/login"
              port: 8080
            initialDelaySeconds: 60
            periodSeconds: 10
            timeoutSeconds: 5
            failureThreshold: 3
          volumeMounts:
            - name: jenkins-data
              mountPath: /var/jenkins_home
      volumes:
        - name: jenkins-data
          persistentVolumeClaim:
              claimName: jenkins-pv-claim

# Service Config
---
apiVersion: v1
kind: Service
metadata:
  name: jenkins-service
  annotations:
      prometheus.io/scrape: 'true'
      prometheus.io/path:   /
      prometheus.io/port:   '8080'
spec:
  selector:
    app: jenkins
  type: NodePort
  ports:
    - port: 8080
      targetPort: 8080
      nodePort: 32000
Create the deployment.
kubectl apply -f jenkins.yamlOnce the deployment is up and running, you will be able to access the Jenkins server on any of the Node port 32000
Conclusion
We have see how to setup persistent volume on a GKE cluster with few examples using pods and deployments.
Hope this article helps.
Let me know in the comment section, if you face any issues,