


In this blog, you will learn how to set up Istio Ambient Mode and validate Layer 4 (ztunnel) and Layer 7 (waypoint proxy) traffic on a Kubernetes cluster.
By the end of this tutorial, you will have learned the following.
- What is Istio Ambient Mode and how it differs from traditional sidecar architecture
- Install Istio Ambient Mode using Helm charts
- Core components (ztunnel, waypoint proxy, Istio CNI) and their specific roles
- How ztunnel handles L4 traffic at the node level for all pods.
- Deploy and configure waypoint proxies using Gateway API resources to handle L7 traffic
and more..
Lets gets started.
What is Istio Ambient Mode?
Istio Ambient Mode is a sidecar-less architecture for the Istio service mesh. Traditionally, Istio injects a sidecar in to every pod that is part of the mesh.
However, Ambient Mode uses the new data plane architecture in Istio service mesh that does not require sidecar proxies for each workload.
Instead, all the L4 traffic is managed by a light weight ztunnel (Zero Trust tunnel) proxy at the node level. Meaning all the ingress and egress connectivity from pods are intercepted by the ztunnel proxy.
All the the L7 traffic is handled by the waypoint proxies at namespace level.
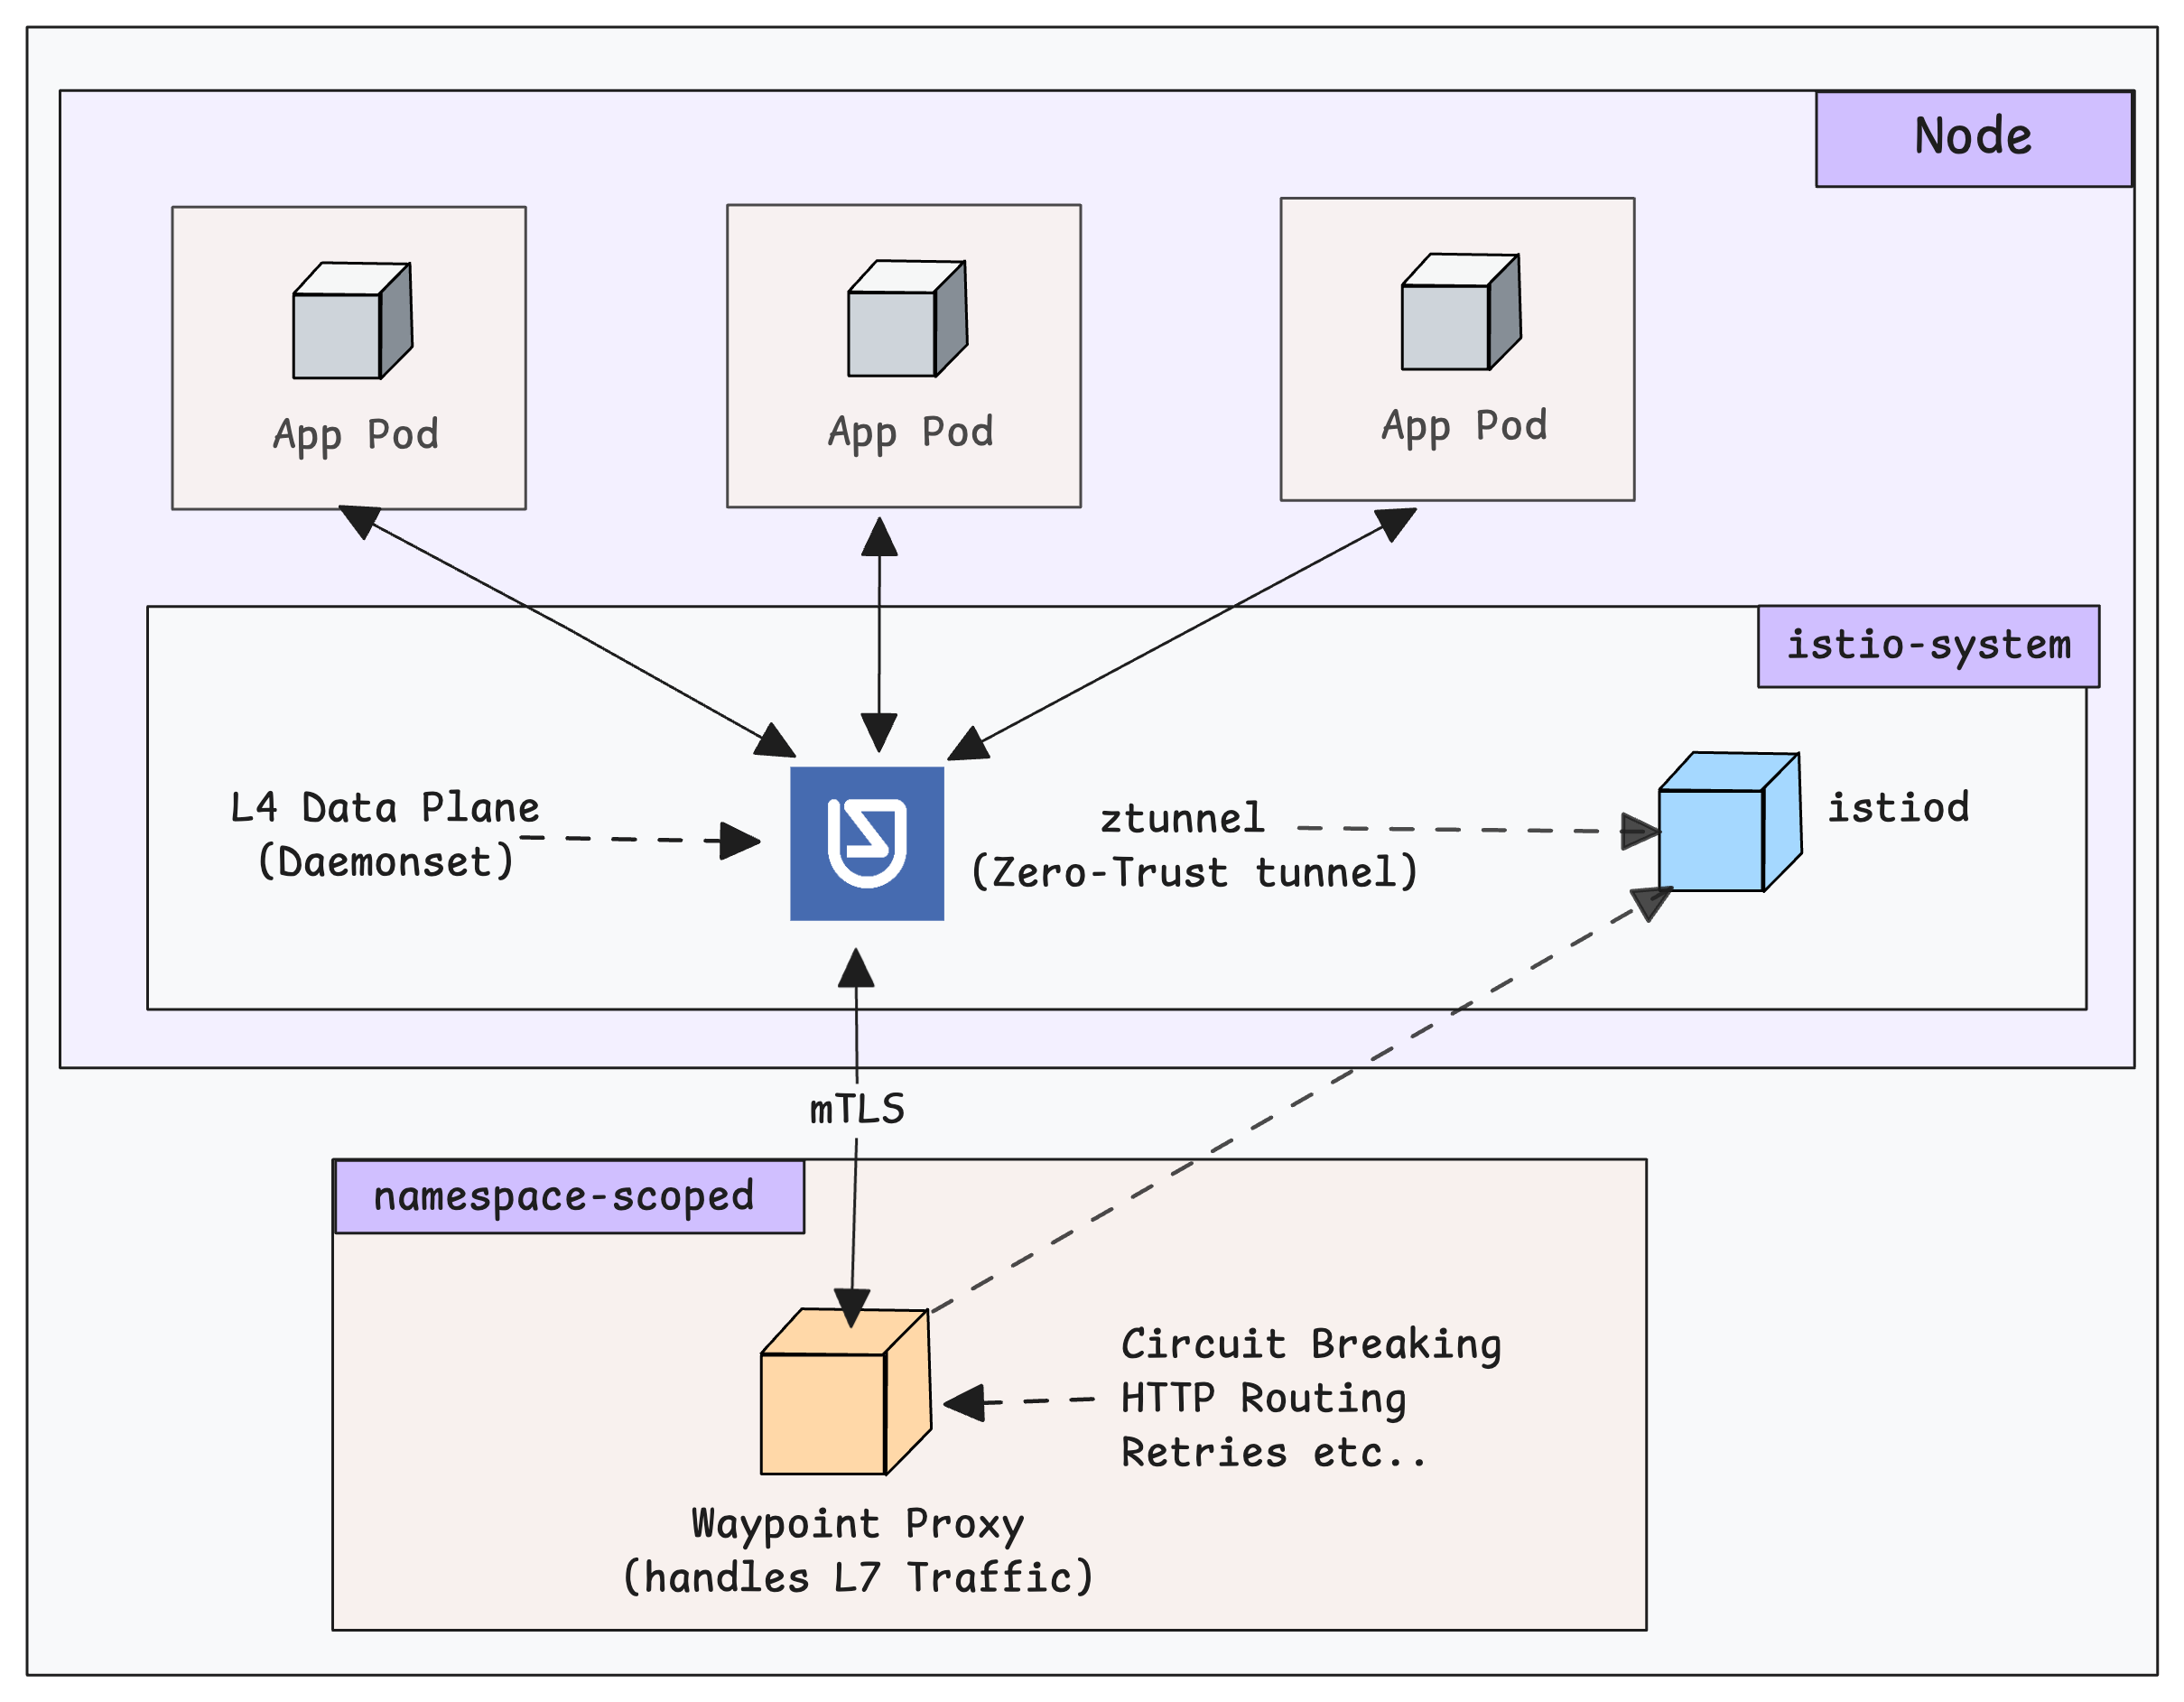
By eliminating per-pod sidecar proxies, it significantly reduces CPU and memory consumption (up to 70% savings).
Now that you have an idea about Ambient mode, lets get started with the setup.
Istio Ambient Mode Installation via Helm (Step-by-Step)
For this setup, we use will use the official Helm chart to install the Istio ambient mesh components one by one.
istio/ambient chart. This is mainly useful for testing purposesYou can also set up the whole Ambient environment using
Istioctl install --set profile=ambientLets get started with the setup.
Step 1: Initialize the Istio Repository
The first step is adding the whole Istio repo on our local machine and using the update command to ensure that we have all the latest charts.
helm repo add istio https://istio-release.storage.googleapis.com/charts

helm repo update
The installation begins with the base chart.
Step 2: Install Istio Base Chart
The Istio base chart contains all the Istio-related Custom Resource Definitions.

To install the base chart, use the following command.
helm install istio-base istio/base -n istio-system --create-namespace --waitOnce the installation is completed, use the following command to list them.
$ kubectl get crds | grep istio.io

authorizationpolicies.security.istio.io         2025-11-28T04:33:38Z
destinationrules.networking.istio.io            2025-11-28T04:33:39Z
envoyfilters.networking.istio.io                2025-11-28T04:33:38Z
gateways.networking.istio.io                    2025-11-28T04:33:38Z
peerauthentications.security.istio.io           2025-11-28T04:33:38Z
proxyconfigs.networking.istio.io                2025-11-28T04:33:38Z
requestauthentications.security.istio.io        2025-11-28T04:33:38Z
serviceentries.networking.istio.io              2025-11-28T04:33:38Z
sidecars.networking.istio.io                    2025-11-28T04:33:38Z
telemetries.telemetry.istio.io                  2025-11-28T04:33:38Z
virtualservices.networking.istio.io             2025-11-28T04:33:38Z
wasmplugins.extensions.istio.io                 2025-11-28T04:33:38Z
workloadentries.networking.istio.io             2025-11-28T04:33:38Z
workloadgroups.networking.istio.io              2025-11-28T04:33:38Z
The output shows that the CRDs are installed.
Next, we need to install the Gateway API resources to create routing rules.
Step 3: Install Gateway API CRDs
VirtualService and DestinationRule resources. While Istio Ambient mesh still supports them, it heavily favors the Kubernetes Gateway API for Layer 7 configuration using waypoint proxy.
That is why we are setting up the Gateway API CRDs.
We need to use the Gateway API Custom Resources to create and configure the Waypoint proxy.
To install the Gateway API CRDs, use the following command. Please refer official gateway API installation page to get the latest version of the Gateway API CRDs
kubectl apply --server-side -f https://github.com/kubernetes-sigs/gateway-api/releases/download/v1.4.1/standard-install.yamlOnce the installation is completed, use the following command to list the installed custom resource definitions.
$ kubectl get crds | grep gateway.networking.k8s.io

backendtlspolicies.gateway.networking.k8s.io    2025-12-17T05:26:49Z
gatewayclasses.gateway.networking.k8s.io        2025-12-17T05:26:49Z
gateways.gateway.networking.k8s.io              2025-12-17T05:26:50Z
grpcroutes.gateway.networking.k8s.io            2025-12-17T05:26:50Z
httproutes.gateway.networking.k8s.io            2025-12-17T05:26:51Z
referencegrants.gateway.networking.k8s.io       2025-12-17T05:26:52Z
Now, the Gateway API resources are installed, so the next step is to install the Istio Daemon with the ambient mode.
Step 4: Deploy Istiod with Ambient Profile
We need to install the Istiod and enable the ambient mode. We can enable the ambient mode during the installation.
The following marked Istio chart we use to install the Istio Daemon.
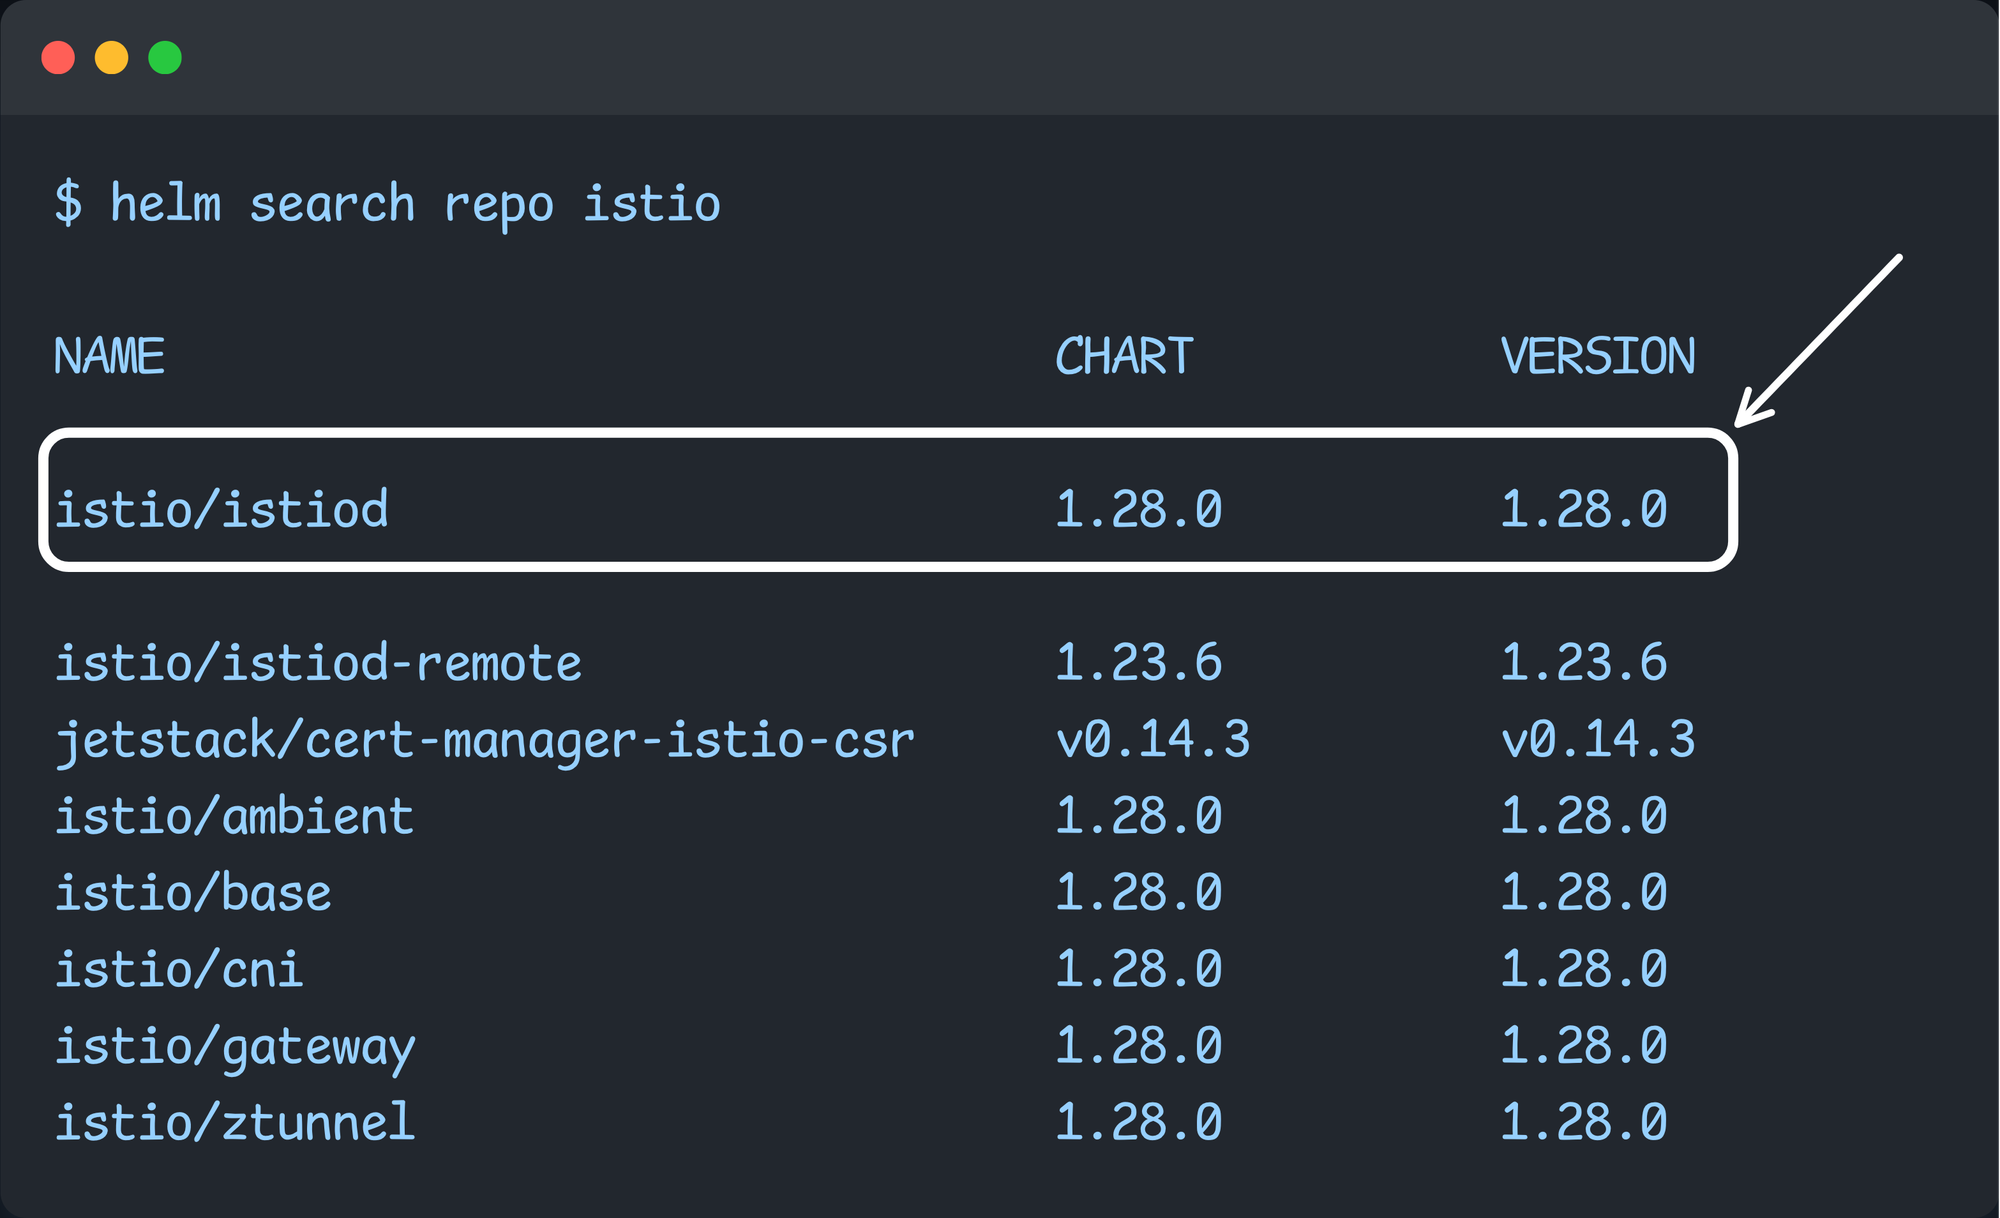
During the installation, we use the flag --set-profile=ambient to tell Istiod to enable the Ambient Mode feature.
Use the following command to install istiod in ambient mode.
helm install istiod istio/istiod --namespace istio-system --create-namespace --set profile=ambient --waitOnce the installation is completed, ensure that the Istiod pod is running.
$ kubectl -n istio-system get po,svc

NAME                          READY   STATUS    RESTARTS   AGE
pod/istiod-6547d75b5f-wd696   1/1     Running   0          46s

NAME             TYPE        CLUSTER-IP      EXTERNAL-IP   PORT(S)                                 AGE
service/istiod   ClusterIP   10.100.88.243   <none>        15010/TCP,15012/TCP,443/TCP,15014/TCP   3h45m
On the next step, we need to install Istio CNI to redirect the incoming pod traffic to the traffic management component.
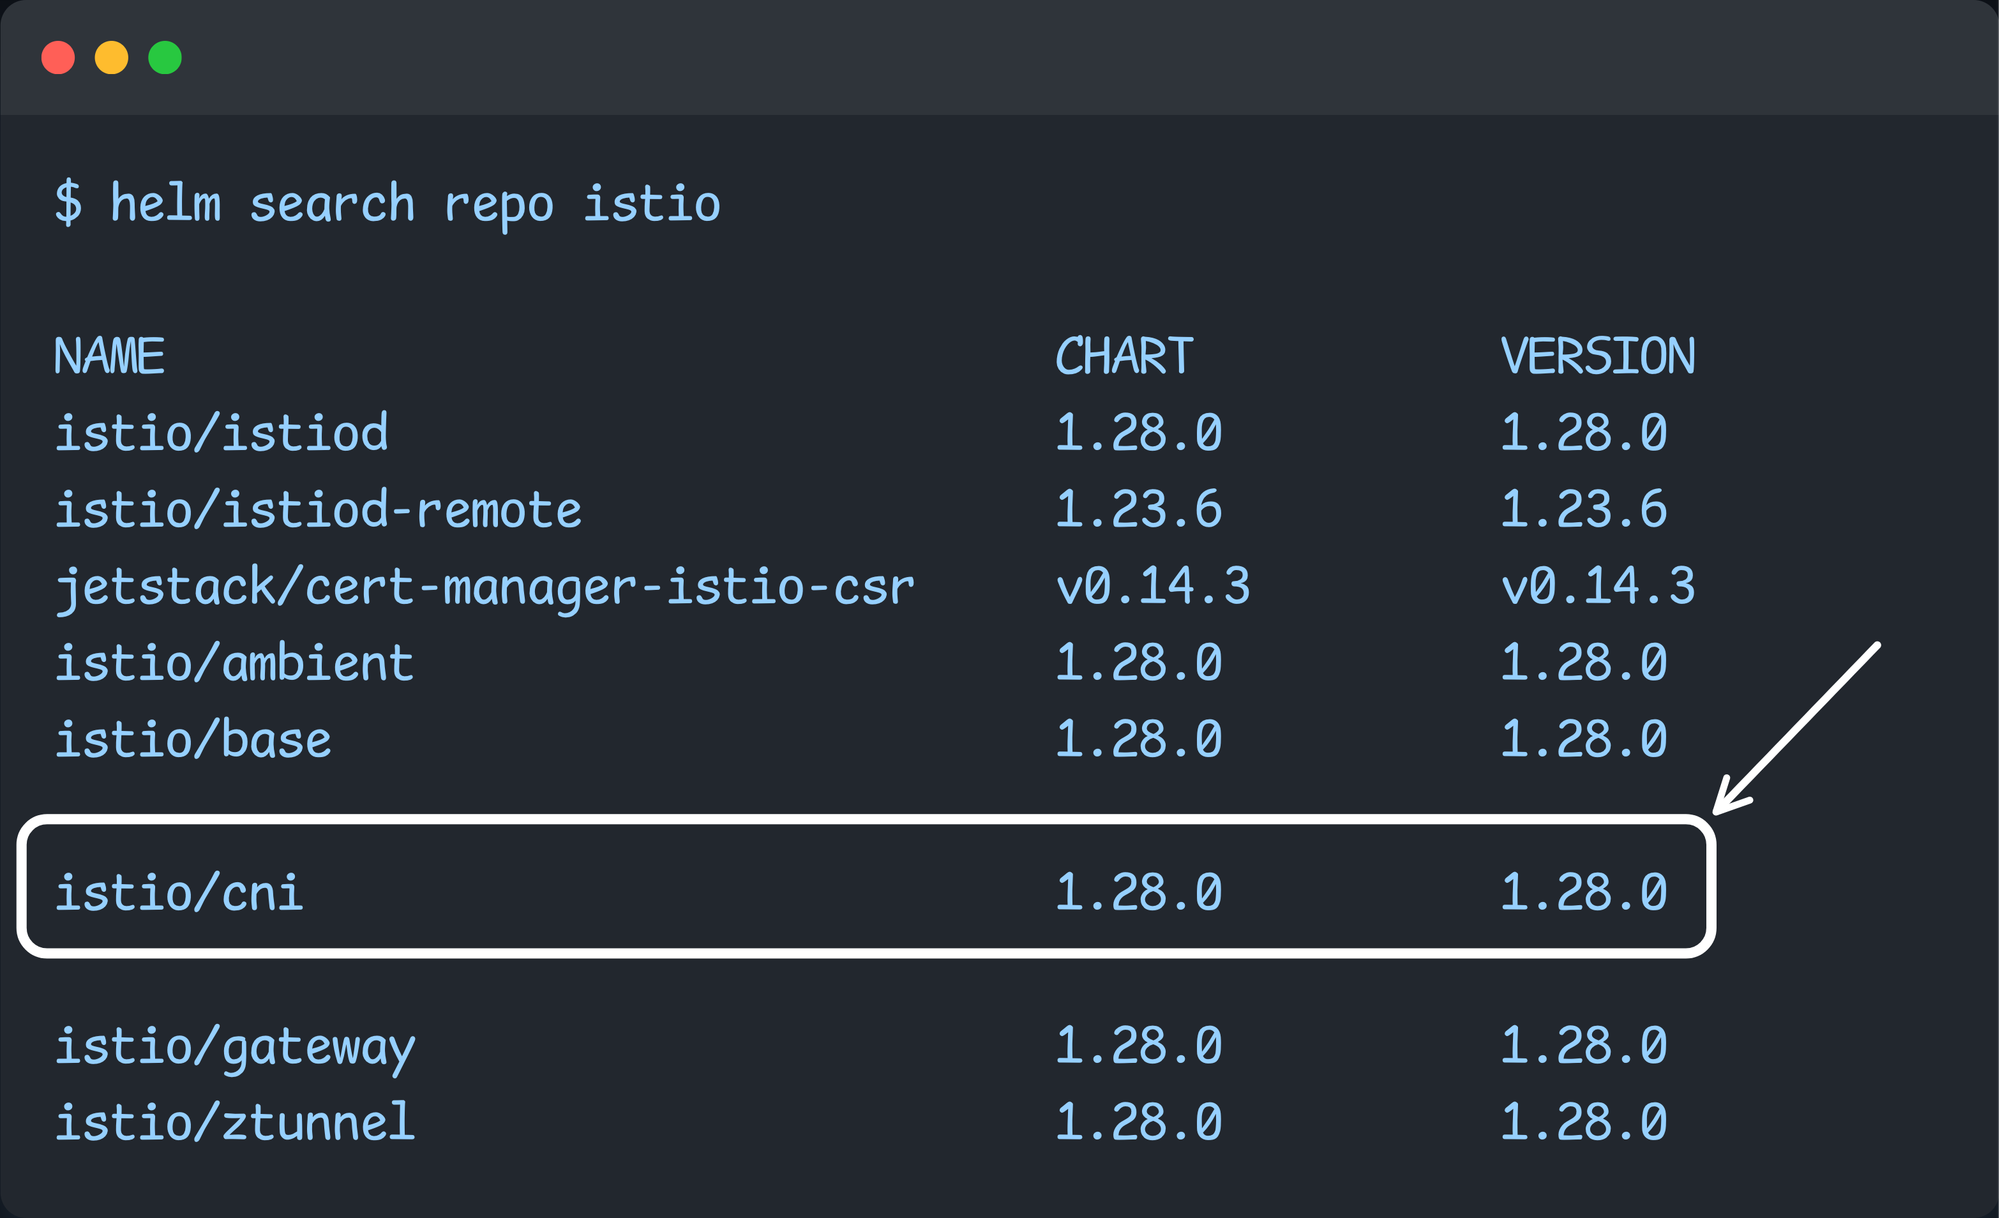
Step 5: Deploy Istio CNI
Istio CNI is an Ambient Mode component that inserts iptables rules so that pod traffic gets redirected through Istio ambient Ztunnel proxies.
To install it, we need to choose the istio/cni chart from the repo.
Install the Istio CNI using the following helm command.
helm install istio-cni istio/cni -n istio-system --set profile=ambient --wait
Once the installation is completed, we need to list the Pods of the Istio CNI
$ kubectl get all -n istio-system -l app.kubernetes.io/instance=istio-cni

NAME                       READY   STATUS    RESTARTS   AGE
pod/istio-cni-node-br6pd   1/1     Running   0          3m47s
pod/istio-cni-node-f58ck   1/1     Running   0          3m47s

NAME                            DESIRED   CURRENT   READY   UP-TO-DATE   AVAILABLE   NODE SELECTOR            AGE
daemonset.apps/istio-cni-node   2         2         2       2            2           kubernetes.io/os=linux   3m48s
Step 6: Deploy Ztunnel
The final component is the Ztunnel proxy.
The Ztunnel proxy is an Istio data plane component in Ambient mode that is the similar to the sidecar containers in the sidecar mode.
To install Ztunnel, you need to choose the istio/ztunnel chart from the repo.

Install Ztunnel using the following command.
helm install ztunnel istio/ztunnel -n istio-system --waitOnce the installation is done, use the following command to list the Ztunnel pods.
$ kubectl get all -n istio-system | grep -i ztunnel

pod/ztunnel-frjjv             1/1     Running   0          79s
pod/ztunnel-jzzx2             1/1     Running   0          79s

daemonset.apps/ztunnel          2         2         2       2            2           kubernetes.io/os=linux   80s
As you can see in the output, the ztunnel is deployed as a Daemonset.
Using istioctl we can verify if the Ztunnel (data planes) are linked with the Istio Daemon (control plane)
$ istioctl proxy-status

NAME                           CLUSTER        ISTIOD                      VERSION     SUBSCRIBED TYPES
ztunnel-flpfw.istio-system     Kubernetes     istiod-6547d75b5f-99tbh     1.28.0      2 (WADS,WDS)
ztunnel-mzmtj.istio-system     Kubernetes     istiod-6547d75b5f-99tbh     1.28.0      2 (WADS,WDS)
In the output, you can see two subscriptions, such as WADS and WDS. It means, the control plane is actively "listening" for live updates.
Now, the entire Istio Ambient Mode setup is ready. Next step is to create a namespace and enable ambient mode in it.
Enabling Ambient Mode for Workloads
To make workloads part of the Istio ambient mesh, we need to enable it in the namespace level using the istio.io/dataplane-mode=ambient label. This way all the pods that gets deployed in that namespace will be part of the mesh.
Lets create a istio-test namespace where we can deploy sample workloads for testing.
kubectl create ns istio-testUse the following command to set the Ambient Mode label to the namespace.
kubectl label namespace istio-test istio.io/dataplane-mode=ambient
Now, verify the label using the following command.
$ kubectl get ns -L istio.io/dataplane-mode

NAME              STATUS   AGE   DATAPLANE-MODE
default           Active   22h
istio-system      Active   21h
istio-test        Active   23s   ambient
We have enabled the ambient mode for the istio-test namespace. So any application we deploy in it will automatically be part of the Ambient mesh.
The next step is deploy workloads in the ambient mesh enabled namespace for testing.
istio-injection=enabled) in that particular namespace.Deploy Demo Applications
To test all the ambient mode features, we will deploy two sample apps (v1 & v2) that expose a simple API.
The following diagram illustrates l4 and l7 traffic workflow that we are going to test with the sample deployments.
Now lets deploy the sample APIs.
Use the following manifest directly to create the deployments and relates services.
cat <<'EOF' | kubectl apply -f -
apiVersion: apps/v1
kind: Deployment
metadata:
  name: backend-v1
  namespace: istio-test
spec:
  replicas: 3
  selector:
    matchLabels: { app: backend, version: v1 }
  template:
    metadata:
      labels: { app: backend, version: v1 }
    spec:
      containers:
      - name: echo
        image: hashicorp/http-echo
        args: ["-text=hello from backend v1"]
        ports:
        - containerPort: 5678
---
apiVersion: apps/v1
kind: Deployment
metadata:
  name: backend-v2
  namespace: istio-test
spec:
  replicas: 2
  selector:
    matchLabels: { app: backend, version: v2 }
  template:
    metadata:
      labels: { app: backend, version: v2 }
    spec:
      containers:
      - name: echo
        image: hashicorp/http-echo
        args: ["-text=hello from backend v2"]
        ports:
        - containerPort: 5678
---
apiVersion: v1
kind: Service
metadata:
  name: backend-v1
  namespace: istio-test
spec:
  selector:
    app: backend
    version: v1
  ports:
  - name: http
    port: 80
    targetPort: 5678
---
apiVersion: v1
kind: Service
metadata:
  name: backend-v2
  namespace: istio-test
spec:
  selector:
    app: backend
    version: v2
  ports:
  - name: http
    port: 80
    targetPort: 5678
EOF
Once the deployment is completed, ensure that the deployments and services are properly created.
$ kubectl -n istio-test get po,svc

NAME                              READY   STATUS    RESTARTS   AGE
pod/backend-v1-7c88547fc6-62skp   1/1     Running   0          33s
pod/backend-v1-7c88547fc6-rstb7   1/1     Running   0          33s
pod/backend-v1-7c88547fc6-w5s45   1/1     Running   0          33s
pod/backend-v2-86c767bf6b-2k8jq   1/1     Running   0          32s
pod/backend-v2-86c767bf6b-2nl4d   1/1     Running   0          32s

NAME                 TYPE        CLUSTER-IP       EXTERNAL-IP   PORT(S)   AGE
service/backend-v1   ClusterIP   10.100.121.209   <none>        80/TCP    31s
service/backend-v2   ClusterIP   10.100.227.24    <none>        80/TCP    31s
Now that the applications are running, lets validate if the applications are configured to serve traffic via Istio mesh.
Validate Application Mesh Configurations
To ensure that the ambient mode is enabled for our deployed workload, describe one of the workload pods using the following command. Replace <BACKEND POD> with the pod name.
kubectl -n istio-test describe po <BACKEND POD> | grep AnnotationsYou will get an output with annotation added by the Istio CNI as shown below. This annotation indicates that the traffic to this Pod is redirected to the Ztunnel proxy.
$ kubectl -n istio-test describe po backend-v1-6997699946-9wlzq

...
Annotations:      ambient.istio.io/redirection: enabled
...
Another way to validate is using the istioctl command. The following command lists the pods that are registered with ztunnel using HBONE protocol.
$ istioctl ztunnel-config workload | grep HBONE

istio-test   backend-v1-567bfdcf7-6rp4q          172.31.36.187 ip-172-31-40-209.us-west-2.compute.internal None     HBONE
istio-test   backend-v1-567bfdcf7-r79hx          172.31.21.17  ip-172-31-26-127.us-west-2.compute.internal None     HBONE
istio-test   backend-v1-567bfdcf7-tlzsx          172.31.42.98  ip-172-31-40-209.us-west-2.compute.internal None     HBONE
istio-test   backend-v2-95d4845d7-fh2gg          172.31.38.186 ip-172-31-40-209.us-west-2.compute.internal None     HBONE
istio-test   backend-v2-95d4845d7-nrv7g          172.31.22.17  ip-172-31-26-127.us-west-2.compute.internal None     HBONE
The above output means, all the listed workloads are in ambient mesh mode, and their traffic is being handled by ztunnel using the HBONE protocol.
Now we have apps running in the Istio mesh ready for testing. First, we will test the layer 4 traffic with ztunnel proxy.
Testing L4 Connectivity with Ztunnel
To test the l4 traffic, we will deploy a simple curl pod that sends request to the backend-v1 service endpoint.
The following diagram shows how traffic flows from a client pod to the destination pods via Ztunnel proxy.
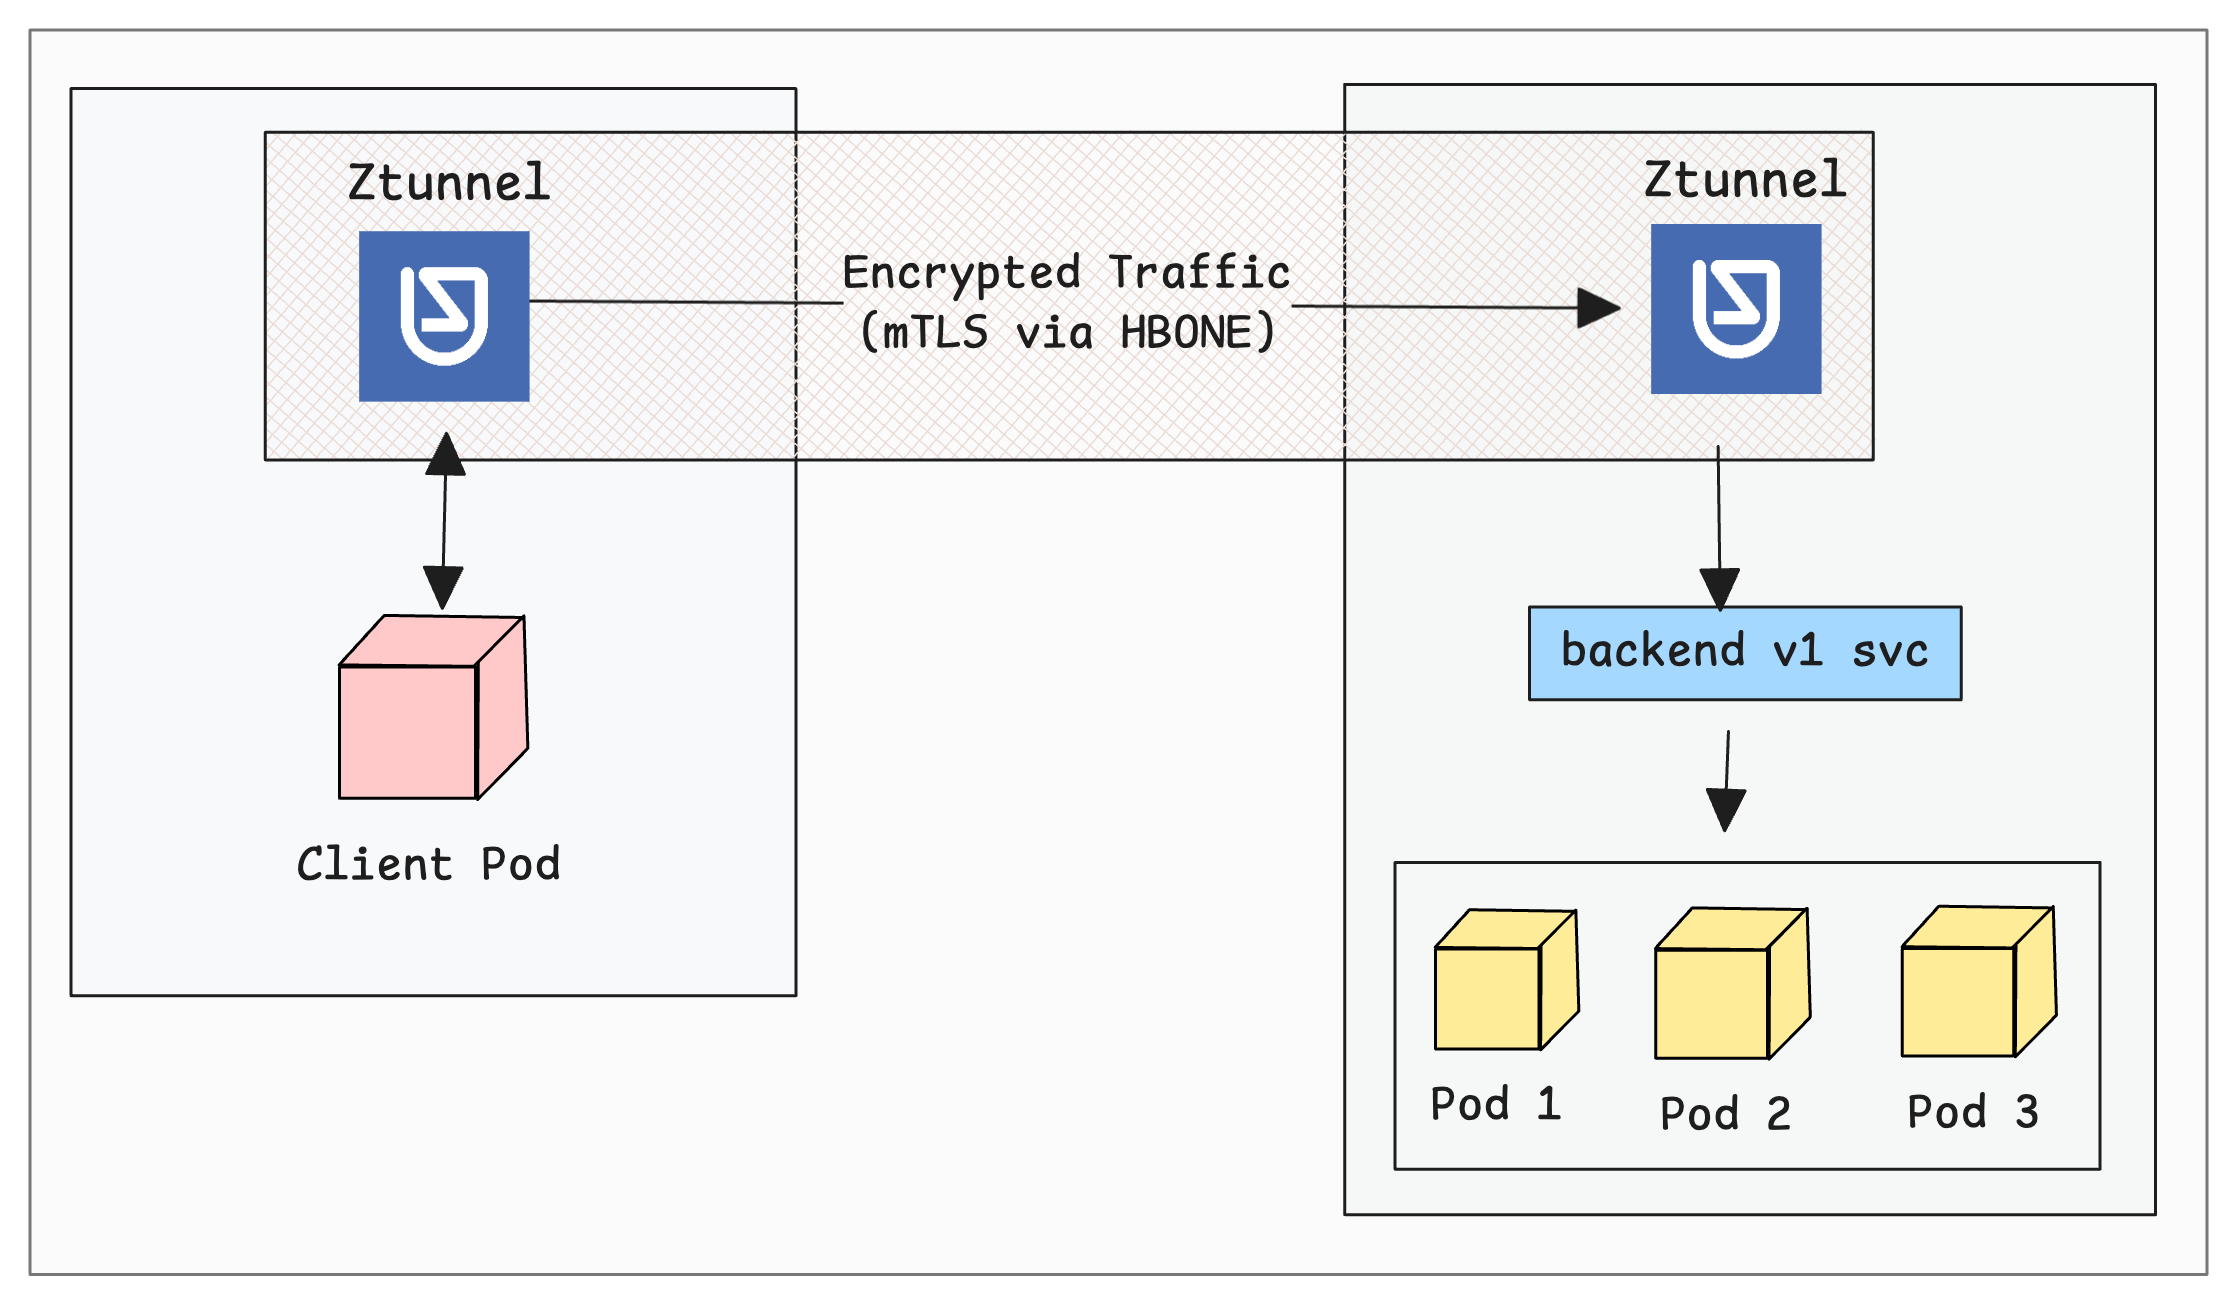
Execute the following command to generate traffic from the client pod.
$ kubectl run test-client -n istio-test \
       --image=curlimages/curl:latest \
       --restart=Never --rm -it \
       -- sh -c "while true; do curl -s http://backend-v1 && sleep 2; done"


hello from backend v1
hello from backend v1
hello from backend v1
hello from backend v1
Now, keep in running.
In a different terminal, lets check the logs of the Ztunnel proxy to see how the traffic is handled by it.
Use the following command to stream new logs from the ztunnel DaemonSet pods
$ kubectl logs -n istio-system daemonset/ztunnel -f --all-containers=true

2025-12-17T06:10:01.553894Z info access connection complete src.addr=172.31.42.213:45010 src.workload="test-client" src.namespace="istio-test" src.identity="spiffe://cluster.local/ns/istio-test/sa/default" dst.addr=172.31.36.187:15008 dst.hbone_addr=172.31.36.187:5678 dst.service="backend-v1.istio-test.svc.cluster.local" dst.workload="backend-v1-567bfdcf7-6rp4q" dst.namespace="istio-test" dst.identity="spiffe://cluster.local/ns/istio-test/sa/default" direction="outbound" bytes_sent=74 bytes_recv=184 duration="1ms"

2025-12-17T06:10:03.561041Z info access connection complete src.addr=172.31.42.213:43500 src.workload="test-client" src.namespace="istio-test" src.identity="spiffe://cluster.local/ns/istio-test/sa/default" dst.addr=172.31.42.98:15008 dst.hbone_addr=172.31.42.98:5678 dst.service="backend-v1.istio-test.svc.cluster.local" dst.workload="backend-v1-567bfdcf7-tlzsx" dst.namespace="istio-test" dst.identity="spiffe://cluster.local/ns/istio-test/sa/default" direction="inbound" bytes_sent=184 bytes_recv=74 duration="0ms"
The log output shows that the source traffic from 172.31.42.213 (ie, test-client pod) is passing through the ztunnel along with the amount of data transferred and the latency.
Now that our L4 traffic testing is done, lets validate L7 traffic using Ztunnel and Waypoint proxy.
Advanced L7 Traffic Management with Waypoint Proxies
To handle L7 features like HTTP/gRPC routing, Load balancing, Retries, timeouts, circuit breaking, L7 observability (HTTP metrics, access logs, tracing) etc., you need to have the waypoint proxy implementation.
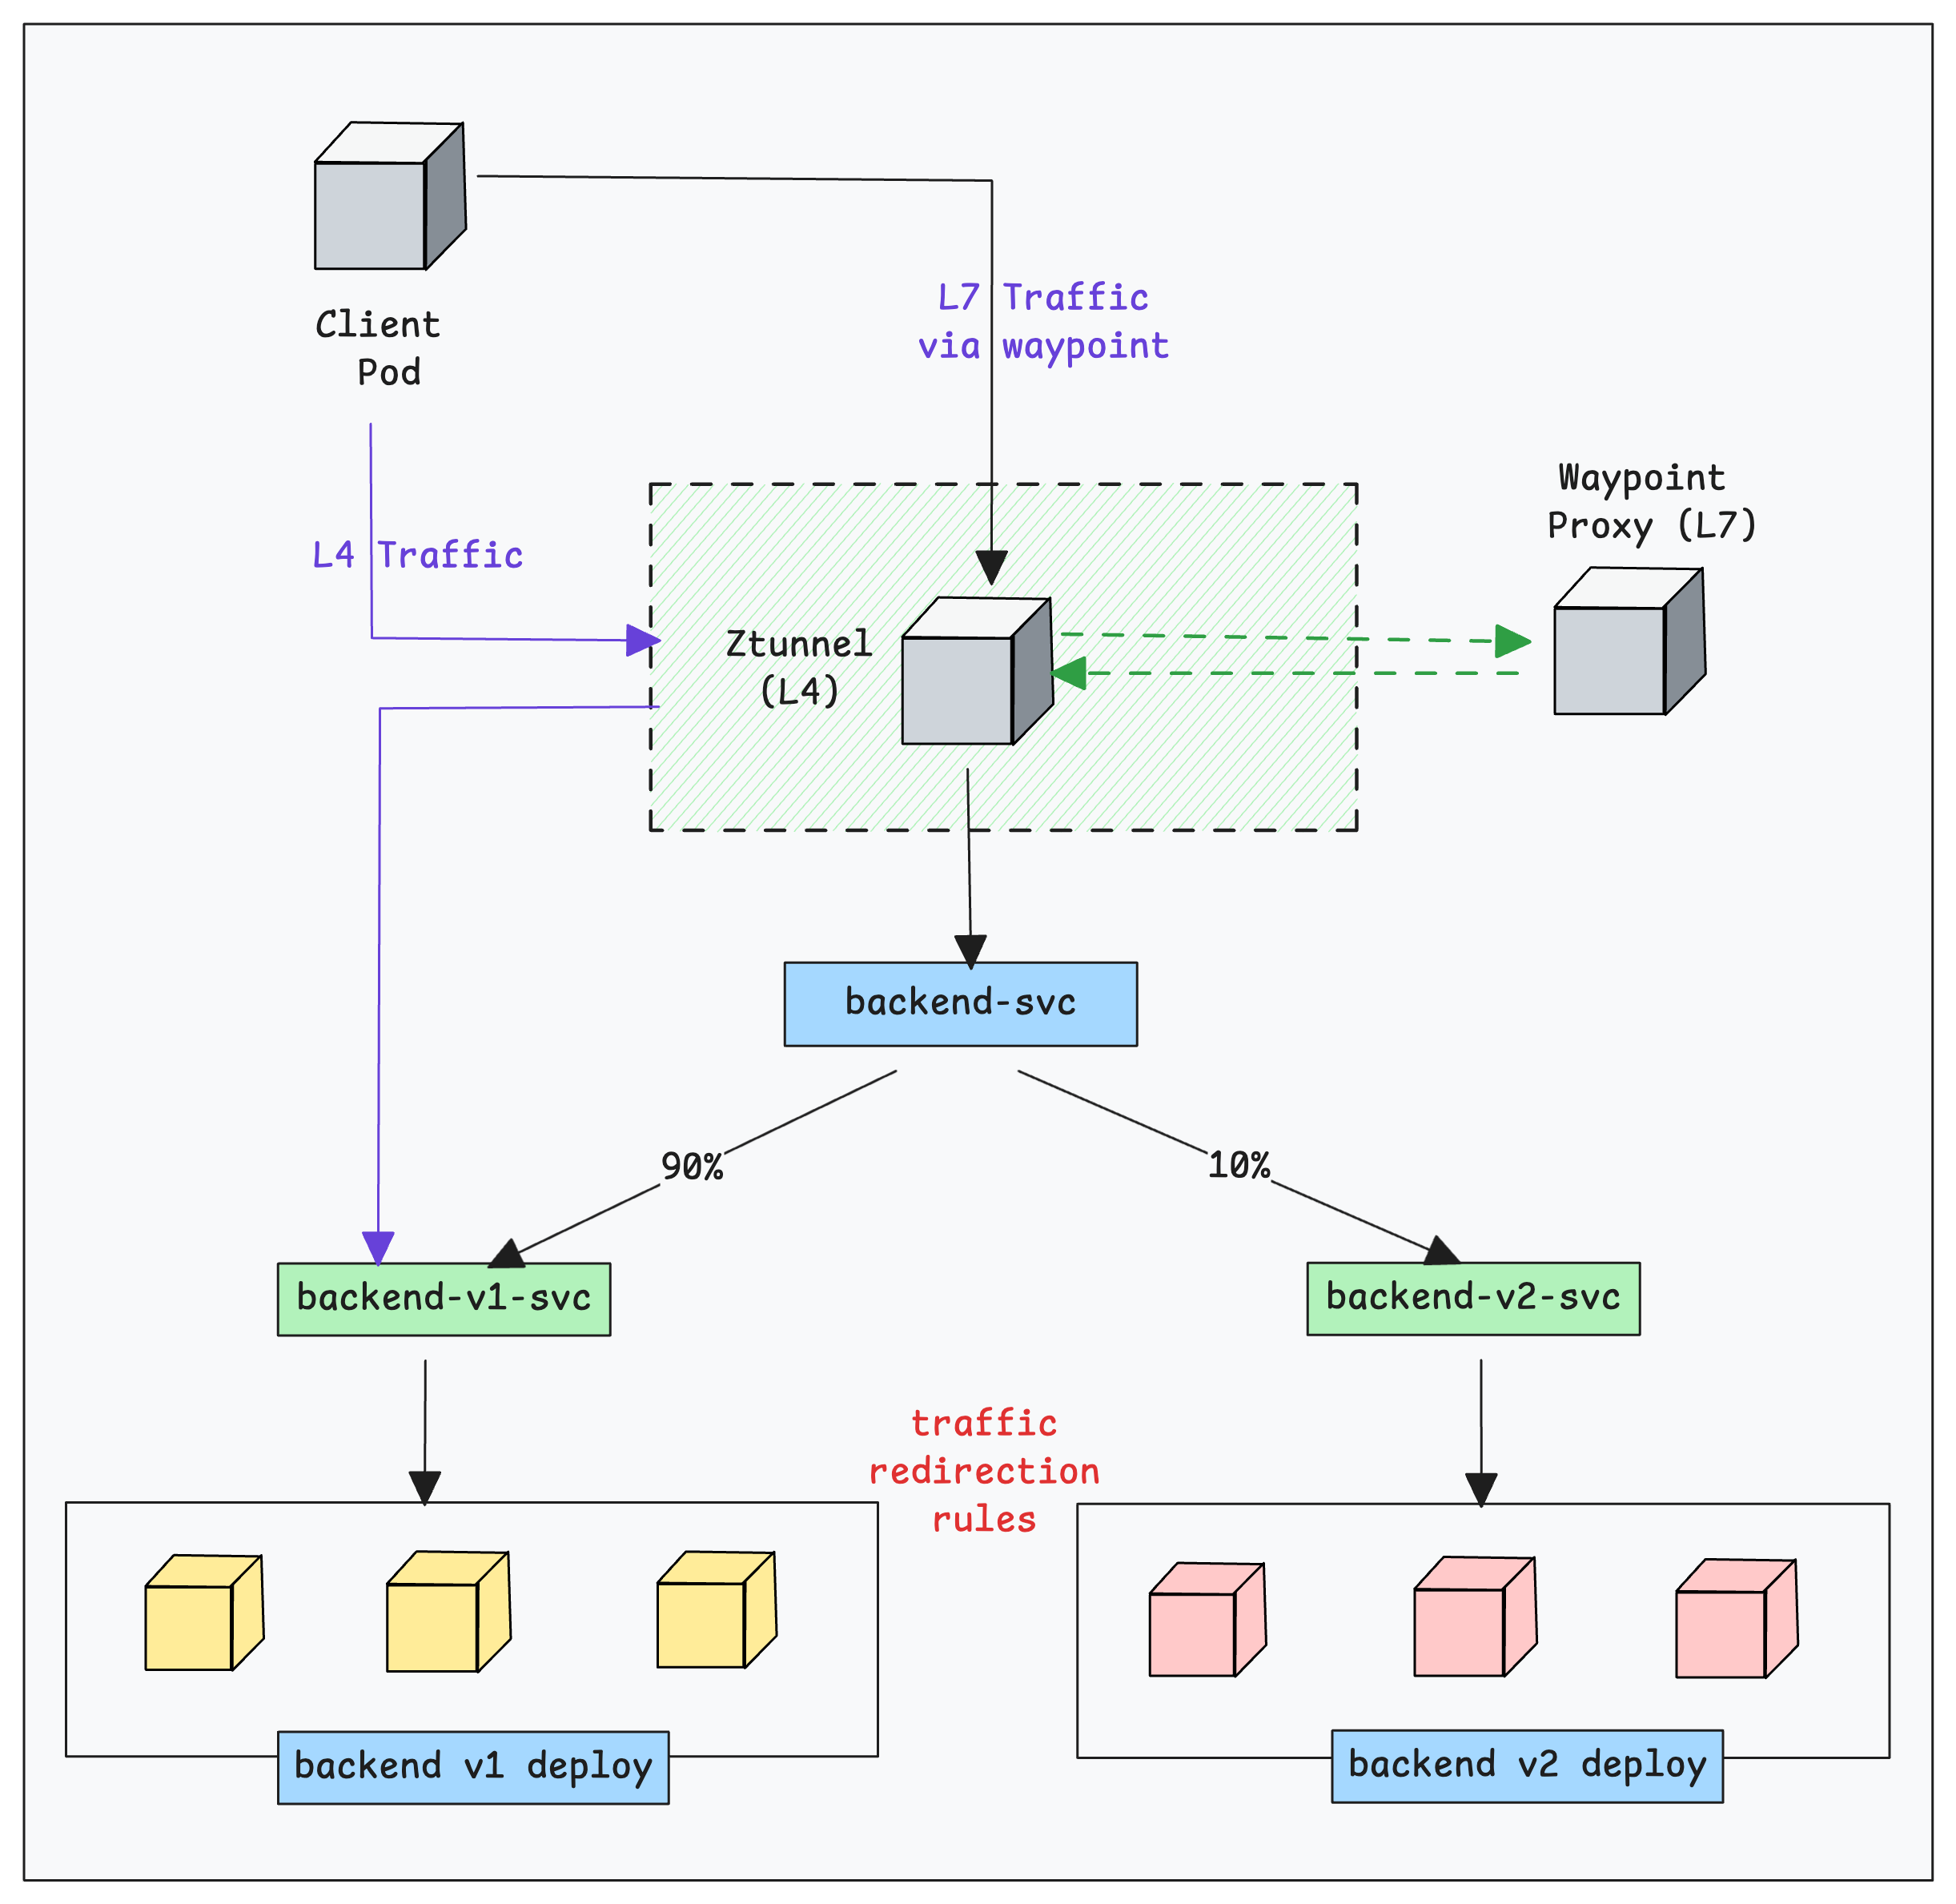
The following diagram illustrates how the waypoint proxy works alongside Ztunnel to manage the L7 traffic.
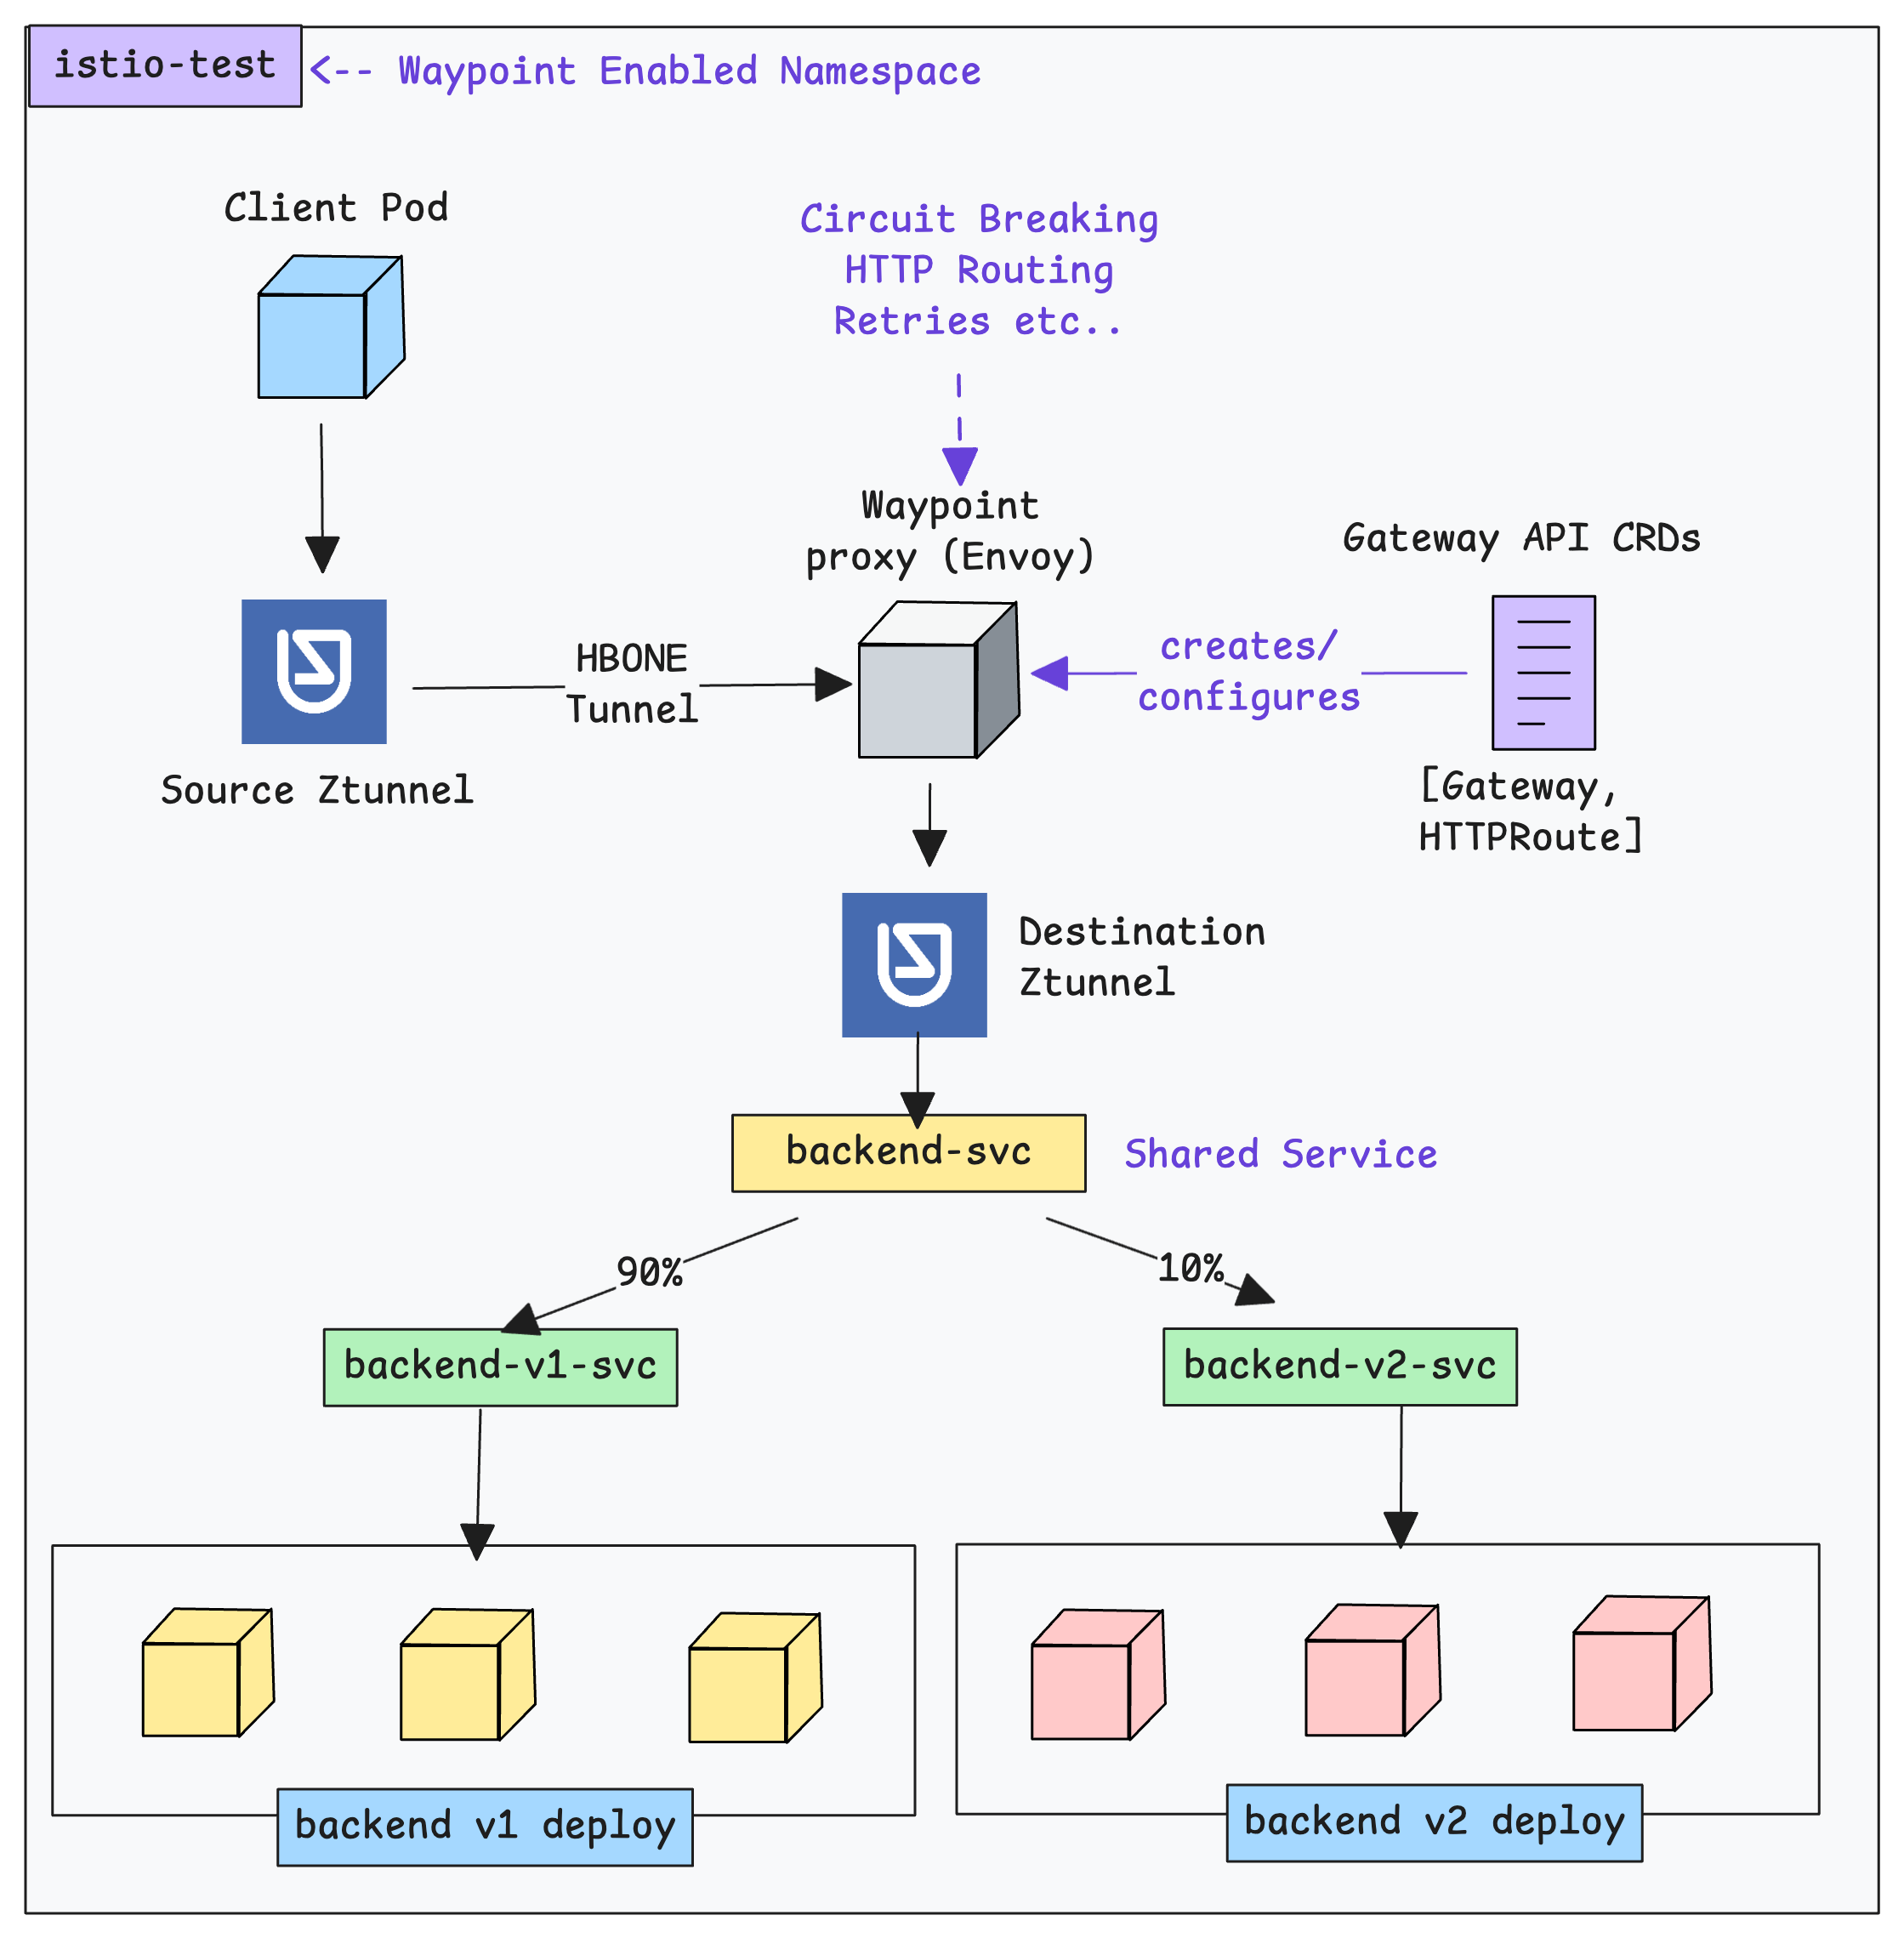
Here is how it works.
When we generate L7 traffic from the client pod, the local ztunnel on the source node intercepts traffic and provides L4 functions.
But when a request needs L7 processing, the source ztunnel wraps the raw TCP/HTTP traffic into an HBONE tunnel (mTLS-encrypted over port 15008) and sends it to the Waypoint Proxy.
The waypoint proxy then applies the L7 rules (e.g., "10% of traffic to v2) and then wraps the traffic back into a new HBONE tunnel and sends it to the destination ztunnel on the node where the target Pod actually lives.
Now, lets get started with the waypoint proxy setup.
Default Waypoint Gateway Class
We need Kubernetes Gateway API to implement Waypoint proxies.
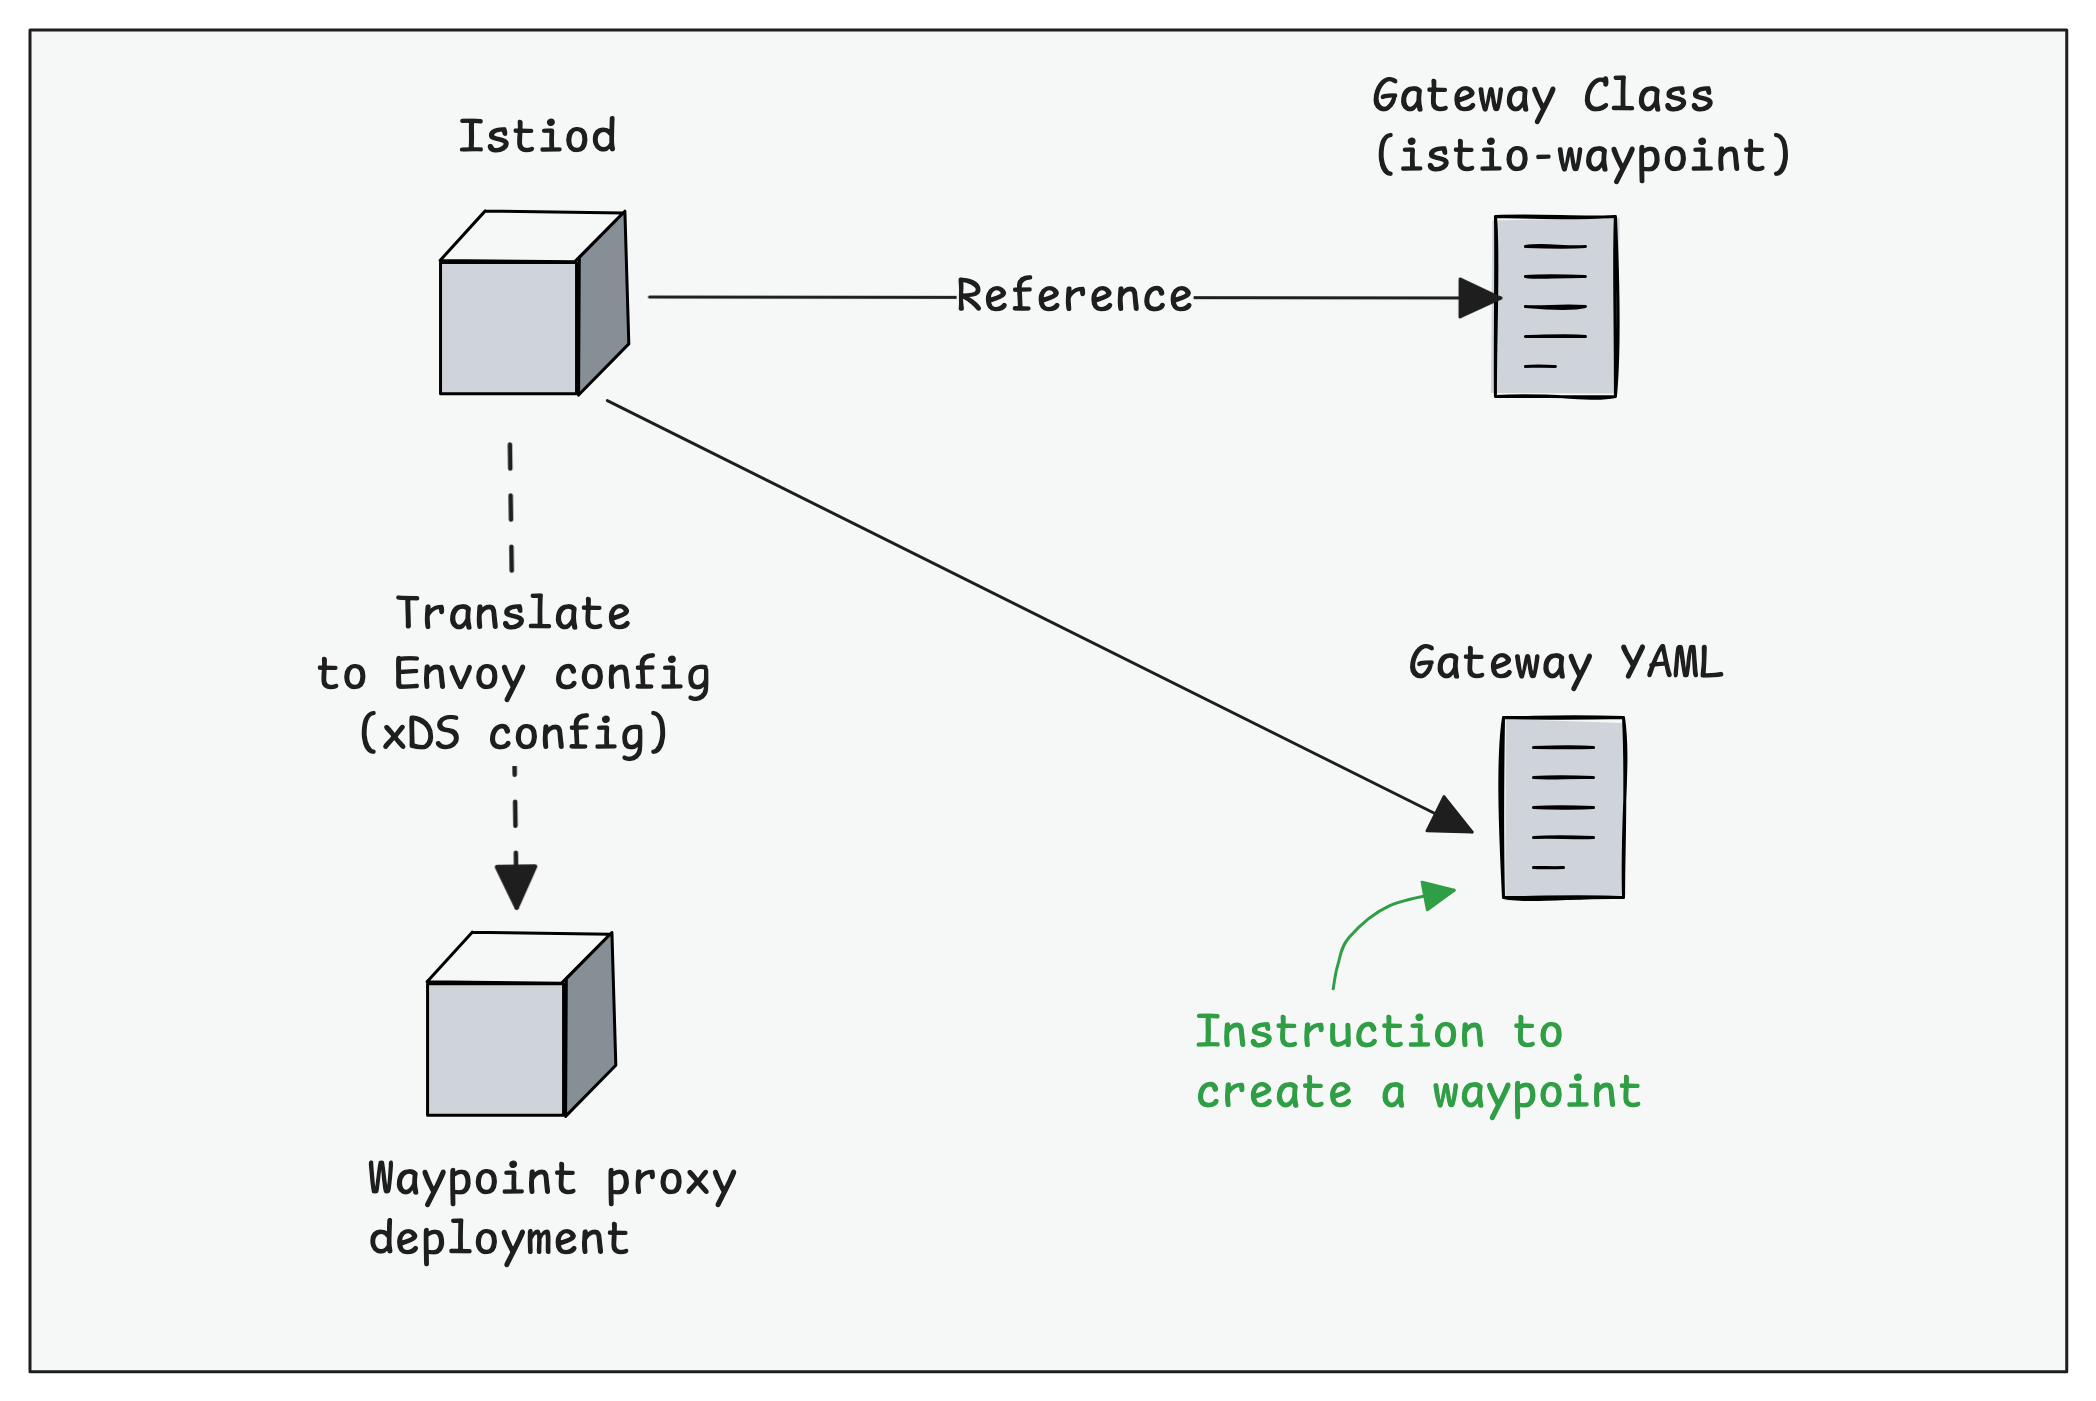
The GatewayClass for waypoint proxy named istio-waypoint is automatically created when you install the Istiod in ambient mode.
To view the waypoint GatewayClass, use the following command.
$ kubectl get gc

NAME             CONTROLLER                    ACCEPTED   AGE
istio            istio.io/gateway-controller   True       6h37m
istio-remote     istio.io/unmanaged-gateway    True       6h37m
istio-waypoint   istio.io/mesh-controller      True       6h37m
As you can see the istio-waypoint gateway class is associated with the istio.io/mesh-controller. Meaning this is the controllers that spins up the required waypoint envoy pods.
With the default GatewayClass in place, the next step is to create a Gateway.
The Gateway is what deploys the waypoint proxy.
Create a Waypoint Gateway
When we create a Gateway API Gateway object, a namespace-scoped Waypoint proxy is created.
When creating a Gateway, we need to HBONE (Port 15008) listener. It handles the encrypted mesh traffic coming from the Ztunnel.
We also need to mention the GatewayClass, that is, the default istio-waypoint GatewayClass.
Use the following to create the Gateway manifest with the above-mentioned details.
cat << EOF > test-waypoint.yaml
apiVersion: gateway.networking.k8s.io/v1
kind: Gateway
metadata:
  labels:
    istio.io/waypoint-for: all
  name: test-waypoint
  namespace: istio-test
spec:
  gatewayClassName: istio-waypoint
  listeners:
  - name: mesh
    port: 15008
    protocol: HBONE
    allowedRoutes:
      namespaces:
        from: Same
EOFistio.io/waypoint-for: all, all traffic from Ztunnel passes through Waypoint for both services and Pods.Instead of
all, we can use workload, services, or even none to control this.To apply this, use the following command.
kubectl apply -f test-waypoint.yamlOnce the Gateway is created, verify it using the following command.
$ kubectl -n istio-test get gateway

NAME            CLASS            ADDRESS          PROGRAMMED   AGE
test-waypoint   istio-waypoint   10.100.255.236   True         60s
As mentioned earlier, the Gateway object will deploy a envoy based waypoint proxy as Deployment with a ClusterIP service.
Use the following command to validate it.
$ kubectl get deploy,po,svc -n istio-test -l gateway.networking.k8s.io/gateway-name=test-waypoint

NAME                            READY   UP-TO-DATE   AVAILABLE   AGE
deployment.apps/test-waypoint   1/1     1            1           3m4s

NAME                                 READY   STATUS    RESTARTS   AGE
pod/test-waypoint-6bf8c7b68b-6v5rc   1/1     Running   0          3m4s

NAME                    TYPE        CLUSTER-IP       EXTERNAL-IP   PORT(S)               AGE
service/test-waypoint   ClusterIP   10.100.255.236   <none>        15021/TCP,15008/TCP   3m5s
Enrolling a Namespace with the Waypoint Proxy
Now we have the waypoint proxy deployed and running in the istio namespace. To use it for our 7 based workloads, we need to enroll the namespace.
To enroll a namespace with the waypoint proxy, you need to label the namespace with the waypoint Gateway name. In our case, the Gateway name is test-waypoint
Execute the following command to add the label to the namespace.
kubectl label ns istio-test istio.io/use-waypoint=test-waypointWith the above Label the traffic goes Client Pod -> Ztunnel -> Waypoint Proxy -> Destination Pod.
Here is where it gets interesting. By labeling the namespace this way, you are essentially opting all workloads and services in that namespace to use the waypoint proxy. It means, now all the L4 and L7 traffic will be intercepted by the waypoint proxy.
For example, a database operating on L4 will also use waypoint and adds a bit of latency.
istio.io/use-waypoint: over service, or pod.For example, if you only want to enable Waypoint for a particular service, then set lbel to that service as
istio.io/use-waypoint: backend-svc-1This way we can avoid the unnecessary pod to pod traffic routing to the waypoint proxy
Now, how do we know if Waypoint Proxy is now fully aware of and ready to manage traffic for our services?
Well, we can check the proxy configurations using the following istioctl command. It will list the endpoints that the Waypoint Proxy is currently tracking.
$ istioctl proxy-config endpoints deployment/test-waypoint -n istio-test

ENDPOINT                                                STATUS      OUTLIER CHECK     CLUSTER
127.0.0.1:15000                                         HEALTHY     OK                prometheus_stats
127.0.0.1:15020                                         HEALTHY     OK                agent
envoy://connect_originate/                              HEALTHY     OK                encap
envoy://connect_originate/172.31.21.17:5678             HEALTHY     OK                inbound-vip|80|http|backend-v1.istio-test.svc.cluster.local
envoy://connect_originate/172.31.22.17:5678             HEALTHY     OK                inbound-vip|80|http|backend-v2.istio-test.svc.cluster.local
envoy://connect_originate/172.31.36.187:5678            HEALTHY     OK                inbound-vip|80|http|backend-v1.istio-test.svc.cluster.local
envoy://connect_originate/172.31.38.186:5678            HEALTHY     OK                inbound-vip|80|http|backend-v2.istio-test.svc.cluster.local
envoy://connect_originate/172.31.42.98:5678             HEALTHY     OK                inbound-vip|80|http|backend-v1.istio-test.svc.cluster.local
envoy://main_internal/                                  HEALTHY     OK                main_internal
unix://./etc/istio/proxy/XDS                            HEALTHY     OK                xds-grpc
unix://./var/run/secrets/workload-spiffe-uds/socket     HEALTHY     OK                sds-grpc
In the above output HEALTHY status means, the Waypoint is successfully communicating with these pods. It ensures that all our backends are configured with the Waypoint proxy.
Now we can create an HTTPRoute object for L7 routing.
istioctl commandistioctl waypoint apply -n default --enroll-namespaceHowever, for a production setup, this approach is not ideal. Production environments should be declarative and versioned in Git.
That is why we chose the Gateway CRD based approach with explicit configuration and custom labels, instead of relying on an imperative
istioctl command.Create a Shared Service for HTTPRoute
For our demo application, we deployed two deployments and two services to test weighted routing.
For HTTPRoute, as discussed in the GAMMA approach for east-west traffic, we need a shared Service endpoint that can be referenced in the HTTPRoute configuration.
Use the following command to create the manifest for shared Service named backend .
cat << EOF> shared-svc.yaml
apiVersion: v1
kind: Service
metadata:
  name: backend
  namespace: istio-test
spec:
  ports:
  - name: http
    port: 80
    targetPort: 80
  selector:
    app: backend
EOF
To apply this, use the following command.
kubectl apply -f shared-svc.yamlNow that we have the shared service endpoint, lets create the HTTPRoute.
Create an HTTPRoute
Using HTTPRoute, we will perform a weighted canary deployment that splits traffic in a 90/10 ratio between the demo applications we deployed.
All these HTTP-based Layer 7 configurations will be handled by the waypoint proxy.
Use the following configuration to create an HTTPRoute
cat << EOF > istio-httproute.yaml
apiVersion: gateway.networking.k8s.io/v1
kind: HTTPRoute
metadata:
  name: backend-route
  namespace: istio-test
spec:
  parentRefs:
  - name: backend
    kind: Service
    group: ""
    namespace: istio-test
  rules:
  - matches:
    - path:
        type: PathPrefix
        value: /
    backendRefs:
    - name: backend-v1
      port: 80
      weight: 90
    - name: backend-v2
      port: 80
      weight: 10
EOF
As you can see, we have used the shared service backend as the parentRefs.
To apply this, use the following command.
kubectl apply -f istio-httproute.yamlVerify the HTTPRoute using the following command.
$ kubectl -n istio-test get httproutes

NAME            HOSTNAMES   AGE
backend-route               48s
Next we will enable access logging for Waypoint Proxy using the istio Telemetry CRD. It will record a detailed log entry for every single request it process.
Enable Access Logging Using Telemetry
Telemetry is one of the Istio Custom Resources that enables the logs and other observability features for all Istio-managed traffic in the proxies.
Here, we are using this to generate the logs in Waypoint about the Layer 7 testing.
Use the following manifest to enable access logging for istio-test namespace.
cat << EOF > telemetry-log.yaml
apiVersion: telemetry.istio.io/v1alpha1
kind: Telemetry
metadata:
  name: enable-logs
  namespace: istio-test
spec:
  accessLogging:
    - providers:
      - name: envoy
EOF
To apply this, use the following command.
kubectl apply -f telemetry-log.yamlTo list the Telemetry resources, use the following command.
$ kubectl -n istio-test get telemetries

NAME          AGE
enable-logs   7m1s
Now, we are ready for testing.
Validate Layer 7 Traffic Through the Waypoint Proxy
To generate traffic, we will use the same curl based test-client pod and send request to the shared backend service endpoint. Ideally we should see the 90/10 traffic split in the response.
Execute the following command.
$ kubectl run test-client -n istio-test \
       --image=curlimages/curl:latest \
       --restart=Never --rm -it \
       -- sh -c "while true; do curl -s http://backend && sleep 2; done"

hello from backend v1
hello from backend v1
hello from backend v1
hello from backend v1
hello from backend v1
hello from backend v2  <-- 10% Canary Traffic
hello from backend v1
hello from backend v1
hello from backend v1
hello from backend v1
hello from backend v1
hello from backend v2  <-- 10% Canary Traffic
hello from backend v1
From the output, you can see that the traffic split is happening in 90/10 way. It means waypoint proxy is handling the traffic.
To further verify if waypoint proxy is handling this traffic, open another terminal to watch the logs.
Use the following command to stream the live logs of the Waypoint proxy.
$ kubectl logs -n istio-test -l gateway.networking.k8s.io/gateway-name=test-waypoint -f

[2025-12-01T12:59:44Z] "GET /" 200 via_upstream
  src=172.31.26.126:46074 (client)
  dst=backend-v2.istio-test.svc.cluster.local
  hbone_target=172.31.23.1:5678
  gateway=istio-waypoint-gateway (inbound-vip|80)

[2025-12-01T12:59:46Z] "GET /" 200 via_upstream
  src=172.31.26.126:54482 (client)
  dst=backend-v1.istio-test.svc.cluster.local
  hbone_target=172.31.30.34:5678
  gateway=istio-waypoint-gateway (inbound-vip|80)
The output shows that the traffic is passing through the Waypoint Proxy, where we defined the L7 policies.
That’s it! We have successfully set up Istio Ambient Mode and tested its key features, covering both Layer 4 and Layer 7 traffic.
Now, do not leave any resources running, as they may cost you money.
If you are done with your learning and testing, lets clean up all the Istio system components from the cluster.
Cleanup the Setup
To delete Ztunnel.
helm delete ztunnel -n istio-systemTo delete Istio CNI.
helm delete istio-cni -n istio-systemTo delete the Istio daemon.
helm delete istiod -n istio-systemTo delete the Istio base.
helm delete istio-base -n istio-systemIs Istio ambient mode production ready?
One key question everyone has is the production readiness of ambient mode.
Well, Ambient mode is officially Generally Available (GA).
In our testing on a standard EKS cluster, we noticed that the Ztunnel resource footprint was significantly lighter than the sidecars we previously implemented. Which means, the core is stable enough for single cluster production use in many scenarios today.
That said, this does not automatically mean you should move everything to production today.
You should validate limits and test workloads carefully for your exact use case before any kind of production rollout.
Now the "million dollar question" Is anyone actually using Ambient Mode in production today?
Well, Tetrate, an enterprise service mesh platform has made a secure, government-ready version of Istio Ambient Mode, tested with the U.S. Air Force, and is now offering it to customers who need high security and compliance.
Also, the Multi-cluster ambient mesh is not production ready yet. It is still in alpha. So if you are looking for multi cluster mesh, ambient mesh is not a good choice today.
If you looking at adoption, the ztunnel image in dockerhub has more than 10 million downloads.
Conclusion
This blog covered the setup and configuration of Istio Ambient Mode.
Unlike the traditional sidecar model, Ambient Mesh follows a layered approach by separating Layer 4 and Layer 7 traffic handling.
One important thing to give more attention to is waypoint proxy labeling. You should design your services and namespaces in a way that only workloads that really need Layer 7 features use a waypoint proxy.
For production setups that involve multiple clusters and multiple environments, it is recommended to use Helm along with a GitOps controller like ArgoCD or Flux to manage Istio ambient mesh components.
In the upcoming blogs, we will look at how to migrate from sidecars to the ambient mesh architecture.
If you face any issues during the setup, drop a comment below. We will help you.