


Looking for a guide to setup GPU operator on Kubernetes or to understand how to use GPUs with Kubernetes? This blog is for you.
By the end of this blog, you will have a clear understanding of:
- Need for GPU operator on Kubernetes
- Setting up NVIDIA GPU Operator on a Kubernetes cluster
- Verify if Kubernetes detects GPUs
- How to deploy a real GPU-based workload to validate the full stack.
Lets get started.
Why Kubernetes Can't See Your GPU
By default, Kubernetes will only have knowledge about CPUs and memory.
If you are provisioning GPU nodes for Kubernetes, it will not have knowledge about whether a GPU is attached to the node. The reason os GPU's are vendor specific hardware (NVIDIA, AMD, intel etc.
Kubernetes Device Plugins solves this by letting Kubernetes know about the GPU node details. Meaning, it helps hardware vendors (like NVIDIA or AMD GPUs) register their devices with the kubelet.
Now, installing device plugin and drivers for the GPU nodes manually is a complex task. This is where Kubernetes GPU operators come in. The GPU Operators will automate the installation of device plugins, drivers, Node Feature Discovery, runtimes, etc.
Here is an important thing.
There is no standard operator for GPU's. You have to choose the operator based on the hardware you are using. For example, if the GPU you are using is NVIDIA, you have to install the NVIDIA GPU Operator (one we are using in this guide).
How GPU Operator works
Before we get in to hands-on lets understand how a GPU Operator works.
Here is how it works.
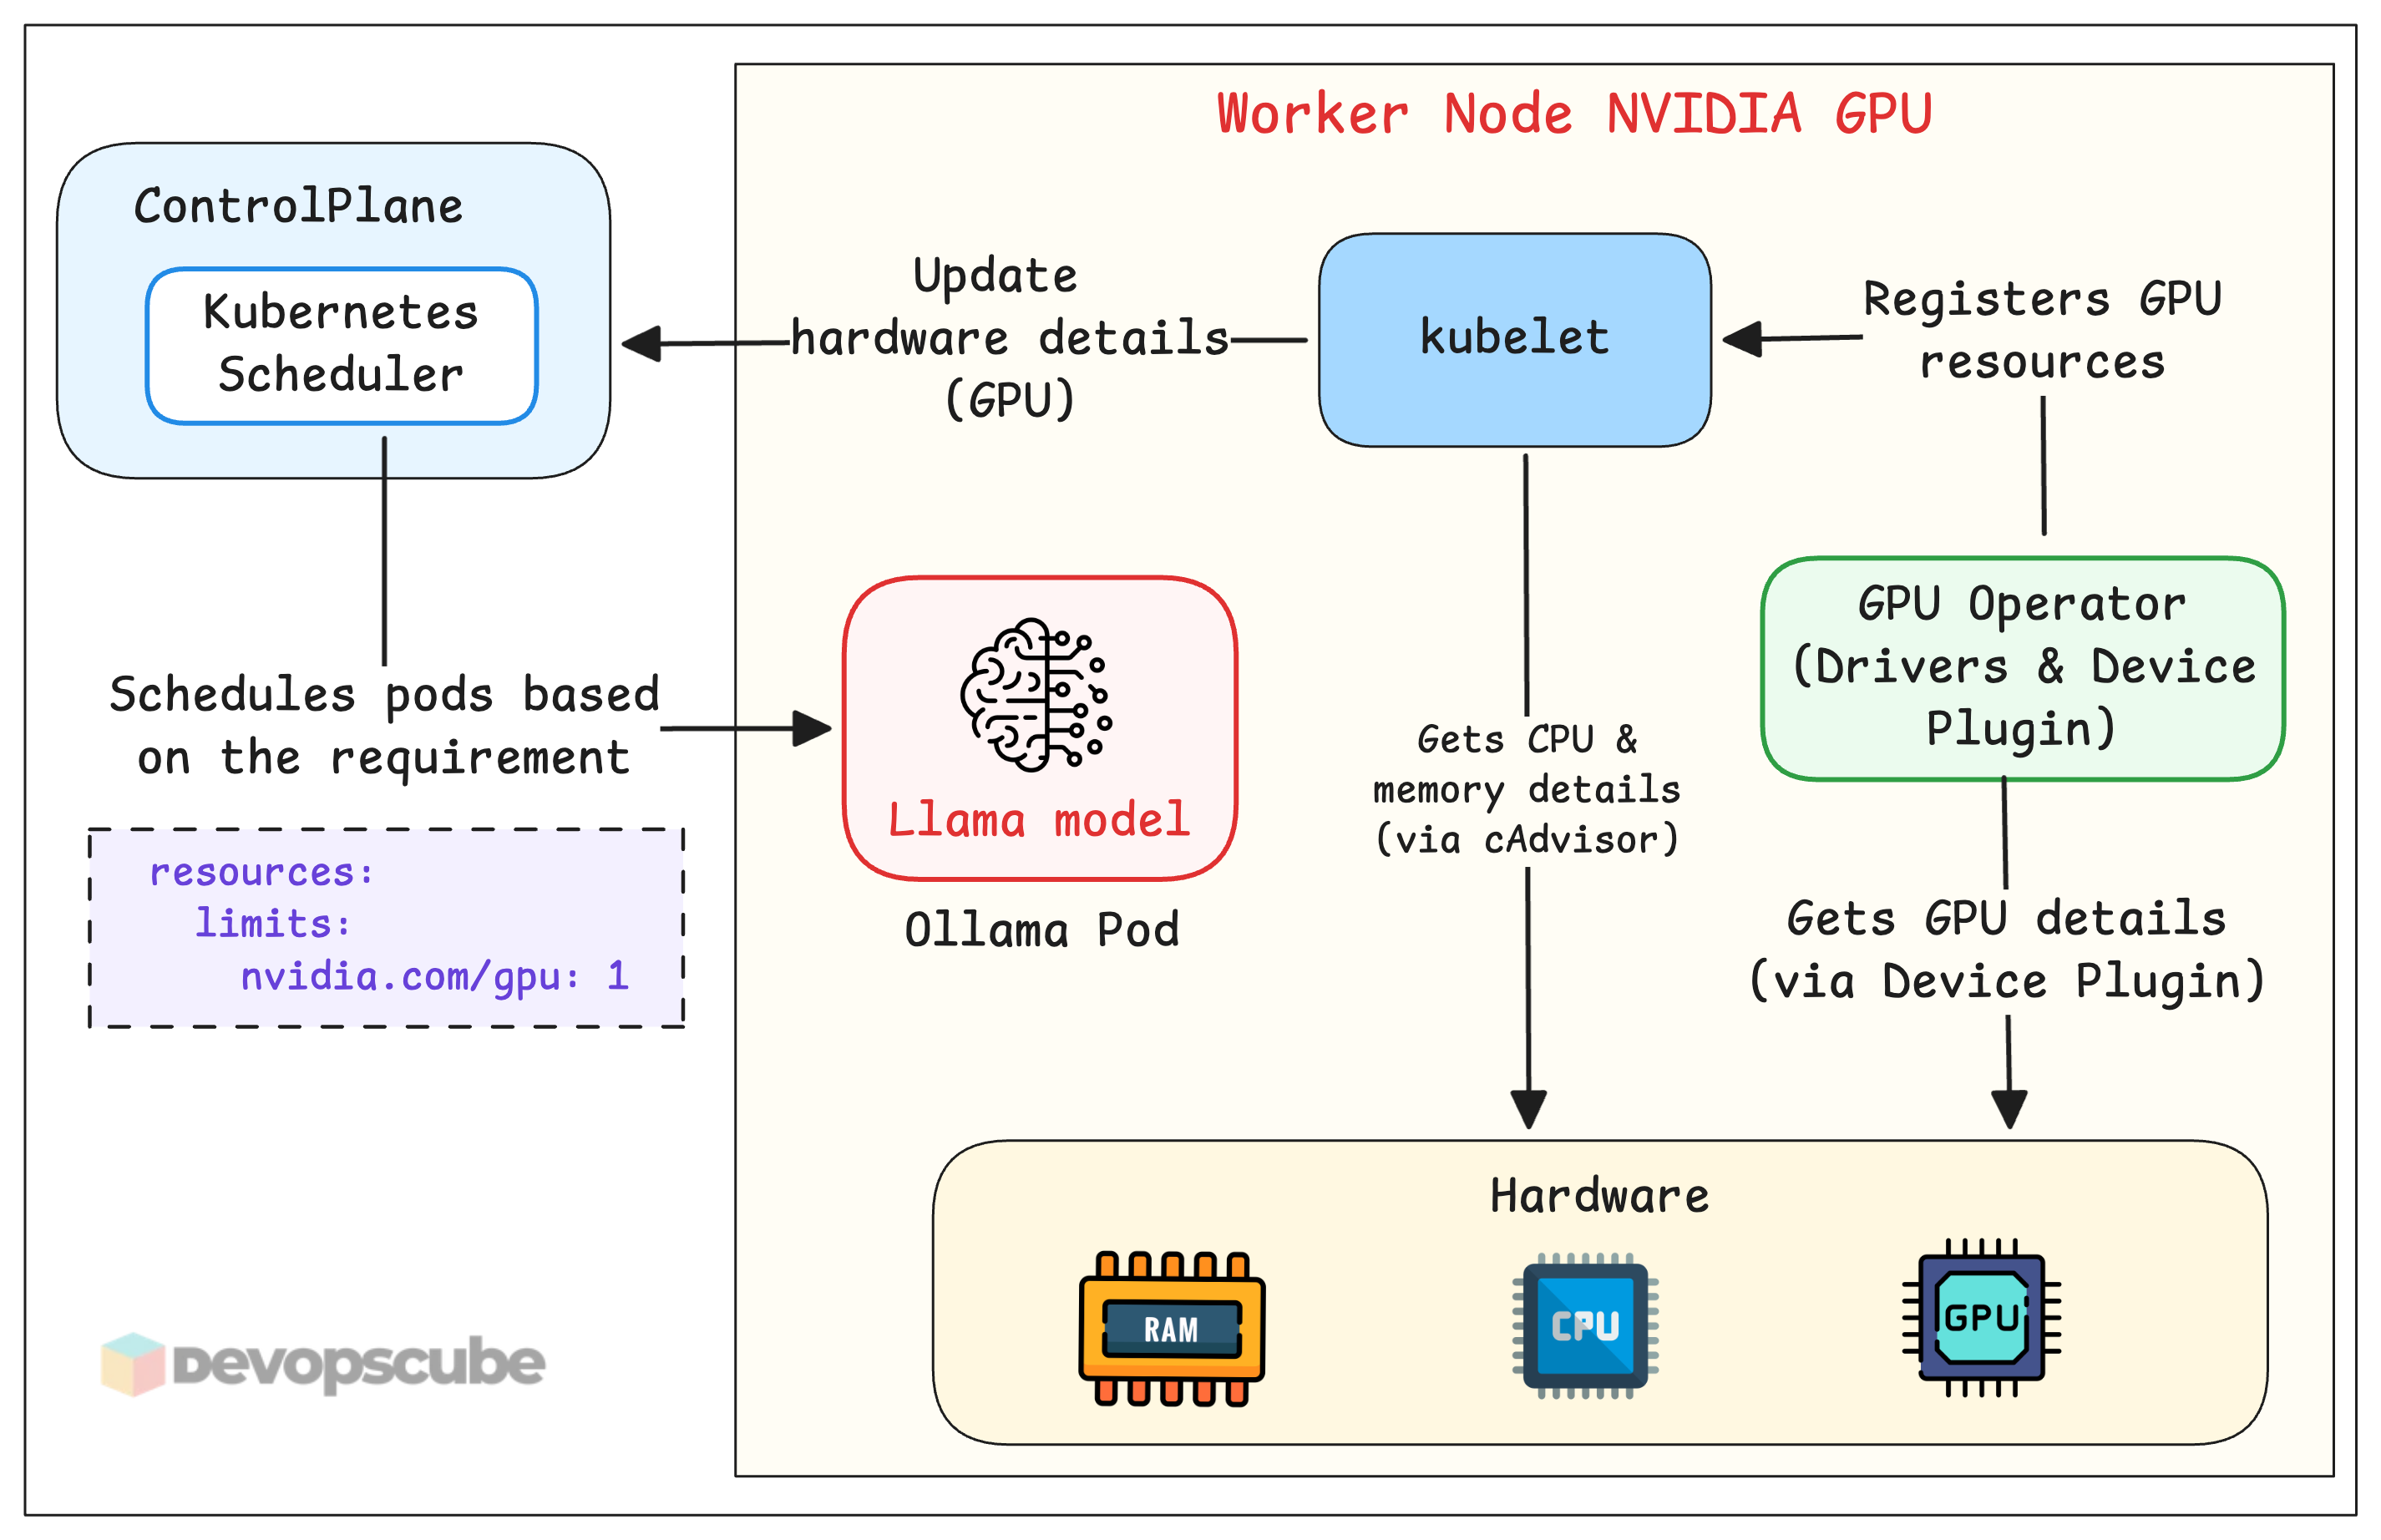
- Kubelet collects the hardware details of the node (via cAdvisor) and sends them to the Scheduler. Kubelet has no awareness about the GPU at this stage.
- Once we install the GPU operator, it installs a device plugin that collects the GPU details and registers
nvidia.com/gpuas an extended resource with kubelet. - Once the GPU details are registered, you can deploy GPU based applications and request for GPU resources (For example, llama model).
The following diagram illustrated how GPU nodes gets exposed to Kubernetes.
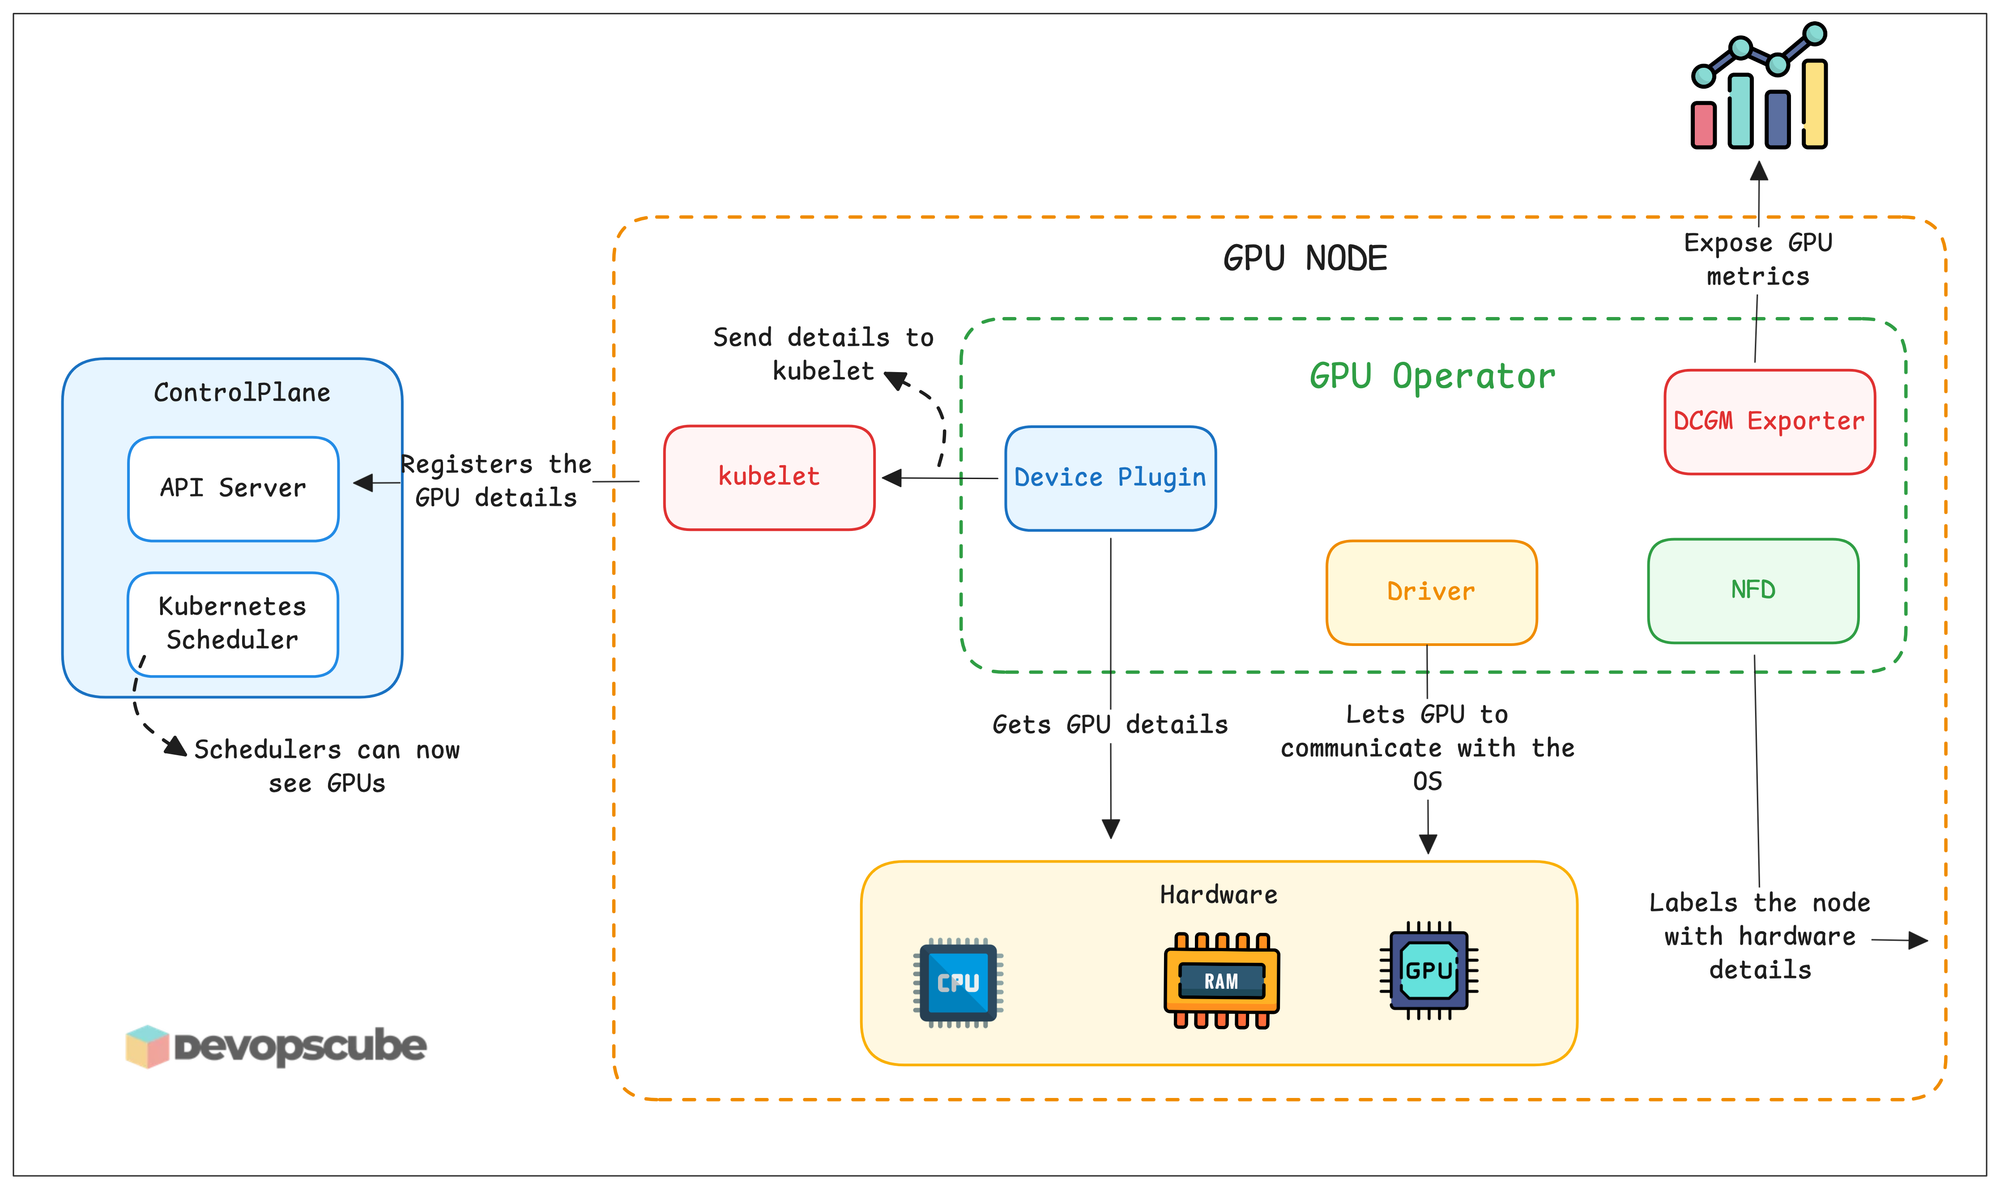
In the diagram, not all operator components are shown; only a few important components are shown.
These are the components that will be deployed by the NVIDIA GPU Operator.
gpu-operator- Main controller of the operator which install and manages all components.nvidia-driver-daemonset- Install the NVIDIA GPU drivers on each GPU node so the node can use the GPU.gpu-operator-node-feature-discovery.*- Detects hardware details and adds as node labels.nvidia-container-toolkit-daemonset- Runs on all nodes and installed GPU runtimes for containers to use GPUs.nvidia-cuda-validator- Runs tests on the nodes to verify if drivers, plugins, and runtimes are installed on the node.nvidia-dcgm-exporter- This exports GPU metrics which can be scraped using Prometheus.nvidia-device-plugin-daemonset- This is the component that registers the GPU details to kubernetesnvidia-operator-validator- Checks the health of GPU operator
Let's start the Nvidia GPU Operator setup.
Setup Prerequisites
Below are the prerequisites required for this blog.
- Kubernetes cluster with GPU-enabled nodes
- kubectl
- Helm
Set Up the NVIDIA GPU Operator
Follow the steps given below to setup the operator.
Step 1: Label and Taint GPU Nodes
In mixed clusters (GPU + non-GPU nodes), you must prevent non-GPU workloads from consuming GPU node resources. We can use taints and labels to enforce this segreration.
Use the following command to add a taint and label the node.
kubectl taint node <your-gpu-node-name> nvidia.com/gpu=present:NoSchedule

kubectl label node <your-gpu-node-name> node-type=gpu
This is one of the best practises for GPU nodes.
nvidia.com/gpu=present:NoSchedule will be added as default.Step 2: Add Nvidia GPU Operator Helm Repo
We are going to use Helm to install the Nvidia GPU operator, lets add the Helm repo for the chart.
Run the following command to add the repo and update the Helm repos.
helm repo add nvidia https://helm.ngc.nvidia.com/nvidia \
    && helm repo update
And run the following command to verify if the NVIDIA repo has added.
helm search repo nvidiaYou will see the following charts.
NAME                               	CHART VERSION	APP VERSION	DESCRIPTION
nvidia/nvidia-device-plugin        	0.9.0        	0.9.0
nvidia/nvidia-dra-driver-gpu       	25.12.0      	25.12.0
nvidia/cybersecurity-dfp           	0.2.1        	23.07
nvidia/cybersecurity-sp            	0.1.0        	23.07
nvidia/deepstream-its              	0.2.0        	1.0
nvidia/dps                         	0.7.8        	0.7.8
nvidia/dps-bmc-simulator           	0.7.8        	0.7.8
nvidia/ds-face-mask-detection      	1.0.0        	1.2
nvidia/ds-lipactivity              	0.0.1        	0.0.1
nvidia/fed-svr-3                   	0.9.0        	1.0
nvidia/fed-wrk-3                   	0.9.0        	1.0
nvidia/gpu-operator                	v25.10.1     	v25.10.1
nvidia/harbor-reef-operator        	1.0.1        	1.0.0
nvidia/isaac-lab-teleop            	2.2.0        	0.0.0
nvidia/k8s-nim-operator            	3.0.2        	3.0.2
nvidia/network-operator            	25.10.0      	v25.10.0
nvidia/nspect_test_policy_org_chart	1            	1.16.0
nvidia/nvsm                        	1.0.1        	1.0.1
nvidia/tensorrt-inference-server   	1.0.0        	1.0
nvidia/tensorrtinferenceserver     	1.0.0        	1.0
nvidia/tritoninferenceserver_aws   	0.1.0        	1.16.0
nvidia/video-analytics-demo        	0.1.9        	1.2
nvidia/video-analytics-demo-l4t    	0.1.3        	0.1.3
Step 3: Install Nvidia GPU Operator
Let's install the Nvidia GPU Operator.
The GPU operator handles everything like installing and managing drivers, plugins, runtimes, etc.
Now, use the following Helm command to install the operator.
helm install --wait gpu-operator \
  -n gpu-operator --create-namespace \
  nvidia/gpu-operator
Then, run the following command to check if the pods are up and running.
kubectl get po -n gpu-operatorYou will get the following output.
gpu-feature-discovery-kbcth                                 1/1     Running     0          43s
gpu-operator-7569f8b499-dgzql                               1/1     Running     0          57s
gpu-operator-node-feature-discovery-gc-55ffc49ccc-6bvmc     1/1     Running     0          57s
gpu-operator-node-feature-discovery-master-6b5787f695-lg584 1/1     Running     0          57s
gpu-operator-node-feature-discovery-worker-f87lc            1/1     Running     0          57s
gpu-operator-node-feature-discovery-worker-nggs5            1/1     Running     0          57s
nvidia-driver-daemonset-dgzql                               1/1     Running     0          57s
nvidia-container-toolkit-daemonset-92vlv                    1/1     Running     0          44s
nvidia-cuda-validator-6pwtz                                 0/1     Completed   0          37s
nvidia-dcgm-exporter-l92vx                                  1/1     Running     0          43s
nvidia-device-plugin-daemonset-5t52d                        1/1     Running     0          44s
nvidia-operator-validator-4wcc6                             1/1     Running     0          44s
Step 4: Verify GPU Detection
Now, let's verify if the GPU nodes are detected by Kubernetes.
Run the following command to check for the GPU capacity.
kubectl describe node <gpu-node-name> | grep -A6 "Capacity"You will get the following output.
Capacity:
  cpu:                24
  ephemeral-storage:  742911020Ki
  hugepages-1Gi:      0
  hugepages-2Mi:      0
  memory:             247413472Ki
  nvidia.com/gpu:     1
You can see the nvidia.com/gpu=1, which means 1 GPU is available. The Nvidia GPU operator setup is completed now.
nvidia.com/gpu is missing, the device plugin is not running correctly. Check logs with: kubectl logs -n gpu-operator -l app=nvidia-device-plugin-daemonsetNext we will deploy a GPU based workload and schedule it on the GPU node.
Deploy a GPU Workload: Ollama + Llama
Let's validate the full stack by deploying a real GPU workload.
We will use Ollama, a lightweight runtime for open-source LLMs to run Llama 3.2 (3B parameters) on our GPU node.
Let's start the Ollama deployment.
Step 1: Add Ollama Helm Repo
To install Ollama, we will use a community Helm chart.
Run the following command to add the repo and update the Helm repos.
helm repo add otwld https://helm.otwld.com/And run the following command to verify if the NVIDIA repo has added.
helm search repo ollamaYou will get the following output.
NAME        	CHART VERSION	APP VERSION
otwld/ollama	1.43.0       	0.16.1
Step 2: Create Custom Helm Chart
To install Ollama, we need to make some configuration changes in the values file, like enabling GPU, adding toleration, selecting a node, etc.
Below is the custom values file we used to deploy Ollama.
Create a ollama.yaml file and copy the following content.
ollama:
  gpu:
    enabled: true
    type: nvidia
    number: 1

  models:
    pull:
      - llama3.2:3b

nodeSelector:
  node-type: gpu

tolerations:
  - key: "nvidia.com/gpu"
    operator: "Exists"
    effect: "NoSchedule"

persistentVolume:
  enabled: true
  size: 30Gi

resources:
  limits:
    nvidia.com/gpu: 1
If you want to check more configurations in the default values file, use the following command to get the values files.
helm show values otwld/ollama > values.yamlStep 3: Deploy Ollama
Lets use the custom values file and install Ollama.
Use the following command to install it.
helm install ollama otwld/ollama \
  --namespace ollama \
  --create-namespace \
  -f ollama.yaml
Once the command is run, use the following command to verify if the pods are up and running.
kubectl get po -n ollamaYou will get the following output.
NAME                     READY   STATUS    RESTARTS   AGE

ollama-cc9b55478-v9ddq   1/1     Running   0          7m50s
Step 4: Verify GPU Usage
To verify if the pod is using a GPU, use the following command.
kubectl exec -n ollama deployment/ollama -- nvidia-smiYou can see the GPUs name as shown below.
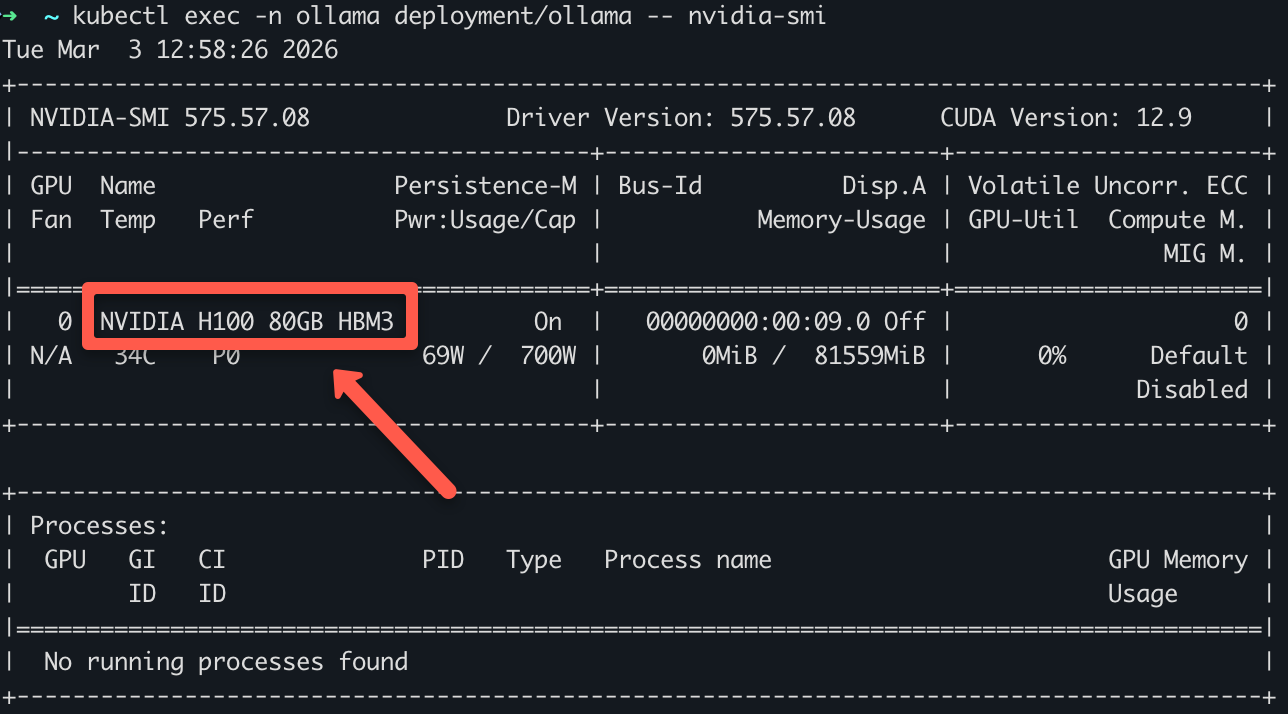
Step 5: Query the Model
Now, Ollama pods are up and running, let's send a query to the llama model running on Ollama.
Since the services are in Cluster IP, we will expose them using port forwarding.
Use the following command to port forward the service.
kubectl port-forward svc/ollama 11434:11434 -n ollama
Once it's port forwarded, run the following command with the query as shown below.
curl -s http://localhost:11434/api/generate \
  -d '{
    "model": "llama3.2:3b",
    "prompt": "What do you know about Kubernetes?",
    "stream": false
  }' | jq -r '.response'
You will get an output similar to what is shown below.

Conclusion
You now have a complete picture of GPU scheduling on Kubernetes.
You have learned about setting up a GPU operator on Kubernetes and deployed a real LLM on a GPU node.
When it comes to MLOps, understanding GPU node on Kubernetes is very important as many ML workloads need GPU based clusters.
Having said that, getting GPUs working is step one. There are different strategies in managing GPUs in Kubernetes for the efficient use of GPU resources. For example, GPU Time-Slicing, Multi instance GPU (MIG) etc..
We will look at in the upcoming hands-on blogs.
If you are facing issues when setting up GPU operator, do let us know in the comments.