


In this guide, you will learn to provision Amazon EFS as persistent storage for an Amazon EKS cluster. It includes dynamic and static provisioning, StorageClass, PVC, and a practical example.
Here is what we are going to do.
- Enable the EFS CSI driver addon
- Create an EFS filesystem
- Create a StorageClass for EFS Dynamic provisioning.
- Deploy a sample app to test the EFS based PVC using Dynamic provisioing.
- Try out Static Provisioning on the existing EFS file system
Lets dive in!
Use Case
There are many use cases where you might need EFS backed storage for your applications running on AWS EKS.
The main advantage of using the EFS as persistent storage is that it is a Network File System (NFS), so multiple worker nodes can share the same storage space.
Unlike EBS volumes which can only be attached to one pod at a time, EFS supports concurrent access from multiple Kubernetes pods (ReadWriteMany access mode), making it ideal for use cases requiring shared storage.
What is Amazon EFS CSI Driver?
EKS does not natively support EFS volumes out of the box.
To use EFS, you need to enable the EFS CSI driver add-on provided by AWS. It is a plugin which allows Kubernetes to use Amazon EFS file systems as persistent storage.
Once you enable it, you will be able to create EFS based persistent volumes using the EFS storage class.
Prerequisites
The following are the prerequisites to follow this guide.
- AWS CLI (v2.18.10 or later) installed with admin privileges to the EKS service [Local Machine]
- Existing EKS cluster or create a new one with this guide --> Create AWS EKS Cluster Using eksctl
- EKSCTL (v0.193.0 or later) utility installed on your workstation [Local Machine]
- Kubectl --> A suitable version as the EKS cluster should be present on the local machine [Local Machine]
Install the EFS CSI Driver (eksctl + alternatives)
You can add parameters to the eksctl manifest to install the EFS CSI driver. This is the easiest method if you are creating the EKS cluster with the driver.
EKSCTL Manifest Installation
To enable the EFS CSI Driver, add the following parameters under the addons section of the eksctl manifest.
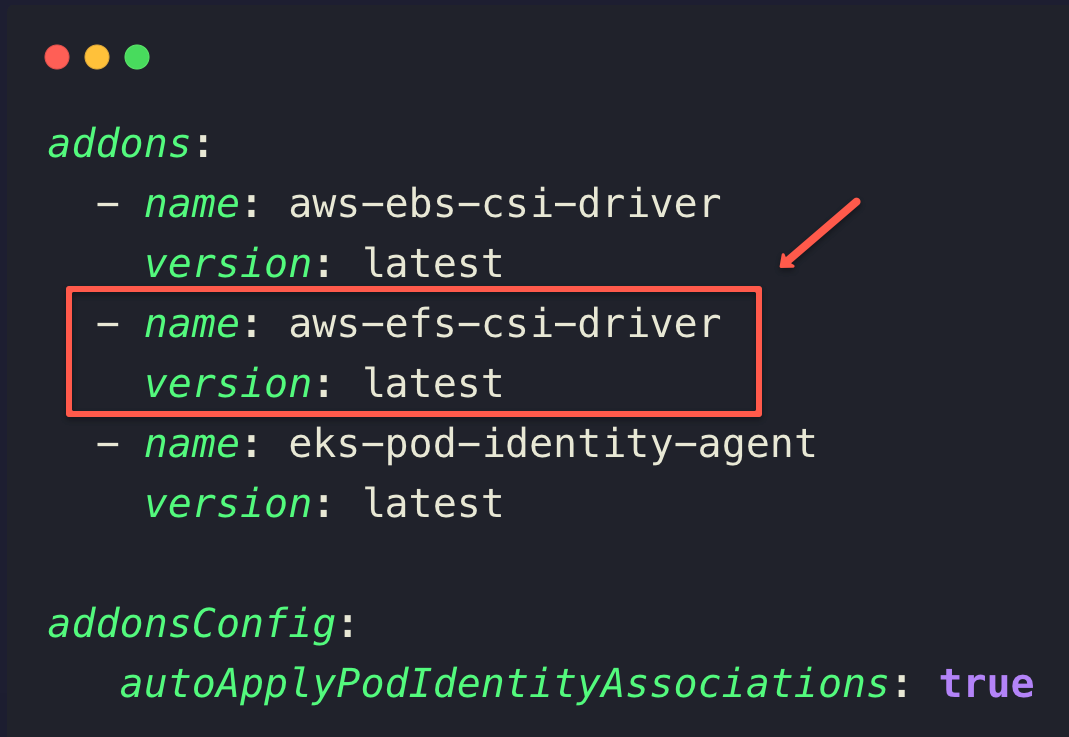
Note: Ensure the addonsConfig.autoApplyPodIdentityAssociations paramenter is set to true to work this plugin with the Pod Identity Agent Plugin.Ensure the Pod Identity Agent Plugin is present in the cluster by listing the available plugins
aws eks list-addons --cluster-name ${CLUSTER_NAME} --region ${REGION}eksctl create cluster -f your-cluster.yaml --update-configValidating the Installation
Once the installation is completed, we can list the pods in the kube-system namespace to ensure the EFS CSI controller and node pods are running properly.
kubectl -n kube-system get po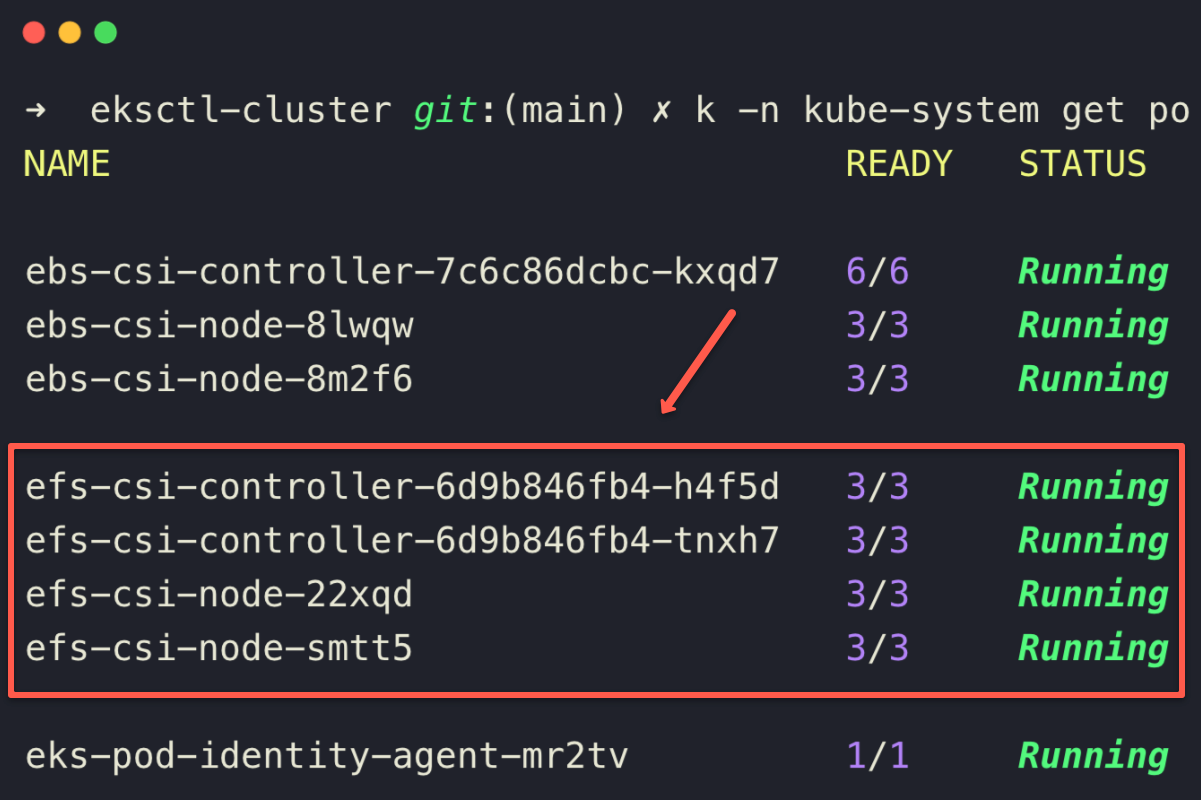
The status of the EFS CSI Driver controller and agent pods ensures that the deployment is properly done.
Create EFS (file system, security groups, mount targets)
Unlike the EBS CSI driver, EFS CSI will not provision EFS itself, instead it will create access points inside the EFS as per the pod requirements.
So we need to manually create an EFS. We will use aws cli to create EFS.
Set the Filesystem name and region as the environment variable
EFS_NAME=EKSEFSFileSystem
EFS_CREATION_TOKEN=eks-efs
REGION=us-west-2
Use the following command to create an EFS using the CLI.
aws efs create-file-system \
    --performance-mode generalPurpose \
    --throughput-mode bursting \
    --encrypted \
    --creation-token ${EFS_CREATION_TOKEN} \
    --region ${REGION} \
--tags Key=Name,Value=${EFS_NAME}performance-mode--> To specify the performance mode (generalPurposeormaxIO)--throughput-mode--> specifies the throughput mode (burstingorprovisioned)--encrypted--> Enables the data encryption at rest--creation-token--> unique identifier for the EFS.
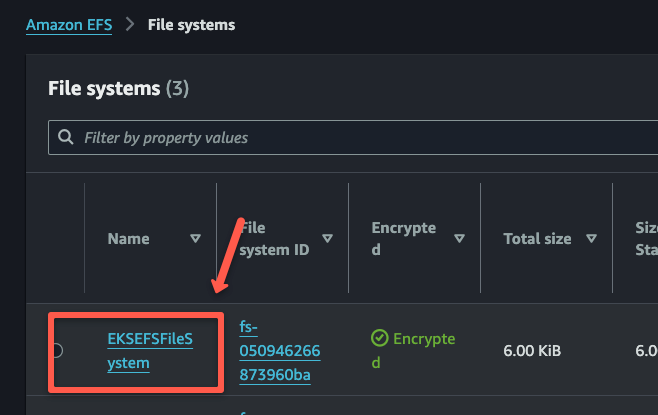
To check the creation of the EFS, open the EFS dashboard on the AWS console.
This is the basic EFS creation, but you can customize the configurations as per your requirements.
Save the file system ID as the environment variable for the upcoming configuration.
export FILESYSTEM_ID=<FILE SYSTEM ID>Configure Security Groups
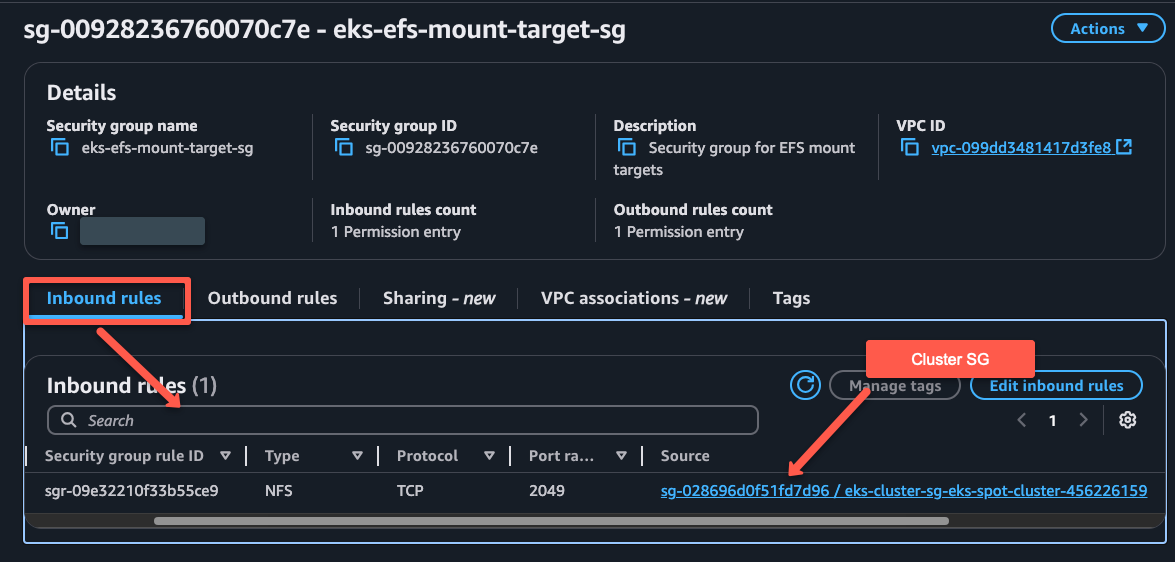
Our cluster only needs to access the EFS via its mount targets, so we need to carefully configure the EFS security group for inbound and outbound traffic.
We will talk about the mount targets in the next section.
We need to set some required values as environment variables to create the Security Group.
export VPC_ID=<YOUR VPC ID>
export CLUSTER_SG_ID=<CLUSTER SECURITY GROUP ID>
You can create a new security group with the following command.
aws ec2 create-security-group --group-name eks-efs-mount-target-sg --description "Security group for EFS mount targets" --vpc-id ${VPC_ID} --region ${REGION}From the terminal output, note down the Security Group ID and create it as an environment variable.
export SG_ID=<SECURITY GROUP ID>Add inbound rules for Protocol TCP and Port 2049. The source should be the Security Group of the EKS Cluster.
aws ec2 authorize-security-group-ingress --group-id ${SG_ID} --protocol tcp --port 2049 --source-group ${CLUSTER_SG_ID} --region ${REGION}For now, we give outbound traffic to allow all, but you can also restrict it.
aws ec2 authorize-security-group-egress \
  --group-id ${SG_ID} \
  --protocol -1 \
  --port all \
  --cidr 0.0.0.0/0 \
  --region ${REGION}
We can ensure the rules are properly configured in the security group from the UI.
EFS creation is completed, so now, we need to create mount targets in EFS and attach the Security Group to those.
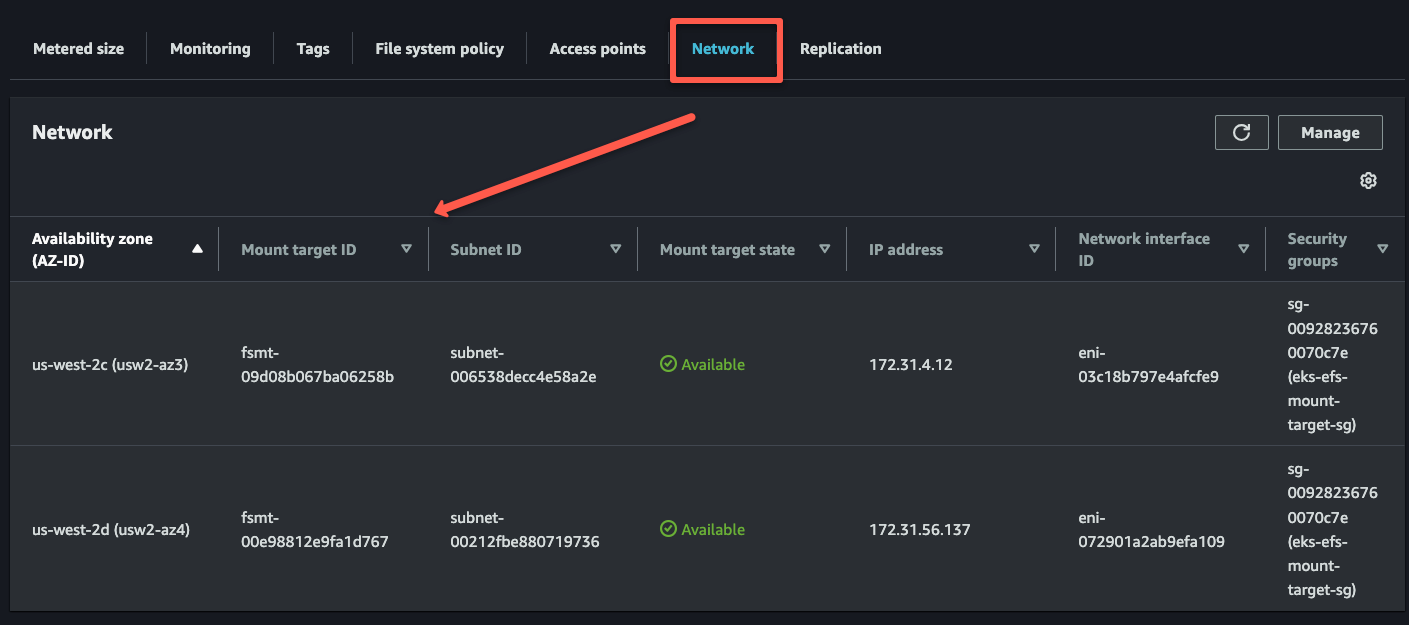
Set up EFS Mount Targets
EFS mount targets are network entry points allowing worker nodes to connect with the File System, and are based on availability zones.
We need to create mount targets on each availability zone of the worker nodes so that each node can access the EFS.
In our case, we only use two subnets in two AZs for our cluster, which are us-west-2c and us-west-2d so that we need to create two mount targets.
Create environment variables for these two subnet IDs.
export SUBNET_1=<ZONE C SUBNET ID>
export SUBNET_2=<ZONE D SUBNET ID>
Replace with your actual subnet IDs.
Use the following command to create mount targets with the subnet IDs.
aws efs create-mount-target --file-system-id ${FILESYSTEM_ID} --subnet-id ${SUBNET_1} --security-groups ${SG_ID} --region ${REGION}aws efs create-mount-target --file-system-id ${FILESYSTEM_ID} --subnet-id ${SUBNET_2} --security-groups ${SG_ID} --region ${REGION}When you execute these commands, you can see the output on the terminal, and you can ensure that with the EFS dashboard.
Provisioning methods
EFS CSI supports the following two provisioning methods.
- Static Provisioning: Manually create an access point and attach it to the workload. Access point are Filesystem entry points. Meaning directories inside the EFS.
- Dynamic Provisioning - Workloads will automatically create access points based on requirements.
The provisioning method depends on the StorageClass configuration.
First we will look at Dynamic Provisioning which is a commonly used provisioning method.
Dynamic Provisioning (StorageClass + PVC)
With EFS now successfully configured, the next step is to create Kubernetes StorageClasses to integrate it as persistent storage for the cluster.
In this method, we don't create the access points manually. Instead, when PVC is created with the specified StorageClass, the access point will be automatically created.
Let's create the storage class with the following parameters.
cat <<EOF > dynamic-efs-sc.yaml
apiVersion: storage.k8s.io/v1
kind: StorageClass
metadata:
  name: dynamic-efs-sc
provisioner: efs.csi.aws.com
reclaimPolicy: Delete
parameters:
  provisioningMode: efs-ap
  fileSystemId: ${FILESYSTEM_ID}
  subPathPattern: "\${.PVC.name}"
  directoryPerms: "0777"
EOF
For dynamic provisioning, we required the fileSystemID parameter to define the EFS and used the subPathPattern parameter to create unique subdirectories inside the EFS file system for each provisioning.
In this dynamic provisioning method, when we create a PVC object, the EFS CSI driver will create an access point in EFS, based on the subPathPattern.
.PVC.name --> This defines the name of the access point and is same as the PVC, instead, you can use PV.name and .NAMESPACE.name as well.To deploy this Storage Class, use the following command.
kubectl apply -f dynamic-efs-sc.yaml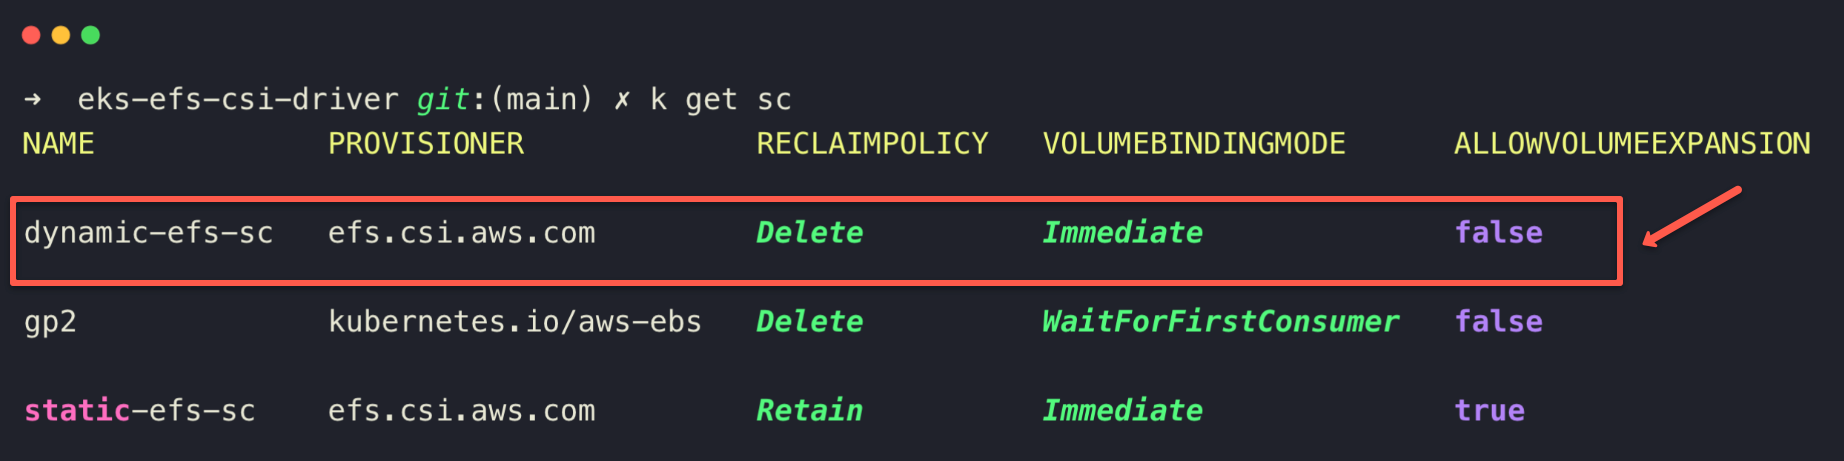
Deploy Sample App (Nginx) & Verify Persistence
Now that we have created a StorageClass object for dynamic provisioning, we need to test it with a real application.
For the testing, we will do the following.
- Creates a PVC for the demo application with the previously created Storage Class.
- Creates a demo nginx deployment with the PVC to test the creation and mounting of the EFS access point.
Create a Persistent Volume Claim (PVC)
The first step is to create a PVC with the Storage Class, so that it can request a volume section from the EFS for the application.
Create a PVC manifest.
cat <<EOF > nginx-efs-claim.yaml
apiVersion: v1
kind: PersistentVolumeClaim
metadata:
  name: nginx-efs-claim
spec:
  accessModes:
    - ReadWriteMany
  storageClassName: dynamic-efs-sc
  resources:
    requests:
      storage: 1Gi
EOF
Since the EFS is a Network Filesystem, we have chosen the access modes as ReadWriteMany . This mode lets multiple nodes access the same access point.
Onverall, EFS supports almost all access modes,
ReadWriteOnce--> Only one pod can read and writeReadWriteMany--> Multiple pods can read and writeReadOnlyMany--> Multiple pods can read the same volume
Deploy the PVC
kubectl apply -f nginx-efs-claim.yamlOnce the PVC manifest is deployed, the EFS Access Point will be created immediately, and binding with the PVC will happen in parallel
Let's check the PVC to see the binding status.
kubectl get pvc
To list the PVs
kubectl get pv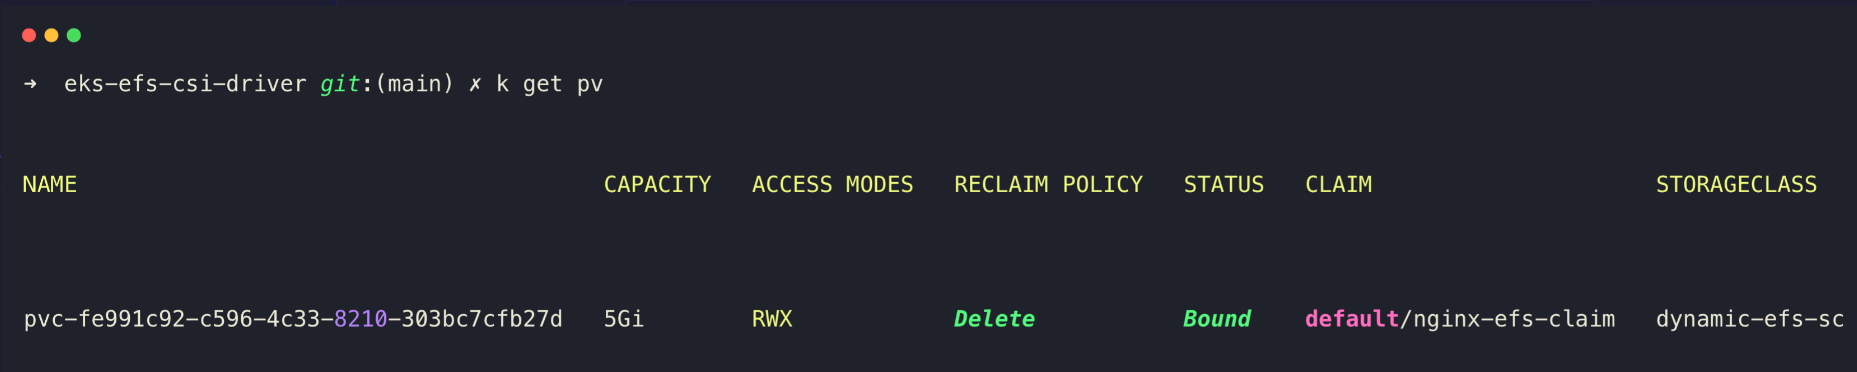
One more thing we need to check is the created access point in the AWS console as shown below..

This ensures that the access point is dynamically created, so now we can create a sample workload to attach and test this volume.
Deploying a Sample Nginx Workload With EFS Mount
You can choose any of your applications for this demo purpose. For now, I am choosing the Nginx web server.
We are creating an Nginx deployment manifest and mounting the /usr/share/nginx/html directory of the web server to the EFS access point, so the data won't be deleted even if the Pod gets destroyed.
Create a deployment manifest
cat <<EOF > nginx-deployment.yaml
apiVersion: apps/v1
kind: Deployment
metadata:
  name: nginx-efs-deployment
  labels:
    app: nginx-efs
spec:
  replicas: 2
  selector:
    matchLabels:
      app: nginx-efs
  template:
    metadata:
      labels:
        app: nginx-efs
    spec:
      containers:
        - name: nginx
          image: nginx:latest
          ports:
            - containerPort: 80
          volumeMounts:
            - name: efs-storage
              mountPath: /usr/share/nginx/html
      volumes:
        - name: efs-storage
          persistentVolumeClaim:
            claimName: nginx-efs-claim

---
apiVersion: v1
kind: Service
metadata:
  name: nginx-efs-service
spec:
  type: NodePort
  selector:
    app: nginx-efs
  ports:
    - protocol: TCP
      port: 80
      targetPort: 80
      nodePort: 30080
EOF
Here, you can see that under the volumes section, we are referring to the PVC that we have previously created.
Deploy the Nginx deployment.
kubectl apply -f nginx-deployment.yamlWait a few seconds for the pods to become ready, and if the pod status turns into ready, that means the mounting is properly done.
In the next section, we can verify the data persistence.
Verify Data Persistence
We can even test that the data is persistent if the pods get rescheduled.
Let's write something custom in the index.html file on one of the Pods, which is actually in the /usr/share/nginx/html
kubectl exec -it $(kubectl get pod -l app=nginx-efs -o jsonpath='{.items[0].metadata.name}') -- /bin/bashUse the following command to rewrite the index file.
echo "<h1>Hello from EFS\!</h1>" > /usr/share/nginx/html/index.html
exit
For testing, let's access the web page of the web server.
Access the Nginx Webpage
Get the public IP of one of the worker nodes and note down the Node Port number of the deployment 30080.
Open any of the web browsers and paste the URL http://<WORKER NODE PUBLIC IP>:30080
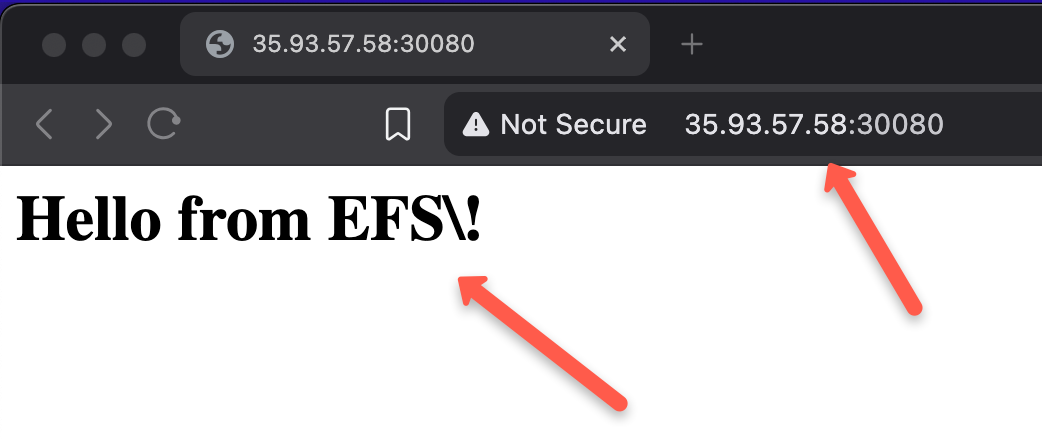
The output ensures that the original data in the index file is modified.
Now, we can test if the Pods get deleted, and the data will persist or not.
Simulate Pod Restart
We can delete the pod so that the new pod will spin up automatically.
The new pod can also be mounted with the existing PVC, so that the new pod will also get the same data.
kubectl delete pod $(kubectl get pod -l app=nginx-efs -o jsonpath='{.items[0].metadata.name}')After the new pod is up, you can do the same test to ensure you are getting the same data.
We have created mount targets on each AZ, so no matter how much you scale the application, all the pods will get the same data. Let's check that as well.
Scaling Pods to Test Cross Pod Access
I have already mentioned that even multiple pods in different zone nodes can also access the same data.
This is because the EFS supports cross-AZ access. Also, we have created more than one mount target for various zones.
To scale the deployment, use the following command.
kubectl scale deployment nginx-efs-deployment --replicas=4
Here, you can see the replications are spread across different nodes, each in a different zone, even though all pods can get the same data from the EFS storage.
To check this, exec to any of the pod and curl localhost
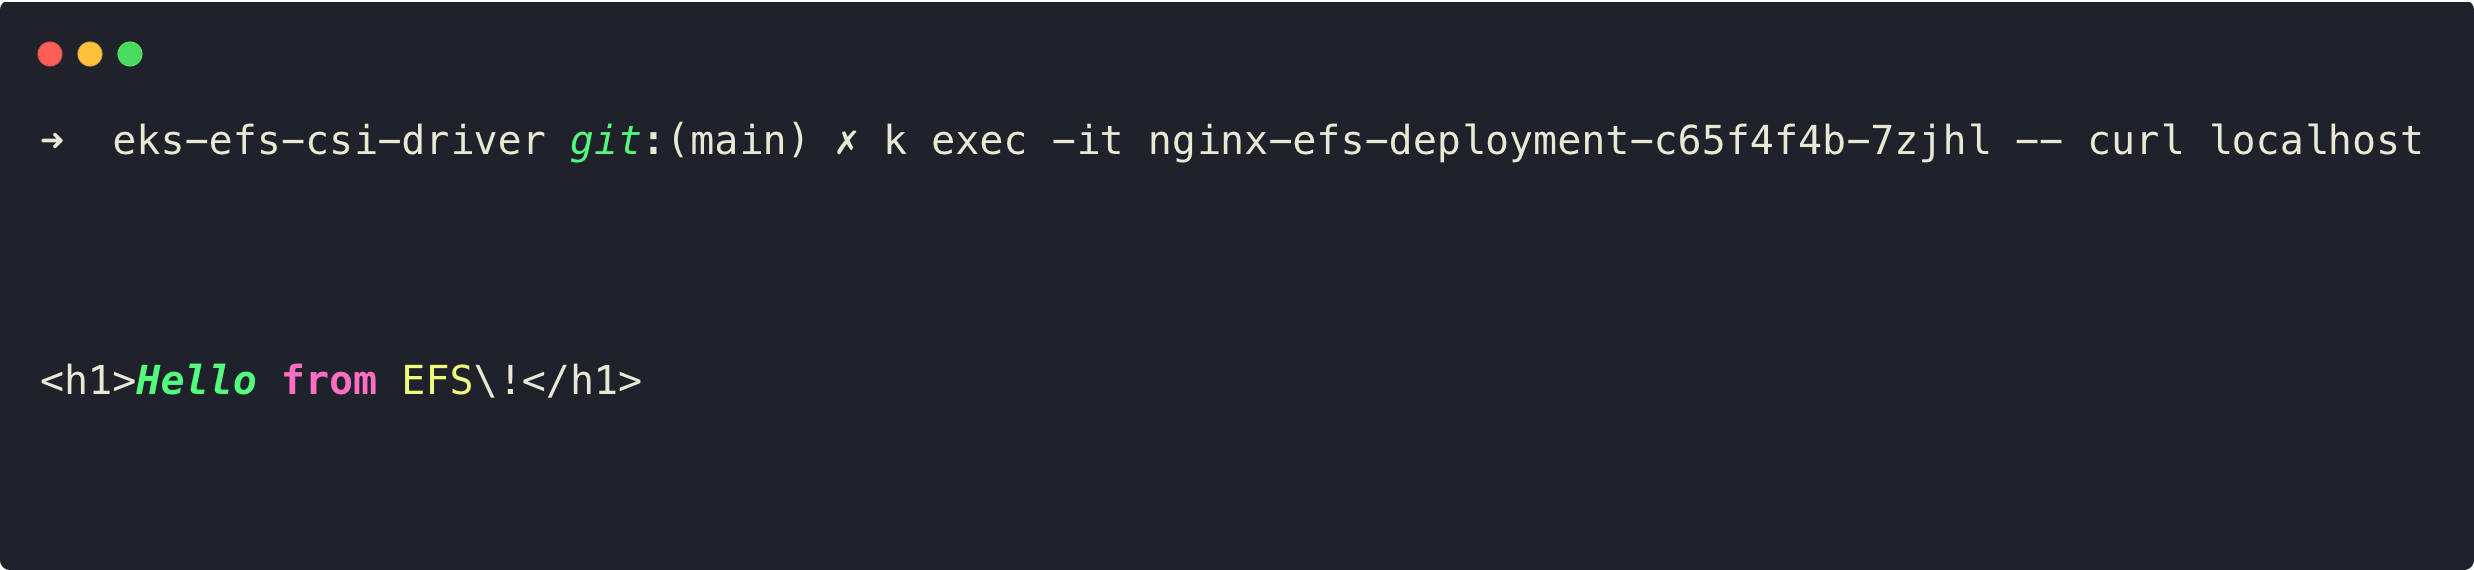
The output clearly shows that the new pods are also getting the same data, and this is how the EFS works as a persistent storage for the EKS cluster.
In the next section, we will do a simulation test to know what happens even if the Pod writes data more than the resource limitation of the PVC.
Static Provisioning Storage Class Creation (Optional)
Static provisioning refers that if we have an existing filesystem (EFS root dir), or access point (Dir inside root dir) we can mount as a volume.
Create a Storage Class for the static provisioning with the following contents.
apiVersion: storage.k8s.io/v1
kind: StorageClass
metadata:
  name: efs-static-fs
provisioner: efs.csi.aws.com
reclaimPolicy: Retain
volumeBindingMode: Immediate
allowVolumeExpansion: true
Apply this configuration.
kubectl apply -f static-efs-sc.yamlCheck and verify that the StorageClass is successfully created.
kubectl get storageclass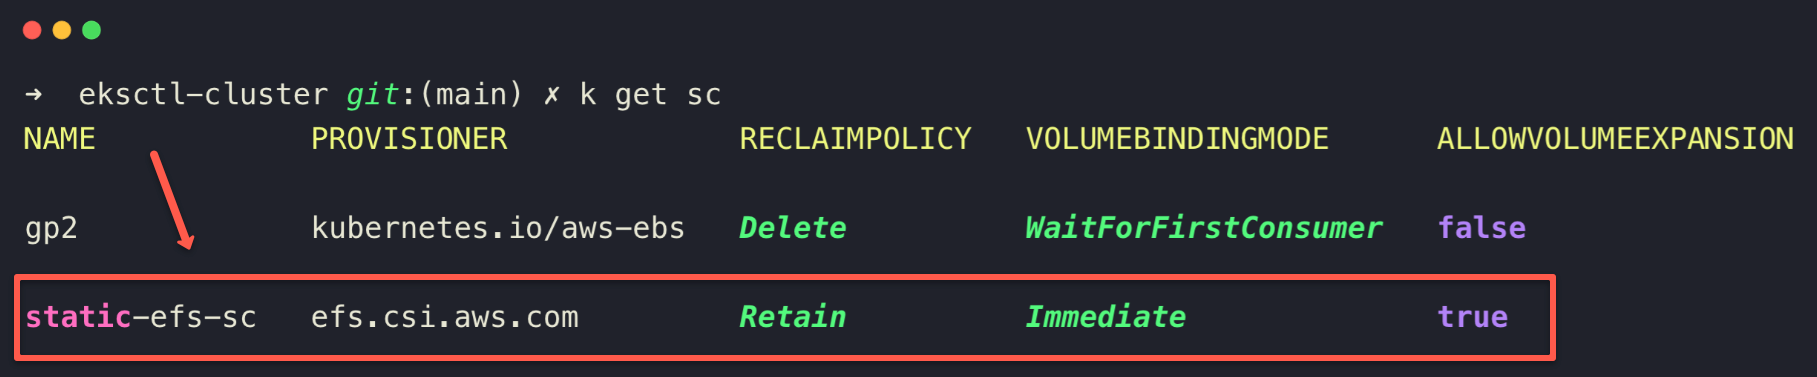
Here, I will show how the existing access point to mount with the workload but for that we need to create one.
Create an EFS Access Point
To create an EFS access point, use the following command.
aws efs create-access-point \
  --file-system-id ${FILESYSTEM_ID} \
  --posix-user Uid=1000,Gid=1000 \
  --root-directory 'Path=/static-fs-access-point,CreationInfo={OwnerUid=1000,OwnerGid=1000,Permissions=750}' \
  --region ${REGION}
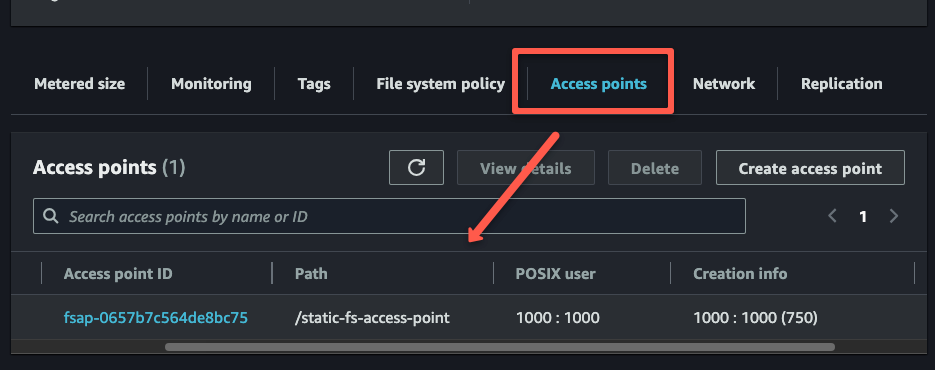
The access point is the directory inside the root file system (/static-fs-access-point)
Also, we are setting the permission for that directory is 750 and the owner and group ID is 1000.
Once the access point creation is completed, we can ensure that it is from the UI.
In the next section, we mount this access point to the workload.
Attaching Access Point to PV
Now, you can use this Storage Class for the PV instead of PVC under the spec section to mount the access point to the workload.
apiVersion: v1
kind: PersistentVolume
metadata:
  name: efs-pv-static
spec:
  capacity:
    storage: 5Gi
  volumeMode: Filesystem
  accessModes:
    - ReadWriteMany
  persistentVolumeReclaimPolicy: Retain
  storageClassName: static-efs-sc
  csi:
    driver: efs.csi.aws.com
    volumeHandle: [FILE SYSTEM ID]::[ACCESS POINT ID]
Now, we can attach this PV to the workload, then the access point will be mounted with the Pod.
Understanding PVC Limits with Amazon EFS
You may be curious to know what happens if the pod writes data more than configured resource limit in the EFS based PVC.
Well, let's do a practical hands-on.
Our current PVC resource limit is 1GB.
We deploy a Pod with this same PVC and simulate writing 2GB of data inside it.
cat <<EOF > nginx-efs-test.yaml
apiVersion: v1
kind: Pod
metadata:
  name: nginx-efs-test
spec:
  containers:
  - name: nginx
    image: nginx
    volumeMounts:
    - name: efs-vol
      mountPath: /usr/share/nginx/html
  - name: write-stuff
    image: busybox
    command: ["sh", "-c", "dd if=/dev/zero of=/mnt/data/bigfile bs=10M count=200 && sleep 3600"]
    volumeMounts:
    - name: efs-vol
      mountPath: /mnt/data
  volumes:
  - name: efs-vol
    persistentVolumeClaim:
      claimName: nginx-efs-claim
EOF
Deploy the test application
kubectl apply -f nginx-efs-test.yamlEnsure the PV is created and the Pod is running without any issues.
Now, we can check the storage usage from inside the pod
kubectl exec -it nginx-efs-test -c write-stuff -- df -h /mnt/data
kubectl exec -it nginx-efs-test -c write-stuff -- du -sh /mnt/data
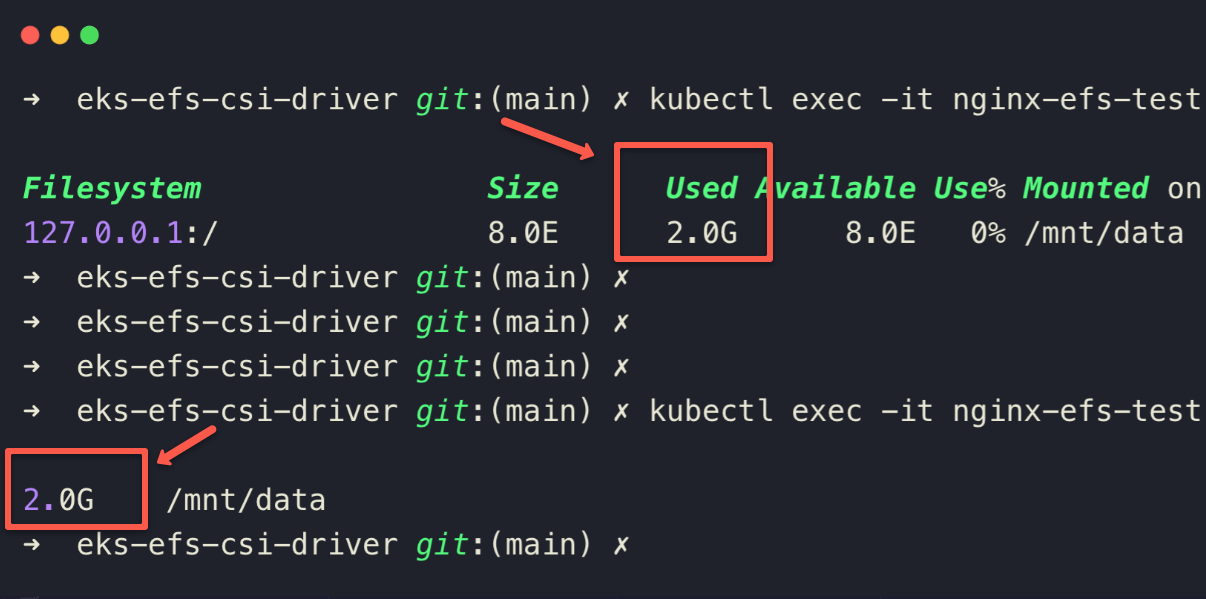
Here, you can clearly see that the container writes data more than the configured PVC storage.
So, if you request, say, 1 GiB in a PVC, the created PV is limitless (i.e. can store much more), because EFS does not enforce the capacity you ask in the PVC.
This means, the storage size in PVC is required (you must put something, e.g. 5Gi) because Kubernetes API needs that. But that number does not limit how much data can actually be stored in the EFS via that PVC.
Let's check the EFS to confirm that the simulated data is reflected in the EFS dashboard.
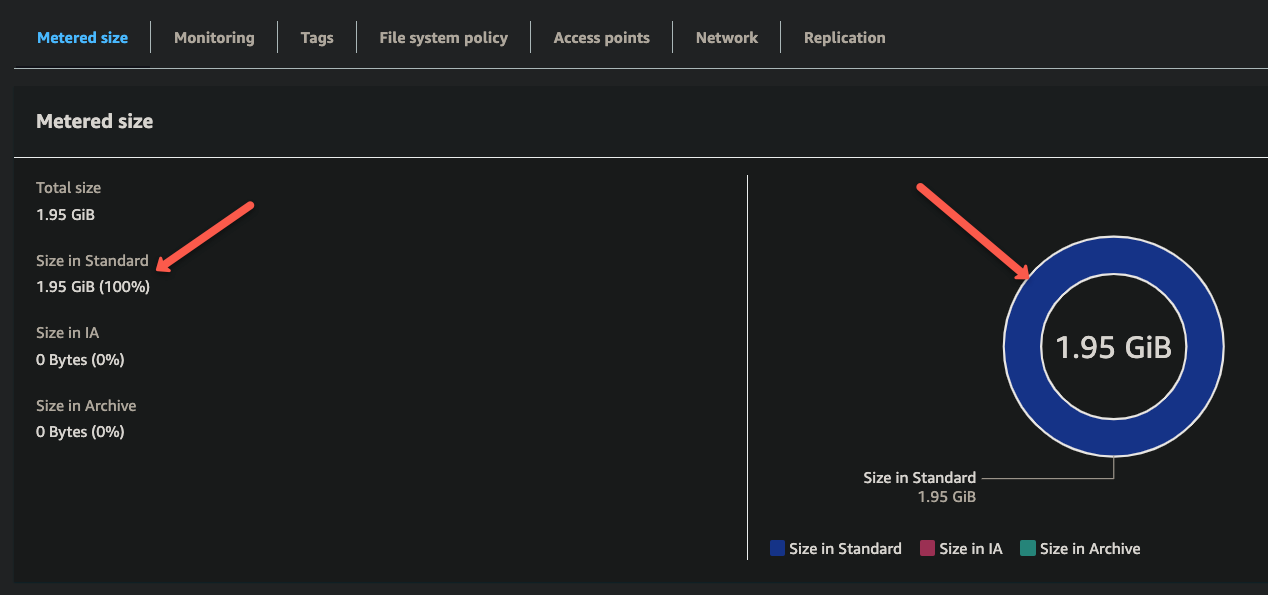
The only way to avoid the unnecessary cost on EFS service, monitor the storage using AWS CloudWatch alarm on
FileSystemSize or other external monitoring system.Also, if true quotas are mandatory, consider using EBS or self-managed NFS on EC2 where OS/file-system quotas (XFS/ZFS) are possible.
Cleaning Up Resources
Remove the Workload
kubectl delete -f nginx-deployment.yamlDelete PersistentVolumeClaims and StorageClasses
kubectl delete -f nginx-efs-claim.yaml
kubectl delete -f static-efs-sc.yaml
kubectl delete -f dynamic-efs-sc.yaml
Delete EFS Access Points
aws efs delete-access-point --access-point-id <access-point-id> --region <region>Delete EFS Mount Targets
aws efs delete-mount-target --mount-target-id <mount-target-id> --region <region>Remove EFS File System
aws efs delete-file-system --file-system-id $FILESYSTEM_ID --region $REGION
Best Practices for EFS CSI Driver
Following are some of the important best practices to follow when using the EFS CSI driver.
- When creating the Security Group for the EFS, ensure only necessary ports and protocols are open.
- When creating the EFS, choose the configuration based on your use case, such as whether you are going to use this for the general workload or need a higher input and output speed.
- Monitor the EFS using AWS CloudWatch to see the I/O and storage allocation.
- Backup the EFS File System using the AWS Backup service, AWS Datasync, or manually perform periodic backups.
Conclusion
In this article, we have covered all the key options and configurations to use EFS as persistent volume on EKS cluster.
When you are working through the setup, if you are facing any issues, do let us know in the comments.
Also, to learn more about EKS storage options, please visit the AWS official documentation.