

When you are using Ansible with AWS, maintaining the inventory file will be a hectic task as AWS has frequently changed IPs, autoscaling instances, and much more.
However, there is an easy solution called ansible dynamic inventory. Dynamic inventory is an ansible plugin that makes an API call to AWS to get the instance information in the run time. It gives you the ec2 instance details dynamically to manage the AWS infrastructure.

When I started using the Dynamic inventory, it was just a Python file. Later it became an Ansible plugin.
I will talk more about how to manage the AWS dynamic inventory later in this article.
Dynamic inventory is not limited to just AWS. It supports most of the public and private cloud platforms. Here is the article on managing GCP resources using Ansible Dynamic inventory.
Setup Ansible AWS Dynamic Inventory
In this tutorial, you will learn how to set up a dynamic inventory on AWS using boto and the AWS ec2 Ansible plugin.
Follow the steps carefully for the setup.
Step 1: Ensure you have python3 & pip3 installed in your Ansible server.
Most Linux operating system comes with phyton3. You can validate it using the following command.
python3 --versionIf you don't have python3, you can install it using the following command.
For centos, Redhat,
sudo yum install python3 -y
sudo yum –y install python3-pip
For Debian, Ubuntu,
sudo apt-get install python3 -y
sudo apt-get install python3-pip -y
Step 2: Install the boto3 library. Ansible uses the boot core to make API calls to AWS to retrieve ec2 instance details.
sudo pip3 install boto3If you have used the Ansible ppa for installation, install pip using the following command.
sudo apt-get install python-boto3or else you might see the following error.
ERROR! The ec2 dynamic inventory plugin requires boto3 and botocore.Step 3: Create an inventory directory under /opt and cd into the directory.
sudo mkdir -p /opt/ansible/inventory
cd /opt/ansible/inventory
Step 4: Create a file named aws_ec2.yaml in the inventory directory.
sudo vi aws_ec2.yamlCopy the following configuration to the file. If you are running an ansible server outside the AWS environment, replace add your AWS access key and secret to the config file.
---
plugin: aws_ec2
aws_access_key: <YOUR-AWS-ACCESS-KEY-HERE>
aws_secret_key: <YOUR-AWS-SECRET-KEY-HERE>
keyed_groups:
  - key: tags
    prefix: tag
If your ansible server is running inside the AWS environment, attach an ec2 instance role with the required AWS ec2 permissions (Mostly describe instances). This way you don't have to add the access and secret key in the configuration. Ansible will automatically use the attached role to make the AWS API calls.
Step 5: Open /etc/ansible/ansible.cfg file.
sudo vi /etc/ansible/ansible.cfgFind the [inventory] section and add the following line to enable the ec2 plugin.
enable_plugins = aws_ec2It should look something like this.
[inventory]
enable_plugins = aws_ec2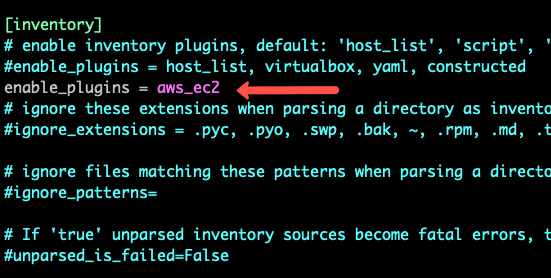
Step 6: Now let's test the dynamic inventory configuration by listing the ec2 instances.
ansible-inventory -i /opt/ansible/inventory/aws_ec2.yaml --listThe above command returns the list of ec2 instances with all its parameters in JSON format.
If you want to use the dynamic inventory as a default Ansible inventory, edit the /etc/ansible/ansible.cfg file and search for inventory parameters under defaults. Change the inventory parameter value as shown below.
inventory = /opt/ansible/inventory/aws_ec2.yaml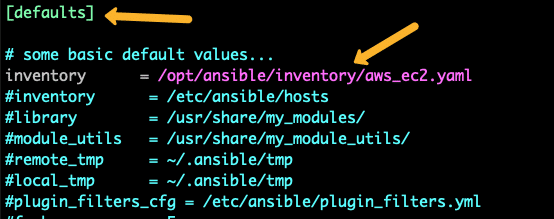
Now if you run the inventory list command without passing the inventory file, Ansible looks for the default location and picks up the aws_ec2.yaml inventory file.
Step 6: Execute the following command to test if Ansible is able to ping all the machines returned by the dynamic inventory.
ansible all -m pingGrouping EC2 Resources With Anisble Dynamic Inventory
The primary use case of AWS Ansible dynamic inventory is to execute Ansible playbooks or ad-hoc commands against a single or group of categorized or grouped instances based on tags, regions, or other ec2 parameters.
You can group instances using tags, instances type, instance names, custom filters, and more. Take a look at all supported filters and keyed groups from here.
Here is a minimal configuration for aws_ec2.yaml that uses a few keyed_groups and filters.
---
plugin: aws_ec2

aws_access_key: <YOUR-AWS-ACCESS-KEY-HERE>
aws_secret_key: <YOUR-AWS-SECRET-KEY-HERE>

regions:
  - us-west-2

keyed_groups:
  - key: tags
    prefix: tag
  - prefix: instance_type
    key: instance_type
  - key: placement.region
    prefix: aws_region
Execute the following command to list the dynamic inventory groups.
ansible-inventory --graphYou will see an output like the following with all instances grouped under tags, zones, and regions with dynamic group names like aws_region_us_west_2 , instance_type_t2_micro, tag_Name_Ansible
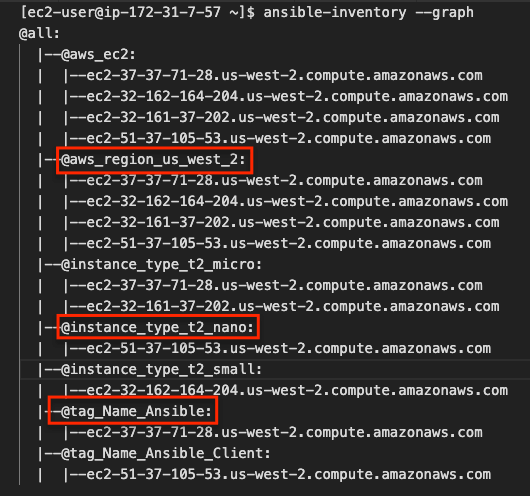
Now you can execute Ansible ad-hoc commands or playbook against these groups.
Execute Ansible Commands With ec2 Dynamic Inventory
Let's test the ec2 dynamic inventory by executing few ansible ad-hoc commands.
Execute Ping
I am going to execute the ping command with all instances in the region us_west_2. As per my configuration, the dynamic group name is aws_region_us_west_2.
ansible aws_region_us_west_2 -m pingIf you have all the right configurations, you should see an output like the following.
ec2-54-218-105-53.us-west-2.compute.amazonaws.com | SUCCESS => {
    "ansible_facts": {
        "discovered_interpreter_python": "/usr/bin/python3"
    },
    "changed": false,
    "ping": "pong"
}
Using Dynamic Inventory Inside Playbook
If you want to use dynamic inventory inside the playbook, you just need to mention the group name in the hosts variable as shown below.
---
- name: Ansible Test Playbook
  gather_facts: false
  hosts: aws_region_us_west_2
  tasks:

    - name: Run Shell Command
      command: echo "Hello World"
You checkout the ansible playbook examples if you want to test more playbooks.