

The best way to manage and orchestrate VM instances in Google cloud using Ansible is through Dynamic inventory plugin. It is an ansible google cloud module that authenticates GCP in run time and returns the instance details.
With dynamic inventory, you don't need to manage a static inventory file, instead, you can group instances based on instance labels, zones, and network tags. Even you can group instances based on names.
Ansible Dynamic Inventory Google Cloud Configuration
Let's get started.
Prerequisites:
- You should have pip installed
- Ansible installed
- Google Service Account JSON with permissions to provision GCP resources.
Follow the steps given below to configure Ansible dynamic inventroy GCP plugin,
Step 1: Install google-auth module using pip.
sudo pip install requests google-authStep 2: Create a dedicated inventory directory
sudo mkdir -p /opt/ansible/inventoryStep 3: Create a Google IAM service account. It will be used by the Ansible server to authenticate against google cloud for dynamic inventory. A service account json will look like the following.
{
  "type": "service_account",
  "project_id": "devopscube-sandbox",
  "private_key_id": "sdfkjhsadfkjansdf9asdf87eraksd",
  "private_key": "-----BEGIN PRIVATE KEY-----\nMIIEvQIBADANBaksdhfjkasdljf sALDIFUHW8klhklSDGKAPISD GIAJDGHIJLSDGJAFSHGJN;MLASDKJHFGHAILFN DGALIJDFHG;ALSDN J Lkhawu8a2 87356801w tljasdbjkh=\n-----END PRIVATE KEY-----\n",
  "client_email": "ansible-provisioning@devopscube-sandbox.iam.gserviceaccount.com",
  "client_id": "32453948568273645823",
  "auth_uri": "https://accounts.google.com/o/oauth2/auth",
  "token_uri": "https://accounts.google.com/o/oauth2/token",
  "auth_provider_x509_cert_url": "https://www.googleapis.com/oauth2/v1/certs",
  "client_x509_cert_url": "https://www.googleapis.com/robot/v1/metadata/x509/ansible-provisioning%40devopscube-sandbox.iam.gserviceaccount.com"
}
Step 5: Save the service account file as service-account.json inside /opt/ansible/inventory folder.
Step 6: Create a file named gcp.yaml inside /opt/ansible/inventory directory and add the following content.
---
plugin: gcp_compute
projects:
- <gcp-project-id>
auth_kind: serviceaccount
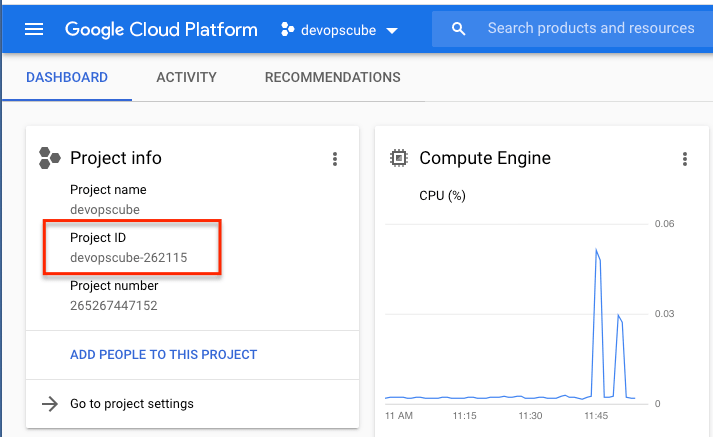
service_account_file: /opt/ansible/inventory/service-account.jsonReplace <gcp-project-id> with your google cloud project id. You can get the id from the GCP dashboard.
There are more configuration
Step 4: Change the inventory folder's permission to 755.
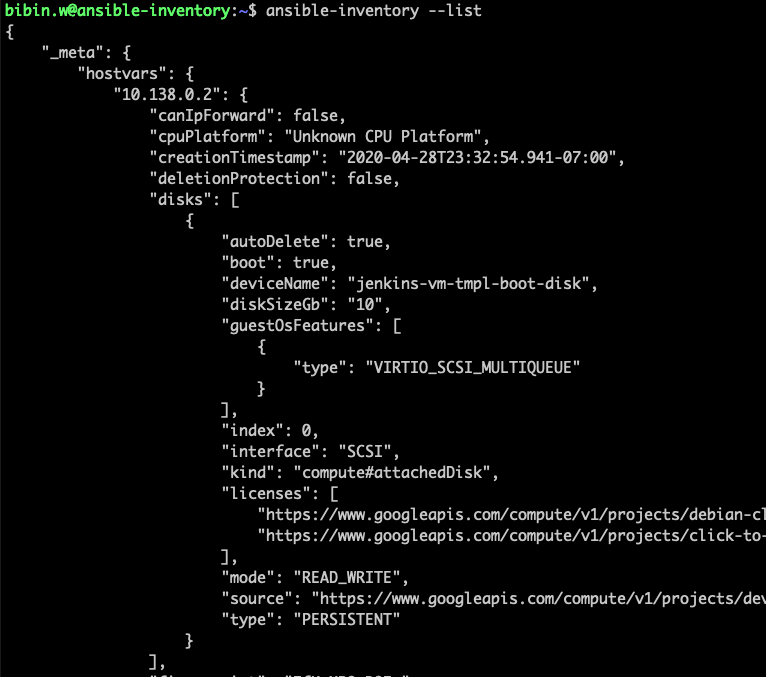
sudo chmod -R 755 /opt/ansibleStep 5: Now we have all the required configurations for gcp dynamic inventory. Lets test it by listing out all the instances using the ansible-inventory command. Make sure you are running this command from /opt/ansible/inventory directory.
ansible-inventory --list -i gcp.yamlThe above command should give a JSON output with all the instance details. Which means, now Ansible is able to communicate to GCP via service account.
Here is an example output.
Step 5: Open /etc/ansible/ansible.cfg file Add the dynamic inventory config path under default configs.
[defaults]

# some basic default values...

inventory      = /opt/ansible/inventory/gcp.yaml
With this configuration, by default all the ansible action will consider the gcp config as its inventory file.
You can verify the default inventory configuration by executing the inventory list command.
ansible-inventory --listYou should get the similar output you got in step 4.
Grouping GCP Resources
Now we have al the configurations for Ansible to interact with GCP. But it is not enough. We need to group resources to execute ansible commands or playbooks against all the servers in that group.
Now, here is the cool feature!
GCP Ansible module automatically groups your resources based on a few standard parameters.
Ansible GCP module supports grouping using labels, zones, and network tags. Grouping with labels is the best way to manage resources using Ansible. It would be best if you had a standard and consistent labeling standard across all your environments.
Here is the inventory file example where I have added grouping using labels and Zone. Also, there are two groups named "development" and "staging". These will return all VMS, which matches the filter.
---
plugin: gcp_compute
projects:
- devopscube-262115
auth_kind: serviceaccount
service_account_file: /opt/ansible/inventory/service-account.json
keyed_groups:
- key: labels
prefix: label
- key: zone
prefix: zone
groups:
development: "'env' in (labels|list)"
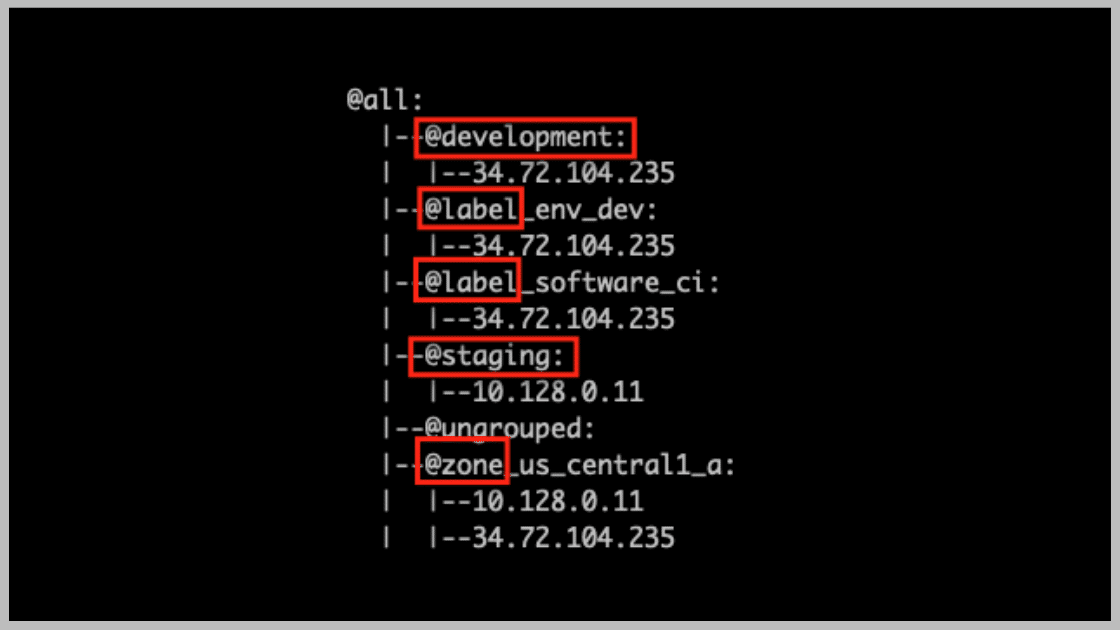
staging: "'jenkins' in name"Modify your inventory file with the above keyed_groups & groups and execute the following command to list the groups.
ansible-inventory --graphThe following output shows all the machines grouped as per the labels and group filters as shown below.
Now, you can use the group names to execute remote commands on all the machines which comes under the group.
Execute Ansible Commands With Dynamic Inventory On GCP
Now, let's test our configuration by running a few ansible ad-hoc remote commands.
I have added the default remote private key and remote user in ansible.cfg file so that Ansible can communicate to the remote host via ssh.
The following are the parameters required for the remote connection. Replace the values accordingly.
remote_user = bibin.w
host_key_checking = False
private_key_file = /home/bibin.w/.ssh/id_rsa
Execute Remote Ping
In my dynamic inventory configuration, I have added a group named staging, which groups all machines with "jenkins" in the instance name.
I am going to execute a ping command against the staging group.
ansible staging -m pingIt successfully executes ping command on an instance which matches the staging group. Here is the output.
root@ansible-inventory:/etc/ansible# ansible staging -m ping
35.192.72.62 | SUCCESS => {
    "ansible_facts": {
        "discovered_interpreter_python": "/usr/bin/python3"
    },
    "changed": false,
    "ping": "pong"
}
Execute a Remote Shell Command
Following ansible ad-hoc command executes an echo command on all servers which belong to the staging group.
ansible staging -m shell -a 'echo "Hello World"'Here is the output.
root@ansible-inventory:/etc/ansible# ansible staging -m shell -a 'echo "Hello World"'
35.192.72.62 | CHANGED | rc=0 >>
Hello World
You checkout the ansible playbook examples if you want to test the dynamic inventory by executing playbooks.
Few Best Practices
When you are using the Ansible dynamic inventory on google cloud, follow the best practices given below.
- Use labels to group the instances.
- Have a standard instance labeling strategy and naming schemes.
- Do not commit the GCP service account JSON to Github or any other SCM.
- Always dry run ansible playbooks before you execute directly on the VMs.