

Looking for a guide that teaches you production level docker image build workflow for application? You are in the right place.
By the end of this guide, you will understand:
- Deployment environments in real projects
- Container registry architecture for multi-environment pipelines
- Docker image tagging strategy (immutable vs mutable tags)
- Git branching strategy for Docker based CI/CD pipelines.
- How the PR-based image build workflow is structured end to end
Lets get started.
Deployment Environments in Real Projects
The common question everyone has is "How many environments are there in real projects?"
Well it depends.
- Small projects typically have three environments. For example dev, stage, and prod. This is the minimum you need for a proper promotion flow.
- Medium projects add a dedicated QA (for functional testing separate from dev) and Performance environment for load testing. The stage environment acts as a pre-prod environment.
- Enterprise projects (finance, healthcare, government) often have many environments. For example, dev, SIT (system integration testing), QA, performance, staging, UAT (user acceptance testing), and production. It can be more.
I have worked with many small to enterprise projects and none of the projects had the same number of environments. It totally depends on the project and teams.
So how are these environments segregated?
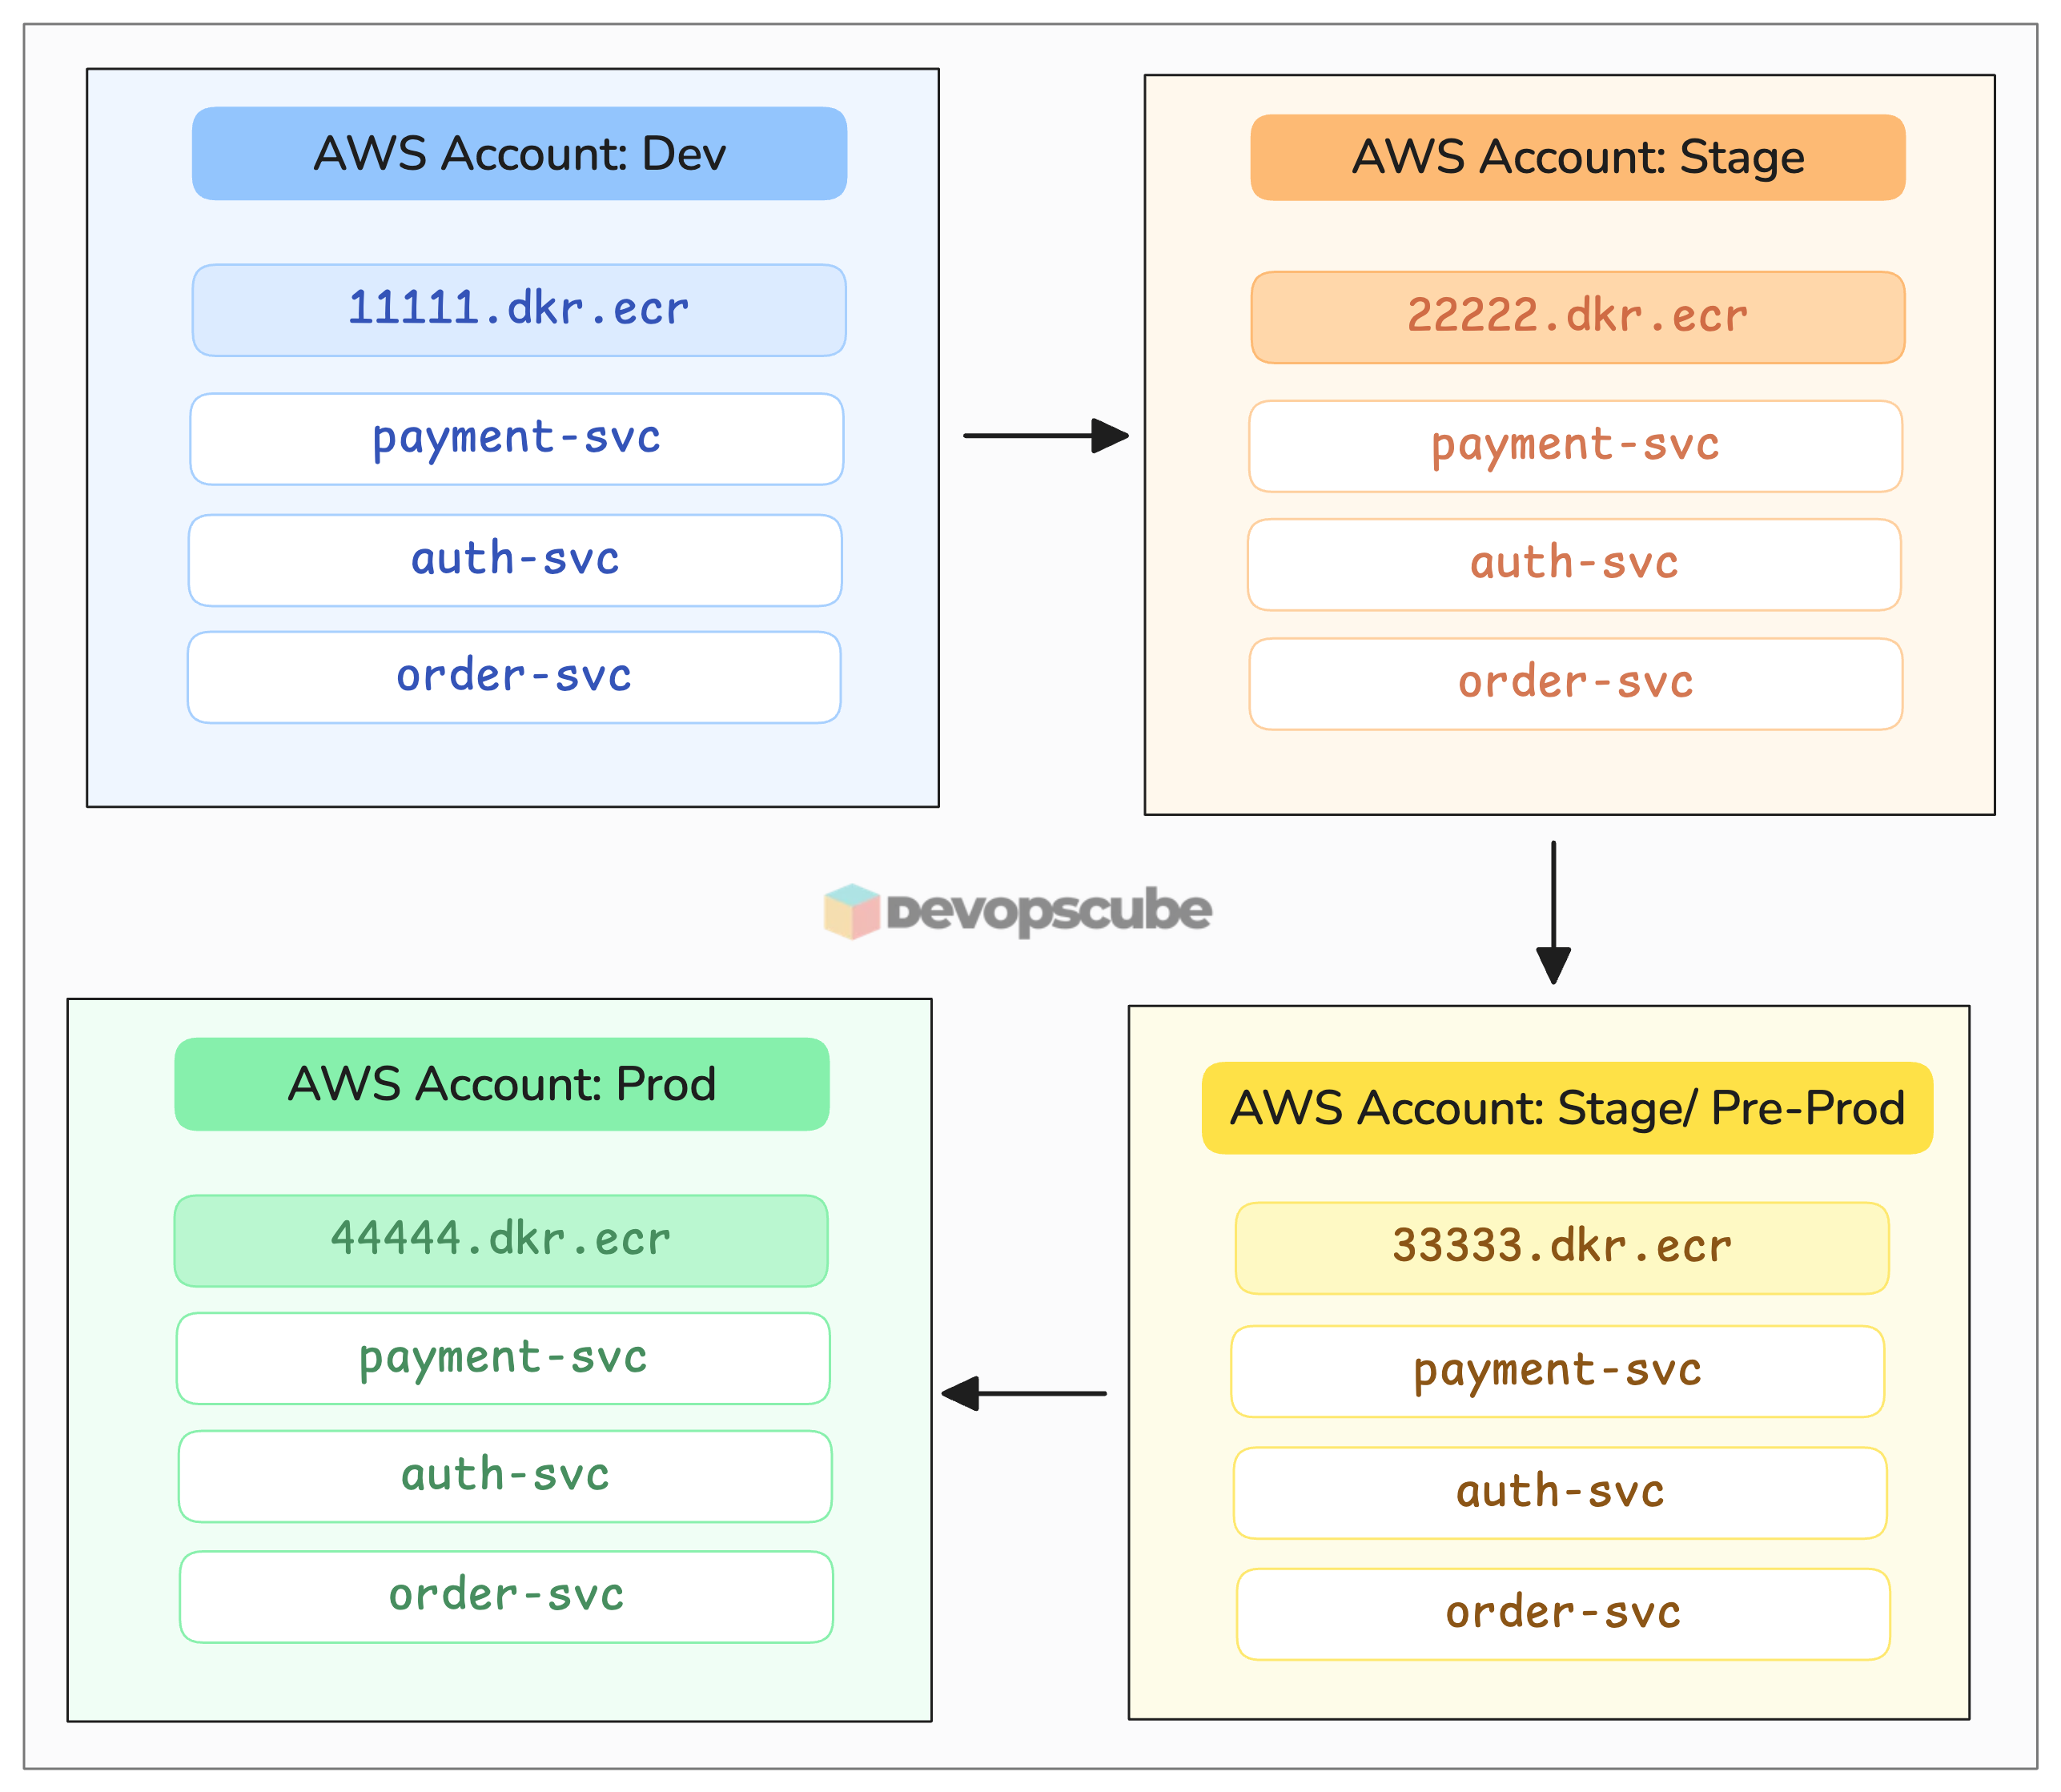
In most enterprise projects, each environment means, a dedicated cloud account ( or subscription/project depending on the cloud provider). Each account has its own VPC, IAM roles, Security, etc..
For example, dev environment runs in the dev AWS account, stage in the stage account, and so on.
The key reason for this is, blast radius isolation. Meaning, how much of the environment is affected when something happens to the environment. So if a developer deletes something in dev, only dev is affected.
Also, separate accounts helps tracking costs better, and maintain clear security logs. We will look at this in detail in the registry architecture section below.
Registry Architecture
One of the common question asked by a Devops engineer is, how many contianer registries should we have for a project?
Well it depends on the project. The common pattern used in enterprise environments is Per-Account Registry Pattern.
1. Per-Account Registry Pattern
Meaning, each account (environment) gets its own container registry. (Eg, AWS ECR). So the dev account has its own registry, the staging account has its own, and so on.
So why separate registries?
Its the same concerns we discussed above.
- If the dev account is compromised, they can't touch the prod registry or its images. The accounts are completely separate.
- Each account has different permissions. For example, Dev teams may get full access to the dev registry for productivity. However only the CI pipeline job can push to prod. No one can push or modify images in prod manually.
- It also helps complying with SOC2, HIPAA, and PCI-DSS for strong security controls.
2. Shared Registry Pattern
In this pattern, you have one container registry for multiple environments. For example, dev, QA, stage, pre-prod use the same registry.
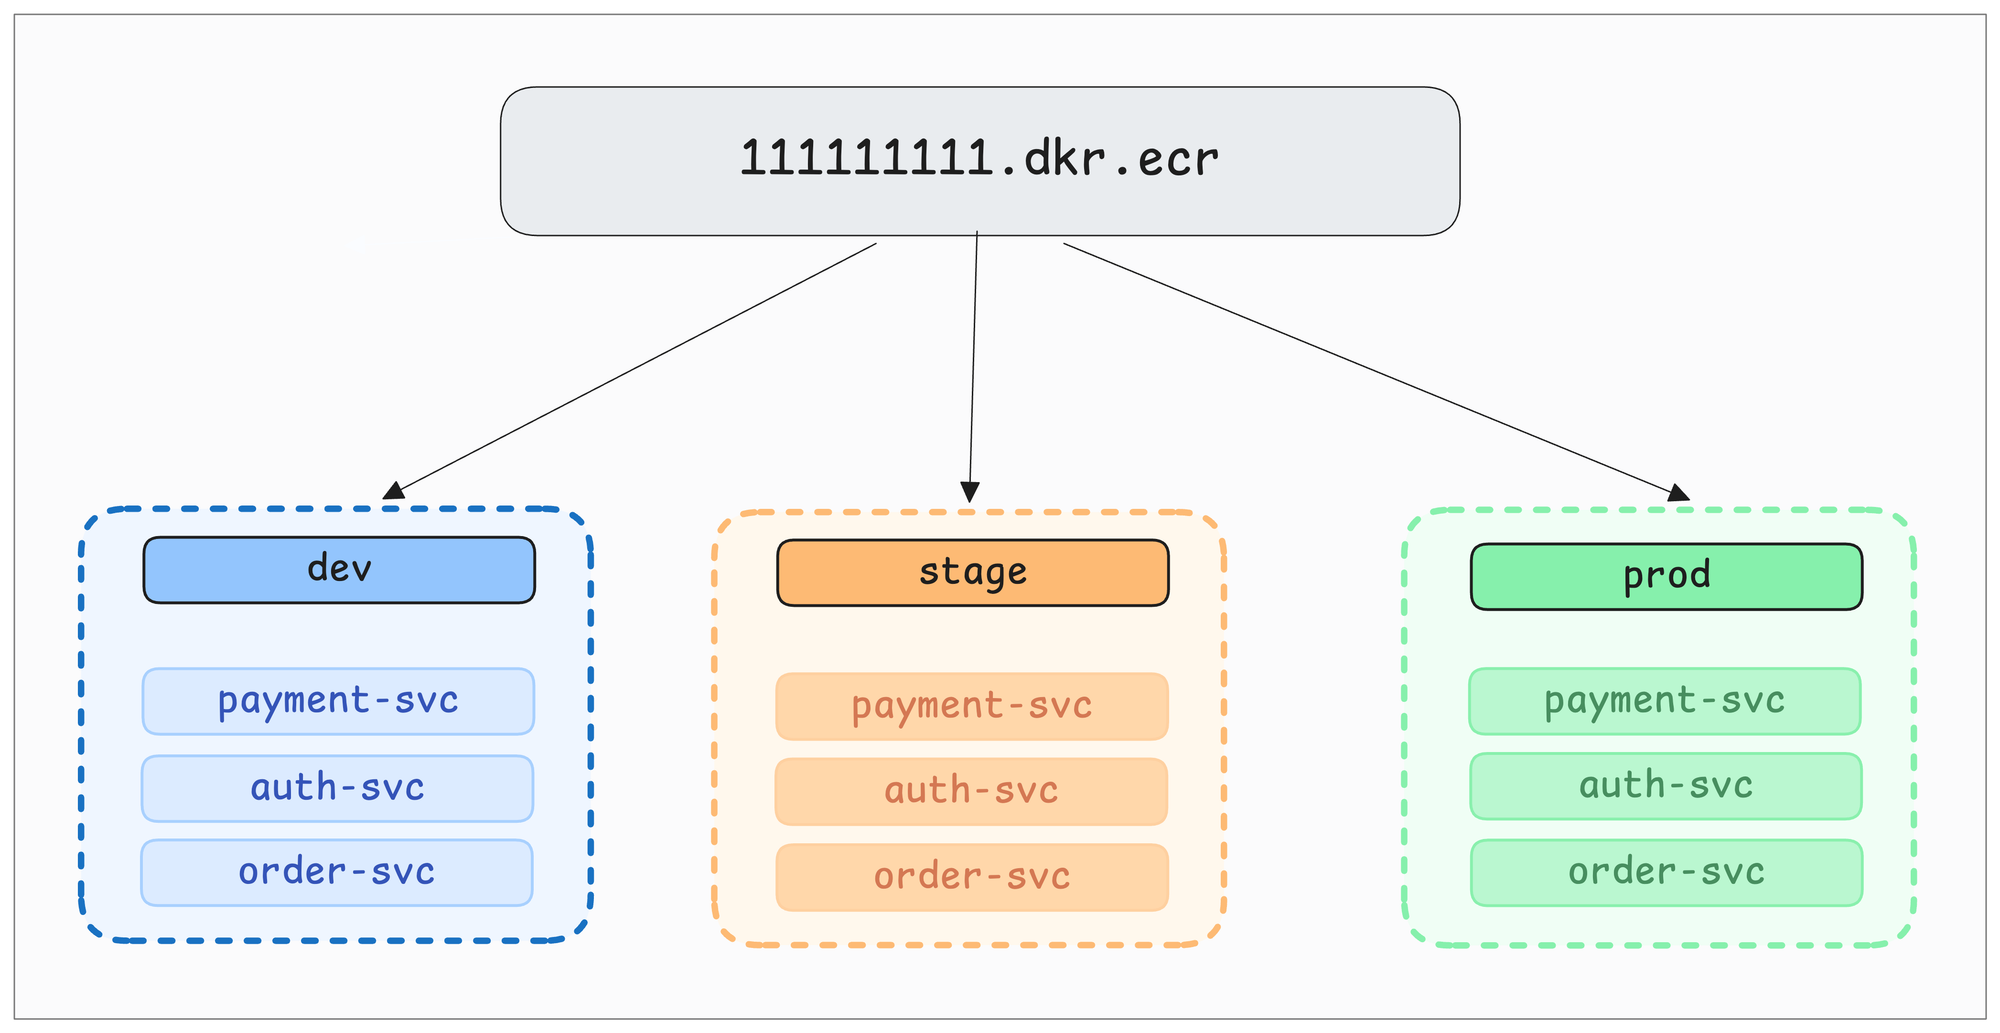
You have to use namespaces or paths to separate environments.
For example,
- In Dockerhub, you have to use naming conventions like
myorg/dev-payment-svc,myorg/stage-payment-svc - GCR/Harbor / JFrog Artifactory supports project-based separation with individual access control (e.g.,
harbor.company.com/dev/payment-svc)
So the common structure on registries that support paths looks like the following.
registry.company.com/
├── dev/
│   ├── payment-svc
│   ├── auth-svc
│   └── order-svc
├── stage/
├── release/
└── prod/qa-payment-svc and stage-payment-svcAlso, this approach is simple and cost-effective. You have to manage two registries. One shared for non-prod, one dedicated for prod.
Registry Storage and Garbage Collection
Garbage Collection is the key thing you should plan in your pipeline.
Think of 100+ services pushing images daily. What happens to registry storage? That is where garbage collection policies come in.
You can configure policies to automatically clean up old images based on certain criteria.
For example,
- Delete after a certain number of days or
- After a set number of images.
Most registries (Harbor, ECR, GCR, Artifactory) support this natively.
Now, when it comes to production images, every organization has complience rules to keep certain versions that was deployed to production for certain period of time.
For example, in financial services, the compliance requirement is to keep production artifacts for 5 to 7 years
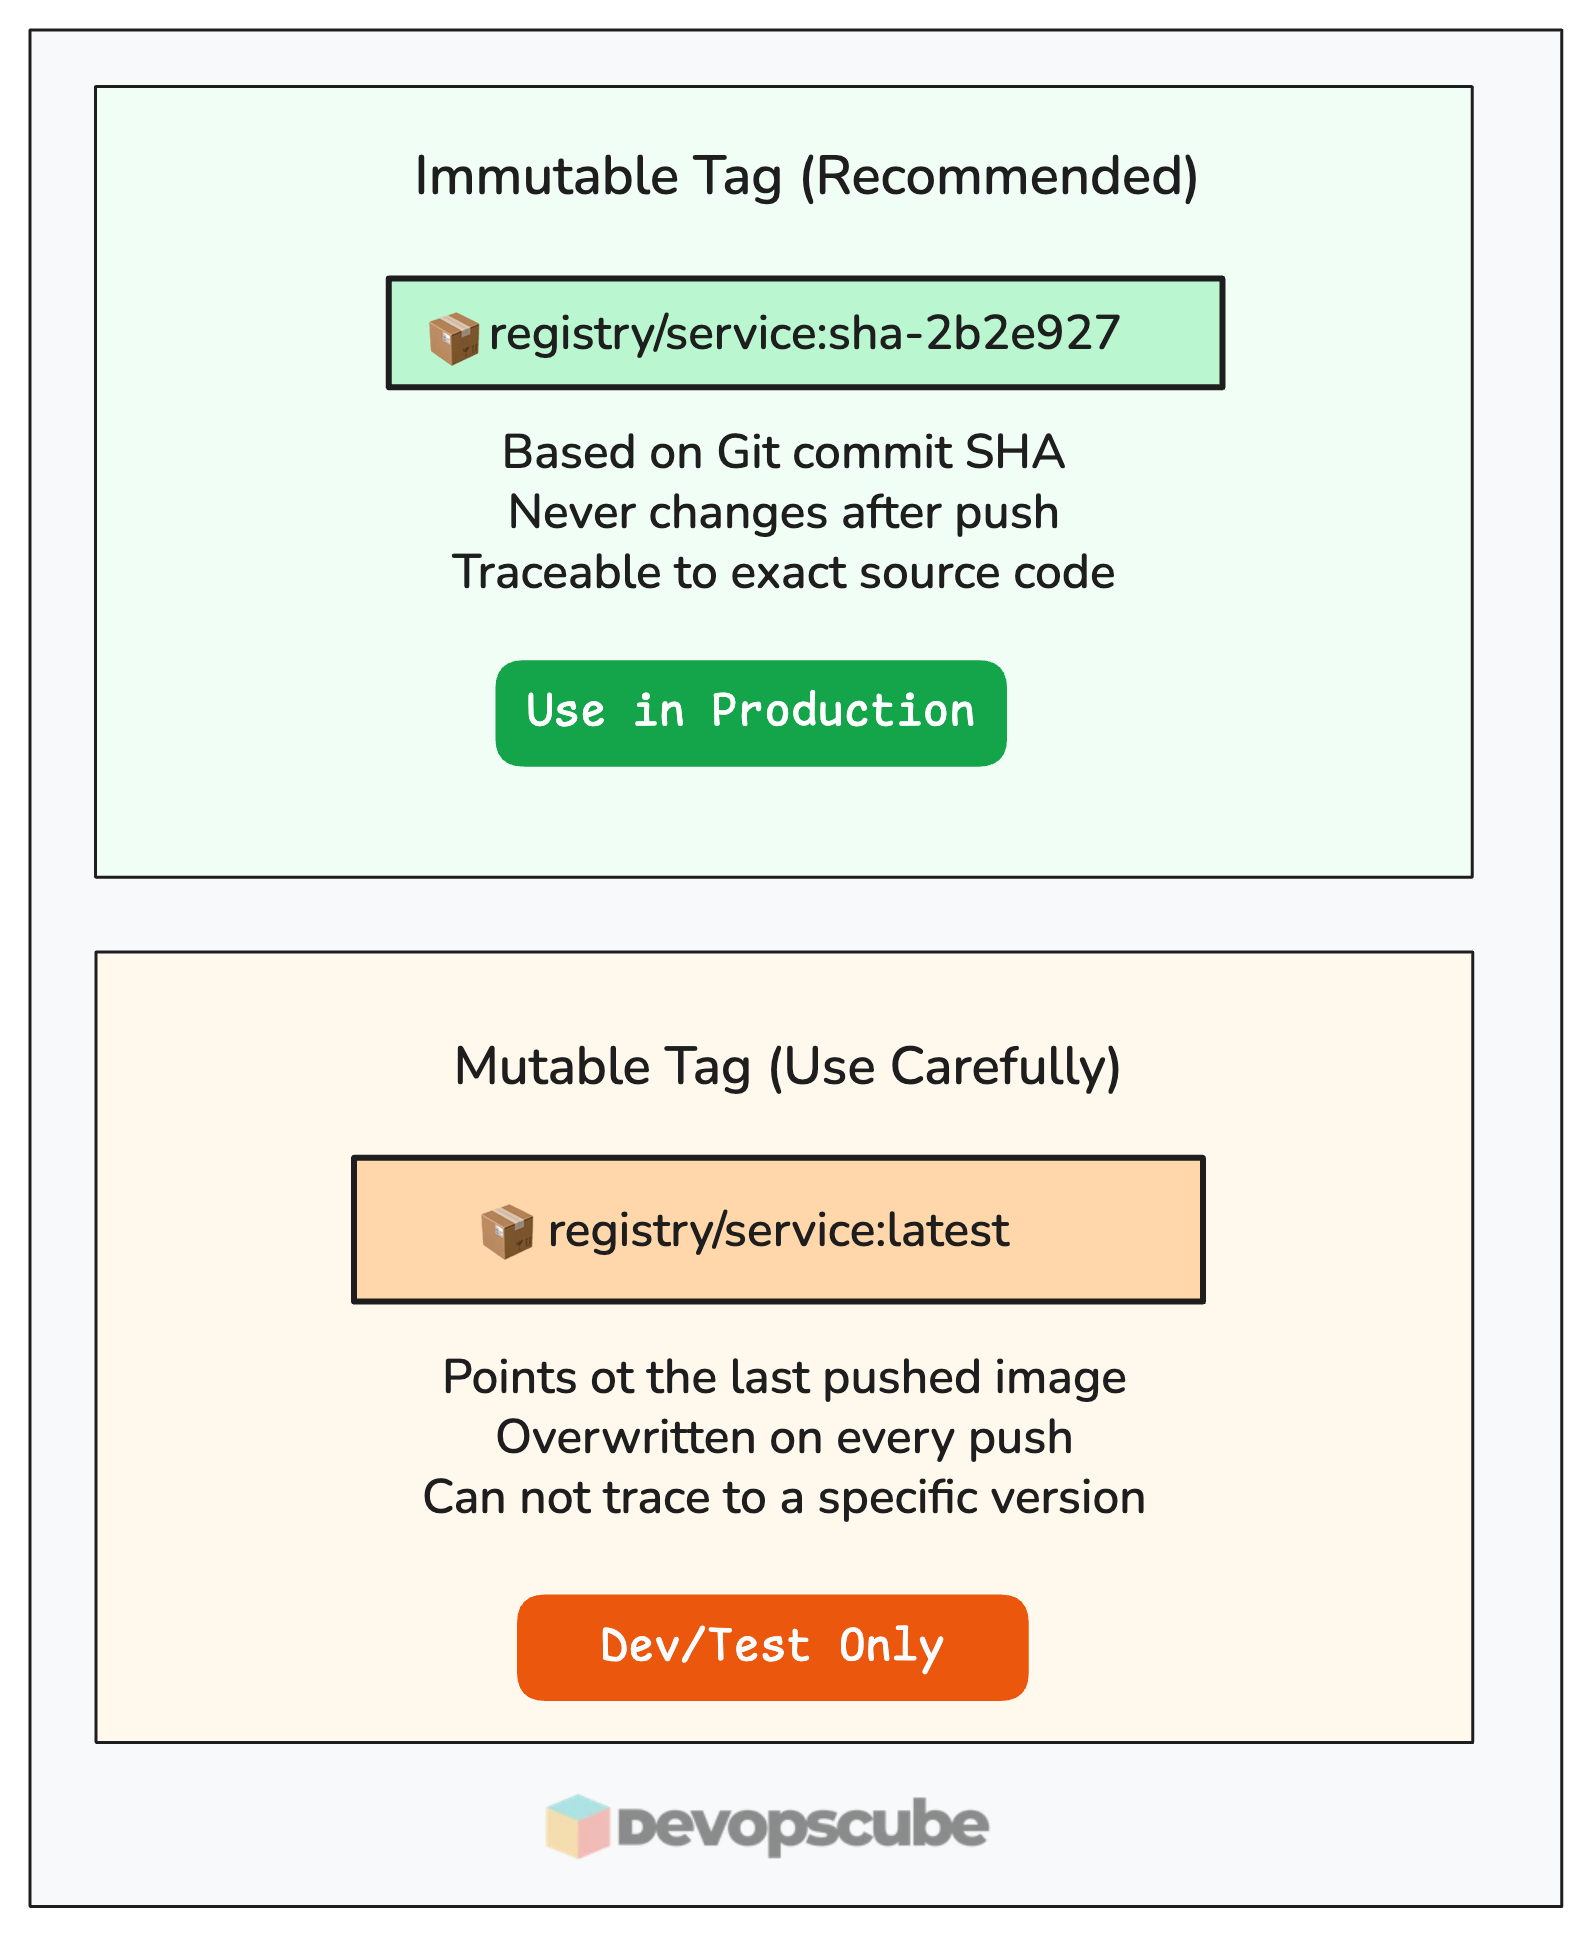
Image Tagging Strategy (Immutable vs Mutable Tags)
One of the key things that help in how we track, promote, and trace images across environments is image tags.
There are two types of tags.
- Immutable tag: It is a tag that never changes and always points to the same image. For example, tag based on the GitHub commit SHA ID (
registry/service:sha-abc1234).The best part is, it is a one to one mapping between image and the exact source code that built it. - Mutable tag: It is the tag can be updated to point to a different image. For example, the
latesttag. It always points to the last pushed image. It is actually useful for quick testing.
Docker Image Build Pipeline Architecture
Before we dive deep, lets look at the high level architecture.
Our pipeline is split into four stages. Each stage get triggered at a different point in the development lifecycle.
- PR Check Workflow
- Image Build + Dev Deployment
- Image promotion from dev to stage environment
- Image promotion from stage to prod environment.
The following image illustrates those fours stages.
When we say image promotion, taking a verified image and moving it across environment. In practice, this means either retagging the image or copying it to a different registry using tools like crane or skopeo.
Before we get in to the image build pipeline, you need to first understand the branching strategy. Why? Because every workflow in this pipeline is triggered by a branch event.
If you don't understand which branch does what, the workflow triggers won't make sense.
Branching Strategy
Our pipeline follows a Git-flow style branching model. The key branches develop, release, and main drive the pipeline through dev, stage, and prod environments.
Here is the key thing to understand.
Not every environment needs its own branch. For example, for the environments like perf, UAT, or pre-prod the same image that is ready for productions gets promoted into them without a separate branch.
The following image illustrates the git branching strategy.

Here is the development flow.
feature/*: Developers create feature branches fromdevelop. When the feature is ready, they raise a PR. This triggers the PR check workflow.develop: Merging a PR triggers the image build followed by deployment to the dev environment. This happens many times.release/*: When a version is finalized for production deployment, the team cuts a release branch fromdevelop. This triggers the stage promotion. QA and integration testing happen here. Also, all the bugfixes go directly on this branch.main: Merging the release branch intomaintriggers the production promotion.
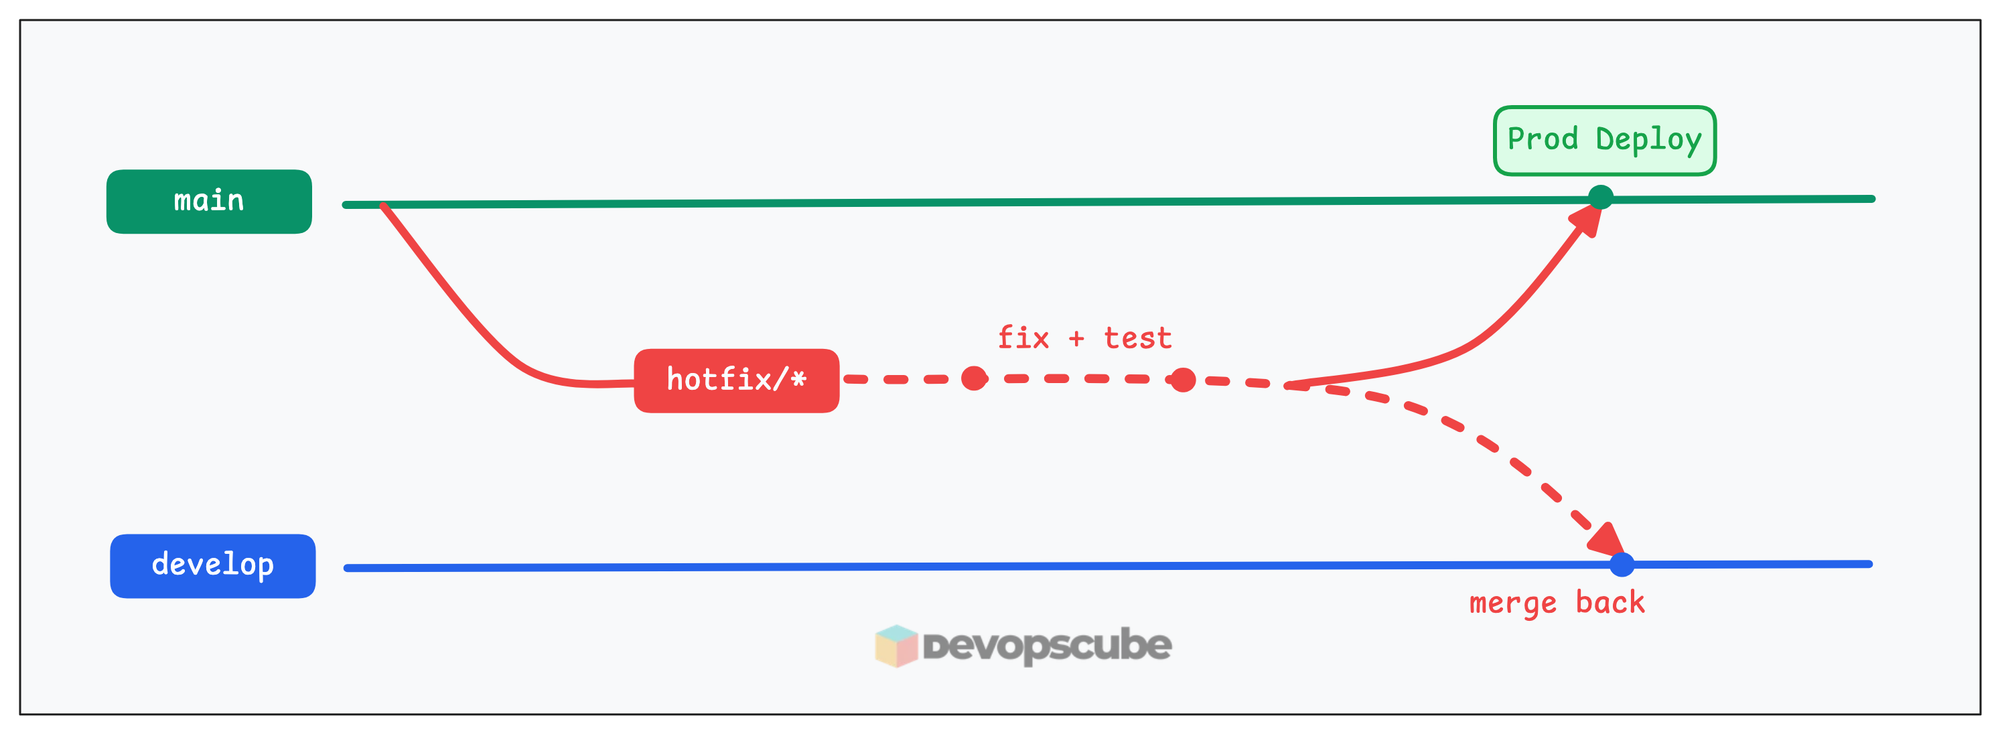
Now lets say, the app is running in production and what if we want to fix something in production.
This is where, we will create a hotfix branch.
For emergency production fixes, a hotfix branch is created from main, tested quickly, merged back to both main (prod deploy) and develop (so the fix is not lost).
Now lets look at the image build workflow in detail.
PR Check Workflow
This is where everything begins. When you raise a Pull Request (PR) to the develop branch, this workflow kicks in automatically.
The goal here is very simple. We need to verify that everything is correct before the code gets merged.
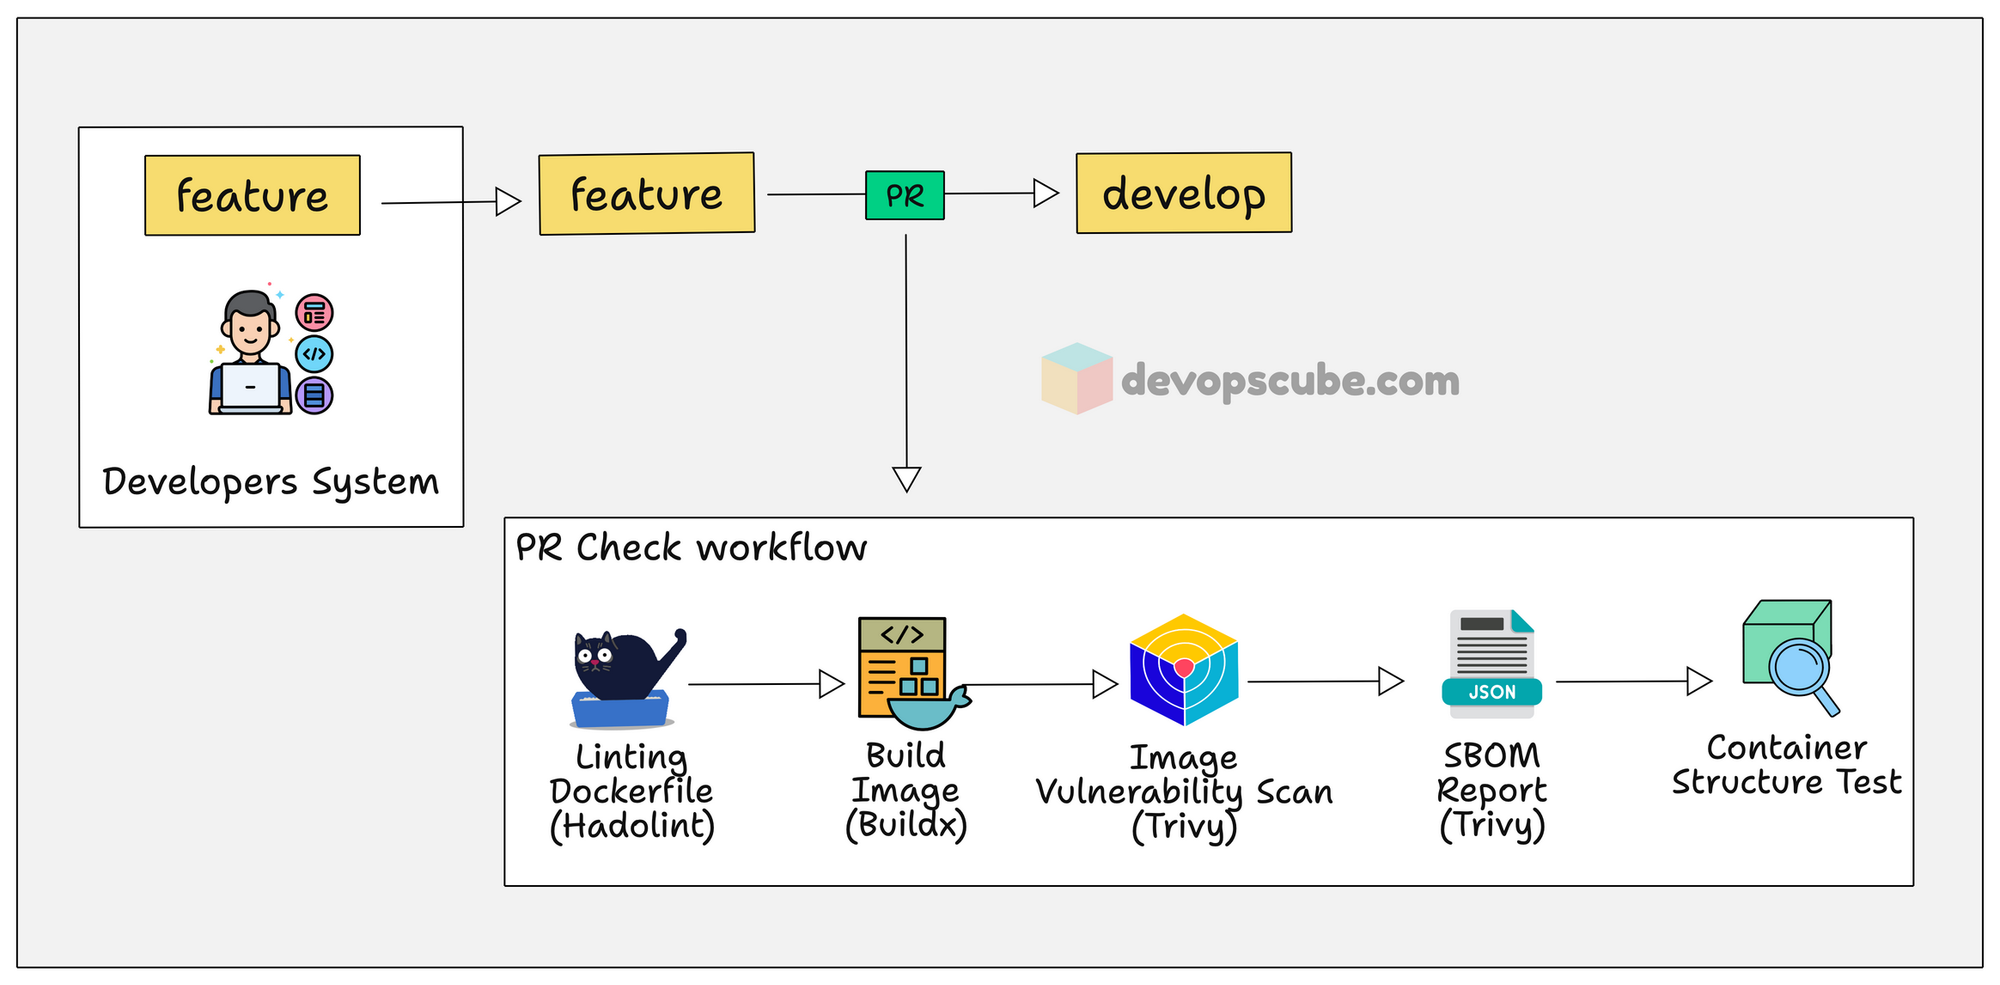
Here is how it works.
- The PR first checks out the files and folders on the GitHub repository.
- Then, it uses Hadolint to lint the Dockerfile that catches common issues (like missing version pinning or running as root).
- Then it uses Buildx to build the Docker image using the Dockerfile to check if the image builds without any issues.
- For the built image, it generates an SBOM (Software Bill of Materials) report using Trivy and uploads it to GitHub Actions artifacts.
- Then, it scans the Docker image using Trivy for vulnerabilities.
- Finally, it uses the container structure test to verify if meets your compliance rules.
So far, so good.
If the PR check passes, it means the Dockerfile has no issues, the image builds as expected, there are no known vulnerabilities image, and the container structure is compliant. Only then we will merge the PR.
Build Multi-Architecture Docker Image and Deploy to Dev
Once the PR is merged into the develop branch, the image build workflow triggers automatically.
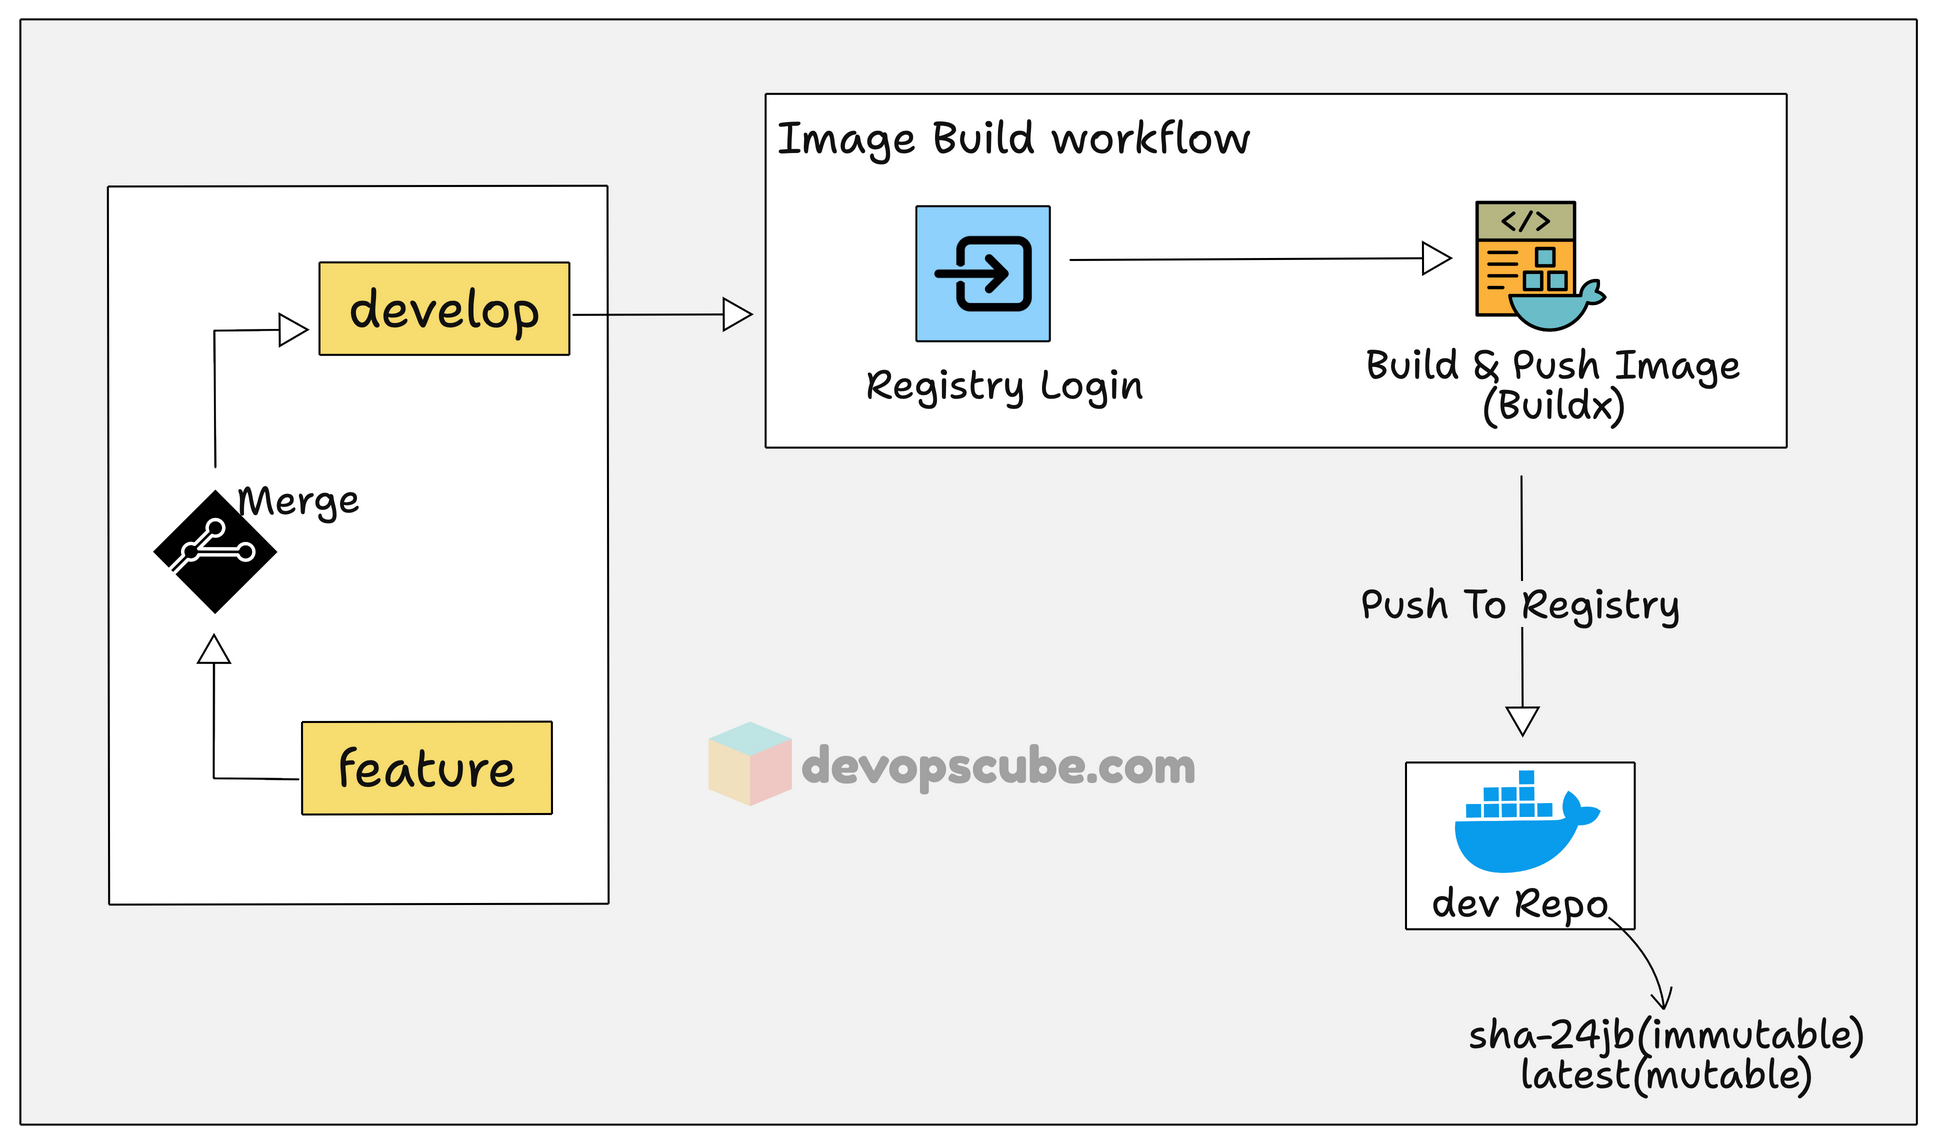
Here is how it works.
- The build workflow starts with checking out the files and folders on the GitHub repository.
- Then it installs QEMU and Buildx to build multi architecture Docker image. In the workflow, we specify to build
linux/amd64 and linux/arm64architecture. - Logs in to DockerHub using credentials stored in GitHub Secrets.
- Builds and pushes the image to the dev container registry with two tags. An immutable git commit SHA (e.g.,
sha-2b2e927) based tag and a mutable tag (latest). The SHA tag is what we will use later to promote the exact image to stage and prod. - Deploys the image to the dev environment (Kubernetes, ECS, or whatever your team uses).
Now, the built image is running in dev. Dev team uses this deployment to test their changes for the latest code.
Once the code is stable and ready for deployment, the specific image version gets promoted to the stage environment.
Promote Docker Image from Dev to Stage Registry
Next the dev team picks a specific application version/commit that has been tested, reviewed, and agreed upon for production deployment. That is the image that gets promoted to stage environment.
For that, we need to create a release branch from the specific commit on develop branch. The image that was built of that commit is the one we want to promote to stage environment.
For example, lets say 2b2e927 is the SHA of the commit development team chose for production. The following command creates a release branch named release/v1.2.0-sha-2b2e927 from that exact commit 2b2e927.
$ git checkout develop

$ git checkout -b release/v1.2.0-sha-2b2e927 2b2e927
Here,
release/v1.2.0- Branch name with semantic versioning2b2e927- The specific commit on develop to branch from
This way, anyone looking at the branch instantly knows which image version it is promoting.
release/sprint-42, release/2025-03-10, or release/v1.2.0 if you follow semantic versioning. You can pick whatever works for your project.Here is the important part.
The stage promotion workflow is manual. We need to pass the Docker image tagged with SHA in the pipeline as input.
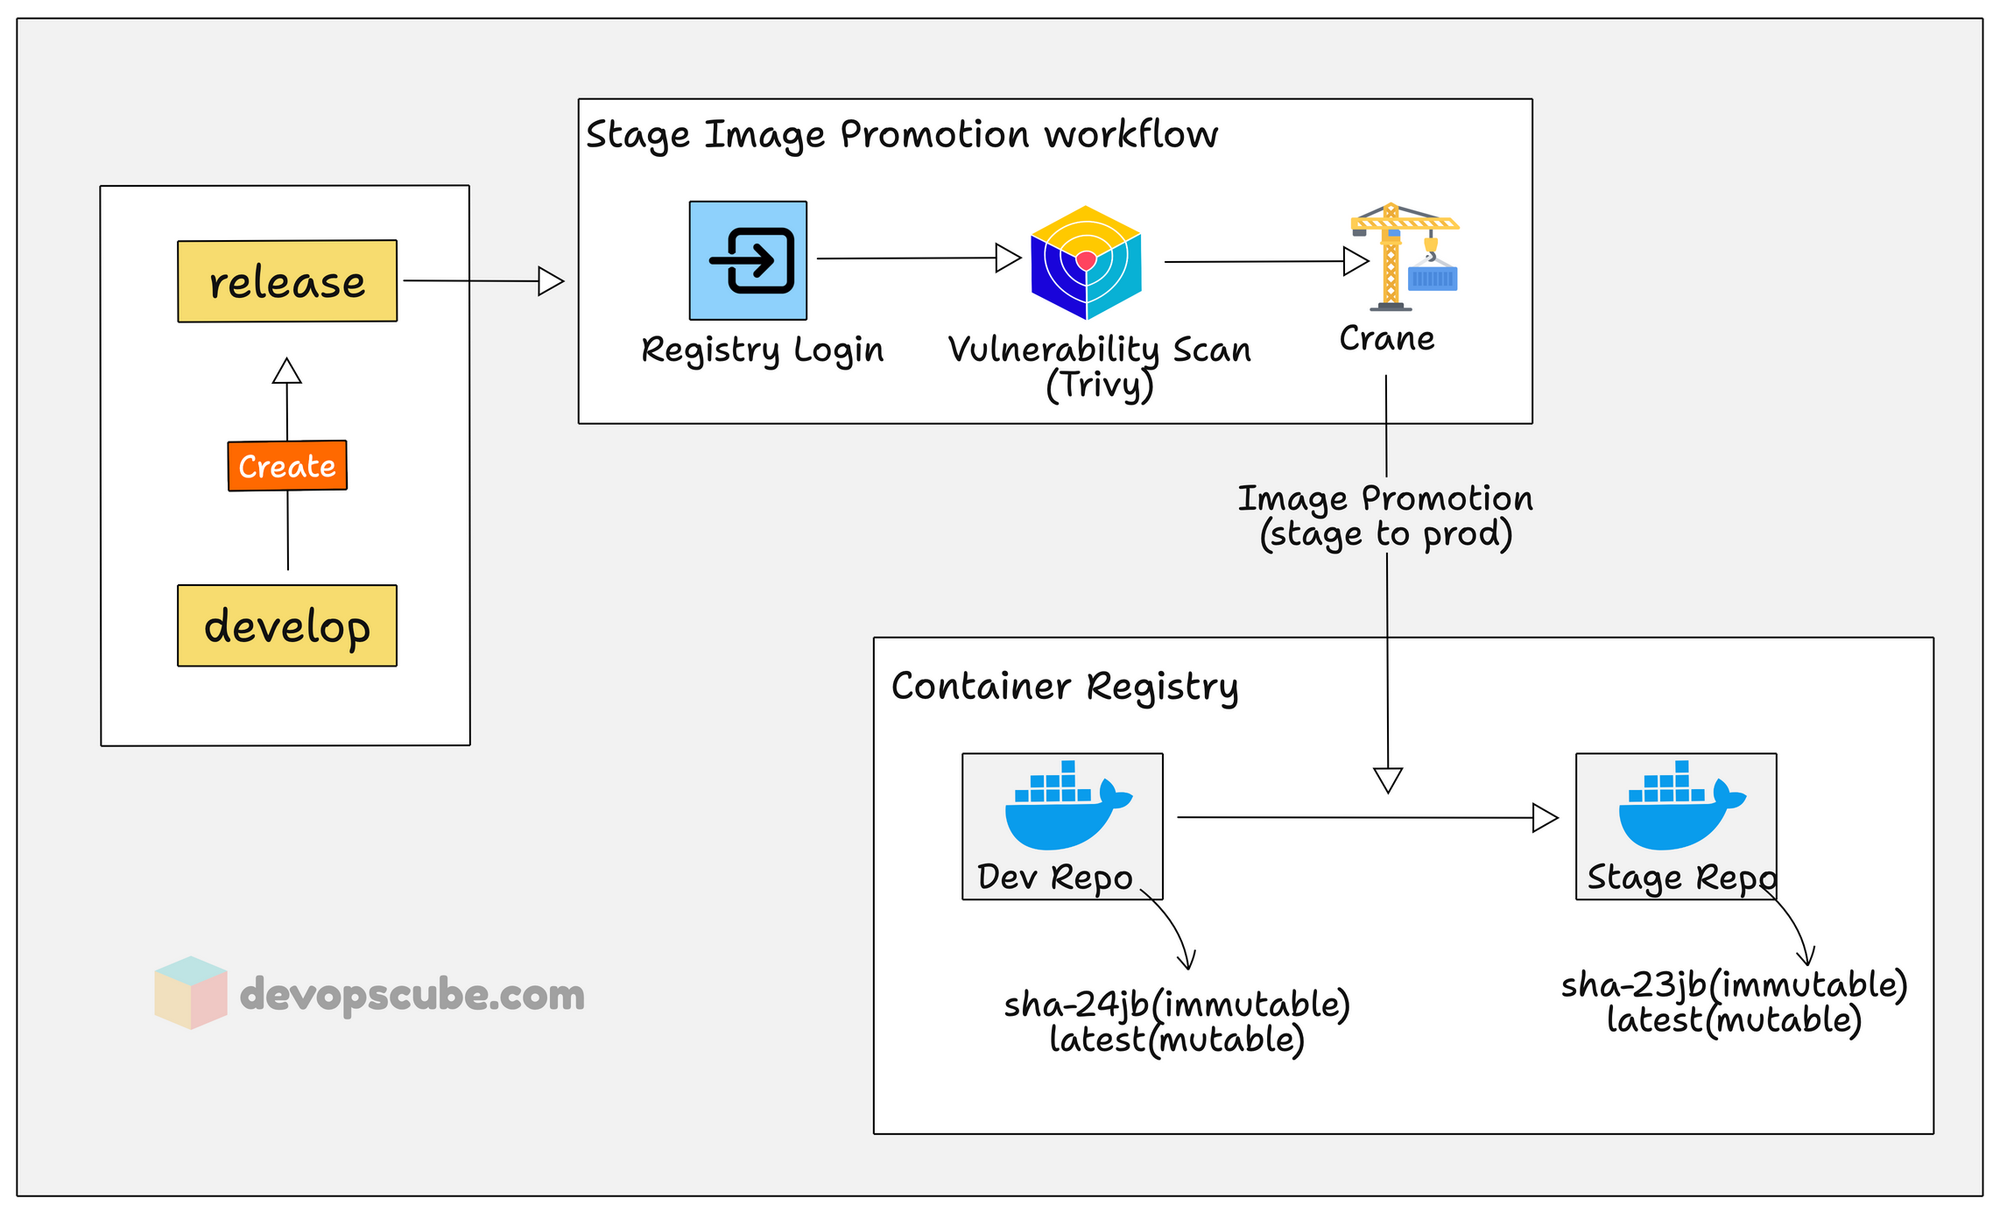
Here is what happens in this promotion pipeline.
- It runs a Trivy vulnerability scan on the dev image to catch issues before staging.
- Once it passes vulnerability scan, it uses Crane to copy (promote) the image from the dev registry to the stage registry.
- Finally the image gets deployed to the stage environment for integration and QA testing.
Promote Docker Image to Production with Cosign Signing
This is the final gate in the pipeline. After stage environment tests passes, we push the changes to the main branch and manually trigger the production promotion.
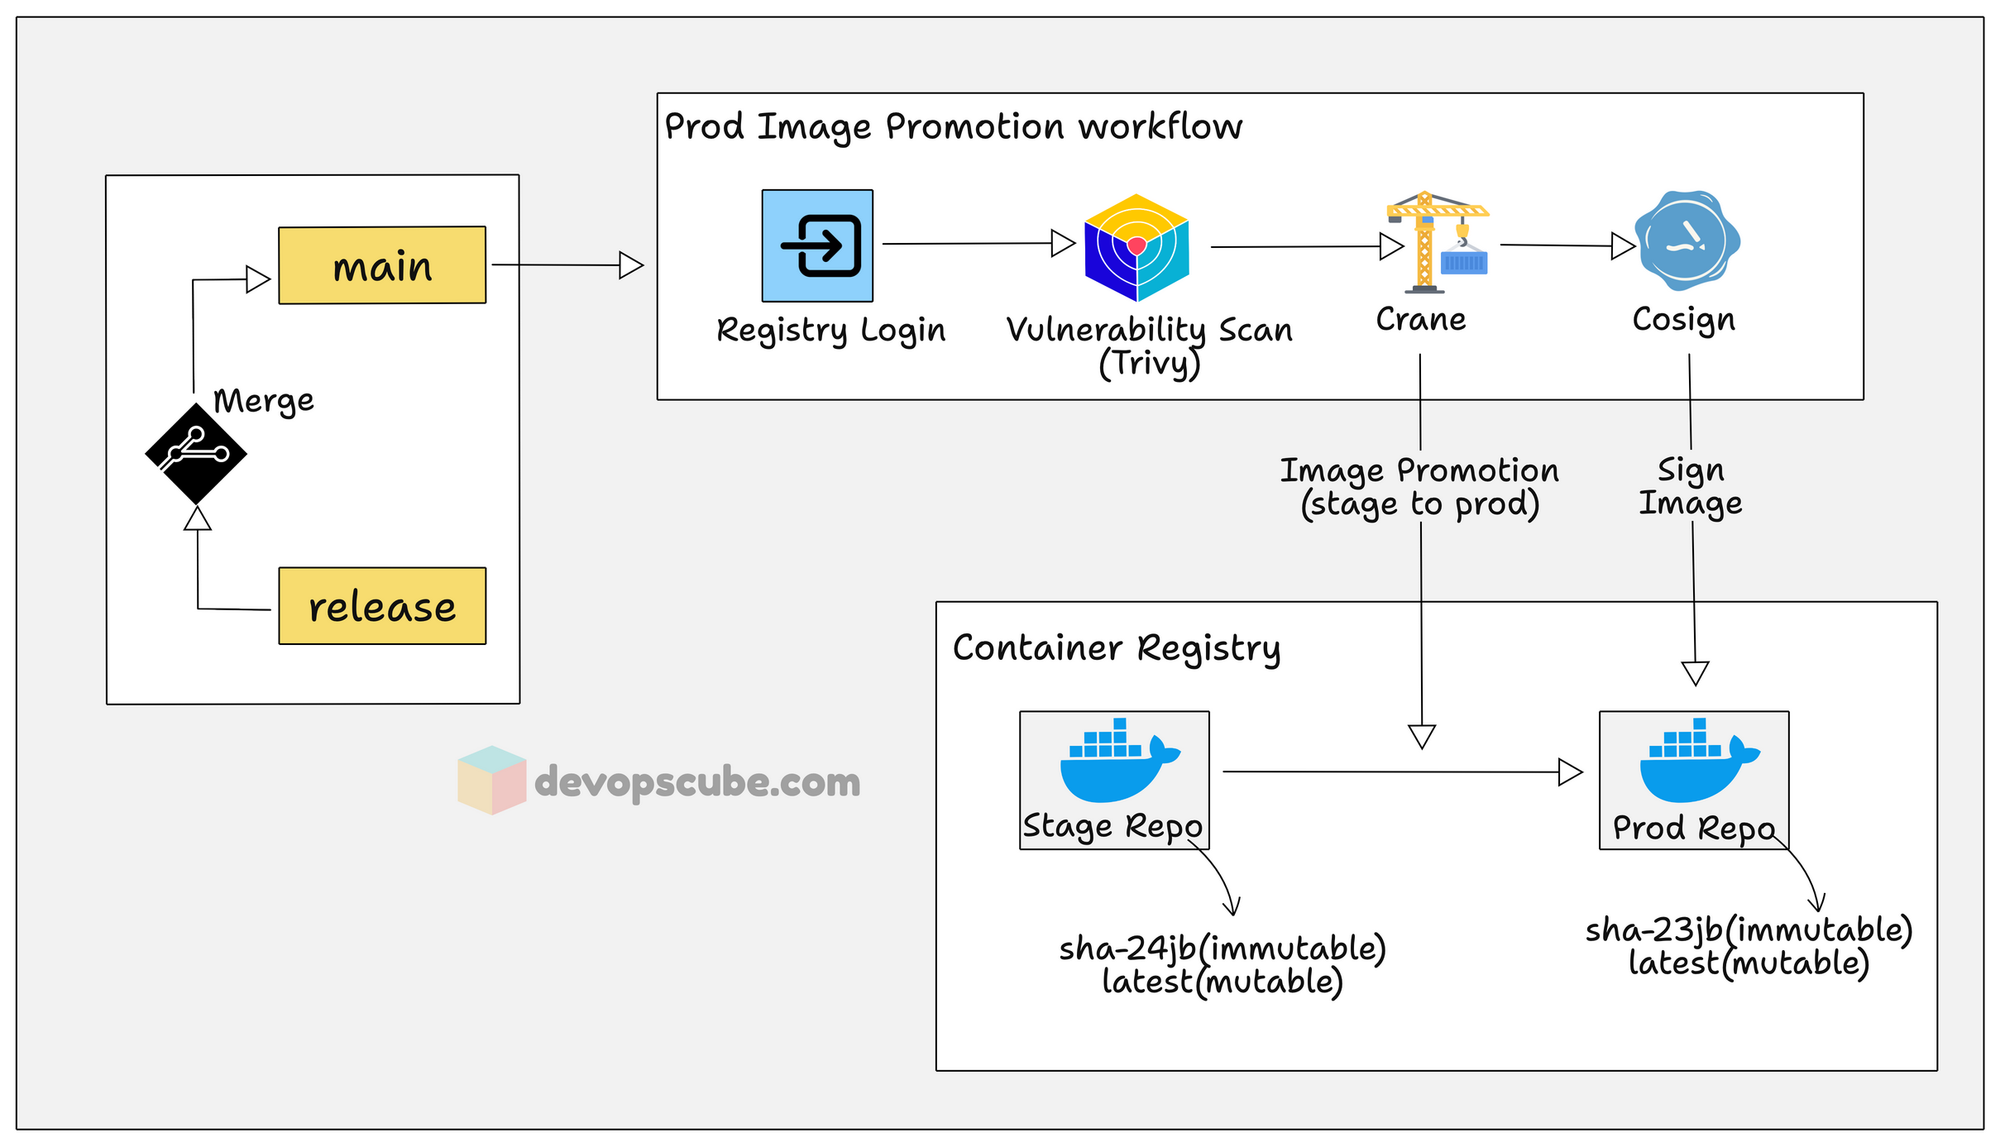
Now, you might ask, don't we need to rebuild the image from main?
No. The whole point of the promotion model is that we should never rebuild between environments. The exact same image (same SHA digest) that was tested in stage gets copied to the prod registry via Crane.
Why? Because even with the same source code, a image rebuild can pull different base image layers, get updated code dependencies etc. So the code merge from release to main is just for keeping the Git history in sync.
Here is what this pipeline does.
- It runs one last Trivy vulnerability scan on the staged image. This is called admission-time scanning. It is sort of a safety net to catch any new vulnerabilities that appeared between staging and now.
- It then uses Crane to copy the image from the stage registry to the production registry.
- Finally, the image is digitally signed using Cosign. This way, during deployment, we can verify if it was created by our image pipeline and has not been modified after it pushed to the registry.
- The the signed image is deployed to the production environment.
Conclusion
In this guide, we have gone through sections to learn how a Docker image is built and promoted to different environments.
A key thing to understand it the process would differ based on the project requirements.
What I have explained in this guide is, build once and deploy everywhere. However, I have personally worked on projects where the image gets build again from release branch when the production commit it decided. So overall it depends on the project and team.
In the next guide, we will walk through a complete hands-on guide on a production-grade Docker image build pipeline using GitHub Actions.