

AWS now as EBS Volume Clone feature that lets you copy an EBS volume instantly with a single API call and no snapshot is required.
By the end of this guide, you will understand,
- What EBS Volume Clones are and how they work
- How cloning differs from snapshots (and when to use each)
- How to clone an EBS volume using the AWS CLI
- Best practices for managing cloned volumes
Let's get started.
What is EBS Volume Cloning?
EBS Volume Cloning lets you create an instant, point-in-time copy of an EBS volume within the same Availability Zone.
Previously, copying a volume required the follwing two steps.
- Create a snapshot of the volume and wait for it to upload to S3
- Create a new volume from that snapshot and wait again for all the data to fully copy over to the new volume.
This process could take anywhere from minutes to hours depending on volume size.
With EBS Volume Clones, both steps combine into a single API call or console click is enough to clone a volume.
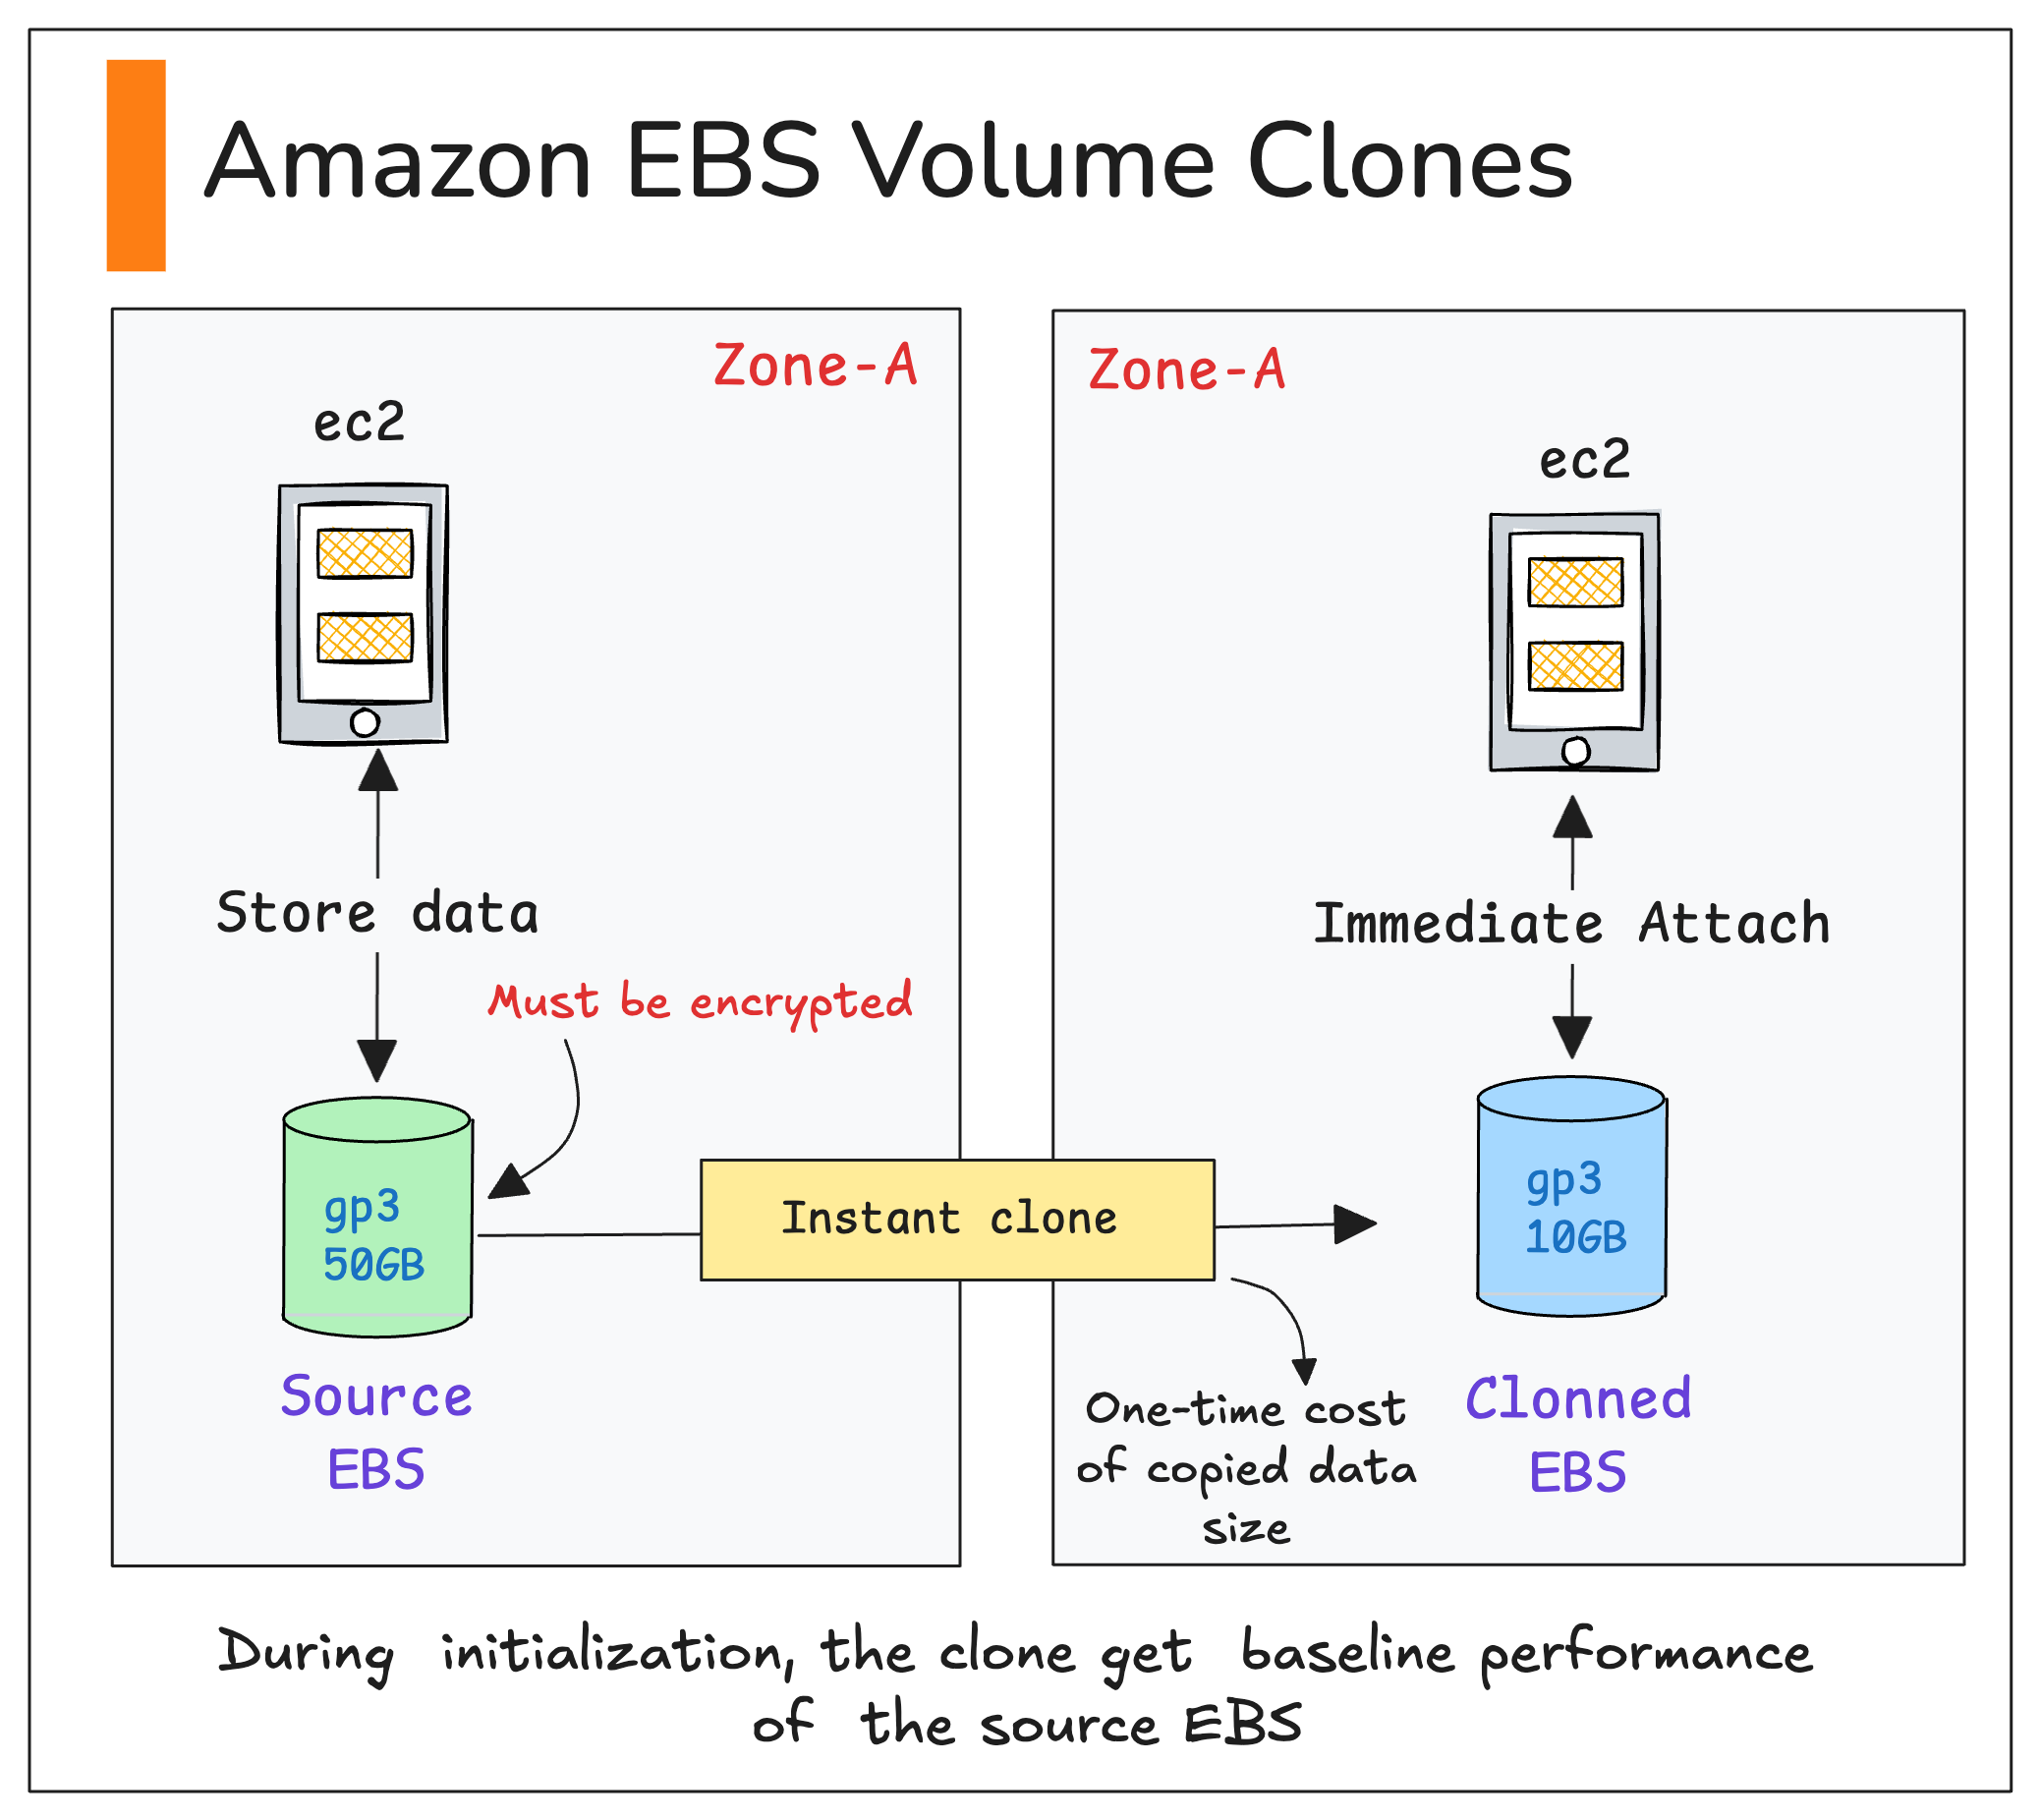
The interesting thing is, the cloned volume becomes immediately available to mount on an EC2 instance, even if it contains TBs of data.
Here are the important things you should know about cloning.
- You cannot clone a volume across AZs or Regions.
- It currently only works with encrypted volumes, so the original volume must be encrypted.
- You cannot start a second clone until the first one completes initialization.
- The cloned volume is ready to use immediately, while the remaining data from the source volume continues copying in the background.
- The clone does not have to be the same size as the original volume. For example, if your 100 GiB volume only uses 15 GiB, you can clone it as a 15 GiB volume.
What is Background Initialization?
When you clone a volume, it shows a status of "initializing" until the background data transfer completes.
During this period,
- The volume is fully usable and can be attached to an EC2 instance immediately.
- Performance is limited to the baseline of the source volume (e.g., gp3 baseline is 3,000 IOPS / 125 MiB/s).
- If your application reads a block that hasn't been copied yet, AWS fetches it from the source volume first and it adds slight latency.
Now, let us do a hands-on
How to Clone an EBS Volume Using AWS CLI
Let look at cloning an existing EBS volume and attaching it to another instance.
This hands-on assumes you already have:
- AWS CLI installed and configured on your local system
- The Volume ID of the existing EBS volume
- The Instance ID of the instance you want to mount the cloned volume.
copy-volumes command is not found, upgrade your CLI first.Now follow the steps given below.
Step 1: Clone the volume
Now, run the following command to directly clone the volume. Replace the source volume ID with your own.
aws ec2 copy-volumes \
  --source-volume-id vol-08e73a245cfa471e0 \
  --size 15 \
  --volume-type gp3 \
--region us-west-2Once the command executes successfully, you will receive a similar output of the created volume details.
{
    "Volumes": [
        {
            "SourceVolumeId": "vol-08e73a245cfa471e0",
            "Iops": 3000,
            "Tags": [],
            "VolumeType": "gp3",
            "MultiAttachEnabled": false,
            "Throughput": 125,
            "VolumeId": "vol-06622189b221b795a",
            "Size": 15,
            "AvailabilityZone": "us-west-2a",
            "State": "creating",
            "CreateTime": "2025-10-23T04:41:30+00:00",
            "Encrypted": true,
            "KmsKeyId": "arn:aws:kms:us-west-2:123456789:key/a79d6e35-6397-4a88-8e51-aebee33cb434"
Note down the created volume ID (vol-06622189b221b795a) to attach to another instance.Step 2: Attach the cloned volume to an Ec2 instance
To mount a volume to an instance, use the following command. Replace the Instance ID (i-09a1664e976dce9d7) and the cloned volume ID vol-06622189b221b795a) with your own value.
aws ec2 attach-volume \
         --volume-id 'vol-06622189b221b795a' \
         --instance-id 'i-09a1664e976dce9d7'   \
         --device '/dev/sdb'
Note: If you get an error that the device path is already in use, try another path such as /dev/sdfOnce the execution is completed, you will see a similar output.
{
    "VolumeId": "vol-06622189b221b795a",
    "InstanceId": "i-09a1664e976dce9d7",
    "Device": "/dev/sdb",
    "State": "attaching",
    "AttachTime": "2025-10-23T04:55:56.197000+00:00"
Step 3: Mount and verify the volume
SSH into the target Ec2 instance, where you want to mount the volume.
Then execute the following command to list the block stores.
sudo lsblk -fThe output will list the attached volumes.
NAME          FSTYPE FSVER LABEL UUID                                 FSAVAIL FSUSE% MOUNTPOINTS
nvme0n1
├─nvme0n1p1   xfs          /     6bf6dcc0-0673-443a-b92a-b26a3524cf3b    8.4G    16% /
├─nvme0n1p127
└─nvme0n1p128 vfat   FAT16       92F7-4B7C                               8.7M    13% /boot/efi
nvme1n1
├─nvme1n1p1   xfs          /     6bf6dcc0-0673-443a-b92a-b26a3524cf3b
├─nvme1n1p127
└─nvme1n1p128 vfat   FAT16       92F7-4B7C
Here, nvme1n1p1 is the cloned volume, but it is not mounted with the file system yet.
Create a mount directory and mount the volume
sudo mkdir -p /mnt/data
sudo mount -o nouuid /dev/nvme1n1p1 /mnt/data
Why -o nouuid? The clone has the same filesystem UUID as the source. This flag prevents a mount conflict.
Once the mounting is completed, we can check the disk filesystem.
df -hThe following output will show the file systems and their usage.
Filesystem        Size  Used Avail Use% Mounted on
devtmpfs          4.0M     0  4.0M   0% /dev
tmpfs             453M     0  453M   0% /dev/shm
tmpfs             181M  452K  181M   1% /run
/dev/nvme0n1p1     10G  1.6G  8.4G  16% /
tmpfs             453M     0  453M   0% /tmp
/dev/nvme0n1p128   10M  1.3M  8.7M  13% /boot/efi
tmpfs              91M     0   91M   0% /run/user/1000
/dev/nvme1n1p1    8.0G  1.6G  6.4G  20% /mnt/tmp
You should see /dev/nvme1n1p1 listed with its size and usage. This ensures that our volume is mounted and that we can even check the data inside it.
ls /mnt/tmp/

bin  boot  dev  etc  home  lib  lib64  local  media  mnt  opt  proc  root  run  sbin  srv  sys  tmp  usr  var
These are all the system files of the original EBS volume.
Real-World Use Cases
This clone eature aims to eliminate waiting time and increase productivity.
Here are are some real-world use cases.
- Dev/test environment setup: Developers and the QA team can quickly create up-to-date copies of the production application environment to test, find bugs, and try new features without affecting the live system.
- Database testing and upgrades: Before running a risky migration or upgrade, clone the database volume. If something breaks, your source is untouched.
- Machine learning experiments:Data scientists and analysts also often need copies of large datasets for new machine learning experiments, so this feature is useful for them as well.
Best Practices
Volume cloning is designed to make development and testing workflows more efficient.
It is not a replacement for EBS snapshots, since snapshots are secure backups stored in Amazon S3 and can be copied to other availability zones or regions for disaster recovery.
In terms of cost, cloning has a one-time charge based on the amount of data in the cloned volume, followed by the regular fees for the volume type, IOPS, and throughput.
Although the volume can be attached and used immediately, the data may not be fully consistent until the entire data transfer is completed.
To maintain data accuracy, it is recommended to pause the application’s write operations during this period.
Also, tags are not inherited from the source. Tag every clone at creation time with environment, owner, and expiry date. Use AWS Config rules or tag-based automation to identify and remove stale cloned volumes.
Conclusion
EBS Volume Clones removed the multi-step snapshot workflow for creating volume copies. You get an instant and point-in-time copy of EBS.
This feature is introduced to improve the efficiency of quickly cloning volumes for testing.
