

I completed my Kubernetes certification two years ago, and now it's time to recertify. I initially completed the CKA to start learning Kubernetes and stay updated with new technologies.
This certification really helped me understand Kubernetes architecture, how to create and scale pods, troubleshoot Kubernetes nodes, and back up the etcd cluster. I have published study notes on the Certified Kubernetes Administrator.
As it's time to recertify again, this time I want to dive deeper into setting up a cluster from scratch and understanding components like certificate generation, communication between master and worker nodes, and setting up the etcd cluster.
I have decided to use the well-known guide for setting up Kubernetes from scratch, "Kubernetes the Hard Way." In this blog, I will share my experiences from building a cluster from scratch.
Disclaimer: Don't use this blog as a step-by-step guide. I highly recommend this link for that purpose. This blog is based on my personal experience and covers some of the missing explanations in the guide.
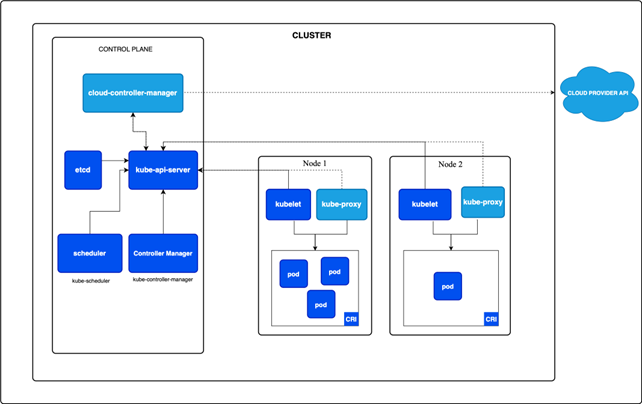
Also, if you want to learn more about the different components of Kubernetes, please refer to the kubernetes architecture.
Why Hard Way
There are multiple options available to build a Kubernetes cluster or use a Kubernetes cluster. You can build Kubernetes clusters using tools like Kubeadm, kops, and Kubesparay.
And if you want to use cloud vendor-provided services like EKS, AKS, and GKE, which are most popular these days, use them in production.
Yes, these tools are simple to build clusters and suitable for production use. But if you build a learning cluster from scratch, here are several benefits, like below
- Deep Dive into Kubernetes Components: You get direct experience with key Kubernetes parts like the API server, scheduler, controller manager, etc., and learn how they work together.
- Understanding Networking Concepts: Setting up cluster networking from scratch, like using CNI plugins, helps you better understand Kubernetes networking, how pods communicate, and how services are discovered.
- Problem-Solving and Debugging: Building a cluster manually lets you face possible problems, teaching you how to fix issues like failed node joins, certificate problems, or networking errors.
- Mastering Configuration: You gain practical experience with configuration files like kubeconfig, manifests, and yaml definitions, allowing you to adjust your cluster for specific needs.
- Increasing Security Understanding: Configuring authentication, RBAC policies, and TLS certificates helps you understand how Kubernetes ensures secure communication and access control.
- Boosts Confidence: Starting from scratch helps you to feel more confident in administering and troubleshooting Kubernetes clusters independent of managed services or pre-built setups.
Kubernetes Hardway LabSetup
Let's create a playground for building Kubernetes clusters. You have two options: set it up in the cloud or on your laptop.
I chose to set up the cluster on Azure Cloud because you get $200 in free credits for a month, and there are limitations on the type of VM.
Initially, I considered setting up Kubernetes clusters on AWS EC2, but you only get 750 hours of EC2 instance time, and only t2.micro or t3.micro instances qualify. However, Kubernetes master clusters need a minimum of 2GB of memory.
If you want to set up on your laptop, you can use Vagrant to create a VM and install Kubernetes.
Refer to the lab setup guide below:
- Vagrant Setup: Vagrant VM Guide
- VM Setup: Compute Resources Guide
Pre-Requisites
The requirements for setting up Kubernetes from scratch are simple: 2GB of memory and 1 VCPU. You need to have one of the following containers pre-installed. I am familiar with Docker, so I installed it.
Refer to this Prerequisites guide.
Downloading Binaries
As we are installing Kubernetes from scratch, we need to download all the binaries for each component. Make sure you select the correct CPU architecture when downloading the binaries.
You can use commands like lscpu or uname to check your CPU architecture. Kubernetes binaries support the following CPU architectures: amd64, arm, arm64, ppc64le, and s390x.

Below are the links to download the binaries.
https://dl.k8s.io/v1.31.2/bin/linux/arm64/kubectl

https://dl.k8s.io/v1.31.2/bin/linux/arm64/kube-apiserver

https://dl.k8s.io/v1.31.2/bin/linux/arm64/kube-controller-manager

https://dl.k8s.io/v1.31.2/bin/linux/arm64/kube-scheduler

https://github.com/kubernetes-sigs/cri-tools/releases/download/v1.31.1/crictl-v1.31.1-linux-arm64.tar.gz

https://github.com/opencontainers/runc/releases/download/v1.2.1/runc.arm64

https://github.com/containernetworking/plugins/releases/download/v1.6.0/cni-plugins-linux-arm64-v1.6.0.tgz

https://github.com/containerd/containerd/releases/download/v2.0.0/containerd-2.0.0-linux-arm64.tar.gz

https://dl.k8s.io/v1.31.2/bin/linux/arm64/kube-proxy

https://dl.k8s.io/v1.31.2/bin/linux/arm64/kubelet

https://github.com/etcd-io/etcd/releases/download/v3.4.34/etcd-v3.4.34-linux-arm64.tar.gz
Certificate Authority
Once you have downloaded the necessary binaries for the Kubernetes components, the next important step is to generate the certificates. First, you will create a certificate authority, and from that, you will generate TLS certificates for the Kube-apiserver, Kube-controller-manager, Kube-scheduler, Kubelet, and Kube-proxy.
A certificate authority is a trusted organization that checks and confirms the digital identity of websites, email addresses, companies, or people. Certificate authorities (CAs) use the public key infrastructure (PKI), which includes various processes and rules that allow data to be encrypted.
A public key infrastructure (PKI) is a system that includes roles, rules, hardware, software, and steps needed to create, manage, share, use, store, and cancel digital certificates and handle public-key encryption.
Since we are using certificates for internal communication, we can create a CA and certificates using OpenSSL.
Refer to this Certificate Authority guide.
TLS Certificates
There are two types of certificates you can create from a CA: public and private. Public certificates are for websites that are open to everyone.
Private certificates safeguard communication between various components, such as the Kube-apiserver and Kubectl.
Why do we need certificates?
The Kubernetes cluster uses certificates to confirm the identities of different parts, like nodes, users, and services. Kubernetes requires TLS certificates to secure network traffic.
They protect data by encrypting communication between nodes, pods, and services. Certificates are necessary for both Kubernetes master and worker node components.
Kubernetes Server Certificates
KubeAPI Server, ETCD Server, and Kubelet Servers are all part of Kubernetes servers.
- KubeAPI server: KubeAPI server: The KubeAPI server manages API requests and offers an HTTPS service that both components and users utilize to oversee the Kubernetes cluster. It requires TLS certificates to ensure secure communication with its clients over HTTPS.
- etcd server: A certificate is essential for safeguarding the data on the Kubernetes cluster's ETCD server. This server acts as a database, storing all information about the cluster and its components, including the KubeAPI server, external users, and service accounts.
- Kubelet server: Kubelet is the primary node agent operating on each node. The API server interacts with the HTTP API endpoints provided by Kubelet services. Kubelet also requires certificate-based authentication to communicate securely with the worker nodes and the KubeAPI server.
Kubernetes Client Certificates
Kube Scheduler, Kube Controller, and Kube Proxy are part of client certificates.
- Kube Scheduler: The Kube Scheduler is responsible for assigning pods to the appropriate nodes. It communicates with the KubeAPI server to request scheduling. Therefore, it acts as a client to the KubeAPI server and requires certificates for authentication.
- Kube Controller: The Kubernetes Controller Manager includes essential control loops. It communicates with the KubeAPI server as a client and needs authentication from the server.
- Kube Proxy: Kube Proxy runs on each node in a cluster as a network proxy, enforcing network rules. These rules allow network sessions to connect both within and outside the cluster to reach your pods. Consequently, Kube Proxy is a client of the KubeAPI server and requires certificate-based authentication.
Kubernetes Configuration Files
The use of kubeconfig files is to manage details about clusters, users, namespaces, and authentication methods. The kubectl command-line tool relies on kubeconfig files to access the necessary information to select a cluster and interact with the cluster's API server.
Refer to this kubernetes configuration files guide.
Data Encryption in Kubernetes
Kubernetes stores various types of data, such as cluster state, application configurations, secrets, and keys, in etcd. It supports encrypting cluster data at rest. By default, the KubeAPI server stores data in etcd in plain-text format.
You can change this by enabling encryption providers in the Kubernetes API server. To enable encryption, you need to generate an encryption key and create an encryption configuration.
Below is the format for the encryption config file:
apiVersion: apiserver.config.k8s.io/v1
kind: EncryptionConfiguration
resources:
- resources:
  - secrets
  - configmaps
  - persistentvolumeclaims
  providers:
  - aescbc:
      keys:
      - name: key1
        secret: <base64-encoded-32-byte-key>
  - identity: {}
Once you have the configuration file ready, you can update the API server with the following command:
kube-apiserver --encryption-provider-config=/path/to/encryption-config.yamlRefer to this Data Encryption guide.
Bootstrapping etcd Cluster
An etcd cluster in Kubernetes is essential for storing the cluster's state, including configurations, secrets, and workloads. It is a distributed key-value store that ensures data is available and reliable.
Kubernetes uses etcd to manage cluster coordination and save configurations. To set up an etcd cluster, you need to download the etcd binaries and place the extracted files in /usr/local/bin/.
Then, copy the necessary TLS certificates (ca.crt, kube-api-server.key, kube-api-server.crt) to /etc/etcd/ to enable secure communication.
https://github.com/kelseyhightower/kubernetes-the-hard-way/blob/master/docs/07-bootstrapping-etcd.md Bootstrapping Kubernetes Control Plane
The Control Plane manages Kubernetes clusters and the workloads running on them. It includes various components like the API Server, Scheduler, and Controller Manager.
Transfer the necessary Kubernetes binaries (kube-apiserver, kube-controller-manager, kube-scheduler, and kubectl) and systemd unit files to each controller instance.
Move TLS certificates and encryption configuration files to /var/lib/kubernetes/ to enable secure communication.
Refer to this Bootstrapping guide.
Authorizing for Kubelet
Even though the Kubernetes API Server acts as the master for everything, it still needs to create authorization to access the Kubelet API on each worker node. Access to the Kubelet API is necessary for retrieving metrics and logs and executing commands in pods.
Below is the config file for the kubelet authorization.
apiVersion: rbac.authorization.k8s.io/v1
kind: ClusterRole
metadata:
  annotations:
    rbac.authorization.kubernetes.io/autoupdate: "true"
  labels:
    kubernetes.io/bootstrapping: rbac-defaults
  name: system:kube-apiserver-to-kubelet
rules:
  - apiGroups:
      - ""
    resources:
      - nodes/proxy
      - nodes/stats
      - nodes/log
      - nodes/spec
      - nodes/metrics
    verbs:
      - "*"
---
apiVersion: rbac.authorization.k8s.io/v1
kind: ClusterRoleBinding
metadata:
  name: system:kube-apiserver
  namespace: ""
roleRef:
  apiGroup: rbac.authorization.k8s.io
  kind: ClusterRole
  name: system:kube-apiserver-to-kubelet
subjects:
  - apiGroup: rbac.authorization.k8s.io
    kind: User
    name: kubernetes
So far, we have completed all the steps needed to set up the Kubernetes master cluster. In the next phase, I will explain how to set up your Kubernetes worker nodes.
Bootstrapping the Kubernetes Worker Nodes
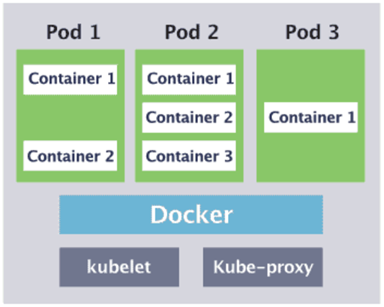
For a worker node to function, you need to install runc, a container networking plugin, containerd, and kubelet, kube-proxy.
runc is required if you are using containerd.runc directly interfaces with the Linux kernel to create and manage containers
The CNI (Container Network Interface) plugin is needed for networking between pods. CNI plugins set up the network interfaces and routing rules necessary to ensure smooth communication between pods across nodes.
Containerd is needed to run containers inside your worker node.
Kubelet acts as an agent; it registers the node with the API server. It is also responsible for creating pod deployments, managing resources, and monitoring health.
Kube-proxy is responsible for facilitating communication between services and pods. If you use Kubeadm, Kube-proxy usually runs in your cluster as a DaemonSet. However, if you install it manually, it runs as a process.
Another important thing to remember when setting up a worker node is to turn off swap. Kubernetes depends on the Linux kernel's memory management to schedule and manage workloads efficiently. It assumes full control over resource allocation, especially for CPU and memory. Swap can cause unpredictability because the kernel might move processes or parts of their memory to swap space, which is slower than physical RAM. This can slow down workloads and interfere with Kubernetes' ability to manage resources well.
Once you have installed all these components, run the following command on the master node to check that all services are running properly.
kubectl get nodes --kubeconfig admin.kubeconfig

NAME     STATUS   ROLES    AGE    VERSION
node-0   Ready    <none>   1m     v1.31.2
node-1   Ready    <none>   10s    v1.31.2
Configuring Pod Network Routes
By default, pods get IP addresses from the node’s pod CIDR range. At this point, pods cannot communicate with other pods on different nodes because the routes are missing.
We need to create a route for each worker node that maps the node’s pod CIDR range to the node's internal address. Routes can be added manually using commands like ip route add <POD_CIDR> via <NODE_IP>.
In production, CNI plugins (e.g., Calico, Flannel) automate IP allocation, routing, and network management.
Refer to this Configuring Pod Network Routes guide.
Smoke Test
Finally, you can perform end-to-end testing by creating a POD, deployment, and services.
Refer to those Smoke Test guide.
Conclusion
Building a Kubernetes cluster from scratch, as described in "Kubernetes the Hard Way," is a valuable learning experience. It helps you understand the architecture and components of Kubernetes, from setting up certificates and configuring etcd to deploying the control plane and worker nodes.
By manually handling challenges like networking, pod communication, and data encryption, you gain important insights into how Kubernetes works and develop the skills to troubleshoot and optimize clusters with confidence.
Remember, Kubernetes the Hard Way is not just about building a cluster; it’s about understanding every decision, every configuration, and every component.
I encourage you to take on this challenge, embrace the learning curve, and gain a deeper appreciation for Kubernetes and the powerful ecosystem it supports. Happy learning, and may your Kubernetes journey continue to thrive!
