

In this blog, you will learn Terraform AWS RDS provisioning with secret manager integration using step-by-step guides.
Prerequisites
To follow this guide you need to have the following.
- The latest Terraform binary is installed and configured in your system.
- AWS CLI installed and configured with a Valid AWS account with permission to deploy RDS instances.
- If you using an ec2 instance for provisioning, ensure you have a valid IAM role attached to the instance with RDS provisioning permissions.
Terraform RDS Workflow
The following image shows the RDS provisioning workflow using Terraform.
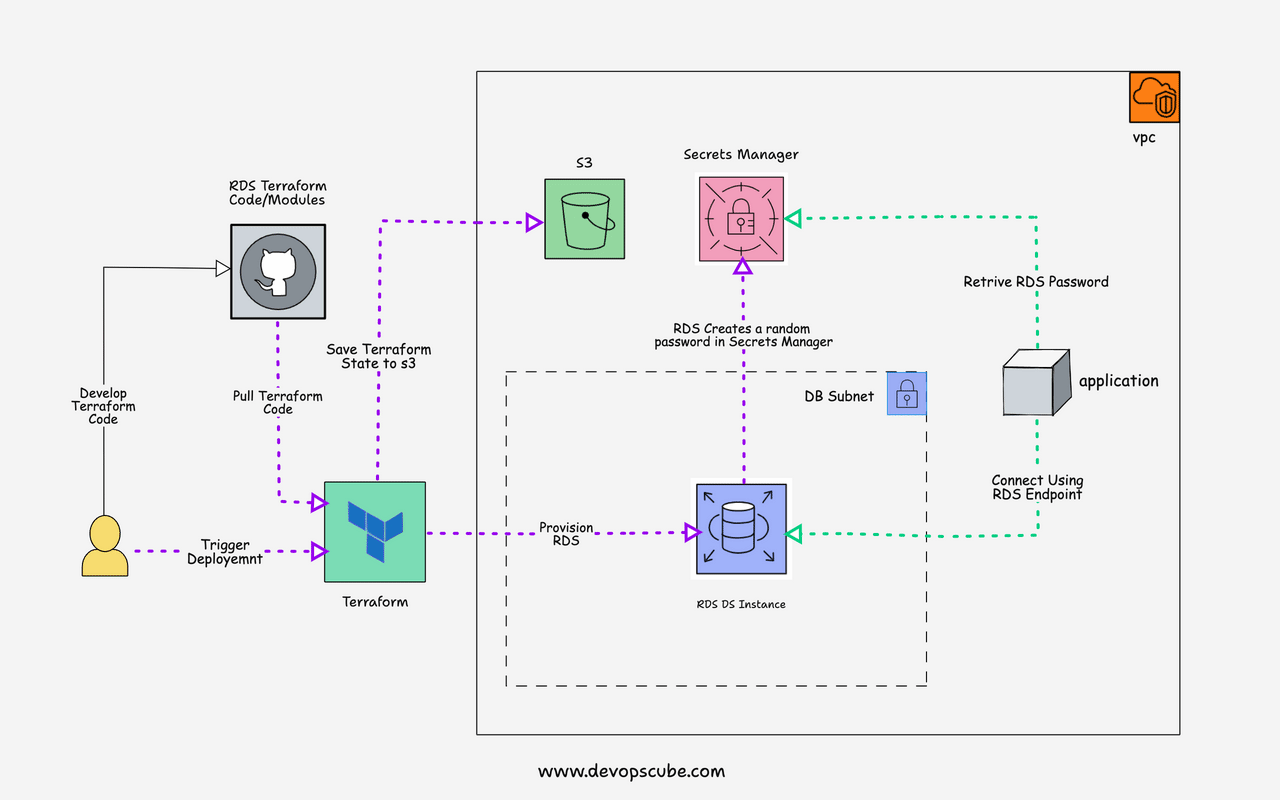
Here is the workflow explanation.
- Terraform code is developed, tested, and pushed to GitHub
- Pull the terraform code to the workstation or server where you have the terraform and AWS CLI configured. Ideally, this would be an agent of a CI server like Jenkins
- Execute the terraform RDS script by passing the variables required for RDS provisioning.
- RDS gets provisioned and the password for RDS will be automatically created and stored in the AWS secrets manager. You can also use direct passwords instead of secret manager. However, it is not recommended to keep secrets in terraform code.
- Once the RDS instance is provisioned the RDS endpoint, address, and secret manager secret arn get added to the terraform output. With the secret arn, applications can retrieve the DB username and password from the secrets manager.
- If you use s3 as a remote state, the state file gets stored in s3 or else the state gets stored locally. It is not recommended to use the local state in real projects.
Terraform RDS Code Repository
RDS terraform code is part of the terraform AWS repository. Clone it to your workstation to follow the guide.
git clone https://github.com/techiescamp/terraform-aws.gitFork and clone the repository if you intend to reuse and make changes as per your requirements.
Terraform AWS RDS Provisioning Workflow
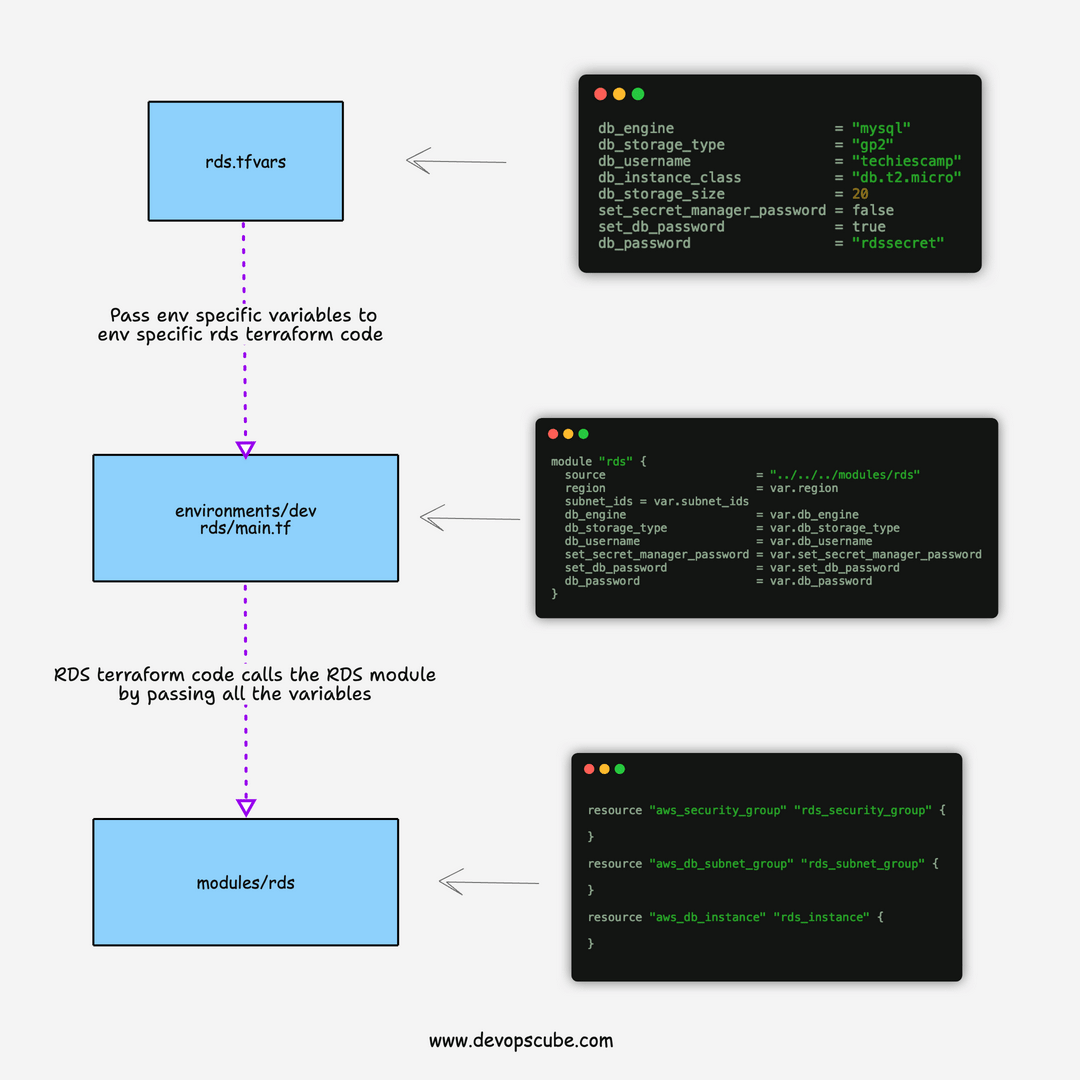
The RDS terraform script is structured in the following way.
├── environments
│   ├── dev
│   │   ├── rds
│   │   │   ├── main.tf
│   │   │   └── variables.tf
├── modules
│   ├── rds
│   │   ├── main.tf
│   │   ├── outputs.tf
│   │   └── variables.tf
└── vars
    └── dev
        └── rds.tfvars
vars folder contains the variables file named rds.tfvars
environments folder contains the terraform code (main.tf) that calls the actual RDS module from the modules directory.
The module contains the following resources
- Security Group: To allow & deny access to/from the instance.
- Subnet Group: For demo purposes, we have added the subnet group. Ideally, you don't need to create a subnet group for each RDS. You can re-use the existing subnet groups as there is a default limit of 50 subnet groups you can create per region. The limits can be increased by request though.
- RDS: Resource to provision RDS instances based on the variables.
Note: There are many parameters supported by RDS. If you want to deploy RDS for production use cases, please refer to the official documentation and design a solution that complies with security and availability as per organizational standards. Refer to terraform official aws_db_instance resource documenation to know about all the supported parameters.
Provisioning RDS Using Terraform
Follow the steps given in this section to provision an RDS instance.
Note: For this demo, we will be using the MySQL RDS instance that is publicly accessible over port 3306. If you deploying it in project environemnt, modify the paramters to restrict access to only required IP ranges.
I assume terraform-aws folder as the root folder for the entire guide.
Step 1: Modify the RDS variables
Open the rds.tfvars file present in the vars/dev folder. Change these variables according to your requirements. The following are the variables present.
Primarily you need to change the variables marked in bold.
- Replace subnet_ids with your subnet ids.
- If you want to manage the RDS secret using AWS secrets manager, ensure you set
set_secret_manager_password = trueandset_db_password = false. The condition is handled inside the RDS module code. - Change the cidr_block to the CIDR range from which access is required to RDS.
- Replace db_engine with the required DB engineer. RDS supports Aurora, MariaDB, PostgreSQL, Oracle, and Microsoft SQL Server.
Other variables are self-explanatory and change
# Network Vars
region                      = "us-west-2"
subnet_ids                  = ["subnet-058a7514ba8adbb07", "subnet-0dbcd1ac168414927", "subnet-032f5077729435858"]
multi_az                    = false
publicly_accessible         = true

# DB Vars
db_engine                   = "mysql"
db_storage_type             = "gp2"
db_username                 = "techiescamp"
db_instance_class           = "db.t2.micro"
db_storage_size             = 20
set_secret_manager_password = false
set_db_password             = true
db_password                 = "rdssecret"

# Security Group Vars
from_port                   = 3306
to_port                     = 3306
protocol                    = "tcp"
cidr_block                  = ["0.0.0.0/0"]

# Backup vars
backup_retention_period     = 7
delete_automated_backups    = true
copy_tags_to_snapshot       = true
skip_final_snapshot         = true
apply_immediately           = true

# Tag Vars
owner                       = "techiescamp-devops"
environment                 = "dev"
cost_center                 = "techiescamp"
application                 = "techiescamp-commerce"
Step 2: Initialize terraform
Once the variables are modified as per your requirements, go to the terminal and cd into environments/dev/rds directory.
cd environments/dev/rdsInside the rds folder, you can find the main.tf file where it calls the rds module present in the modules directory as shown below.
provider "aws" {
  region = var.region
}

module "rds" {
  source                      = "../../../modules/rds"
  region                      = var.region
  subnet_ids = var.subnet_ids
  db_engine                   = var.db_engine
  db_storage_type             = var.db_storage_type
  db_username                 = var.db_username
  set_secret_manager_password = var.set_secret_manager_password
  set_db_password             = var.set_db_password
  db_password                 = var.db_password
  db_instance_class           = var.db_instance_class
  db_storage_size             = var.db_storage_size
  from_port                   = var.from_port
  to_port                     = var.to_port
  protocol                    = var.protocol
  cidr_block                  = var.cidr_block
  backup_retention_period     = var.backup_retention_period
  multi_az                    = var.multi_az
  delete_automated_backups    = var.delete_automated_backups
  copy_tags_to_snapshot       = var.copy_tags_to_snapshot
  publicly_accessible         = var.publicly_accessible
  skip_final_snapshot         = var.skip_final_snapshot
  apply_immediately           = var.apply_immediately
  owner                       = var.owner
  cost_center                 = var.cost_center
  environment                 = var.environment
  application                 = var.application
}
Initialize Terraform using the following command
terraform initThis command initializes terraform. Make sure to run the init command inside the environments/dev/rds directory.
Step 3: To verify the configurations, run terraform plan with the variable file.
terraform plan -var-file=../../../vars/dev/rds.tfvarsThis command displays the plan which is going to execute.
Step 4: Apply the terraform configurations.
After verifying, apply the configurations using the command given below.
terraform apply -var-file=../../../vars/dev/rds.tfvars --auto-approveThis command applies the changes to start the provisioning using the variables given in the rds.tfvars file. The --auto-approve flag automatically approves the provisioning without manual confirmation.
Step 5: Validate provisioned RDS instances
Once the terraform is executed, you can validate the RDS instance by getting the RDS DNS endpoint, address, and secret arn using the following command.
terraform outputAlso, use the AWS console and verify all the RDS instance details.
Try accessing the database using the username, password, and RDS endpoint as host. You can use MySQL client or MySQL workbench utility.
If you have enabled secret management using secrets manager, you can retrieve the secret from the AWS console.
Step 5: To clean up the setup, execute the following command.
terraform destroy -var-file=../../../vars/dev/rds.tfvars --auto-approveConclusion
In this guide, we looked at terraform aws rds provisioning.
RDS supports password management using a secrets manager. It creates and stores the username and password during provisioning. Each secret in the secret manager costs $.50. The secret created by RDS cannot be modified separately. Also, by default, password rotation is enabled for the master password with a rotation schedule of 7 days. That value can be modified in the secrets manager.
You can also look at the AWS RDS community module to learn more.
When using RDS for production, you must consider security, availability, cloudwatch logging, scalability, and monitoring. Whether you are using a community module or a custom RDS, terraform AWS module, ensure you follow the organization's standards.
Next, you can try our Terraform autoscaling group deployment guide.
I hope this guide is helpful. Do let me know your feedback in the comments.
