

A proxy server has many use cases. it could range from personal internet access to restrict organization systems/servers to access the external world or to limit external internet access for a set of servers on the cloud.
The best way to configure a proxy server is by using the Squid proxy. It is a widely used proxy server.
In this article, we have covered the following.
- Install Squid Proxy on a Ubuntu server
- Configure the proxy server
- Configure basic proxy authentication.
- Block websites using Squid proxy
- Squid Proxy cache
Now, we can begin the installation.
Install Squid Proxy on Ubuntu
Follow the steps below to install the latest Squid proxy on a Ubuntu server.
Note: For this setup, we use the Ubuntu 24.04 virtual machine.Step 1: Install Squid Proxy
Update the package list and install the Squid Proxy, using the following command.
sudo apt update -y
sudo apt -y install squid
Once the installation is completed, we need to start and enable the Squid Proxy service.
Step 3: Start and enable the Squid server
To start and enable the service, use the following command.
sudo systemctl start squid
sudo systemctl enable squid
Once we start the service, we need to check its status.
Step 4: Check the status of the squid server
To check the status of the Squid proxy, use the following command.
sudo systemctl status squid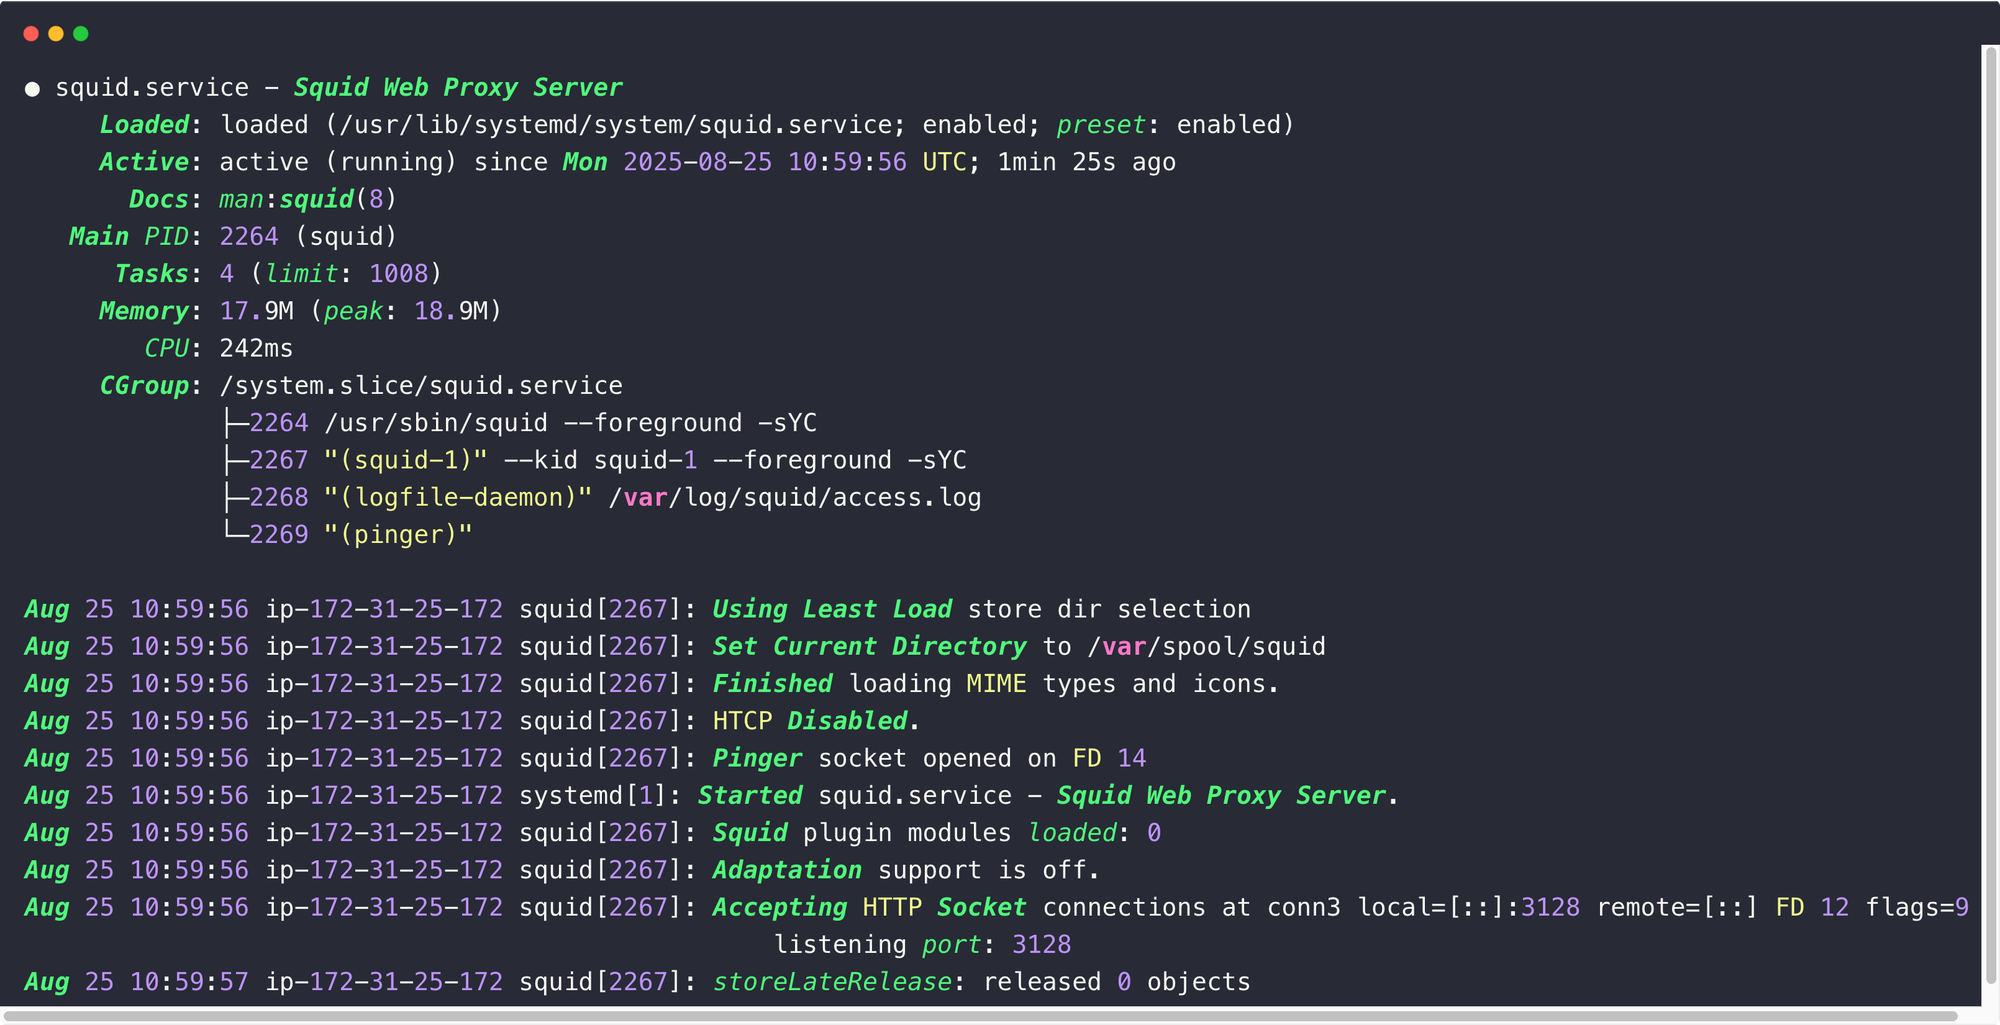
The output ensures that the Squid Proxy is running without any issues, so we can configure the settings.
Configure Proxy Server
All the configurations for the squid server are present in /etc/squid/squid.conf file.
Before modifying the squid.conf, take the backup of the configuration file using the following commands
sudo cp /etc/squid/squid.conf /etc/squid/squid.conf.backup
sudo chmod a-w /etc/squid/squid.conf.backup
But the recommended method is to create a custom configuration file for the custom settings.
Step 1: Create a Custom Configuration File
To create a custom config file, Squid provides a directory /etc/squid/conf.d.
We need to create a file with the .conf extension in this directory.
sudo touch /etc/squid/conf.d/custom.confChange the ownership of the directory as proxy and set the required permissions.
sudo chown proxy:proxy /etc/squid/conf.d

sudo chmod 755 /etc/squid/conf.d
Now, we can add the required configurations inside the file.
Step 2: Configure Proxy Sources to Access the Internet
To modify the configuration, open the configuration file.
sudo vim /etc/squid/conf.d/custom.confFirst, you need to configure the sources from which the Squid proxy should accept connections.
For example, you might need to access this proxy server only from your home network or from specific CIDR ranges.
You can add a source IP range with an ACL using the following format. Here, I am giving my private CIDR range as the source.
acl localnet src 172.31.0.0/16
http_access allow localnet
Once you have added the configuration, save and exit the file.
Restart the proxy server after making the ACL changes.
sudo systemctl restart squidNote: After adding or changing any settings, restart the Squid proxy service to apply the changes.Step 2: Test Proxy Server Connectivity
Now, we can test how we can access a website over the proxy.
3128 for incoming traffic.If you want to change the default port, you can edit the
squid.conf file and modify the HTTP port entry http_port 3128To test, use the following command.
curl -x http://<squid-proxy-server-IP>:3128 -I http://google.com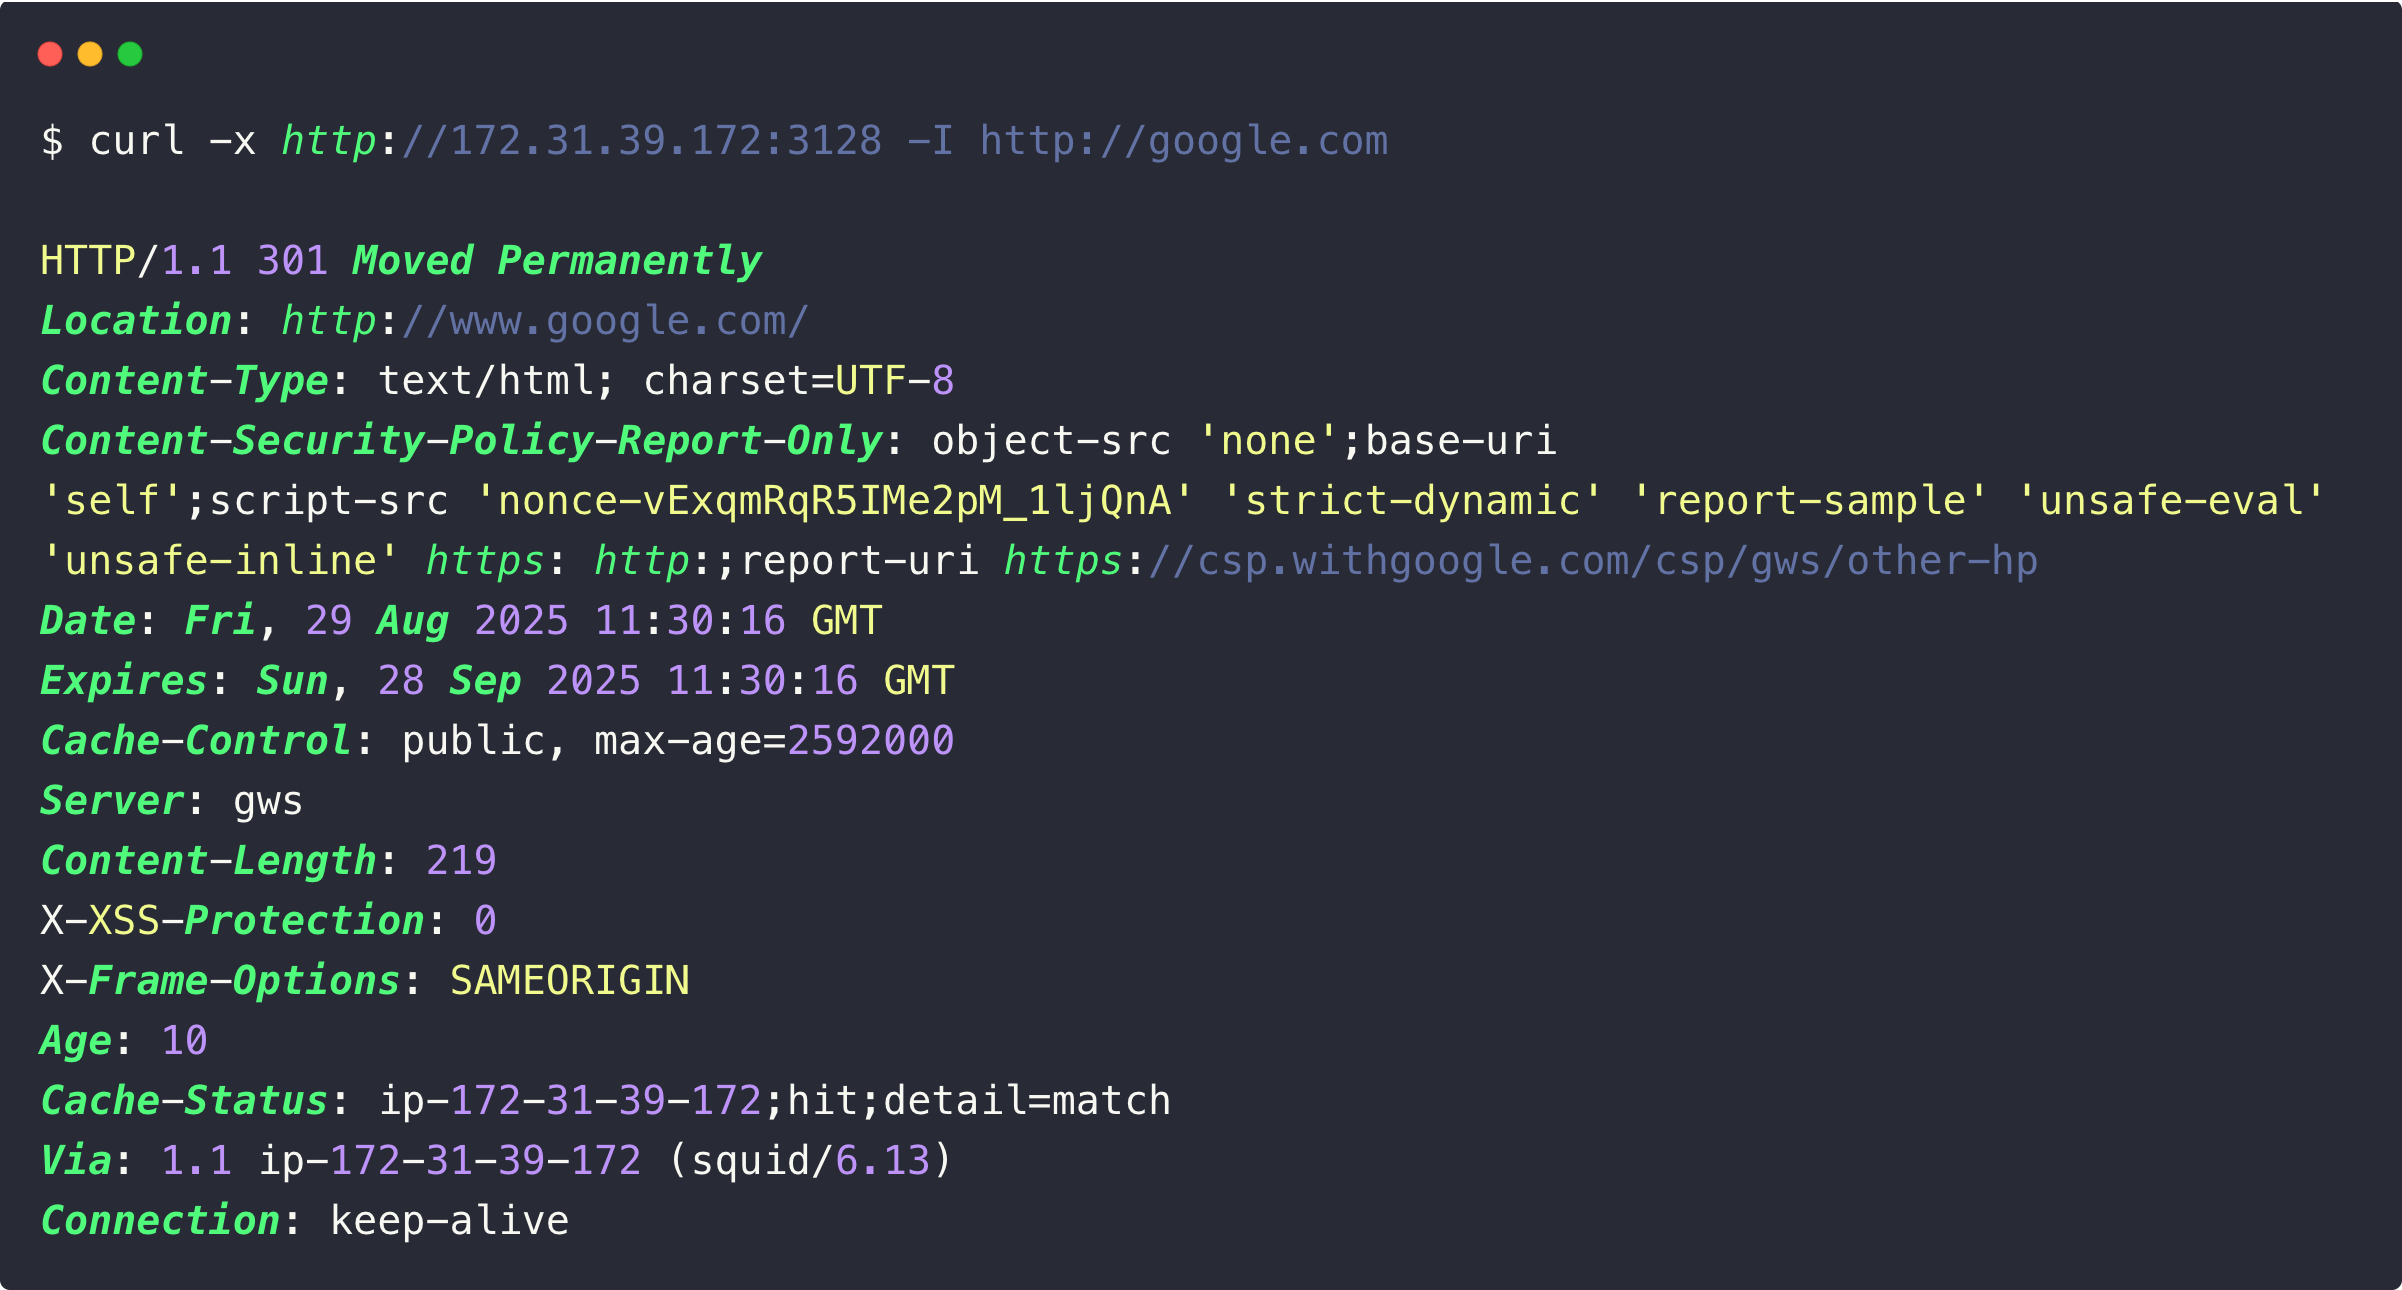
In the next section, we can configure the authentication.
HTTP/1.1 403 Forbidden.In the next section, we can configure the Squid proxy authentication.
Configure Proxy Authentication
Along with access ACL's, you can add basic authentication to your proxy server for extra security.
Follow the steps given below for setting up a basic auth for the squid proxy server.
Step 1: Install httpd-tools
We need to install the htpasswd utility to setup a basic authentication for Squid proxy.
sudo apt install apache2-utils -y
Step 2: Create a passwd file and make squid as the file owner
The password file will stored the encrypted user credentials, such as username and password.
Also, setting up the ownership as the user proxy.
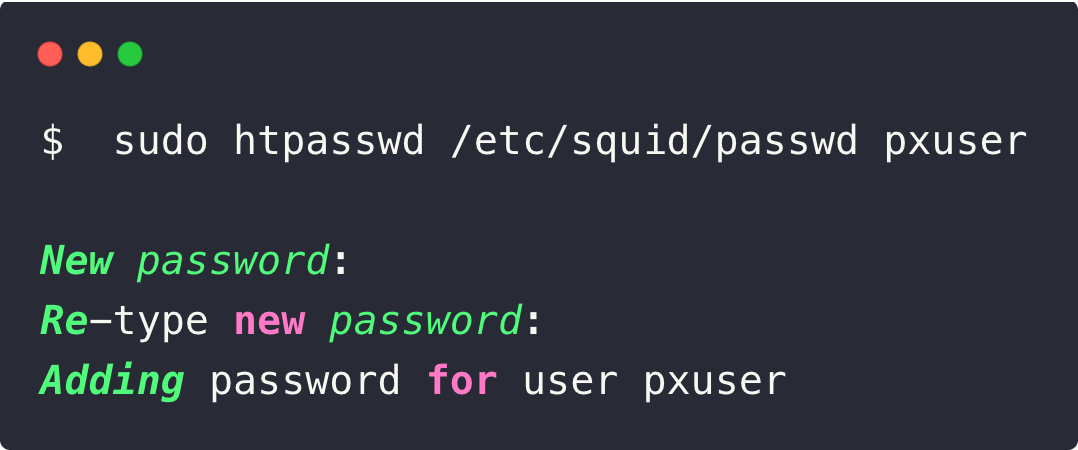
sudo touch /etc/squid/passwd && sudo chown proxy /etc/squid/passwdStep 3: Add pxuser to the password file using htpasswd utility.
Now, we need to create a username and password so that it will be used for all connections through this proxy.
sudo htpasswd /etc/squid/passwd pxuserIt will prompt for a custom password. Enter a strong password you need.
Now, we need to add this authentication details on the Squid configuration file.
Step 4: Add the Authentication Settings on the Config File
Open the configuration file.
sudo vi /etc/squid/conf.d/custom.confAdd the following to the config file and save it.
acl localnet src 172.31.0.0/16

# Authentication parameters

auth_param basic program /usr/lib/squid/basic_ncsa_auth /etc/squid/passwd
auth_param basic children 5
auth_param basic realm Squid Basic Authentication
auth_param basic credentialsttl 2 hours

# Define ACLs

acl auth_users proxy_auth REQUIRED

# Allow authenticated users (for non-blocked sites)

http_access allow auth_users

http_access allow localnet

# Deny all others

http_access deny all
Use the following command to see whether the syntax is correct.
sudo squid -k parseNow, restart the Squid service.
sudo systemctl restart squidStep 5: Test Squid Proxy Authentication
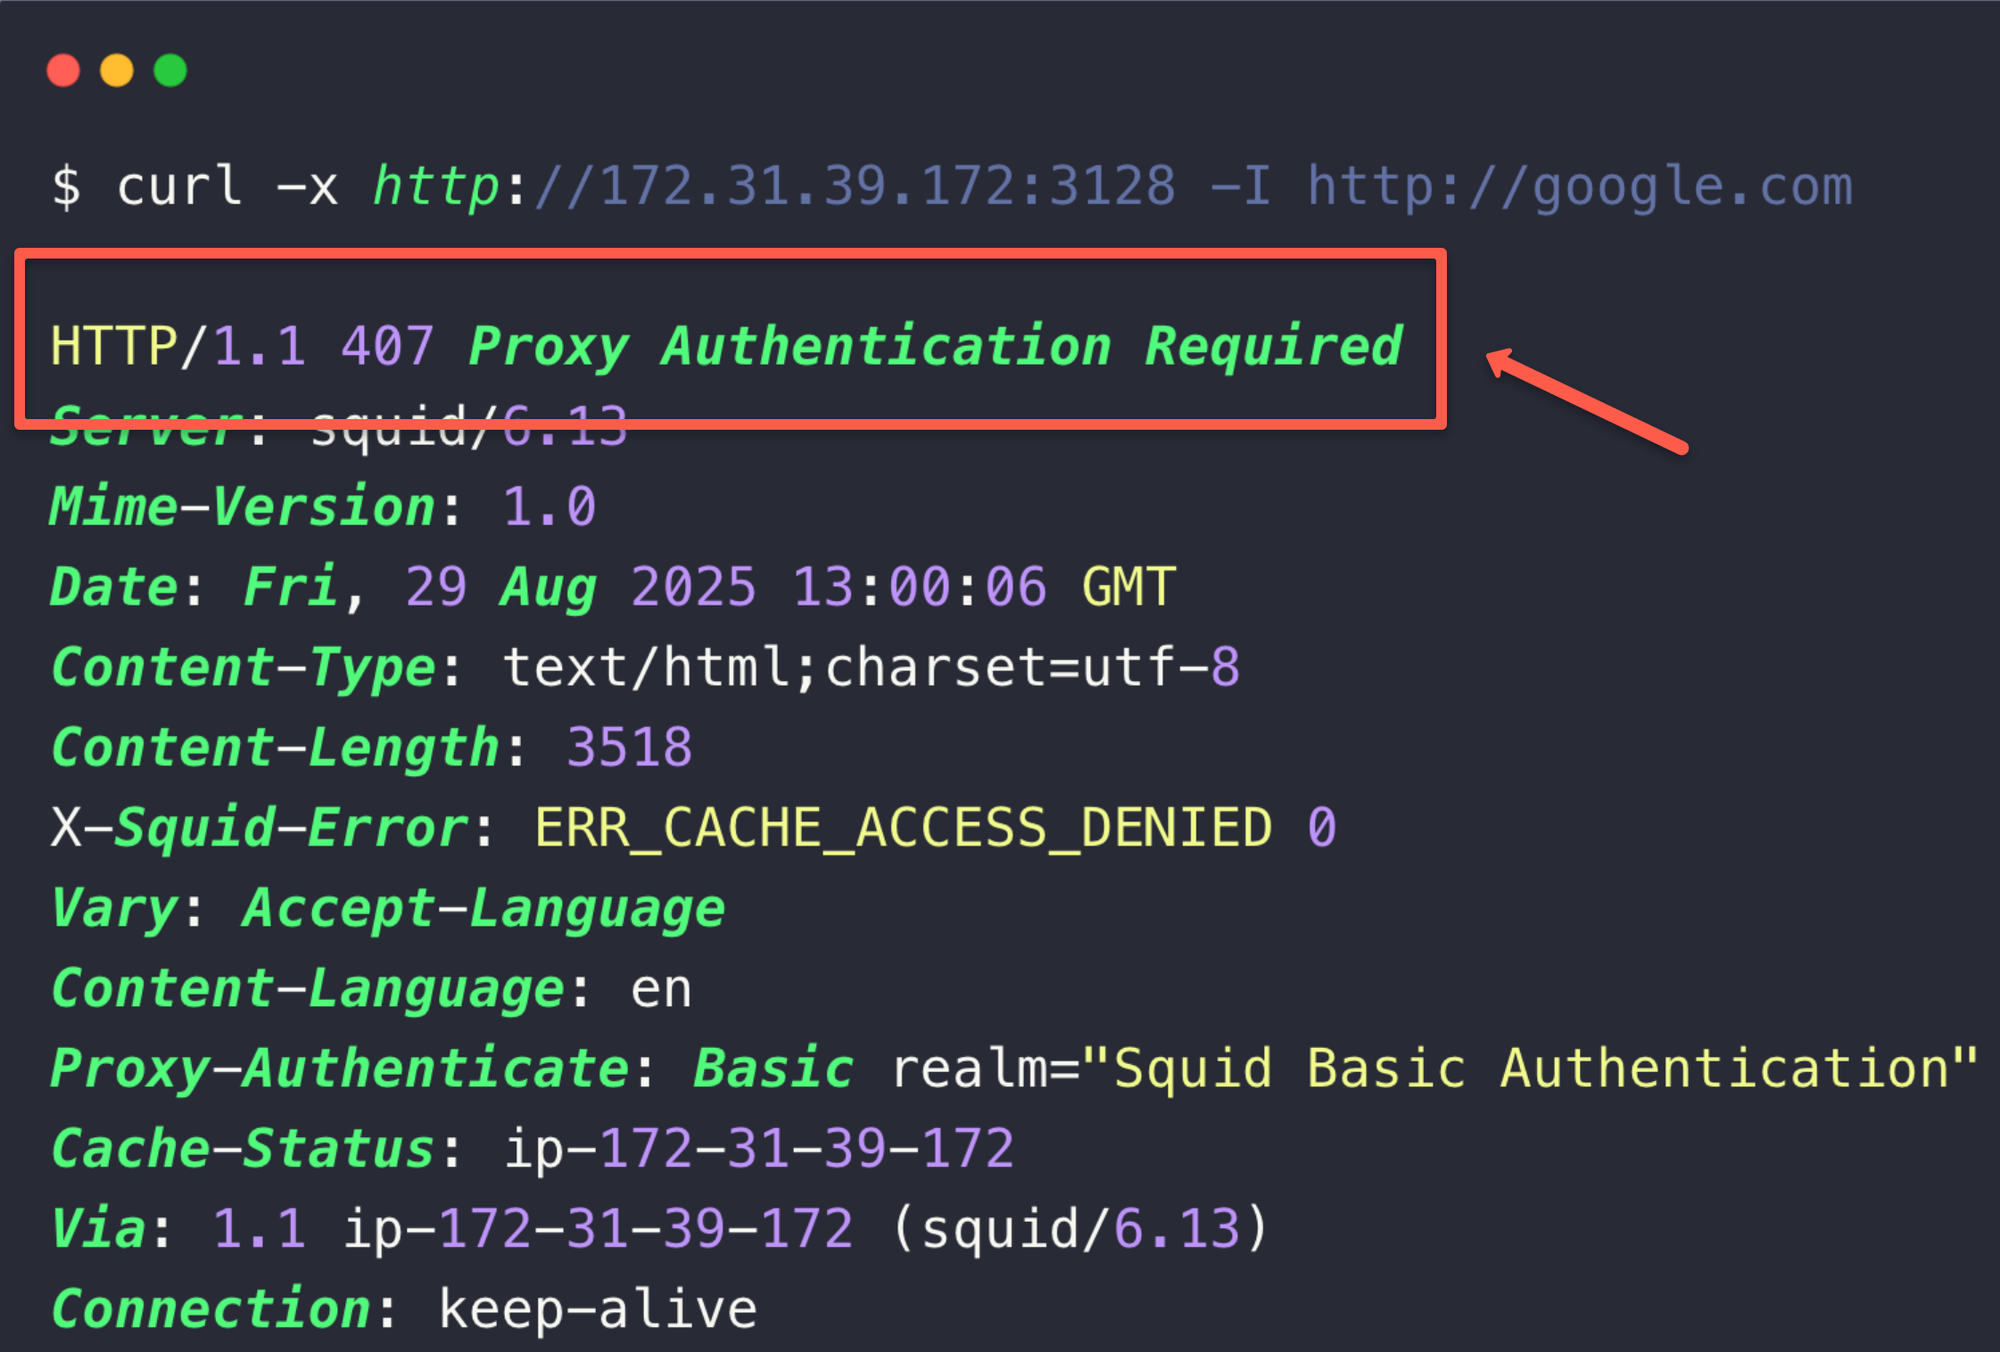
Now, we can test the connection with the authentication.
curl -x http://<squid-proxy-server-IP>:3128 --proxy-user pxuser:admin -I http://google.comWe can see the same output of the above.
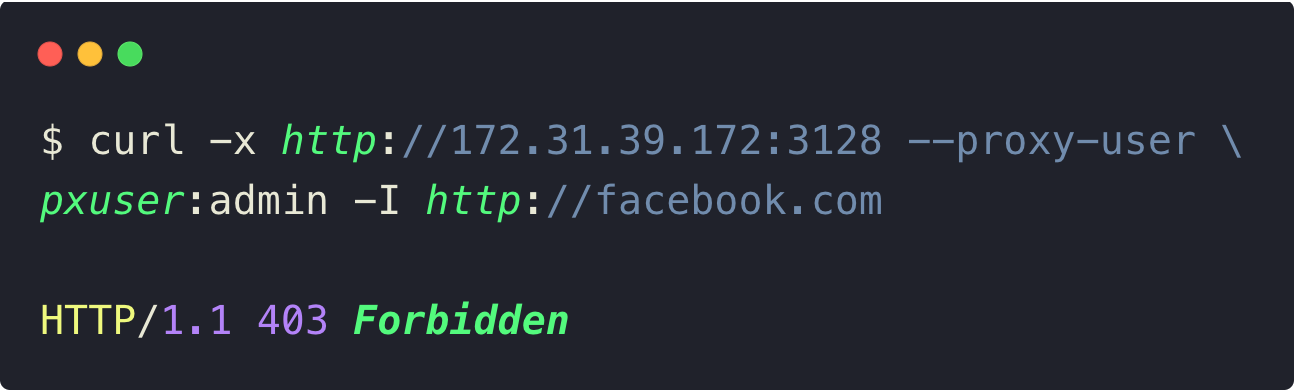
But if you are trying to access without the authentication credentials, you will see the following error.
This how we set the basic authentication on the Squid proxy. In the next section, we will configure to block websites.
Blocking Websites using Squid Proxy
Another great use of the proxy server is restricting the website access. Follow the steps below for creating a block list.
Step 1: Adding Websites on the Block List
Open a .acl file in the /etc/squid directory to add the websites we want to block access.
sudo vi /etc/squid/proxy-block-list.aclNow, we can add the list of websites.
facebook.com
twitter.com
instagram.com
Once our blocklist is ready, we need to add this on the Squid config so Squid knows which website access should block.
Step 2: Adding ACL List in Config File
Open the custom Squid config and add the following configuration at the very beginning of the file.
acl bad_urls dstdomain "/etc/squid/proxy-block-list.acl"
http_access deny bad_urls
So your final config looks like the following
acl bad_urls dstdomain "/etc/squid/proxy-block-list.acl"
http_access deny bad_urls

acl localnet src 172.31.0.0/16

# Authentication parameters

auth_param basic program /usr/lib/squid/basic_ncsa_auth /etc/squid/passwd
auth_param basic children 5
auth_param basic realm Squid Basic Authentication
auth_param basic credentialsttl 2 hours

# Define ACLs

acl auth_users proxy_auth REQUIRED

# Allow authenticated users (for non-blocked sites)

http_access allow auth_users

http_access allow localnet

# Deny all others

http_access deny all
Now, you should restart the Squid service.
sudo systemctl restart squidNow, we can try to access one of the blocked site through the Squid proxy.
Step 3: Test Squid Proxy Blocked Websites
Now, if you try to access the websites that are in the block list, you will get a 403 error as shown below.
In the next section, we can configure the cache configurations on the Squid Proxy.
Cache, Performance Tuning and Logs on Squid Proxy
The caching feature in Squid proxy stores frequently accessed web content locally.
When we access the same web content again, Squid will initially check the local cache, and if it is valid, it will show us the page from the local cache.
This caching can reduce server load and latency.
Step 1: Add the Cache Configuration
Open the Squid configuration file.
sudo vi /etc/squid/conf.d/custom.confAdd the following cache configurations on the custom config file.
# Allow caching of all allowed content
cache allow all

# Memory and disk settings
cache_mem 512 MB
maximum_object_size_in_memory 512 KB
maximum_object_size 1024 MB
cache_dir ufs /var/spool/squid 10000 16 256

# Memory and disk cache replacement policies
memory_replacement_policy heap GDSF
cache_replacement_policy heap LFUDA

# Static content - cache aggressively
refresh_pattern -i \.(gif|png|jpg|jpeg|ico|webp)$  10080 90% 43200 override-expire ignore-reload
refresh_pattern -i \.(css|js)$                     1440  90% 10080 override-expire
refresh_pattern -i \.(html|htm)$                   1440  50% 10080

# Specific domains
refresh_pattern ^http://.*\.google\.com/            1440  80% 10080

# Protocol patterns
refresh_pattern ^ftp:                               1440  20% 10080
refresh_pattern ^https://                           1440  70% 10080
refresh_pattern ^http://                            1440  70% 10080

# Default catch-all (must be last)
refresh_pattern .                                   0     20% 4320
The above configuration, stores the images, CSS, JS and some HTML on in memory to speed up the browsing.
Also, will keep some other useful files in memory and on the disk.
Next section, we can configure the performance settings.
Step 2: Performance Tuning
For the performance tuning, you can use the following parameters
workers 1
client_lifetime 1 day

# Connection management

client_persistent_connections on
server_persistent_connections on
half_closed_clients off

# More conservative timeout settings

connect_timeout 60 seconds
request_timeout 3 minutes
persistent_request_timeout 1 minute
read_timeout 3 minutes
write_timeout 3 minutes

# Add connection limits

client_db off
maximum_single_addr_tries 3
The above configuration defines the number of workers for traffic and open connection limits as well as timeouts.
Next, we can configure for Squid proxy logs.
Step 3: Log Configuration
For the log configuration, use the following parameters.
access_log /var/log/squid/access.log combined
cache_log /var/log/squid/cache.log
logfile_rotate 10

# Enable cache status in logs
log_mime_hdrs off
strip_query_terms off
The above configuration will logs all the client requests, cache logs and log rotation settings.
Once you add all the configurations, the config file looks like the following.
# === BLOCKED URLS ===
acl bad_urls dstdomain "/etc/squid/proxy-block-list.acl"
http_access deny bad_urls

# === INTERNAL NETWORK ===
acl localnet src 172.31.0.0/16

# === AUTHENTICATION SETTINGS ===
auth_param basic program /usr/lib/squid/basic_ncsa_auth /etc/squid/passwd
auth_param basic children 5
auth_param basic realm Squid Basic Authentication
auth_param basic credentialsttl 2 hours

# === AUTHENTICATED USERS ===
acl auth_users proxy_auth REQUIRED

# === CACHE BEHAVIOR ===
# Allow caching of all allowed content
cache allow all

# Memory and disk settings
cache_mem 512 MB
maximum_object_size_in_memory 512 KB
maximum_object_size 1024 MB
cache_dir ufs /var/spool/squid 10000 16 256

# Cache replacement policies
memory_replacement_policy heap GDSF
cache_replacement_policy heap LFUDA

# === REFRESH PATTERNS ===
# Static content - cache aggressively
refresh_pattern -i \.(gif|png|jpg|jpeg|ico|webp)$  10080 90% 43200 override-expire ignore-reload
refresh_pattern -i \.(css|js)$                     1440  90% 10080 override-expire
refresh_pattern -i \.(html|htm)$                   1440  50% 10080

# Specific domains
refresh_pattern ^http://.*\.google\.com/            1440  80% 10080

# Protocol patterns
refresh_pattern ^ftp:                               1440  20% 10080
refresh_pattern ^https://                           1440  70% 10080
refresh_pattern ^http://                            1440  70% 10080

# Default catch-all (must be last)
refresh_pattern .                                   0     20% 4320

# === PERFORMANCE TUNING ===
# Use single worker for stability
workers 1
client_lifetime 1 day

# Connection management
client_persistent_connections on
server_persistent_connections on
half_closed_clients off

# Conservative timeout settings
connect_timeout 60 seconds
request_timeout 3 minutes
persistent_request_timeout 1 minute
read_timeout 3 minutes
write_timeout 3 minutes

# Connection limits
client_db off
maximum_single_addr_tries 3

# === LOGGING ===
access_log /var/log/squid/access.log combined
cache_log /var/log/squid/cache.log
logfile_rotate 10

# Log settings
log_mime_hdrs off
strip_query_terms off

# === ACCESS CONTROL ===
# Allow authenticated users (not blocked by bad_urls)
http_access allow auth_users

# Allow local network
http_access allow localnet

# Deny all others
http_access deny all
Now, we can check our configurations are correct using the following command.
sudo squid -k parseAfter ensuring the configurations, we need to initialize to create the cache directories.
Step 4: Initialize Cache Directories
First, stop the Squid proxy service.
sudo systemctl stop squidFollow the command to create cache directories.
sudo squid -zStep 5: Start the Squid server and check the status
Once the cache directories are created, we need to again start the service and check the status.
sudo systemctl start squid
sudo systemctl status squid
Now, our configurations are ready so we can test the cache.
Step 6: Test squid proxy cache
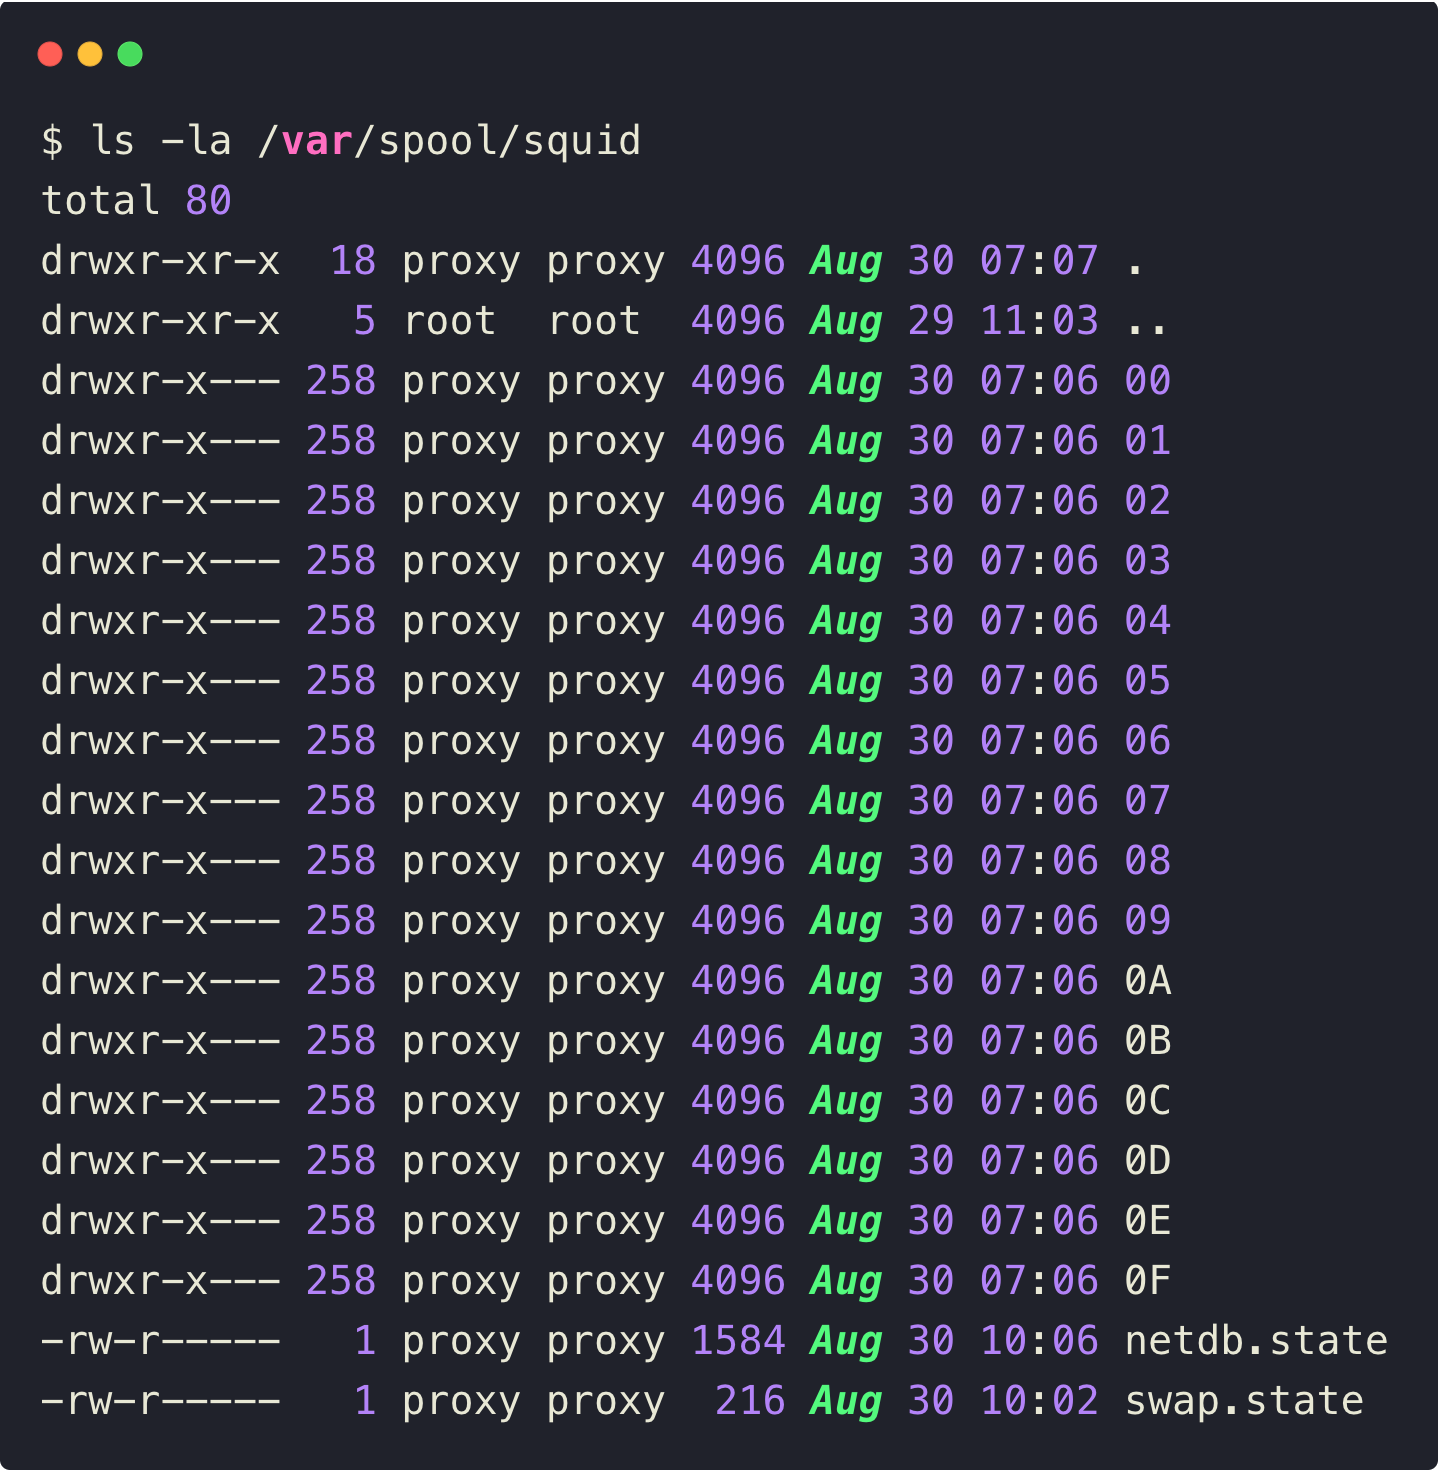
Check the cache directory to ensure whether it is storing the cache or not
ls -la /var/spool/squidYou can see the following output of the Cache.
To test the caching, we need to access any of the non blocked website.
curl -x http://<squid-proxy-server-IP>:3128 --proxy-user pxuser:admin -I http://google.comWhen you access a website for the first time, Squid will save the cache of the website. Next time, you try to access, Squid load the website from the cache so the response time will be reduced.
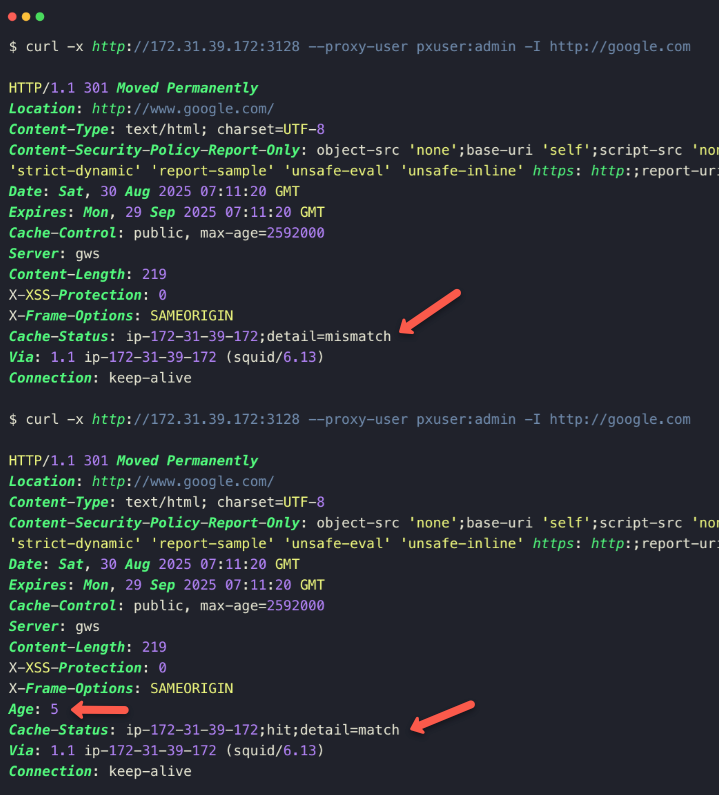
This we can even identify from the access log as well
sudo tail /var/log/squid/access.log
TCP_MISS:HIER_DIRECTmeans that this URL has been requested for the first time.TCP_MEM_HTI:HIER_NONEmeans that the request is served from the memory cache.
Let's check the performance difference before and after the cache.
time curl -x http://<squid-proxy-server-IP>:3128 --proxy-user pxuser:admin -I http://httpbin.org/image/jpeg -o /dev/null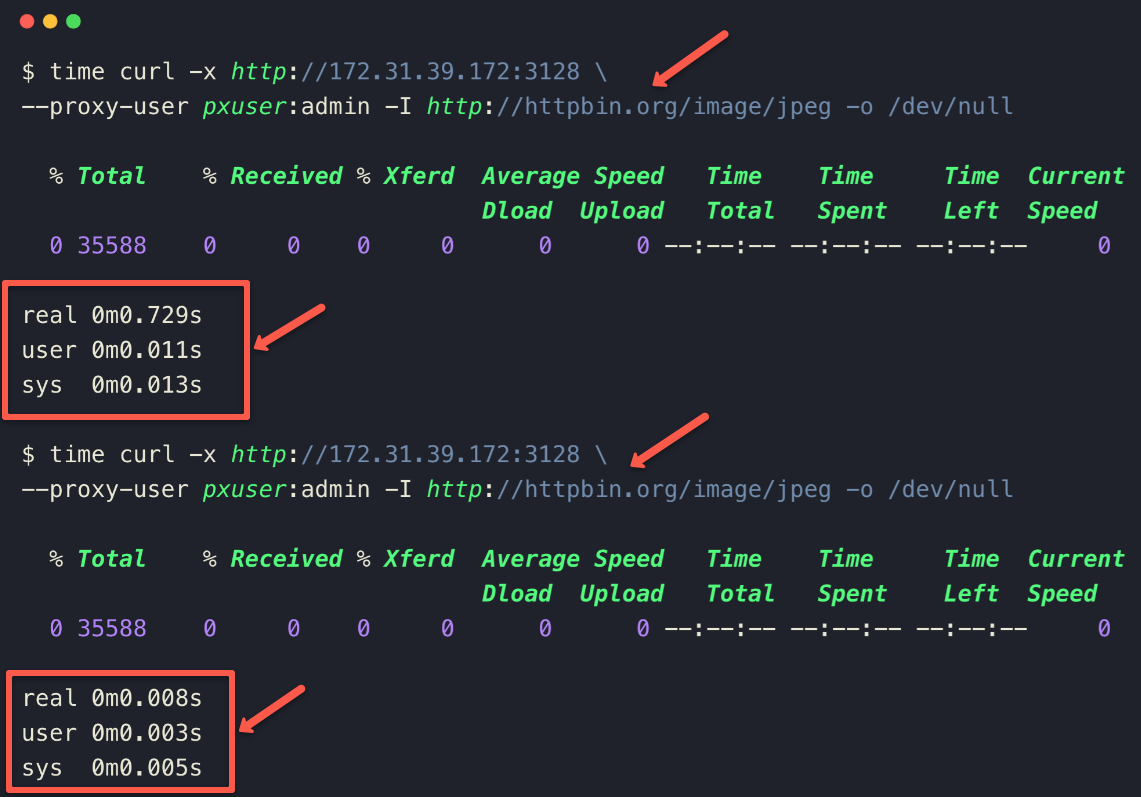
The output clearly shows that in the second time it took very less time then the first time and is because of the cache.
Conclusion
The blog primarily covers the setup of the Squid proxy in a Ubuntu server also the configuration.
The features of the Squid proxy are to restrict outgoing traffic, and the caching feature helps to reduce the latency of the web content.
You can customize the configuration more, so go through and configure as per your requirements.
