

In this blog, you will learn what Seccomp is and explore practical examples of using custom Seccomp profiles with Kubernetes.
By the end of this blog, you will know:
- What is seccomp
- What is a seccomp profile
- How to use seccomp with Docker
- How to use seccomp with Kubernetes pods
What is Seccomp?
System calls are how user-space programs interact with the Linux kernel.
Seccomp (Secure Computing Model) is a security layer in the Linux kernel introduced in 2005 that restricts the system calls a process can make (pre-container era).
It may sound similar to Linux capabilities. However, Seccomp is more flexible as it allows filtering individual system calls. (Usually, both are used)
It essentially creates a sandbox that limits what actions a program can perform.
A common example where Seccomp is used is in container runtimes (e.g., containerd, CRI-O, etc.).
For example, Docker, by default, applies a Seccomp filter to containers, which blocks a significant number of system calls not necessary for typical container operations.
How does Seccomp work?
Seccomp uses Linux’s seccomp-bpf (Berkeley Packet Filter) mechanism that filters syscalls using predefined rules.
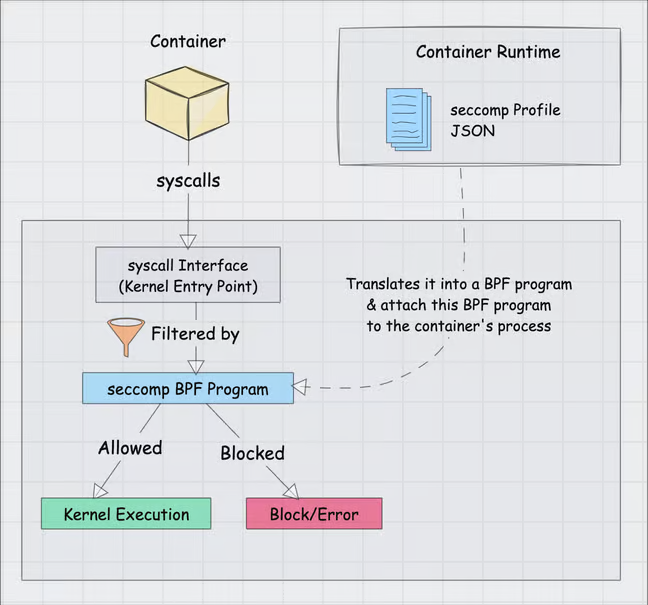
- The container makes syscalls directly to the kernel entry point
- The container runtime translates the seccomp profile JSON into a BPF program
- The runtime attaches this BPF program to the container's process during container creation
- When the container makes syscalls, they get filtered by the seccomp BPF program
- Allowed syscalls proceed to kernel execution, while blocked ones return an error
Seccomp Profile
To create a predefined seccomp rule, you need to define a seccomp profile in a JSON file.
For example, here is a simple seccomp profile that allows read, write, and exit syscalls but blocks chmod syscall with a "Permission denied" error.
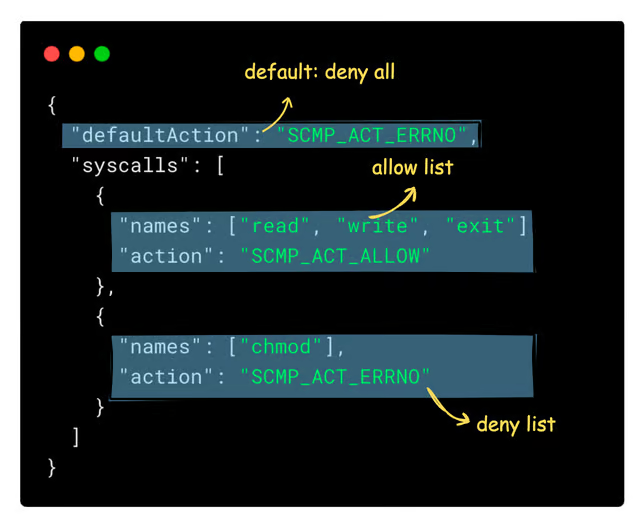
Why Deny Everything by Default?
It’s safer to start by denying everything and explicitly allow only what is needed (whitelist approach). This reduces the risk of accidentally letting a dangerous syscall.
Seccomp & Contianers
As you all know, the container is basically a sandboxed process, and seccomp plays a key role in that sandboxing.
Container runtimes like containerd & crio apply a default seccomp profile that blocks around 40+ system calls (e.g., mount, ptrace, reboot) unless explicitly disabled.
Refer to this detailed seccomp profile used by Docker.
While default profiles provide basic security, you can also apply custom seccomp profiles based on your use case.
Let’s see how to do that.
The following profile (block-mkdir.json) blocks the mkdirat syscall (the syscall used for the mkdir command).
{
  "defaultAction": "SCMP_ACT_ALLOW",
  "syscalls": [
    {
      "names": ["mkdirat"],
      "action": "SCMP_ACT_ERRNO"
    }
  ]
}
If I run a docker container using this seccomp profile, I will not be able to create a directory using the mkdir command. Here is an example
$ docker run --rm -it --security-opt seccomp=block-mkdir.json busybox sh

/ # mkdir test
mkdir: can't create directory 'test': Operation not permitted
Kubernetes Pod & Seccomp
Now lets look at how to use Seccomp with Kubernetes.
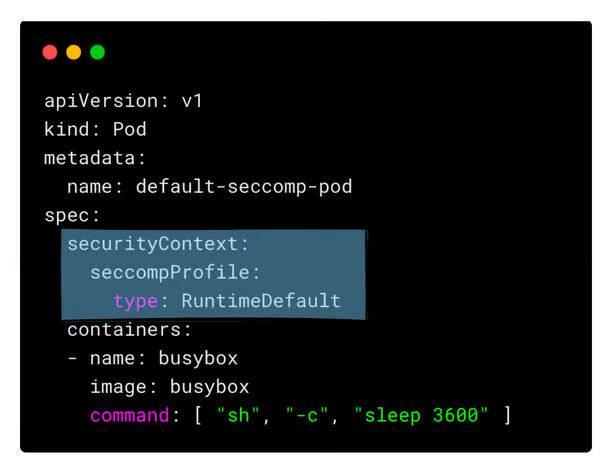
If you want to restrict or apply a specific profile to a container inside a Kubernetes pod, you can do so using securityContext.
Kubernetes comes with a RuntimeDefault profile built into the cluster. It tells Kubernetes to use the default profile provided by the container runtime.
For example,
You can implement custom seccomp profiles as well.
For this, the profile should be present on all the worker nodes at the /var/lib/kubelet/seccomp/ location.
Kubernetes does not provide any native mechanism to add seccomp profiles to the worker nodes. You need to add them to the nodes manually.
For example, I have added the following profile to my worker nodes at /var/lib/kubelet/seccomp/block-mkdir.json.
This profile primarily blocks the mkdir syscall, similar to what we tried with Docker.
{
  "defaultAction": "SCMP_ACT_ALLOW",
  "architectures": [
    "SCMP_ARCH_X86_64"
  ],
  "syscalls": [
    {
      "names": [
        "mkdir",
        "mkdirat"
      ],
      "action": "SCMP_ACT_KILL"
    }
  ]
}
Now, you can implement this seccomp profile in a pod under the securityContext using type: Localhost and the profile path as shown below.
apiVersion: v1
kind: Pod
metadata:
  name: custom-seccomp-pod
spec:
  securityContext:
    seccompProfile:
      type: Localhost
      localhostProfile: block-mkdir.json
  containers:
  - name: busybox
    image: busybox
    command: [ "sh", "-c", "sleep 3600" ]
This configuration applies the custom seccomp profile located at /var/lib/kubelet/seccomp/block-mkdir.json to the container, blocking the mkdir syscall.
Now, if you deploy the pod and try to create a directory from within the pod, you will get an error, as shown below.
$ k exec -it custom-seccomp-pod -- sh

/ # mkdir logs
Bad system call (core dumped)
/ #
"Bad system call (core dumped)" error happens because the applied seccomp profile blocks the mkdir syscall, preventing directory creation within the pod.
Note: You can't apply a seccomp profile to containers that run in Privileged mode. The Privileged flag essentially disables most security constraints, including seccomp filters.Conclusion
Seccomp is a powerful security mechanism that helps restrict system calls in Linux-based containers, enhancing security in Docker and Kubernetes.
Using default or custom seccomp profiles, you can customize syscall access and reduce security risks.
Implementing seccomp effectively requires careful planning, but it significantly strengthens container security.
If you have any questions, feel free to leave a comment!
Want to Stay Ahead in DevOps & Cloud? Join the Free Newsletter Below.