

In this podman tutorial for beginners, I will walk you through step-by-step guides to get started with podman and explore all Podman functionalities.
When we talk about containers, the default tool which comes to our mind is Docker. But there have been so many developments in container space after the inception of Docker, particularly on container security. And one of the projects which address the security concerns is Podman.
Here is what you will learn from this guide.
What is Podman?
Podman is an OCI compliant container management tool that offers similar features like Docker for managing containers.
One of the best features of podman is its ability to run rootless containers. A rootless container is a concept of running and managing containers without root privileges (Normal user). From a security standpoint, rootless containers add an additional layer of security by not allowing root access even if the container gets compromised by an attacker. You can read about the benefits of rootless containers here.
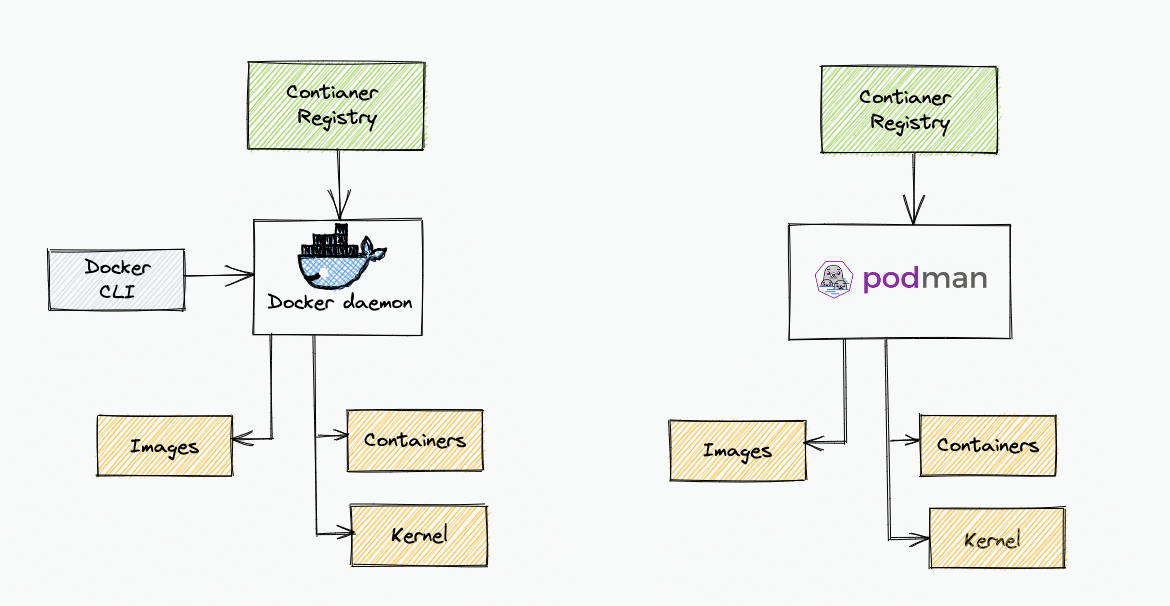
Podman is also daemonless (unlike docker), meaning it doesn't have a daemon and interacts directly with the runc (runs containers based on OCI specification). Toward the end of the article, I added the difference between Docker and Podman.
Also, let's say there are two users in Linux. user-a and user-b. The containers created by user-a using podman cannot be modified by user-b and vice versa.
Another interesting and advanced feature of podman is running containers in Pods. Similar to Kubernetes pods, you can create multi-container pods locally using Podman. You can export the podman pod as a Kubernetes manifest and use a Kubernetes pod manifest to deploy and podman pod.
Podman Github Tutorial Repo
I have created a Podman Github repo with a few examples. I will keep updating the repo on resources and examples.
git clone https://github.com/techiescamp/podmanThe repo contains a Vagrantfile which you can use to learn and test podman. Podman and runc get installed when you bring up the vagrant VM. It uses an ubuntu 24.04 base image.
Installing Podman
Head over to the official podman installation documentation. Here you will find all installation commands for Windows, MAC and Linux flavors.
I am using Ubuntu 24.04 for testing. You can use the following steps for Ubuntu 24.04.
sudo apt-get install runc -y
sudo apt-get -y install podman
For CentOS 7,
sudo yum -y install podmanFor MAC install Podaman and then initalize QEMU based virtual machine using the podman machine command.
brew install podman
podman machine init
podman machine start
After installation, verify the installation using the following command.
podman versionPodman Container Registry Configurations
By default, Podman is configured with two container registries.
You can find the default Podman container registry configuration in the following file.
/etc/containers/registries.conf
unqualified-search-registries field will be masked, so you need to unmask and add the registries such as docker.io , quay.io, etc.If you do not add the registries here, you need to give the full image name on the Dockerfile, for example,
docker.io/nginx:latest, otherwise you will get an error: Error: creating build container: short-name "nginx:latest" did not resolve to an alias and no unqualified-search.You can add custom or private container registries to this configuration. For example, google container registry, AWS ECR, self-hosted private registries, etc.
If you want to use other private container images from the registries, you can log in to the registry using podman command. For example, to login to the docker hub,
podman login docker.ioOnce logged in, you will be able to pull the container images from the docker hub using podman command
If you wish to have a different registry configuration for a specific user, you can create separate registries.conf in the user directory with the container registry information.
$HOME/.config/containers/registries.confPodman Container Storage
Each system user has its own container storage. Meaning, if you try to pull images from different user logins, it pulls the image from the remote registry instead of the local image.
For example,
- For root users, the containers are stored in
/var/lib/containers/storagedirectory - For other users, the containers are stored in
$HOME/.local/share/containers/storage/directory
Managing Containers With Podman
You can manage containers the same way you work with docker. However, instead of the docker command, we will use podman as a command with flags similar to docker. Also, you can run the podman command with any user without sudo privileges.
First, let's try to pull an image. By default, podman searches for images in quay.io first and then in docker.io. If an image is not present in quay.io, podman searches in docker.io and pulls the image. So it is better to specify the full image name what the registry endpoint. For example,
podman pull docker.io/nginx
podman pull quay.io/quay/busybox
Let's run an Nginx container from the dockerhub registry. The following command runs the Nginx container with 8080 host port mapping.
podman run --name docker-nginx -p 8080:80 docker.io/nginxIf you see, the above podman commands are equivalent to the docker command and flags.
You cannot use ports below 1024 in rootless mode (Normal user mode). Because the normal user container namespace does have privileges to map those ports. If you want to map host ports less than 1024 using podman, you should run podman in detach mode as the root user or with sudo privileges as shown below.
sudo podman run -d --name docker-nginx -p 80:80 docker.io/nginxYou can check the mapped port using the following command. -l flat returns the details for the latest container.
podman port -l
You can inspect the container using inspect command.
podman inspect -lOther commands to stop, remove and delete containers work the same as docker commands.
Few examples,
podman images
podman ps
podman ps -a
podman stop <container-name>
podman rm <container-name>
Run the help command to know about all the available podman commands.
podman --helpBuilding Container Image With Podman
Let's try building container image of Nginx with a custom HTML file. I have the Dockerfile and HTML file in a GitHub repo.
Let's clone the repo and cd into the repo nginx-image directory.
git clone https://github.com/scriptcamp/podman.git
cd podman/nginx-image
Inside the nginx-image folder, you will see a Dockerfile and index.html file.
Let's build the container image using podman. The command is similar to the docker command.
podman build -t scriptcamp/nginx .When build this container image, the name will be localhost/scriptcamp/nginx, so before pushing it into the registry, we need to tag the image with our repo name.
podman tag localhost/scriptcamp/nginx:latest docker.io/scriptcamp/nginx:latestNow, let's push the image to the container registry. Ensure you are logged in to the container registry to push the image. Here I a using dockerhub.
podman push docker.io/scriptcamp/nginx:latestCreating Pod With Podman
In this section, we will learn how to create a pod with Podman. One of the advanced features of Podaman is its ability to create pods similar to Kubernetes pods. A pod is a unit where you can have one or more containers.
Here is what you can do.
- Create an empty pod: When you create an empty pod, Podman assigns an infra container k8s.gcr.io/pause to hold the namespace and allow communication to other containers in the pod.
- You can add and remove containers in a pod.
- You can create a full application stack in a pod.
- You can start and stop containers selectively inside a pod.
Now lets, look at the examples.
To know all the available podman pod commands, just run the help command.
podman pod --helpCreate an Empty Pod
Let's create an empty pod. If you don't specify the --name flag, podman will create a pod with a random name.
podman pod create --name demo-podLet's list the created pod.
podman pod lsThe following command lists all the containers in the pod. For empty pods, there will be a k8s.gcr.io/pause container added to it.
podman ps -a --podAdd containers to Podman Pod
Let's add an Nginx container to the empty pod. If you list the containers after running the following command, you will see the Nginx container added to the demo-pod
podman run -dt --pod demo-pod nginxStart, Stop and Remove containers inside Podman Pod
You can start, stops, and remove containers from the podman pod using the same commands you use to remove containers with their ids.
First list the containers in the pod using the podman command and using the following commands with the container Ids.
podman start <continer-id>
podman stop <continer-id>
podman rm <continer-id>
Create Pod With Containers
We can create a pod and add containers with a single command. Let's create a pod with an Nginx container with host port mapping for 8080.
podman run -dt --pod new:frontend -p 8080:80 nginxIf you access port 8080 on the VM's IP, you should be able to see the Nginx homepage.
Start, Stop and Delete Pod
You can pick and stop individual containers inside the pod using the container id/name or you can stop all the containers at once using the following command.
podman pod stop <podname>
podman pod start <podname>
To remove a pod, first, stop all the containers in the pod and then run,
podman pod rm <podname>Or you can remove the pod forcefully without stopping the containers using -f flag
podman pod rm -f <pod-name>Multi Container Application Stack
You can have a multi-container application stack in a single podman pod. This helps in developing and testing applications locally.
For example, if you have an application and database, you can have an app and DB container in the same pod. You can destroy and bring up the stack any time you need. Something similar to docker-compose.
Both app and DB containers can talk to each other using localhost. I will cover this implementation separately in a blog.
Generate Kubernetes YAML from Podman Pod Definitions
Another interesting feature of Podman is you can generate Kubernetes pod YAMLs from podman pods. This is a working feature but is still under development.
First, let's deploy a pod named webserver with an Nginx container.
podman run -dt --pod new:webserver -p 8080:80 nginxNow to generate the Kubernetes YAML for the podman pod, we will use the generate kube flag with the pod name as shown below.
podman generate kube webserverYou can direct the generated YAML to a file with redirection.
podman generate kube webserver >> webserver.yamlCreate Podman Pod from YAML
If you have a pod YAML file, you can import and run it as a Podman pod using the play kube flag.
For example, we will use the webserver.yaml generated in the last section to run the pod. First, we need to remove the existing webserver pod.
podman pod rm -f webserverLet's import the pod using webserver.yaml
podman play kube webserver.yamlNow, let's try importing a Kubernetes YAML. Save the following Kubernetes manifest as nginx.yaml
apiVersion: v1
kind: Pod
metadata:
  name: nginx
spec:
  containers:
  - name: webserver
    image: docker.io/nginx:latest
    ports:
    - containerPort: 80
Let's import it as a podman pod.
podman play kube nginx.yamlNow, if you list the pods, you can see a running Nginx pod.
Podman Desktop
Podman Desktop is a GUI tools for managing podman contianers. It is available for Windows, MAC and Linux Systems.
You can download and install Podman Desktop from here.
Docker Vs Podman
If you are wondering how Podman is different from docker, the following table helps you with some key differences.
| Podman | Docker |
|---|---|
| Podman is Daemonless | Docker has a daemon (containerd ). The docker CLI interacts with the daemon to manage containers. |
| Podman interacts with the Linux kernel directly through runc | Docker daemon owns all the child processes of running containers |
| Podman can deploy pods with multiple containers. The same pod manifest can be used in Kubernetes. Also, you can deploy a Kubernetes pod manifest as a Podman pod. | There is no concept of a pod in Docker |
| Can run rootless containers without any additional configurations. You can run containers with root or non-privileged users. | Docker rootless mode requires additional configurations. |
Podman Vs Buildah
When you start learning or researching about podman, you will read about Buildah. Both projects were initially created by Redhat.
You might get confused with Podman & Buildah projects. Podman uses Buildah under the cover for run and build operations. Read this official podman blog that explains the difference between Podman and Buildah.
Podman Errors & Issues
Following are some of the errors and issues I faced while doing hands-on with Podman.
Port Mapping Error
If you try to map privileged ports you might get the following error. Always use a nonprivileged port if you want to run Podman as a non-root user.
Error: error from slirp4netns while setting up port redirection: map[desc:bad request: add_hostfwd: slirp_add_hostfwd failed]If you don't have runc installed, you might get the following error.
Error: default OCI runtime "runc" not found: invalid argumentImage Errors
If you don't specify the correct image name, Podman will throw the following error.
Trying to pull quay.io/busybox...
  error parsing HTTP 404 response body: invalid character '<' looking for beginning of value: "<!DOCTYPE HTML PUBLIC \"-//W3C//DTD HTML 3.2 Final//EN\">\n<title>404 Not Found</title>\n<h1>Not Found</h1>\n<p>The requested URL was not found on the server. If you entered the URL manually please check your spelling and try again.</p>\n"
It normally happens with quay.io because, unlike docker, for quay.io , you should specify the image name correctly.
For example, podman pull busybox, will throw the error. But, podman pull quay/busybox works without any error.
Pod Errors
If you try to add a container with ports that were not added during the pod creation, you will get the following error.
Error: invalid config provided: published or exposed ports must be defined when the pod is created: network cannot be configured when it is shared with a podIf you try to delete a pod with running containers, you will get the following error. First, you need to stop all the containers and then delete the pod.
Error: pod 9e31de31950664702f21 has containers that are not ready to be removed: cannot remove container 3d10007e844a5aea3c7805fb0ee986b0b4c2cedd66c0996d0bff9f53ba1c0b57 as it is running - running or paused containers cannot be removed without force: container state improperSometimes you might deploy containers using a specific user and if you try to list the containers with a different user or with sudo, you will get the following error.
Error: no pod with name or ID webserver found: no such podConclusion
In this podman tutorial, I have explained all the basic concepts to get started with managing containers using Podman.
If you are already using Docker desktop extensive on mac and windows, podman is not something that can replace it. However, podman comes with its own benefits.
But definitely, it's time to stop thinking of Docker as the de-facto standard when it comes to containers.
You might be using docker and looking for another tooling around container management or just heard about podman. Either way, let me know your thoughts in the comments below.
Also, if you are learning Kubernetes, you can check out my Kubernetes tutorials for beginners.