

In this blog, we will learn to migrate Kubernetes Ingress to gateway API and follow the easy migrating steps.
Most of the workflows still use the standard Ingress traffic routing mechanism for traffic routing, but it has limitations in the routing rules.
The Gateway API offers a lot of traffic routing features to simplify the advanced routing rules.
Kubernetes Ingress
Before we jump into the migration, let me give a brief introduction about the Ingress.
Ingress in the Kubernetes cluster helps to route the traffic to the applications based on certain rules such as domain name and path.
But, in Ingress, it is difficult to configure the header-based routing or method-based routing. Also, there is no separation for the TCP/UDP or HTTP/HTTPS-based routing.
Here, we can use the Gateway API, which has all the features for the Ingress resource as well as more advanced functions.
Kubernetes Gateway API
Kubernetes Gateway API is the replacement for the Ingress resource because of its advanced features for traffic routing when compared to Ingress.
To learn the complete setup of the Kubernetes Gateway API in the Kubernetes cluster, please refer to this blog.
Let's compare the core components of the Kubernetes Gateway API with the Ingress.
Gateway Class - Defines the controller information like Ingress Class
Gateway - The entry point for the traffic, like Ingress.
HTTPRoute - Defines the HTTP routing rules, like Ingress rules.
Prerequisites
- Helm v3.17.0 or a higher version should be available on the local machine.
- Kubernetes Cluster v1.30 or higher
- Kubectl v1.30 or higher should be available on the local machine, and the config file should be configured to access the cluster.
Migrating from Kubernetes Ingress to Gateway API
In this section, will migrate an existing Ingress routing configuration to the Gateway API.
Step 1: Setup the Nginx Ingress Controller in the Kubernetes Cluster
I am setting up the Nginx Ingress Controller to show the demo from the beginning.
You might be thinking why we need a controller to route the traffic, but actually the Controller is an Nginx Pod which act as a reverse proxy, when we add rules in the Ingress object, the routing informations will be configured in the Nginx Pod.
When the traffic reaches the controller, it will route the traffic to the intended endpoints based on the rules and conditions.
To pull the Helm chart of the Nginx Ingress Controller and to untar, use the following command.
helm pull oci://ghcr.io/nginx/charts/nginx-ingress --untarThis will give a local copy of the Helm chart, and open the following directory.
cd nginx-ingressWe can see a values.yaml file inside the directory, which has all the modifiable parameters.
We can change the values as per our requirements or store the entire chart on our repositories to reuse.
We are not modifying the default file, instead creating a new file demo-values.yaml file.
cat <<EOF> demo-values.yaml
controller:
  service:
    create: true
    type: NodePort
    httpPort:
      enable: true
      port: 80
      nodePort: 30080
      targetPort: 80
EOF
By default, the Service Type of the Nginx Ingress Controller is Load Balancer, but if you are testing the setup on your local cluster, the setup might not work properly.
Note: If you are deploying the Nginx Ingress Controller on any production or in a cloud environment, keep the Service type as default (Load Balancer), which is an actual best practice.
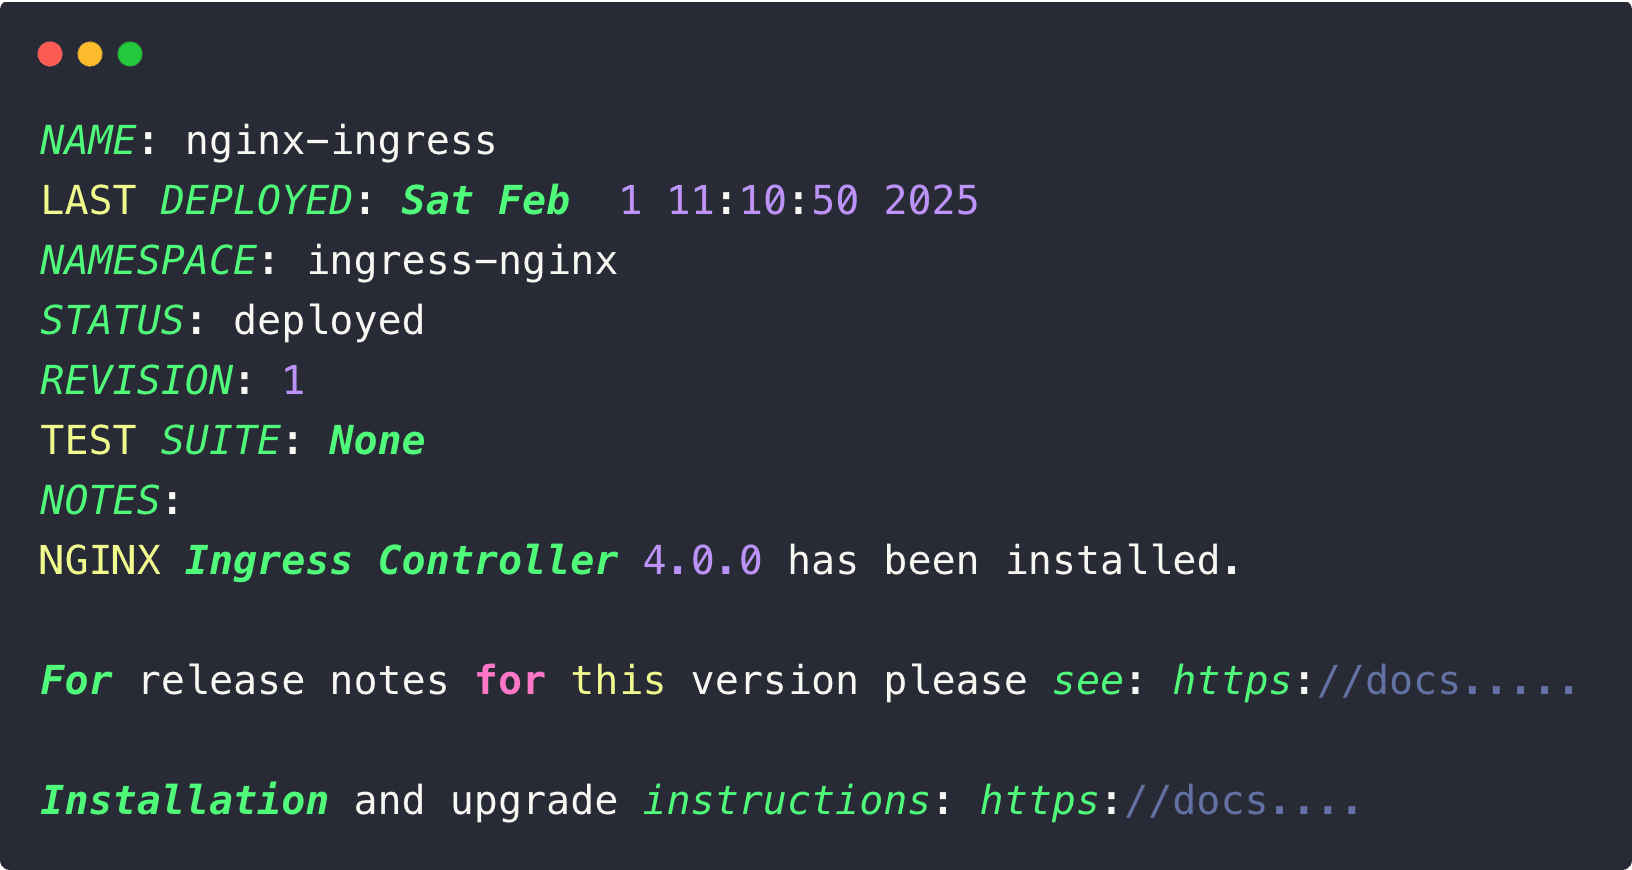
Now, we can deploy the Nginx Ingress Controller with the new values file.
helm install nginx-ingress -f demo-values.yaml --create-namespace --namespace=ingress-nginx .nginx-ingress is the release name, and you can give any name.
demo-values.yaml is the configuration file to override the default installation.
ingress-nginx is the Namespace name where the Nginx Ingress Controller components need to be deployed.
Once the installation is properly done, you can see the following output.
Let's check the Nginx Ingress Controller components status.
If you want to know more about the Nginx Ingress Controller and configuration, please refer to this blog.
kubectl -n ingress-nginx get all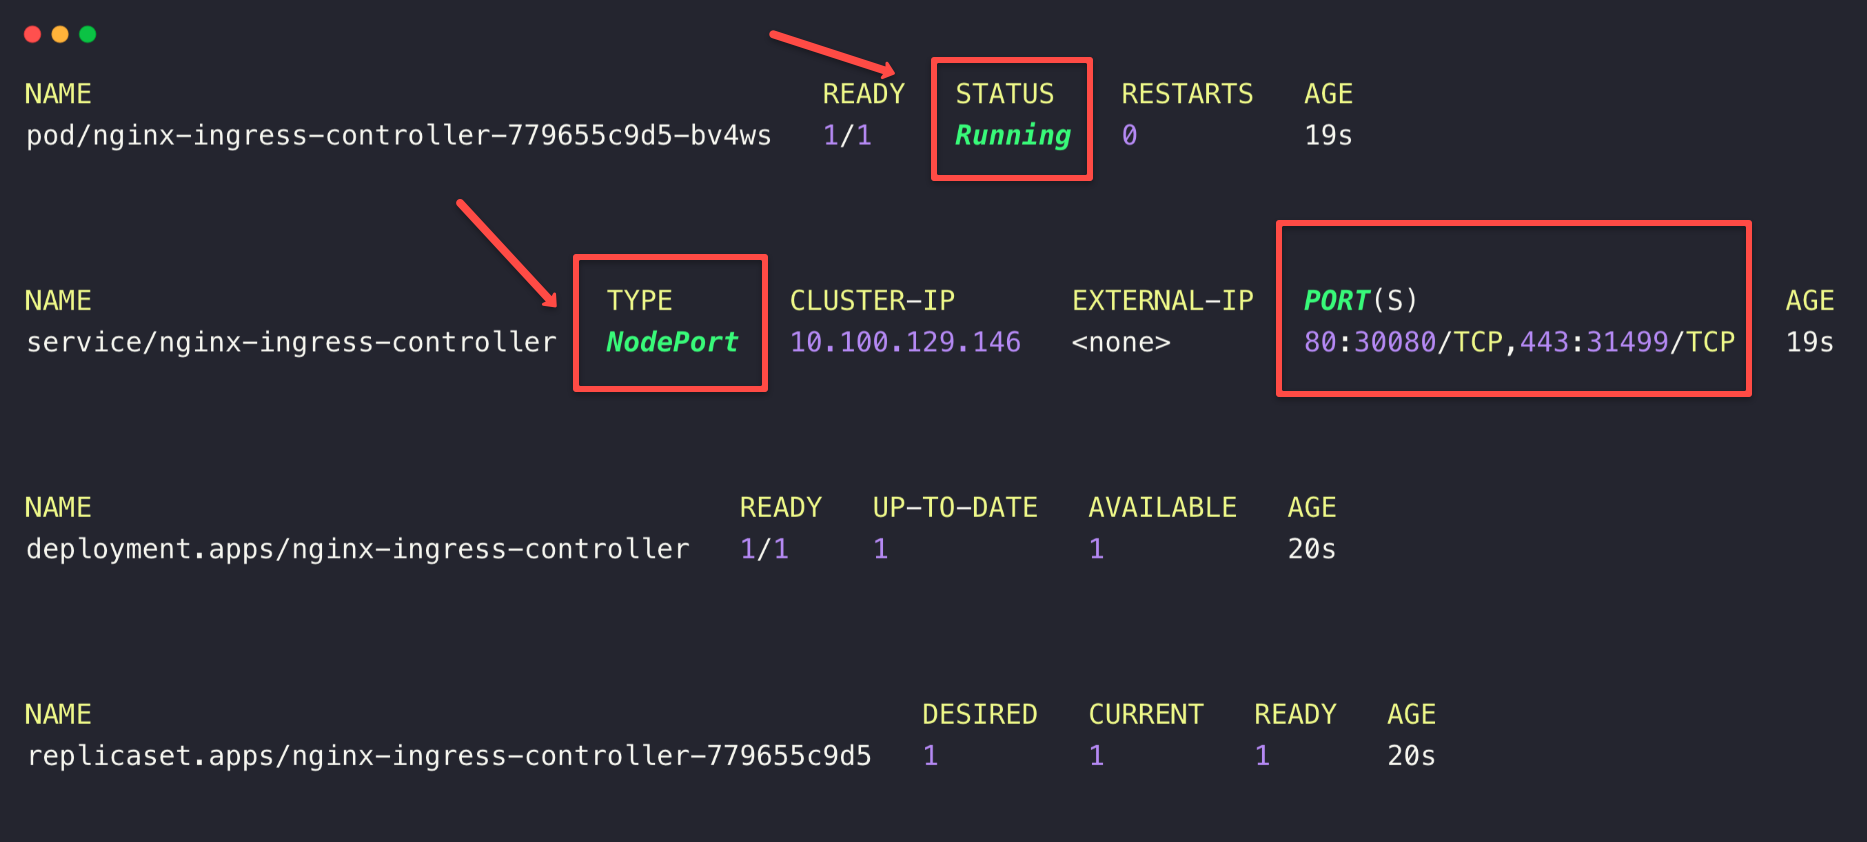
The Nginx Ingress Controller Pod is in a running state, which indicates all the Controller components are running without any issues.
Note down the Node Port number (30080) for the access-related operations.
Currently, we haven't installed any application, so once that is done, we can use the public IP of the cluster nodes with the Node Port number to access the application.
My cluster nodes are in the AWS cloud, so I can get the IP information over the GUI or CLI.
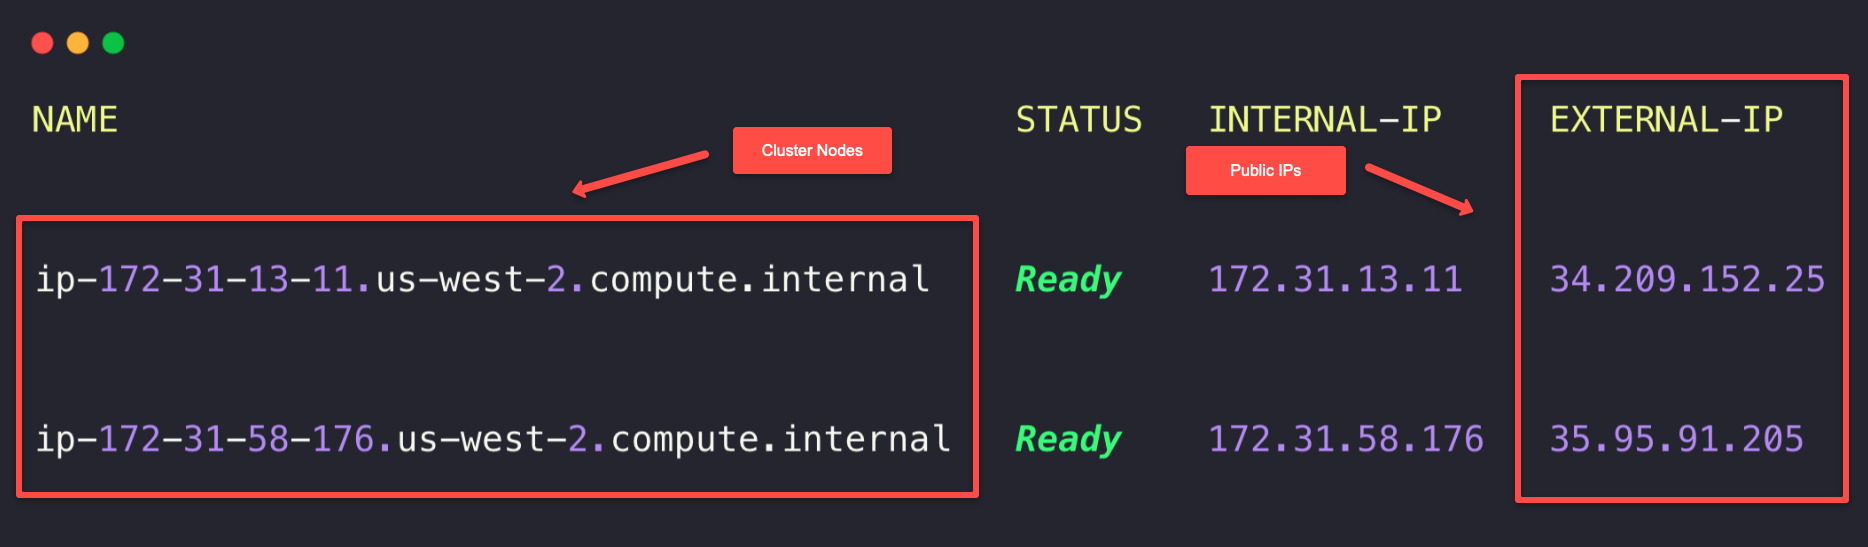
We can directly use the Public IP of any one of the Nodes with the Node Port number as a URL (34.209.152.25:30080) to access the application, but that won't be quite convenient.
To make the access more convenient, we use the Local DNS Resolution.
Step 2: Setup Local DNS Resolution
For the local DNS resolution, we need to map the Nodes public IPs along with a host name in the /etc/hosts directory of the local system.
We already know the public IPs of the cluster nodes so open the /etc/hosts directory with sudo privileges.
sudo vim /etc/hosts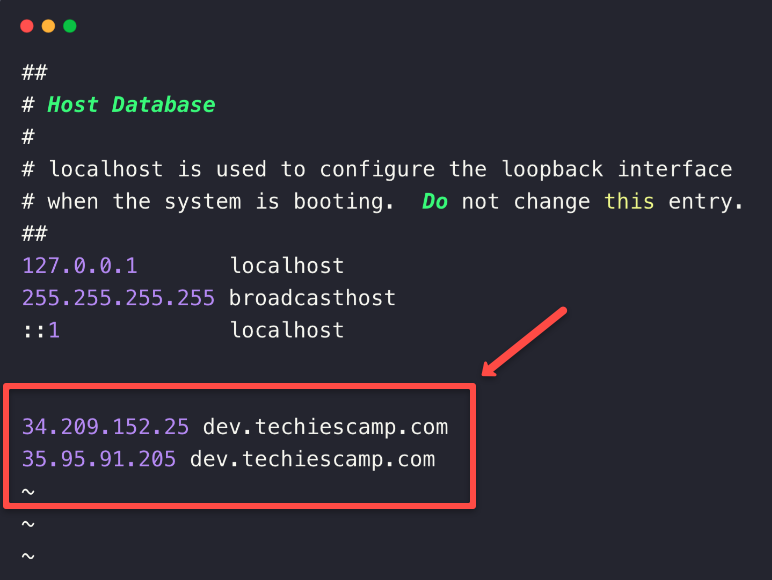
This is how we map the IP address with the hostname (dev.techiescamp.com), you can provide any host name you want.
The DNS resolution only happens on the local machine where you configured it.
Note: To access the application over the internet using the domain name, you need to configure it with the DNS servers such as Route53, GoDaddy, etc.
Step 3: Deploy an Application for the Demo
We have an container image in the Docker hub, so we are using it for testing, you can also you it if you want.
Create a Namespace to deploy the applications and services.
kubectl create ns colorsNow, we can deploy the applications.
cat <<EOF > colors-deployments.yaml
apiVersion: apps/v1
kind: Deployment
metadata:
  name: orange-app
  namespace: colors
  labels:
    app: orange-app
spec:
  replicas: 3
  selector:
    matchLabels:
      app: orange-app
  template:
    metadata:
      labels:
        app: orange-app
    spec:
      containers:
      - name: color-app
        image: techiescamp/go-color-app-demo:latest
        ports:
        - containerPort: 8080
        env:
        - name: POD_NAME
          valueFrom:
            fieldRef:
              fieldPath: metadata.name
        - name: POD_IP
          valueFrom:
            fieldRef:
              fieldPath: status.podIP

---
apiVersion: apps/v1
kind: Deployment
metadata:
  name: green-app
  namespace: colors
  labels:
    app: green-app
spec:
  replicas: 3
  selector:
    matchLabels:
      app: green-app
  template:
    metadata:
      labels:
        app: green-app
    spec:
      containers:
      - name: color-app
        image: techiescamp/go-color-app-demo:latest
        ports:
        - containerPort: 8080
        env:
        - name: POD_NAME
          valueFrom:
            fieldRef:
              fieldPath: metadata.name
        - name: POD_IP
          valueFrom:
            fieldRef:
              fieldPath: status.podIP
EOF
kubectl apply -f colors-deployments.yamlHere, I have deployed two deployments, which help to demonstrate the path based routing.
We need services for these two Deployments to get the endpoints.
cat <<EOF > colors-svc.yaml
apiVersion: v1
kind: Service
metadata:
  name: orange-app-service
  namespace: colors
  labels:
    app: orange-app
spec:
  selector:
    app: orange-app
  ports:
  - protocol: TCP
    port: 80
    targetPort: 8080
  type: ClusterIP
---
apiVersion: v1
kind: Service
metadata:
  name: green-app-service
  namespace: colors
  labels:
    app: green-app
spec:
  selector:
    app: green-app
  ports:
  - protocol: TCP
    port: 80
    targetPort: 8080
  type: ClusterIP
EOF
kubectl apply -f colors-svc.yamlOnce all the deployments are completed, we can check the status.
kubectl -n colors get po,svc -o wide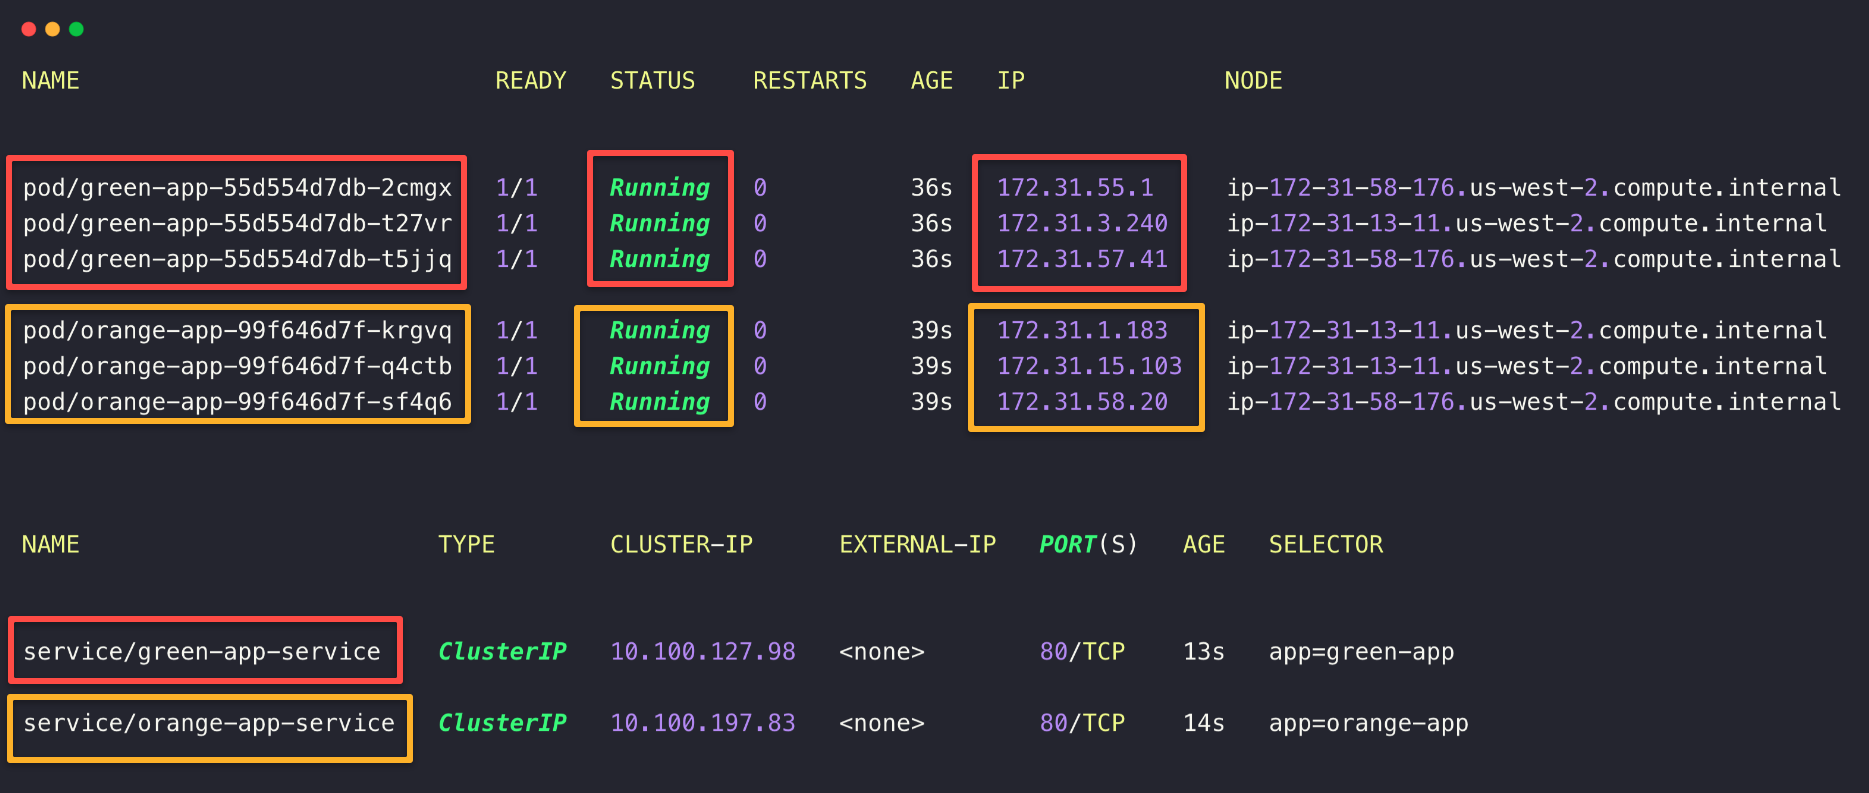
The resources are ready for the testing, let's explore the Ingress resources.
Step 4: Describe Ingress Class
The Ingress Class is an object which has the information about the Ingress Controller.
The default Ingress Class will automatically be created when we deploy an Ingress Controller.
The Ingress Class is a cluster scoped resource.
Let's describe the Ingress Class.
kubectl get ingressclass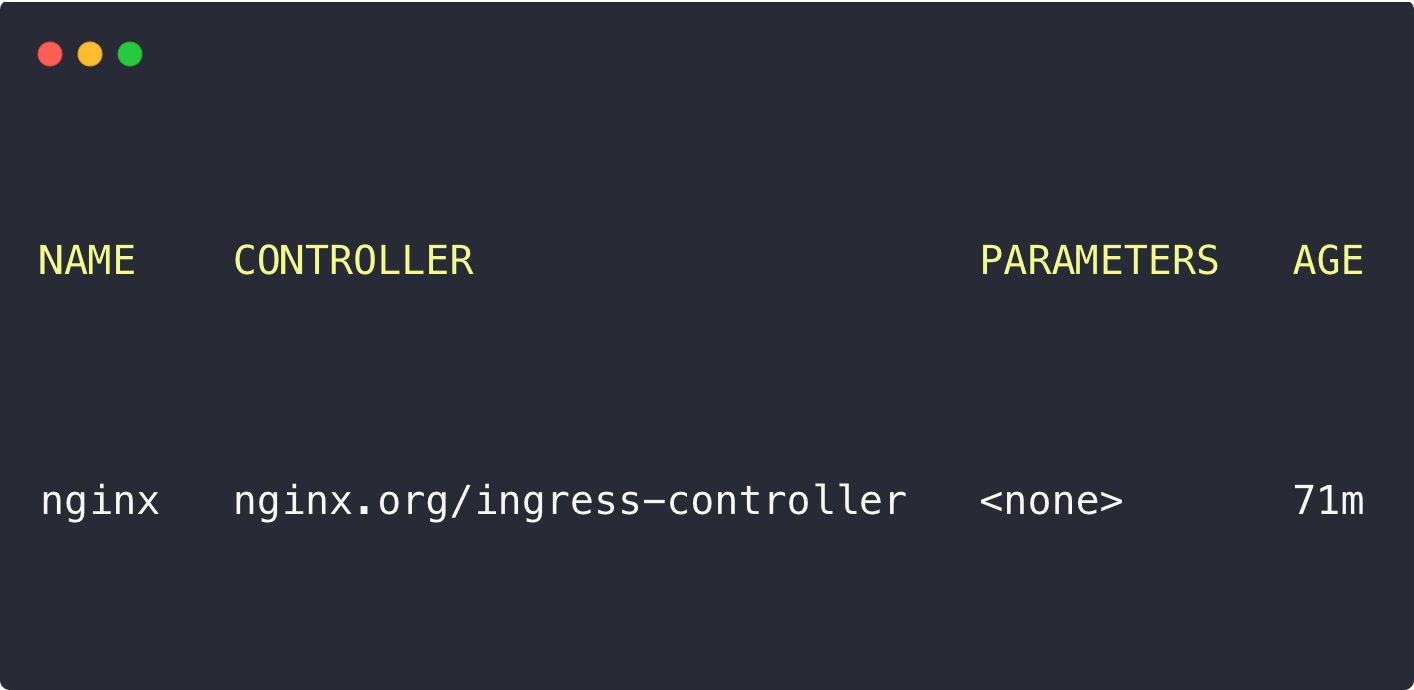
Here, we can see that the controller is nginx.org/ingress-controller, which indicates that it is Nginx Ingress Controller.
Step 5: Create an Ingress to Define Routing Rules
The Ingress is an object where we define the routing rules for traffic.
The controller keeps on watching the Ingress object creation and modifications.
The defined rules in the Ingress object will be configured in the controller so that once the traffic is reached in the controller, will route to the correct endpoint based on the rules.
We can create an Ingress object will the rules for path based as well as hostname based routing.
cat <<EOF > colors-ingress.yaml
apiVersion: networking.k8s.io/v1
kind: Ingress
metadata:
  name: colors-ingress
  namespace: colors
spec:
  ingressClassName: nginx
  rules:
  - host: dev.techiescamp.com
    http:
      paths:
      - path: /green
        pathType: Prefix
        backend:
          service:
            name: green-app-service
            port:
              number: 80
      - path: /orange
        pathType: Prefix
        backend:
          service:
            name: orange-app-service
            port:
              number: 80
EOF
Ingress objects are Namespace scoped so where the applications are lying, there you have to create the Ingress.
We have deployed the applications at colors Namespace, so the Ingress object must be created in colors Namespace.
Under the spec section, need to mention the Ingress Class name, which is nginx.
For the host name based traffic routing we have provided the hostname (dev.techiescamp.com) that we have already configured with the local DNS resolution configuration.
Under the rules sections, there are two rules, one for the first application (Green) and the other for the second application (Orange).
The Ingress to identify the service endpoints, we have provided the service names such as green-app-service and orange-app-service.
The demo application is created for the path based routing so that the paths are mentioned in the rules, such as /green for the first application and /orange for the second application.
So if want to access the applications, the URL should be <HOST_NAME>:<NODE_PORT_NUMBER>/<PATH>.
kubectl apply -f colors-ingress.yamlAfter the Ingress object deployment, use the following command to list it.
kubectl -n colors get ingress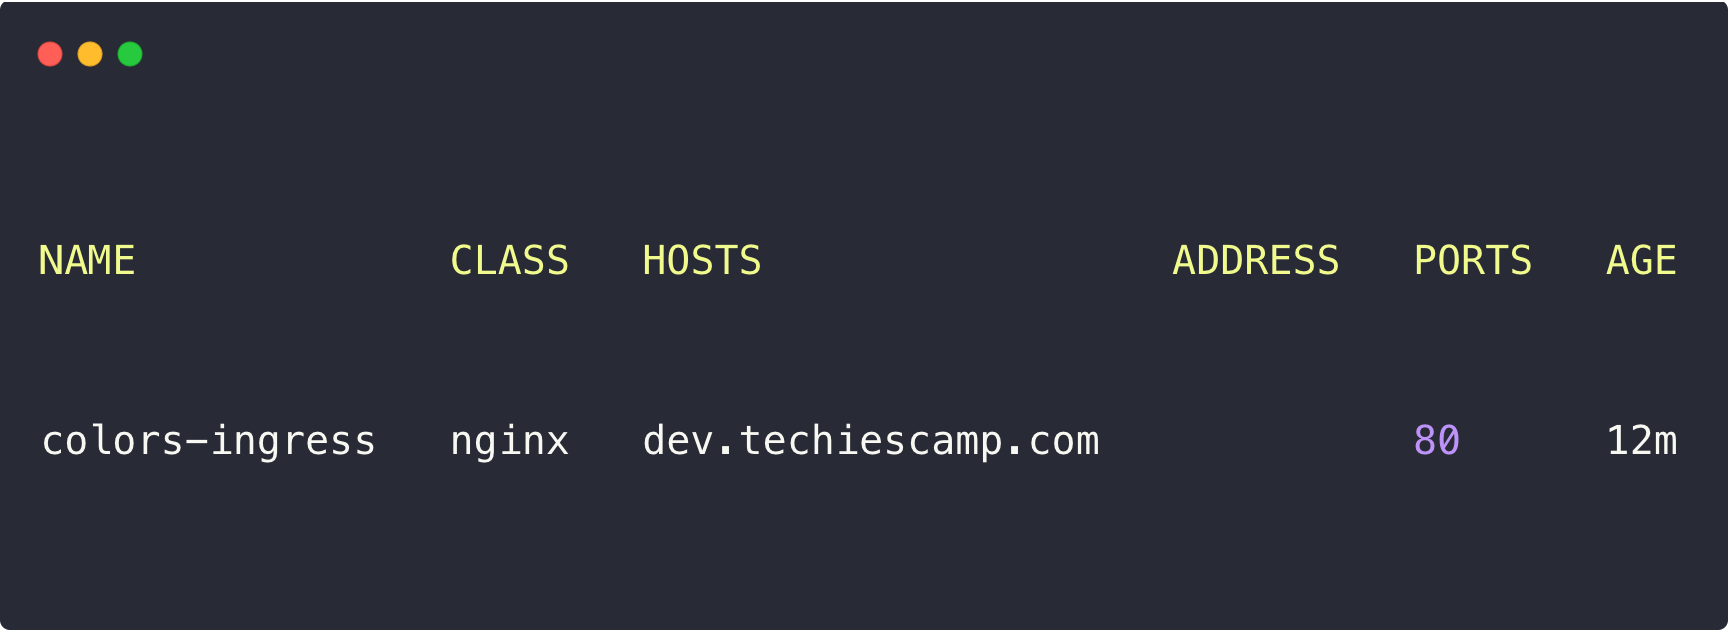
Now, the configurations are ready, so need to access the applications.
For that, open any of the web browsers from the local machine and paste the URL dev.techiescamp.com:30080/green.
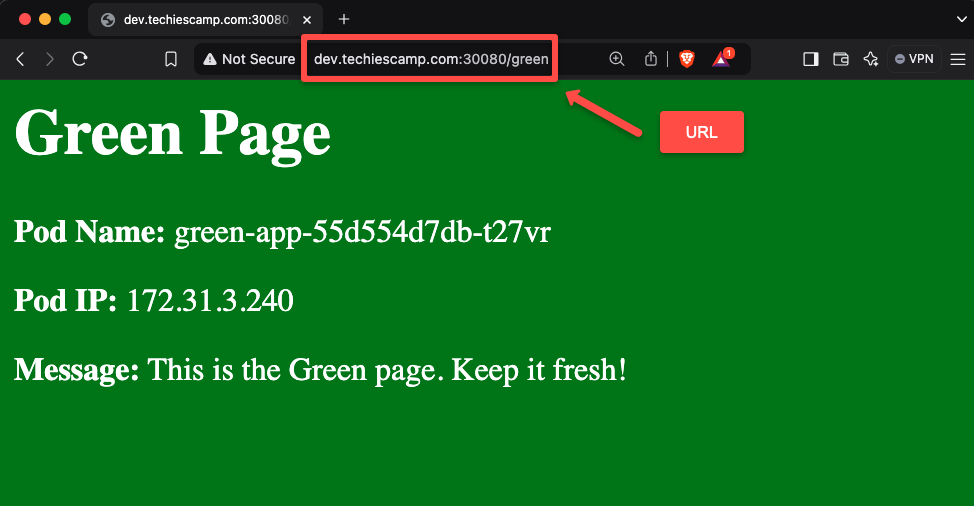
We can see the output in the browser also if you notice the Pod name and IP, which is pointing to Pods of the first application deployment, so this ensures that the traffic is properly routed based on the rules that we provided in the Ingress object.
You can check the second application if you want with this URL dev.techiescamp.com:30080/orange
We have understood how the traffic is routed through the Ingress controller, so now, it is time to migrate this configuration to the Kubernetes Gateway API.
Step 6: Install Kubernetes Gateway API in the Kubernetes Cluster
First, we need to install the Gateway API Custom Resource Definitions in the Kubernetes cluster.
kubectl apply -f https://github.com/kubernetes-sigs/gateway-api/releases/download/v1.2.1/standard-install.yamlTo check the CRDs, use the following command.
kubectl get crds | grep gateway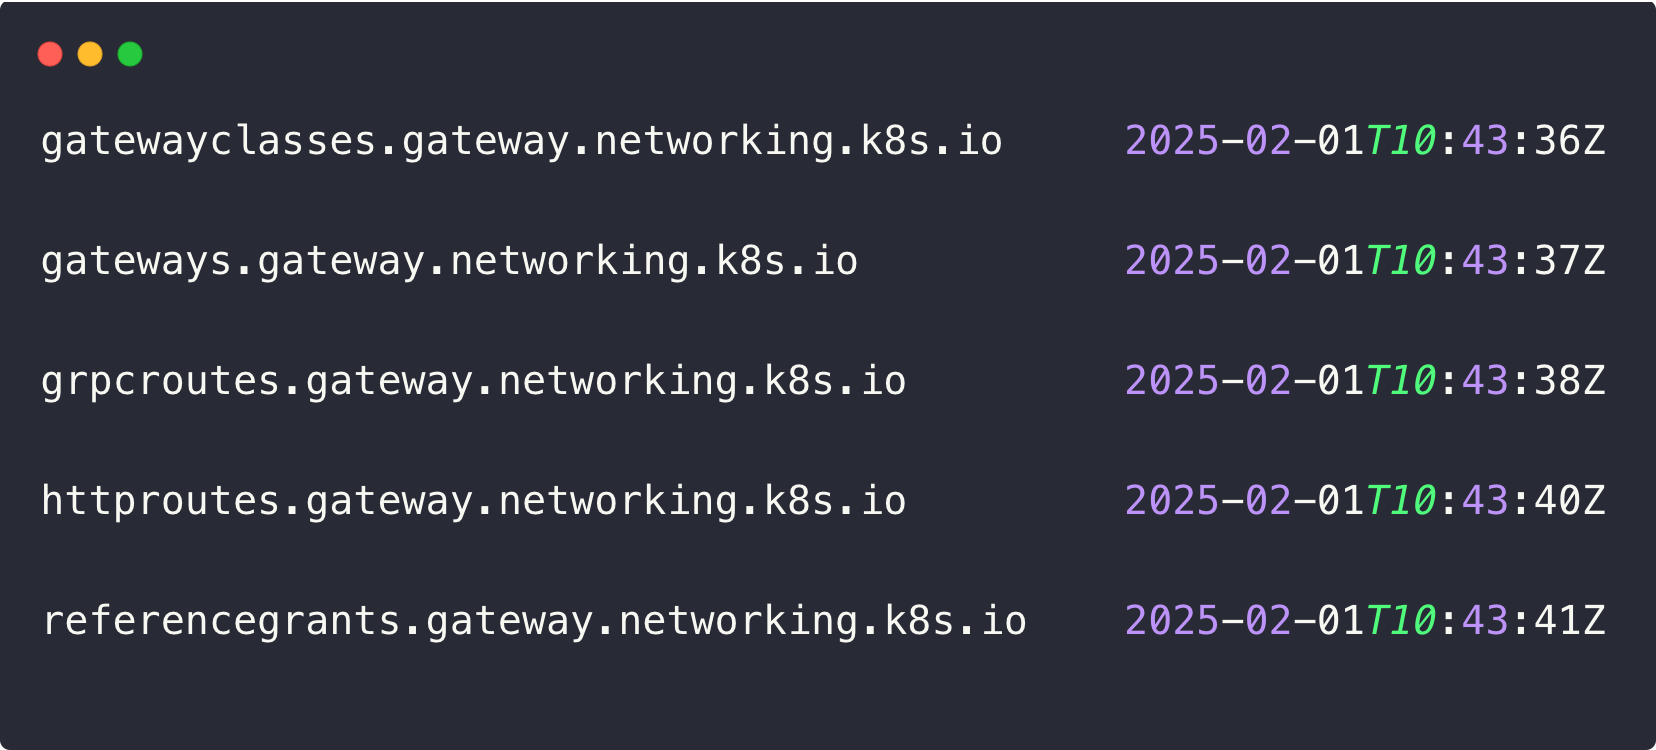
Gateway Classdefines the Gateway API Controller informations, same like theIngress Classin IngressGatewaydefines the entry point for the incoming traffic.gRPC Route, HTTP Routeare the resources where we define the routing rules.
Step 7: Install Nginx Fabric Gateway API Controller.
Similar to the Ingress, we need a controller for the Gateway API, and we can't use the same controller of the Ingress because that doesn't have the capabilities for the Gateway API routing configurations.
For the Ingress, we have used the Nginx Ingress Controller, and for the Gateway API, we use the Nginx Fabric Gateway API Controller.
To pull the Helm Chart of the controller, use the following command.
helm pull oci://ghcr.io/nginxinc/charts/nginx-gateway-fabric --untarFor this also, we use the Node Port service for the controller.
Navigate to the Nginx-gateway-fabric directory.
cd nginx-gateway-fabric Create a values file with the necessary parameters to deploy the controller with the Node Port service.
cat <<EOF> demo-values.yaml
service:
  type: NodePort
  ports:
    - port: 80
      targetPort: 80
      protocol: TCP
      name: http
      nodePort: 31080
EOF
In this, we have changed the Node Port number (31080).
To deploy the controller, use the following command.
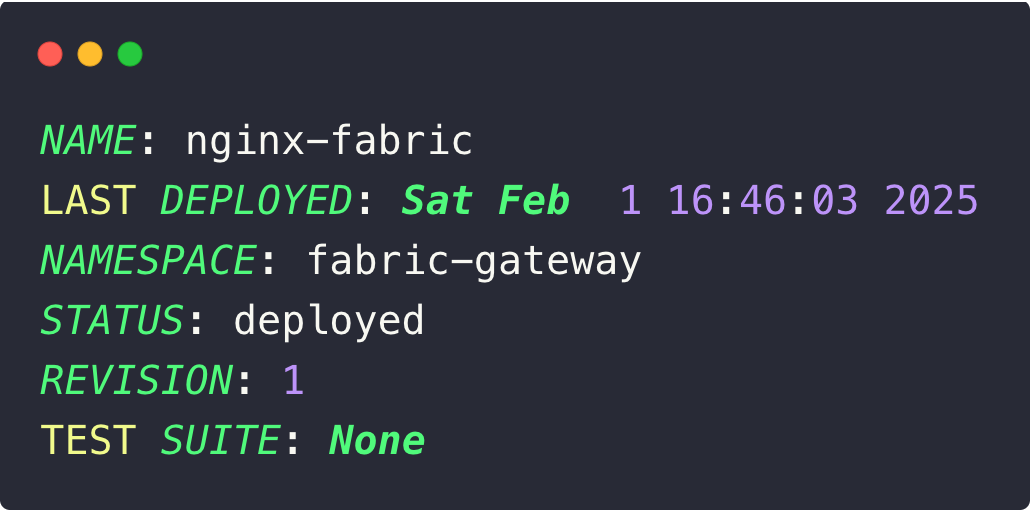
helm install nginx-fabric --create-namespace -n fabric-gateway -f demo-values.yaml .Once the installation is done correctly, you will get the following output.
After the deployment, we can check the components of the Gateway API Controller.
If you want to know the setup of the Kubernetes Gateway API in the EKS cluster with the Load Balancer, you can refer to this blog.
kubectl -n fabric-gateway get all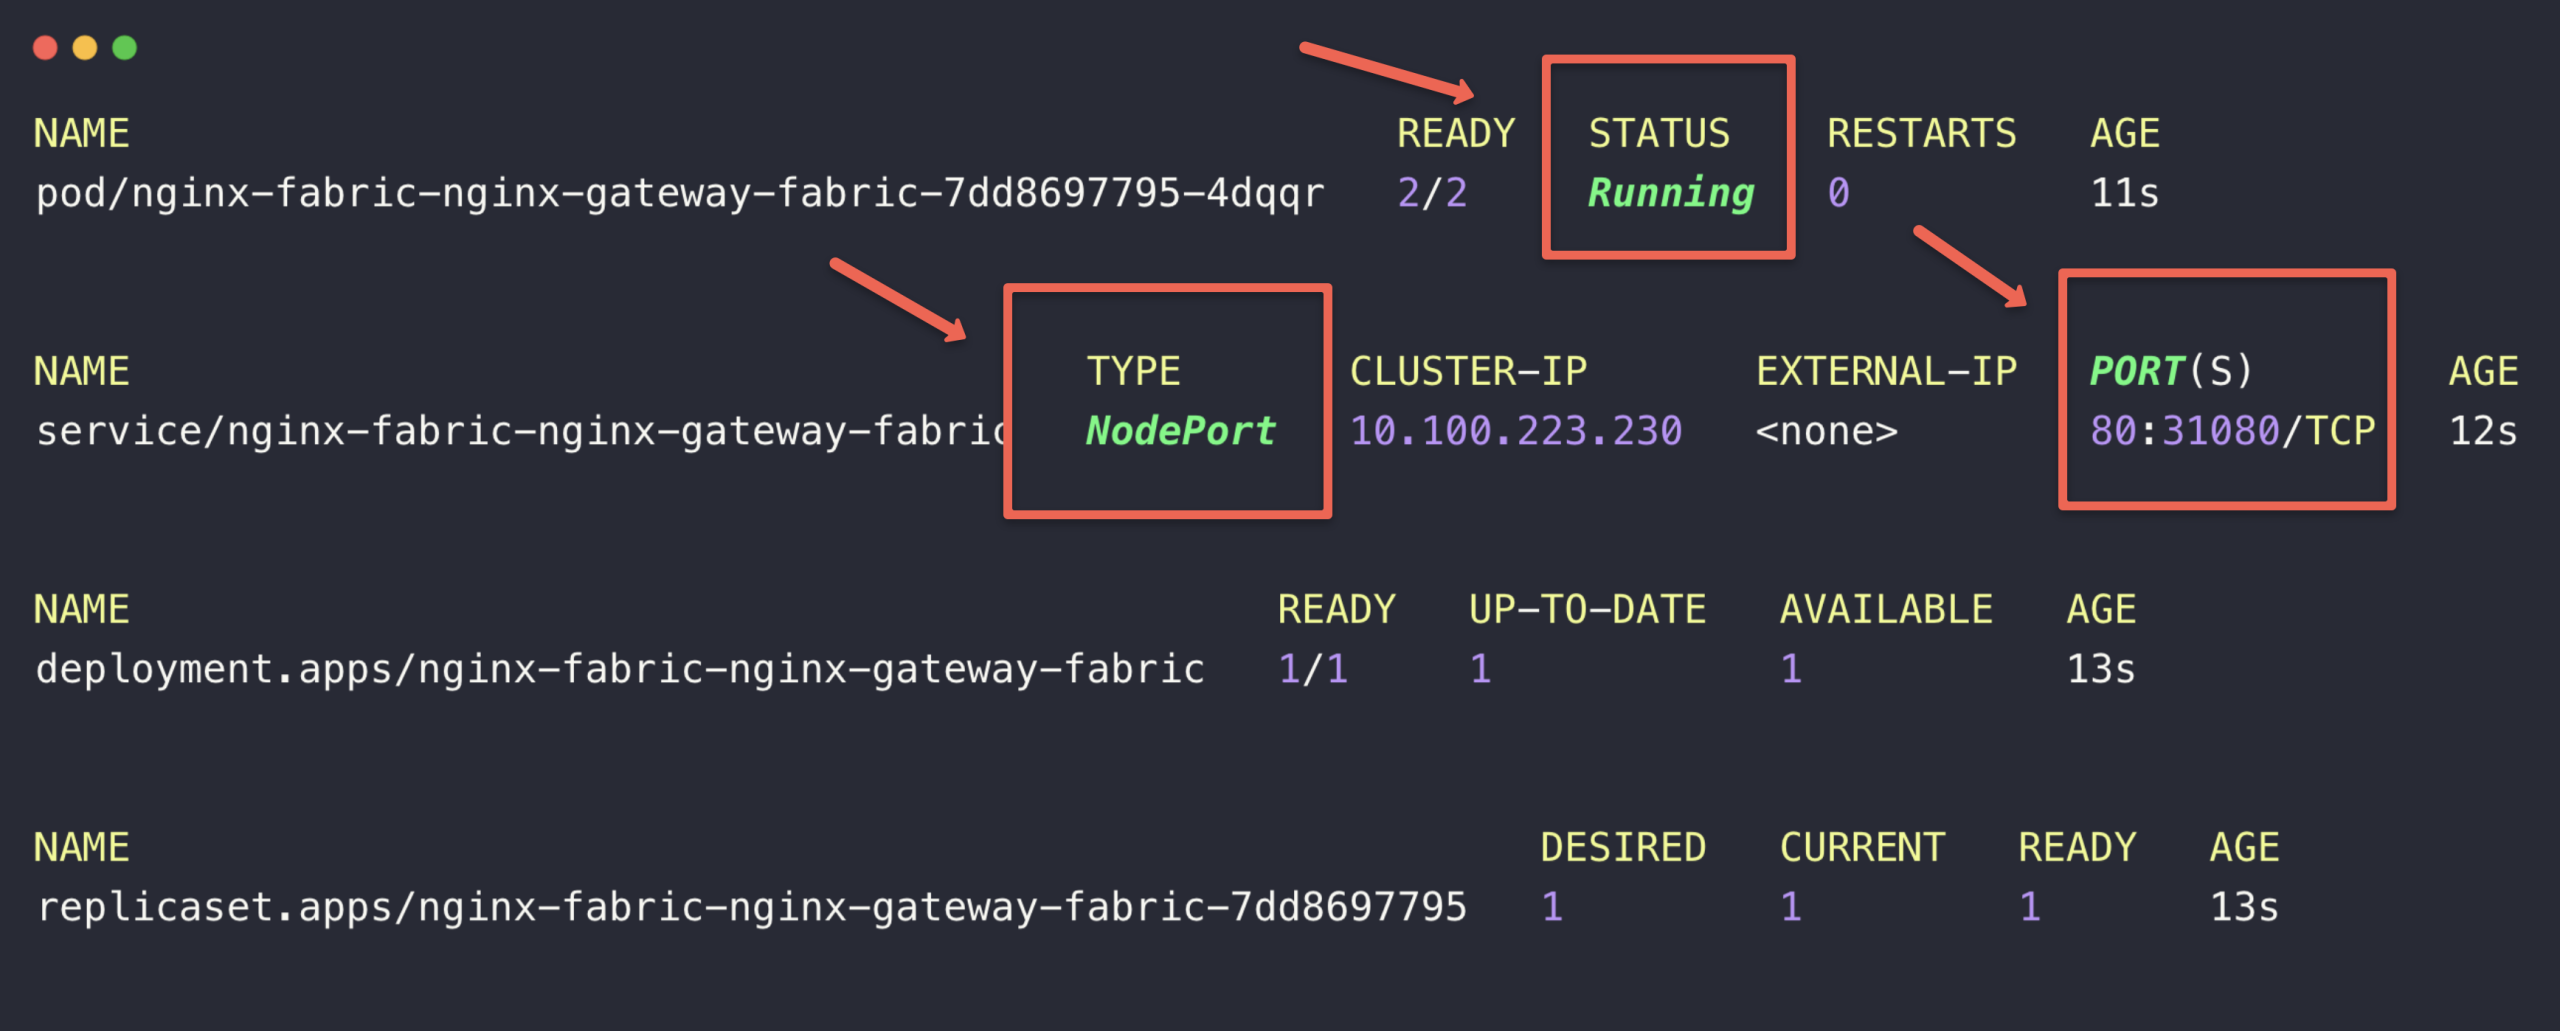
We don't have to make any modifications in the local DNS resolution because the hostname and IPs are the same.
Step 8: Describe Kubernetes Gateway API Gateway Class.
As with the Ingress, when we deploy the Gateway API Controller, the Gateway Class will be created with the controller information.
kubectl get gatewayclass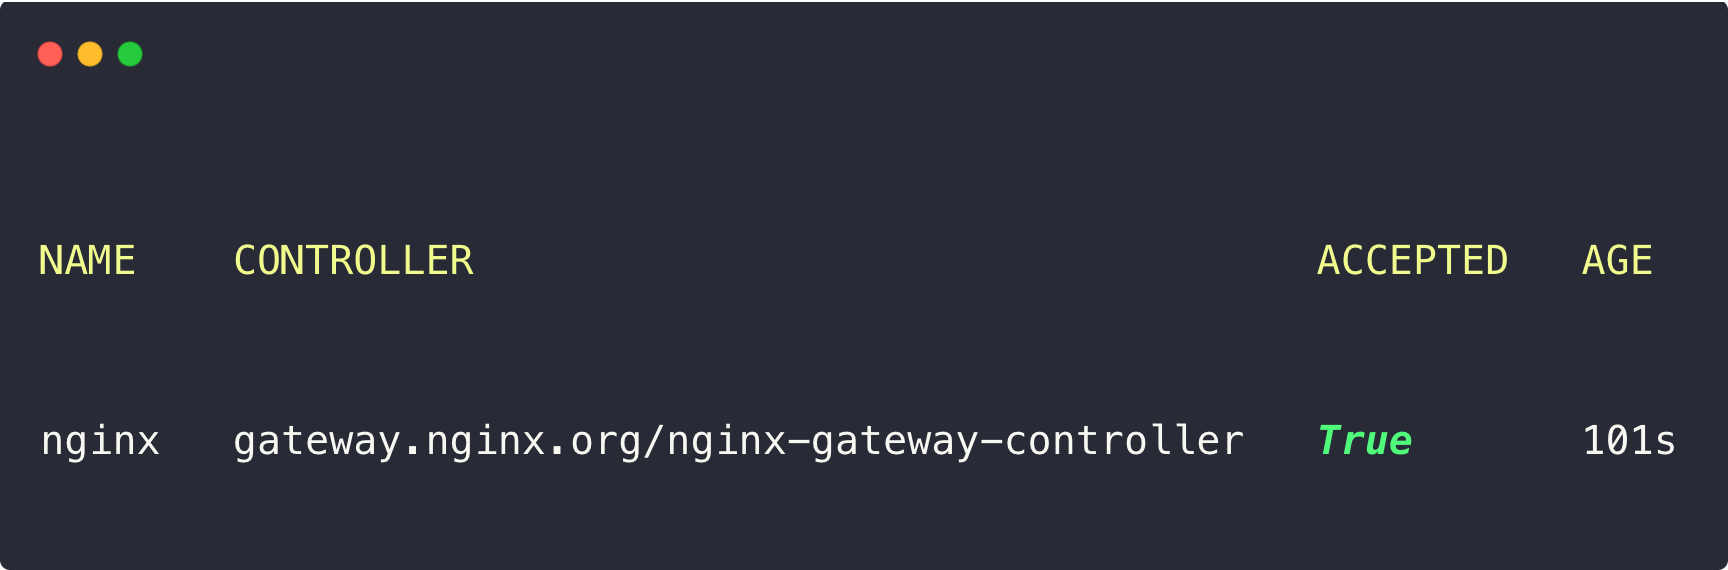
The gateway.nginx.org/nginx-gateway-controller is the Gateway API Controller name.
Step 9: Create the Kubernetes Gateway API Gateway Resource.
This is slightly different from Ingress because in Ingress, we can directly create the rules with the Ingress object, but in Gateway API, we need to create an entry point for the traffic. Then only we can create rules.
To create an entry point for the traffic, we need to create a Gateway object.
cat <<EOF > colors-gateway.yaml
apiVersion: gateway.networking.k8s.io/v1
kind: Gateway
metadata:
  name: colors-gateway
  namespace: colors
spec:
  gatewayClassName: nginx
  listeners:
  - name: http
    port: 80
    protocol: HTTP
    allowedRoutes:
      namespaces:
        from: All
EOF
Gateway is a Namespace scoped object, so we need to create the Gateway on where the endpoints are.
In Ingress, we define the Ingress Class in the Ingress object, but in Gateway API, the Gateway Class will be specified in the Gateway object.
Listeners are the type of network, we can define multiple listeners in a same Gateway (Example: 443, 8080).
The allowRoutes section, we can instruct from what are the Namespaces to allow the traffic to the Gateway.
These are some of the basic configurations in the Gateway object.
kubectl apply -f colors-gateway.yamlTo list the Gateway, use the following command.
kubectl -n colors get gateway
If you describe it, you will get more information about the Gateway.
kubectl -n colors describe gateway colors-gatewayNow, we can define rules for routing.
Step 10: Create Gateway API HTTP Route Resources to Define Routing Rules
We have multiple resources to define our rules based on the protocol.
We know that our demo application is HTTP based, so we are using the HTTP Route resource.
cat <<EOF > colors-http-route.yaml
apiVersion: gateway.networking.k8s.io/v1
kind: HTTPRoute
metadata:
  name: colors-httproute
  namespace: colors
spec:
  parentRefs:
  - name: colors-gateway
    sectionName: http
  hostnames:
  - "dev.techiescamp.com"
  rules:
  - matches:
    - path:
        type: PathPrefix
        value: /green
    backendRefs:
    - name: green-app-service
      port: 80
  - matches:
    - path:
        type: PathPrefix
        value: /orange
    backendRefs:
    - name: orange-app-service
      port: 80
EOF
The parentRefs section where we define the Gateway resource.
hostname section where we define the host name (dev.techiescamp.com).
Under the rules sections, we can define the service details to get the endpoints.
The HTTP Route Custom Resource is similar to the Ingress object in Ingress, where we define the routing rules.
The only difference is that in Ingress, the Ingress Class will be defined in the Ingress object, but in Gateway API, the Gateway Class will be defined in the Gateway object, and the Gateway object will be defined in the HTTP Route.
kubectl apply -f colors-http-route.yamlAfter the deployment, we list the HTTP Routes using the following command.
kubectl -n colors get httproutesYou can describe to ensure the routes are properly configured and the status is active or not.
kubectl -n colors describe httproutes colors-httproute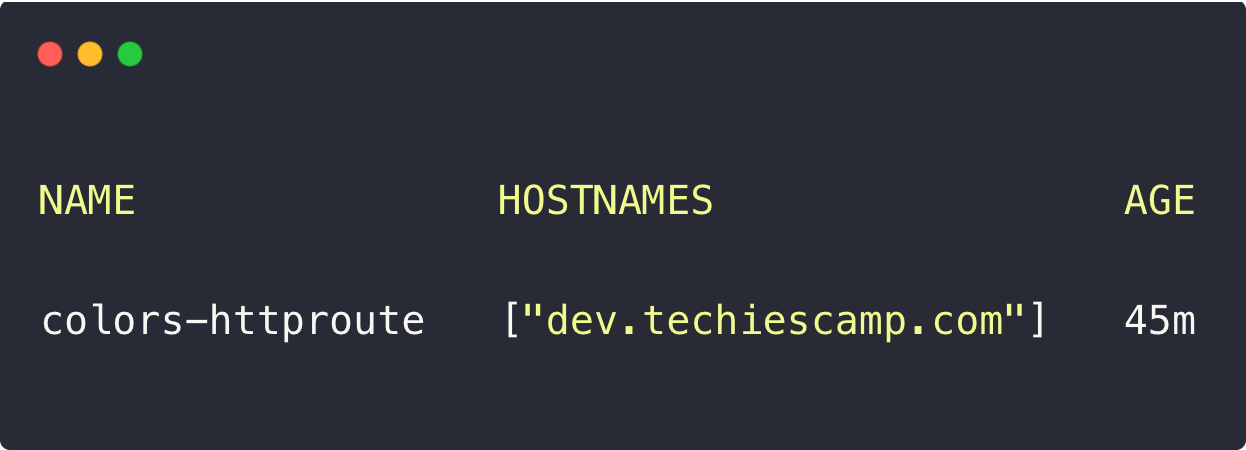
The migration configuration is properly done so we can check the application.
This time, for the testing, we need to use the URL with the Gateway API Controller Node Port, which is 31080.
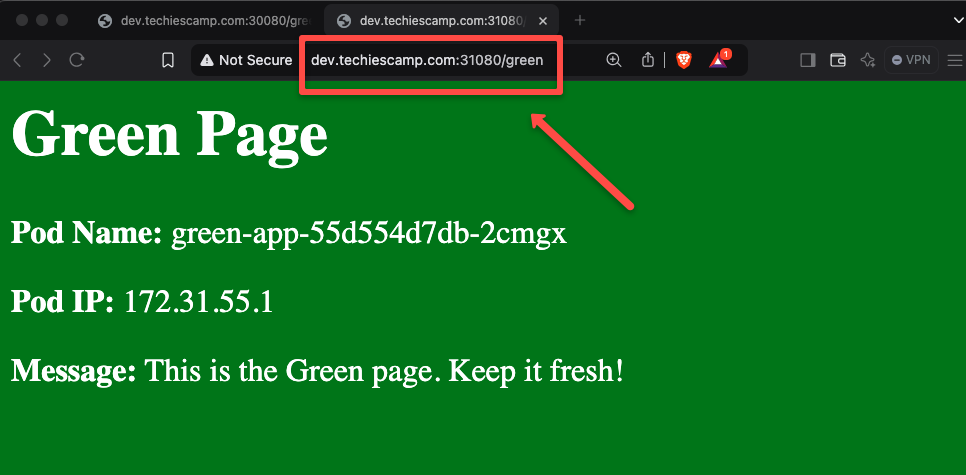
We have successfully migrated the traffic routing from the Ingress to the Gateway API.
Step 11: Remove the Nginx Ingress Controller from the Cluster
Use the following command to uninstall the Nginx Ingress Controller.
helm -n ingress-nginx uninstall nginx-ingressNote: We have migrated the traffic routing from Ingress to Gateway API without any downtime, but in actual production, the Controller will be exposed with Load Balancer service and the domain name will be configured with DNS Servers.
During the migration, the Load Balancer DNS records were also remapped with the DNS server, so it might face some downtime.
Conclusion
This blog explains how we can migrate the existing Ingress setup to Gateway API for the futuristic traffic routing. This is the basic migration, but you can configure the entire traffic routing to Gateway API.
In future blogs, we will cover the Gateway API and its use cases more. Please refer to the official documentation to learn more about the Gateway API.
