In this blog, you will learn to install and configure AWS CLI on a Linux system. We will also look at all the important configuration details and best practices of AWS CLI.
AWS CLI Prerequisites
The following are the prerequisites to install and configure AWS CLI.
- A Valid AWS account.
- AWS IAM user access key and secret key with permission to access AWS services. If you don't have access and secret keys, you can get one created from the AWS IAM service.
Install AWS CLI on Linux
Step 1: Download the AWC CLI installation files using curl.
curl "https://awscli.amazonaws.com/awscli-exe-linux-x86_64.zip" -o "awscliv2.zip"Step 2: Unzip the files. Ensure you have unzip utility installed on your system.
unzip awscliv2.zip Step 3: Install aws-cli using the following command.
sudo ./aws/installThe above command creates a symlink named aws in the /usr/local/bin directory and adds the AWS CLI executable to the to /usr/local/aws-cli location.

Step 4: Verify the installation by checking the AWS CLI version.
aws --versionConfigure AWS CLI
To access AWS services using the CLI, you must configure the CLI with AWS secret and access keys. You can do this using the following two ways.
- Using aws configure command: Using the CLI command you can configure the AWS keys and default values and persist them in the system under
~/.awsfolder. - Using CLI Environment variables: AWS CLI supports many environment variables. If you export the values as environment variables, the AWS CLI will use it to authenticate to the AWS account.
Choosing an option depends upon your use case and personal preference. Let's take a look at both methods practically.
Configure AWS CLI Using Command
You can choose this option for your workstation. If you want to use multiple AWS accounts, you can use the named profiles option which we discuss later in this article.
To configure the CLI, execute the following AWS CLI command.
aws configureYou will be prompted to provide the access key, secret key, default region, and default output format (json/yaml). Provide the required details as shown below.
vagrant@de:~$ aws configure
AWS Access Key ID : [****************LBSW]
AWS Secret Access Key: [****************QKwi]
Default region name: us-west-2
Default output format: json
After configuration, a folder named .aws gets created in the user's home directory.
cd $HOME/.awsInside the .aws directory, you will see the following two files.
config:It contains all the default configs like region and output. You can change these values anytime and add new values as default.credentials: This file contains the access key and secret key as plain text.
The values in the above files can be overridden using the CLI environment variables.
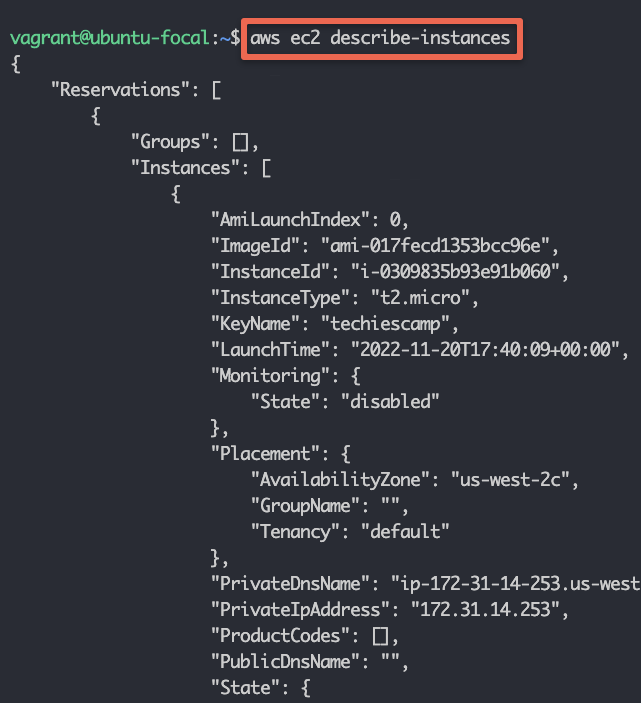
Now that we have configured the CLI, let's execute an AWC CLI command to describe the instances.
aws ec2 describe-instancesIf you have instances running you will see the instances details in json format as shown below.

Also, you can try creating an ec2 instance using AWS CLI.
Configure AWS CLI Using Environment Variables
AWS CLI supports many environment variables. The following are the important environment variables.
| CLI Environment Variable | Value |
|---|---|
| AWS_ACCESS_KEY_ID | AWS Access key |
| AWS_SECRET_ACCESS_KEY | AWS Secret key |
| AWS_DEFAULT_REGION | Default AWS region. Example, us-west-2 |
| AWS_DEFAULT_OUTPUT | Supported AWS CLI output formats. [json, yaml, yaml-stream, text & table] |
AWS CLI Environment Variables
You can set the environment variable using the export command as shown below. Replace the highlighted values with your own.
export AWS_ACCESS_KEY_ID=SDFGEWRTWERSDFGSDFG
export AWS_SECRET_ACCESS_KEY=sdfKJHkjbhkjkKJSDFKJHkjhjkhjkhKKJH
export AWS_DEFAULT_REGION=us-west-2
export AWS_DEFAULT_OUTPUT=json
To know the available environment variables, check the official CLI documentation.
To verify the export, execute the describe instance command.
aws ec2 describe-instances$HOME/.aws location.Configure AWS CLI To Access Multiple AWS Accounts Using Named Profiles
There are use cases where you need to connect to multiple AWS accounts from a single workstation. For example, dev, stage, and prod accounts. For this, you can make use of AWS CLI named profiles.
You can create a new profile using the following command. Where dev is the profile name. You can create more profiles with different names.
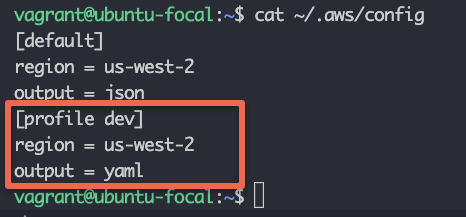
aws configure --profile devOnce you configure the profile, you can see the default profile values in the $HOME/.aws/config file as shown below.

Also, the credentials of the profile get stored in the $HOME/.aws/credentials file under [dev] profile.
To select or switch between different named profiles, export the AWS_PROFILE environment variable with the profile name as shown below.
export AWS_PROFILE=devAlternatively, you can pass the profile name in individual CLI commands as shown below.
aws ec2 describe-instances --profile devChanging AWS CLI Output Format
To change the CLI output format, you can edit the config file or run the aws configure command to update the new output format.
Alternatively, you can use the --output flag with the aws CLI command to override the default output format.
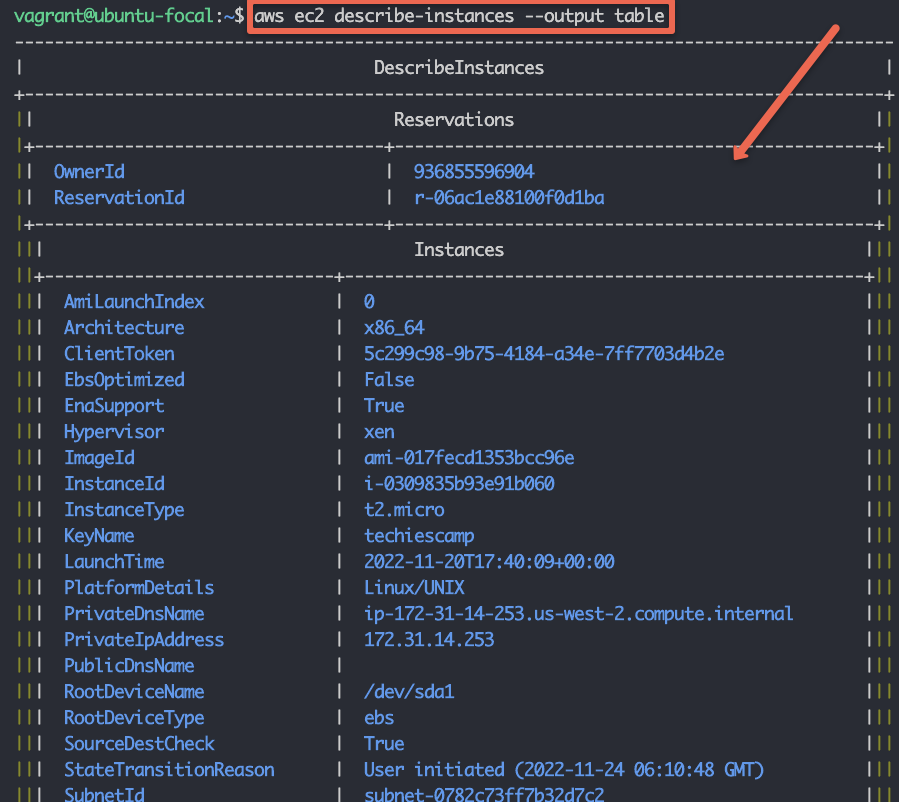
For example, to list ec2 instances in the table output format, you can use the following command with the --output flag.
aws ec2 describe-instances --output tableHere is the table output format.

Similarly, you can use other formats like json and yaml with the --output flag.
AWS CLI Important Configurations
The following table has all the important AWS CLI configurations and their locations.
| AWS CLI Configuration | Details |
|---|---|
| Default config location. | $HOME/.aws/config |
| Default credential location. | $HOME/.aws/credentials |
| Environment variable to change the AWS CLI profile | AWS_PROFILE |
AWS CLI Best Practices
Following are some of the best practices when using AWS CLI.
- Always secure your AWS credentials by following AWS security best practices. Ensure you are not updating the access and secret keys in code files.
- Use named profiles to connect to different AWS accounts.
- When using named profiles, always verify the environment you are running the CLI command. You might end up accidentally deleting or updating production services.
- If you want to use AWS CLI on ec2 instances, always use IAM roles instead of access and secret keys.
AWS CLI Tips
By default, the CLI output goes to less in Linux. If you want to see the whole output in the command line, export AWS_PAGER environment variable to an empty string as shown below.
export AWS_PAGERYou can also set this configuration in the config file as shown below.
[default]
region = us-west-2
output = json
aws_page
AWS CLI FAQs
Where is the AWS CLI config stored?
If you have used the aws configure command to configure the CLI, the config files get stored in the $HOME/.aws/config location. It will have all the default values to connect to the AWS account.
What are the supported AWS CLI output formats?
AWS CLI output supports json, yaml, yaml-stream, text & table formats. You can set the default output format in the CLI config file located in $HOME/.aws/config location.
Conclusion
In this blog, we looked at AWS CLI installation and all its important configurations.
Working with AWS CLI is an important skillset for a DevOps Engineer. It could be setting up a CLI on workstations or servers in terms of automation.
When working with CI/CD pipelines, always configure the CLI with security best practices in mind by limiting AWS service access to required services.


