


One of the key concept in MLOps is Data versioning and DVC is one of the key open source tool you should know to manage data versioning.
We created this guide for beginners to understand and learn about DVC practically. Here is what you can learn from this guide.
- What is DVC, and how it works.
- How to configure remote storage for DVC.
- How to push, pull, and switch between different data versions.
- ML pipeline as code using
dvc.yaml - Understand how DVC integrates with CI/CD and Airflow
- Garbage collection for DVC and more..
Lets get started.
What is DVC?
DVC (Data Version Control) is an open source tool that can be used with version control tools like Git for handling data. You can call it "Git for Data".
Why cant we use git for this? Well, a 2GB training dataset or a 500MB model can't live in a Git repository. This is where DVC comes in.
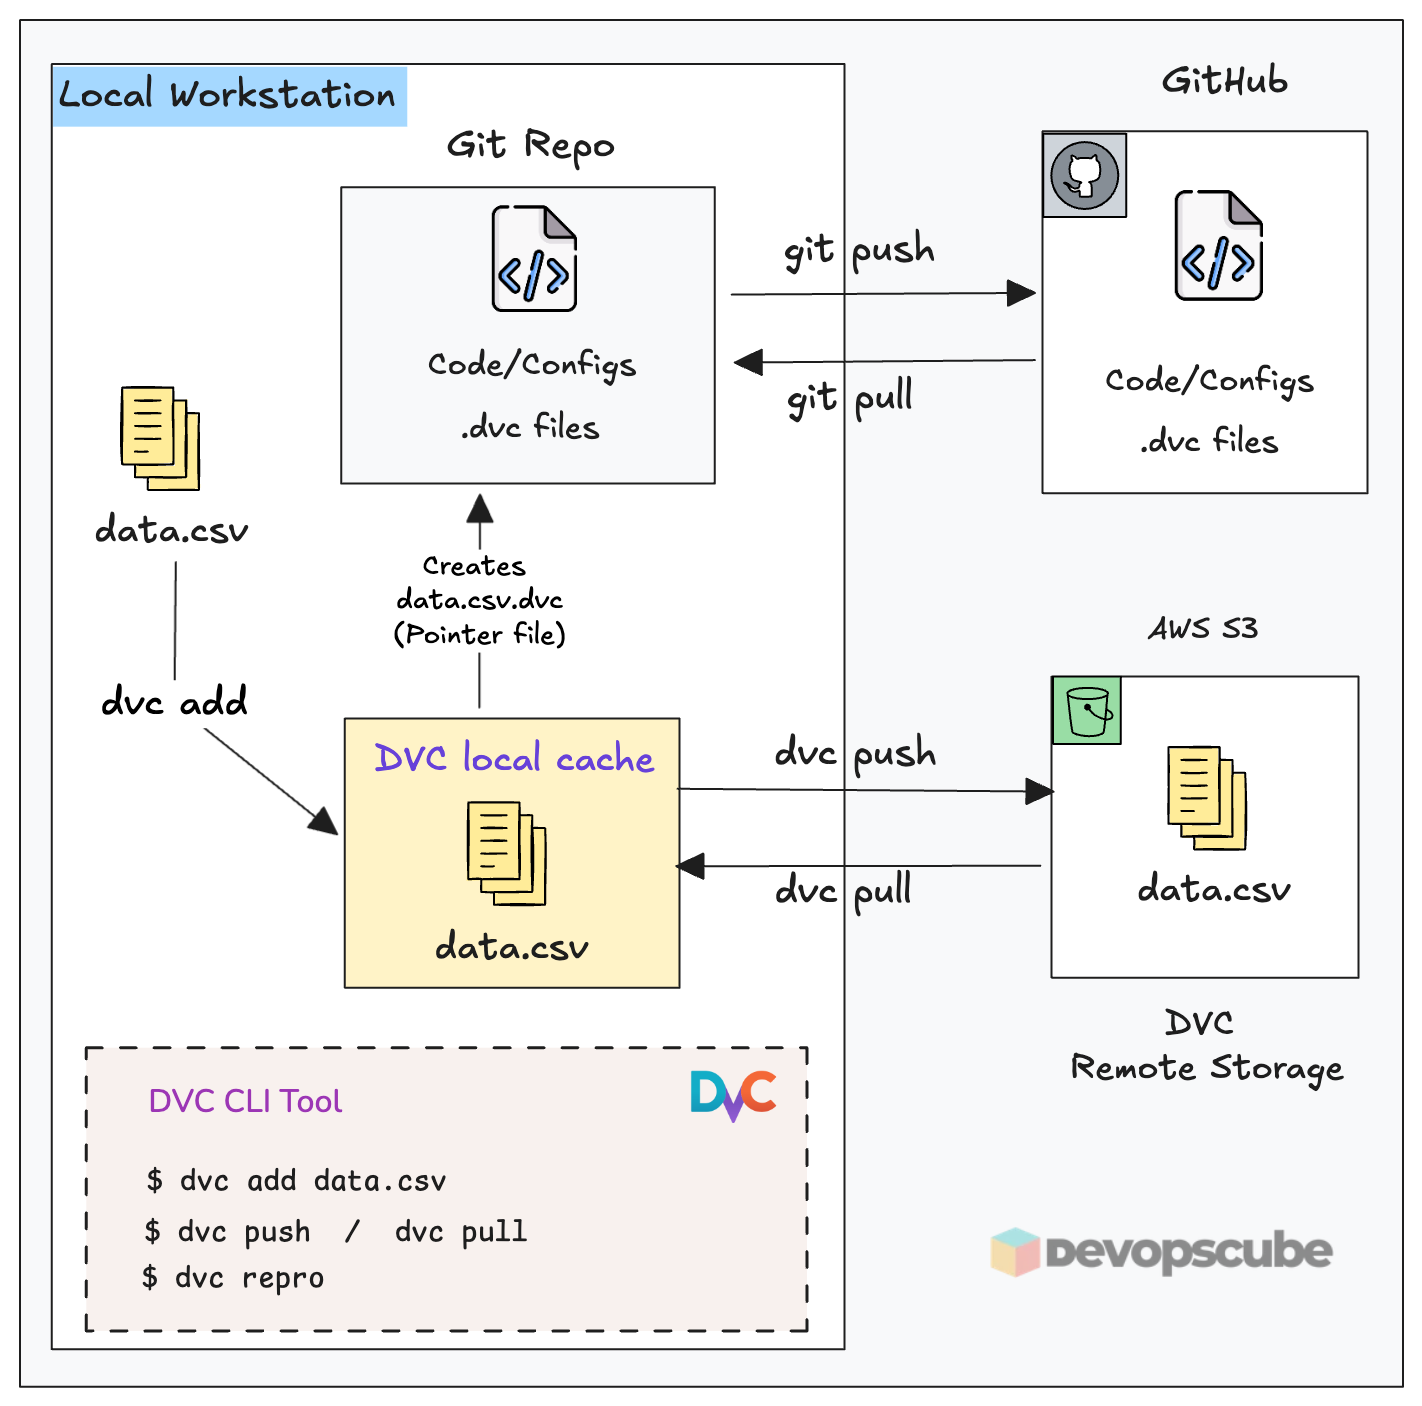
DVC provides Git-like version control for data, models, and large files without storing the actual files in Git. It stores lightweight pointer files (.dvc files) in Git and the actual data resides in a remote storage (Eg., Amazon S3).
Simply put, it is the bridge between your Git repo and storage where data resides. Meaning, Git tracks your code and .dvc pointer files. Your actual data resides in a remote storage like AWS s3. DVC manages the sync between the two.
The following image illustrates how DVC fits in with local workstation, Github and remote storage.
Setup Prerequisites
Before starting, make sure you have the following setup in your workstation.
- Python 3+
- GitHub repository
- AWS CLI configured with credentials
- AWS S3 bucket (e.g.,
ml-dvc-store) - IAM permissions:
s3:GetObject,s3:PutObject,s3:ListBucket,s3:DeleteObject
Set Up DVC With a Repository & Remote Storage
To understand how DVC works, we will set up DVC with AWS S3 as remote object storage and version a dataset using DVC and push it to S3.
Here is what we are going to do.
- Initialize DVC in the Git repository
- Configure S3 as the remote storage
- Tell DVC to track the dataset (
dvc add) - Push the dataset to S3 (
dvc push) - Commit the
.dvcpointer file to Git
The following diagram illustrates what we are going to do.
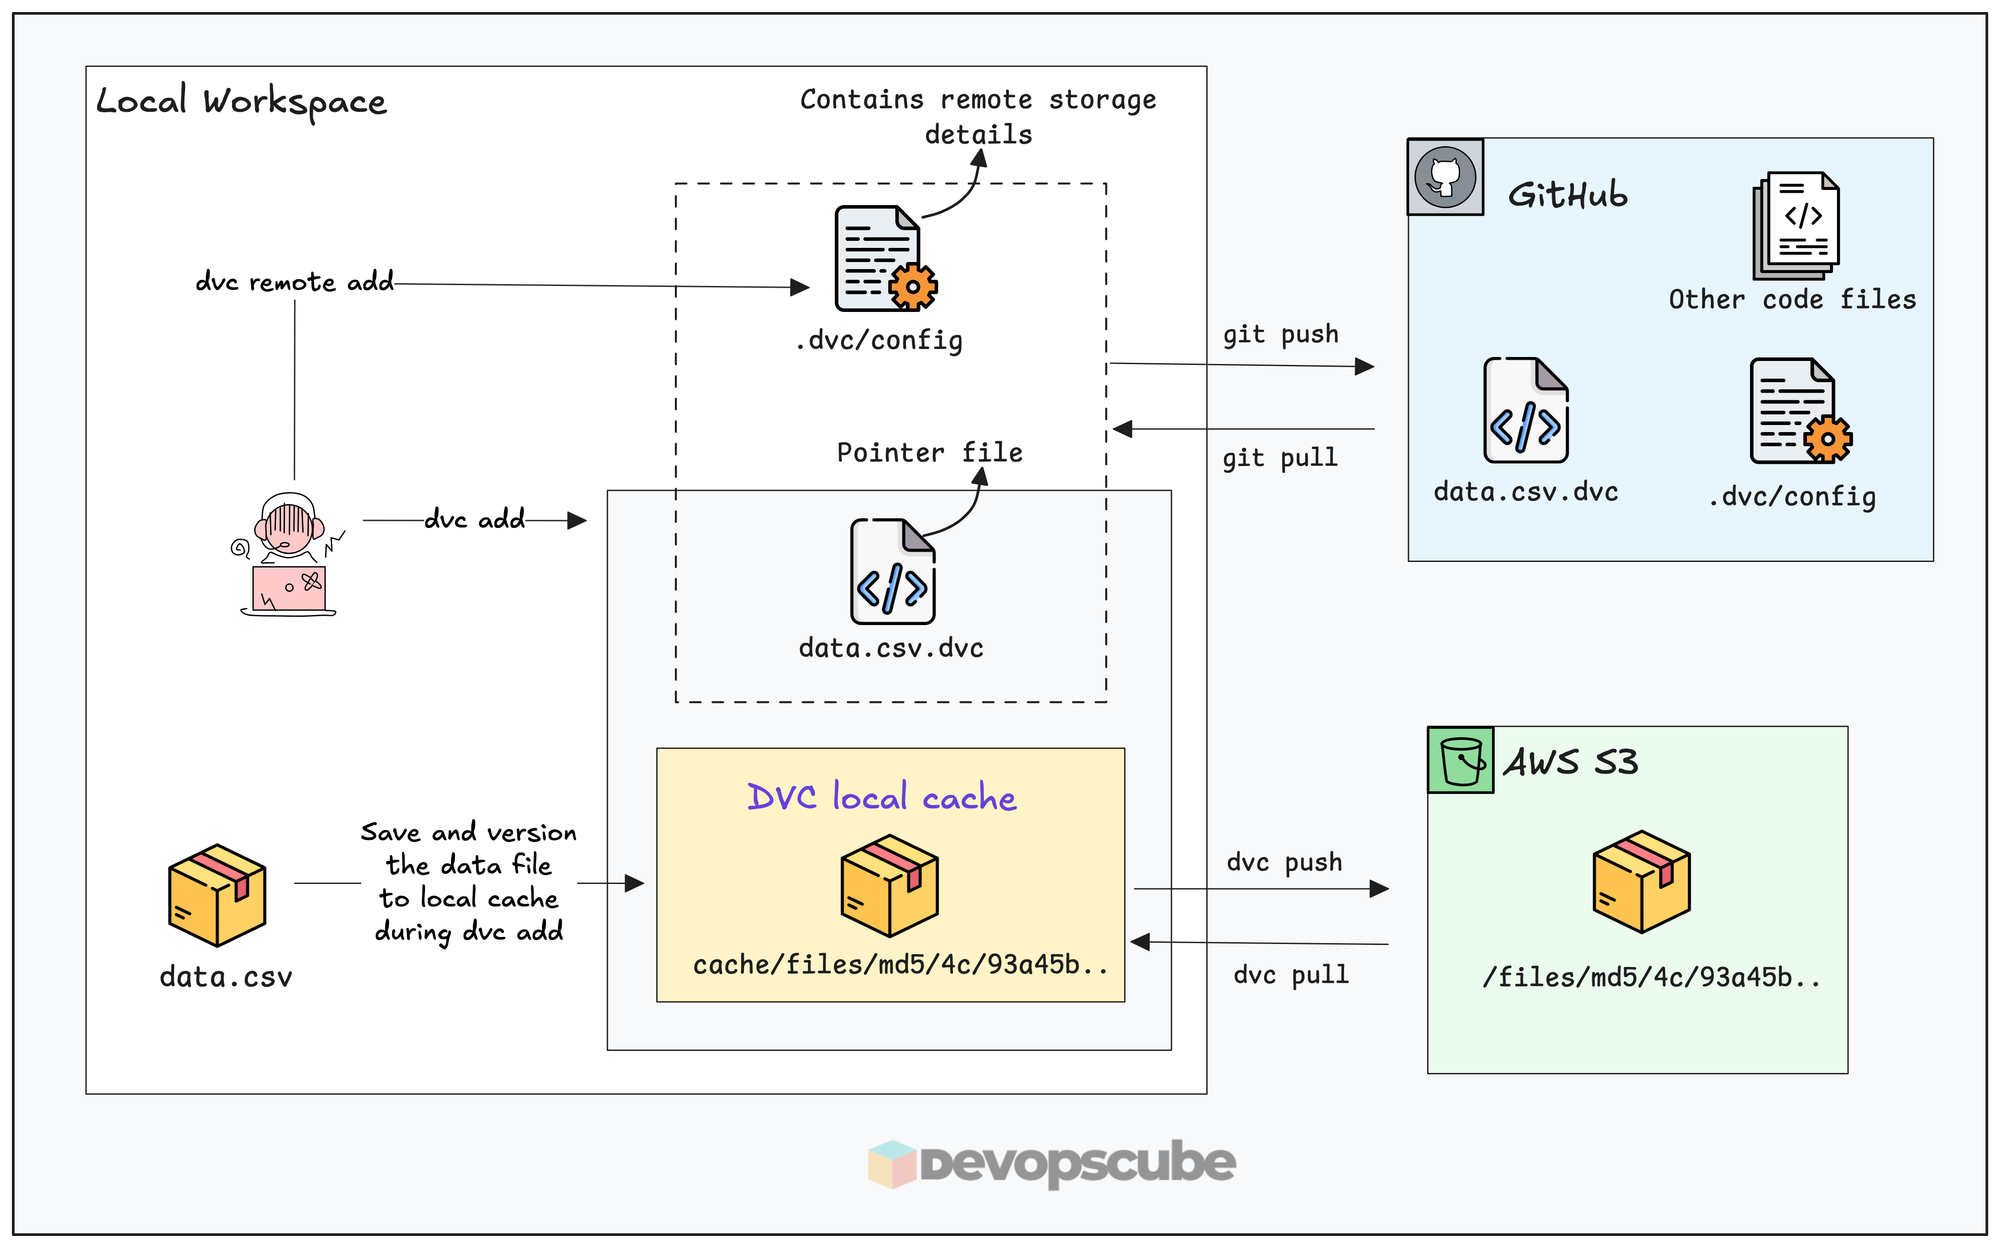
Lets get started.
Step 1: Clone The Repository
You can configure DVC to any Git repository, all you need is the permission to get and push changes to it.
For this guide, clone the MLOps For DevOps repository. The dataset we will version is located at.
phase-1-local-dev/datasets/employee_attrition.csvFork the repository so that you can push DVC configs back to your own repository.
https://github.com/techiescamp/mlops-for-devops.gitLet's move on to the DVC setup.
Step 2: Install DVC
Run the following commands to create a virtual environment named dvc-env.and activate it.
python3 -m venv dvc-env

source dvc-env/bin/activate
Install DVC and DVC S3 Plugin.
pip install dvc dvc-s3- dvc: Install dvc tool
- dvc-s3: Plugin of DVC used to store data in AWS S3 by dvc
Run the following command to verify if dvc is installed.
dvc --versionStep 3: Initialize DVC
Run the following command inside the root of the mlops-for-devops repo folder.
dvc initThis will create a .dvc folder with the configuration and gitignore file.
You can see the following folder structure.
.dvc/
 ├── config
└── .gitignore.dvc/configis the main DVC configuration file..dvc/.gitignoreignores DVC cache from Git.
--subdir flag, but it is not recommended for standard MLOps workflows. Step 4: Set Up Remote Storage for DVC
Now, we need to configure an S3 bucket to DVC as remote storage.
Run the following commands to add the bucket.
dvc remote add -d ml-dataset s3://dcube-attrition-data/datasets
This command tells DVC to store all versioned data in the given S3 location.
- -d: Set as default remote store
- ml-dataset: Alias for this remote store, you can use any name
Now, verify if the remote was added.
dvc remote listYou get a similar output as given below.
ml-dataset s3://dcube-attrition-data/datasets (default)And, if you open the .dvc/config file, you can see configurations similar to this.
[core]
    remote = ml-dataset
['remote "ml-dataset"']
    url = s3://dcube-attrition-data/datasets
In this:
- remote: The default remote storage alias.
- url: URL of S3 bucket where DVC will store its data
dvc-env folder is not added to the .gitignore file, add itFinally, push the DVC configurations to GitHub.
git add .dvc/config
git commit -m "Initialize DVC with S3 remote"
git push origin main
Now, your Git repository or a specific path of the repository is configured with DVC and its remote storage.
Step 5: Stop Tracking Dataset in Git
Git and DVC cannot both track the same file. Git tracks the .dvc pointer file. DVC tracks the actual data.
Use the following command to remove the dataset from Git's tracking.
git rm -r --cached phase-1-local-dev/datasets/employee_attrition.csv
Step 6: Version the Dataset
Let's version the dataset and push it to remote storage.
Our actual dataset that needs to be versioned is present at,
phase-1-local-dev/datasets/employee_attrition.csvWe need to tell DVC to track the dataset using the following command.
dvc add phase-1-local-dev/datasets/employee_attrition.csv
This will:
- Copy the
employee_attrition.csvfile to DVCs local cache (.dvc/cache/) and hashes it. - Create a new
employee_attrition.csv.dvcfile to store its information - And, add the
employee_attrition.csvfile name to the.gitignorefile to avoid pushing the raw file to the git repository.
You will see the following output.
And, your directory structure will look like the following.
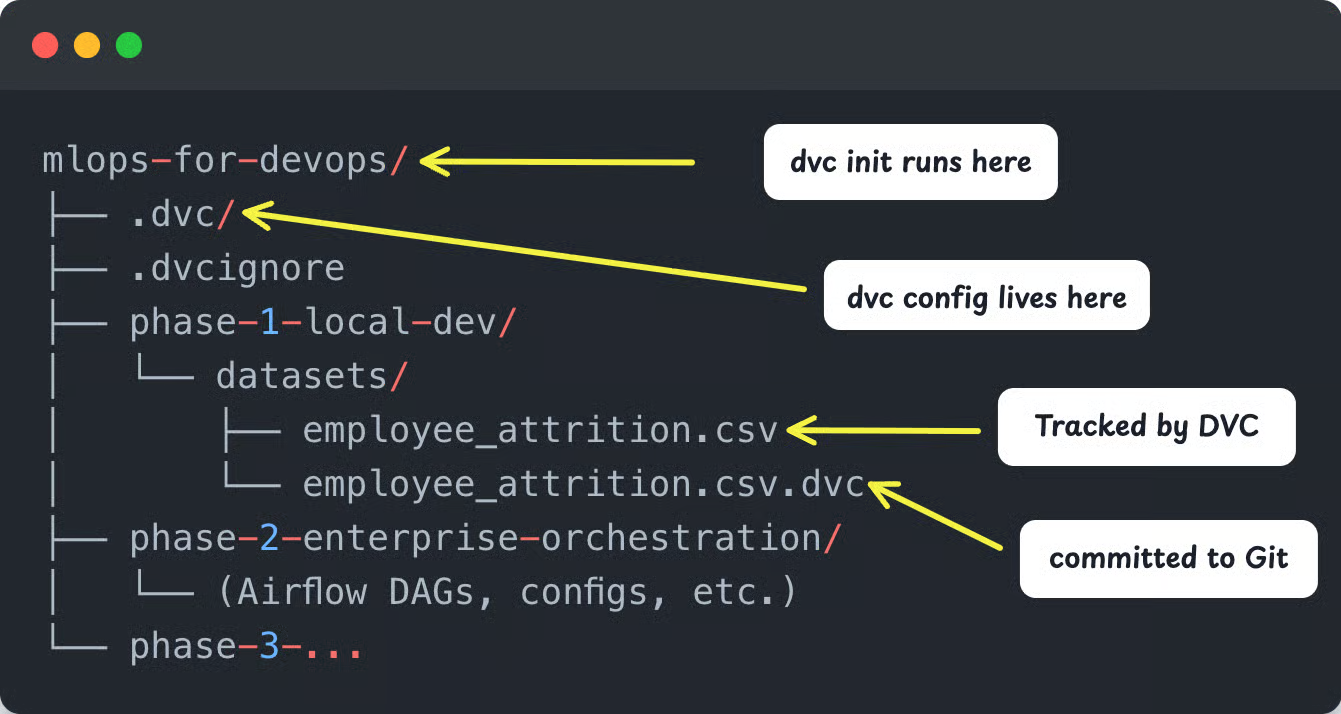
The employee_attrition.csv.dvc pointer file looks like this.
outs:
- md5: 5911ebf0fa91033fb323989b7c6d7fbc
  size: 9983309
  hash: md5
  path: employee_attrition.csv
Git tracks only this pointer file metadata, not the actual data file. The MD5 hash acts as the version identifier that DVC uses to fetch the exact file from S3.
Now that we have enabled the tracking, next step is to push the data to the remote storage.
Step 7: Push the Dataset to S3
When you run dvc push , DVC uploads only the files that are tracked (via .dvc files) to the configured remote storage (S3 in our case). Since we added employee_attrition.csv to DVC, only that file will be pushed.
Now, run the following command to push the dataset into the configured S3 bucket.
dvc push
You will get the following output.
Collecting                                                                             |1.00 [00:00,  214entry/s]
Pushing
1 file pushed
In S3, DVC stores files using a content-addressed layout. Meaning, each file is organized based on its MD5 hash as given below.
s3://your-bucket/
  └── files/
      └── md5/
          └── 8f/
              └── 28b4894c8d5aac17cc23e68127a768
This is the same structure exists in your local cache at .dvc/cache/.
Step 8: Commit the changes to Git
This is the most important step in the DVC workflow. After pushing the data to S3, you mush commit the changes to Git and push it. Without the commit, the dataset version is not recorded. It means,
- Git will not track which version of data was used
- DVC cannot map the data version to your code
Lets commit the changes.
git add .
git commit -m "Added Dataset version 1"
git push origin mainDataset: version 2 — added Q3 records so you can identify versions at a glance in git log. Now, anyone can run git checkout + dvc pull and reproduce the exact setup in the future. Meaning, recreating the same project state (code, data, and configuration) so that you can rerun the experiment if needed.
Pull a Specific Dataset Version
This is the core use case of why we use DVC. A data scientist, a CI/CD runner, or an Airflow worker can pull any historical version of the dataset
To pull the latest version of the data tracked by DVC, simply run,
dvc pullNow, what if you want to pull a specific version?
As discussed earlier, DVC versioning is tied to Git commits. The .dvc file stores the metadata for each version. So to get a specific dataset version, you need to,
- Check out the corresponding Git commit (or
.dvcfile) - Then run
dvc pull
For example, run git log to get the commit history in a short format.
git log --oneline
This will list the commit ID with the appropriate commit message as shown below.
adaaee9  Added Dataset version 2
02d88b7  Added Dataset version 1
If you want version 1, use its commit ID and perform a checkout of dvc as given below. We are just checking out the .dvc file, not the entire branch.
git checkout 02d88b7 -- employee_attrition.csv.dvc
This will restore the .dvc file, which has the version 1 details. Then run the pull command to pull the data from S3. It downloads the exact dataset version (version 1) from S3.
dvc pullNow, you check the dataset, and you can see version 1.
And, if you want to switch back to the latest version, run the following command.
git checkout HEAD -- employee_attrition.csv.dvc
dvc pull
Creating Reproducible DVC Pipelines With dvc.yaml
In the above steps, we used DVC commands to just version a dataset, but in an actual project, there will be more steps like cleaning, processing, etc., involved before versioning the dataset.
Each step gets data from the previous step and gives an output file for the next step, and manually doing these steps every time is repeated work and wastes time.
This is where dvc.yaml, helps you. Think of it as a Makefile for your ML pipeline. You define each processing step once, and DVC handles execution, dependency tracking, and output versioning automatically. You can call it your ML pipeline as code.
Given below is an example dvc.yaml file based on the first two steps of our data preparation:
stages:
  ingest:
    cmd: python -m data_preparation.01_ingestion
    wdir: src
    deps:
      - ../datasets/employee_attrition.csv
      - data_preparation/01_ingestion.py
    outs:
      - ../datasets/processed/raw_ingested.csv

  validate:
    cmd: python -m data_preparation.02_validation
    wdir: src
    deps:
      - ../datasets/processed/raw_ingested.csv
      - data_preparation/02_validation.py
    outs:
      - ../datasets/processed/validated.csv
In this file, you can see the following fields:
- stages - Every step of a process is defined inside this field.
- cmd - Specify the command you want to run in the step.
- wdir - To specify the work directory from where you want to run the command.
- deps - Files required for the step.
- outs - Save location of the output files each stage gives.
To run the dvc.yaml, use the following command.
dvc reproThis will run the steps specified inside the dvc.yaml file one by one.
After the steps inside the dvc.yaml files are run, DVC will create a dvc.lock file that contains every detail of the output file created by each step to track it. Then, push the created dataset to S3 using dvc push and commit the changes to Git.
Quick Reference: Common DVC Commands
Here is a quick reference of DVC commands.
# Setup
dvc init                        # initialize DVC in a git repo
dvc remote add -d remote s3://  # set S3 as default remote

# Tracking files
dvc add data/dataset.csv        # start tracking a file
dvc add data/                   # track an entire directory

# Sync with remote
dvc push                        # upload tracked files to S3
dvc pull                        # download files from S3
dvc fetch                       # download to cache without checkout

# Pipelines
dvc repro                       # run/update the pipeline
dvc dag                         # visualize the pipeline graph
dvc status                      # check what's out of date

# Experiment tracking
dvc params diff                 # compare params across commits
dvc metrics show                # display pipeline metrics
How DVC Works in a Real MLOps Pipeline
What we have seen till now is mostly the developer side of things. We manually did dvc add, push, and commit to Git for versioning the data.
One common question that comes up when working with DVC is, Where Does DVC Actually Run in real projects? What does the workflow look like?
Well, when it comes to actual prodcution workflows, data is usually managed by CI/CD pipelines or workflow orchestrators like Apache Airflow.
DVC in a CI/CD Pipeline
The diagram given below shows how DVC works with a typical CI/CD workflow.
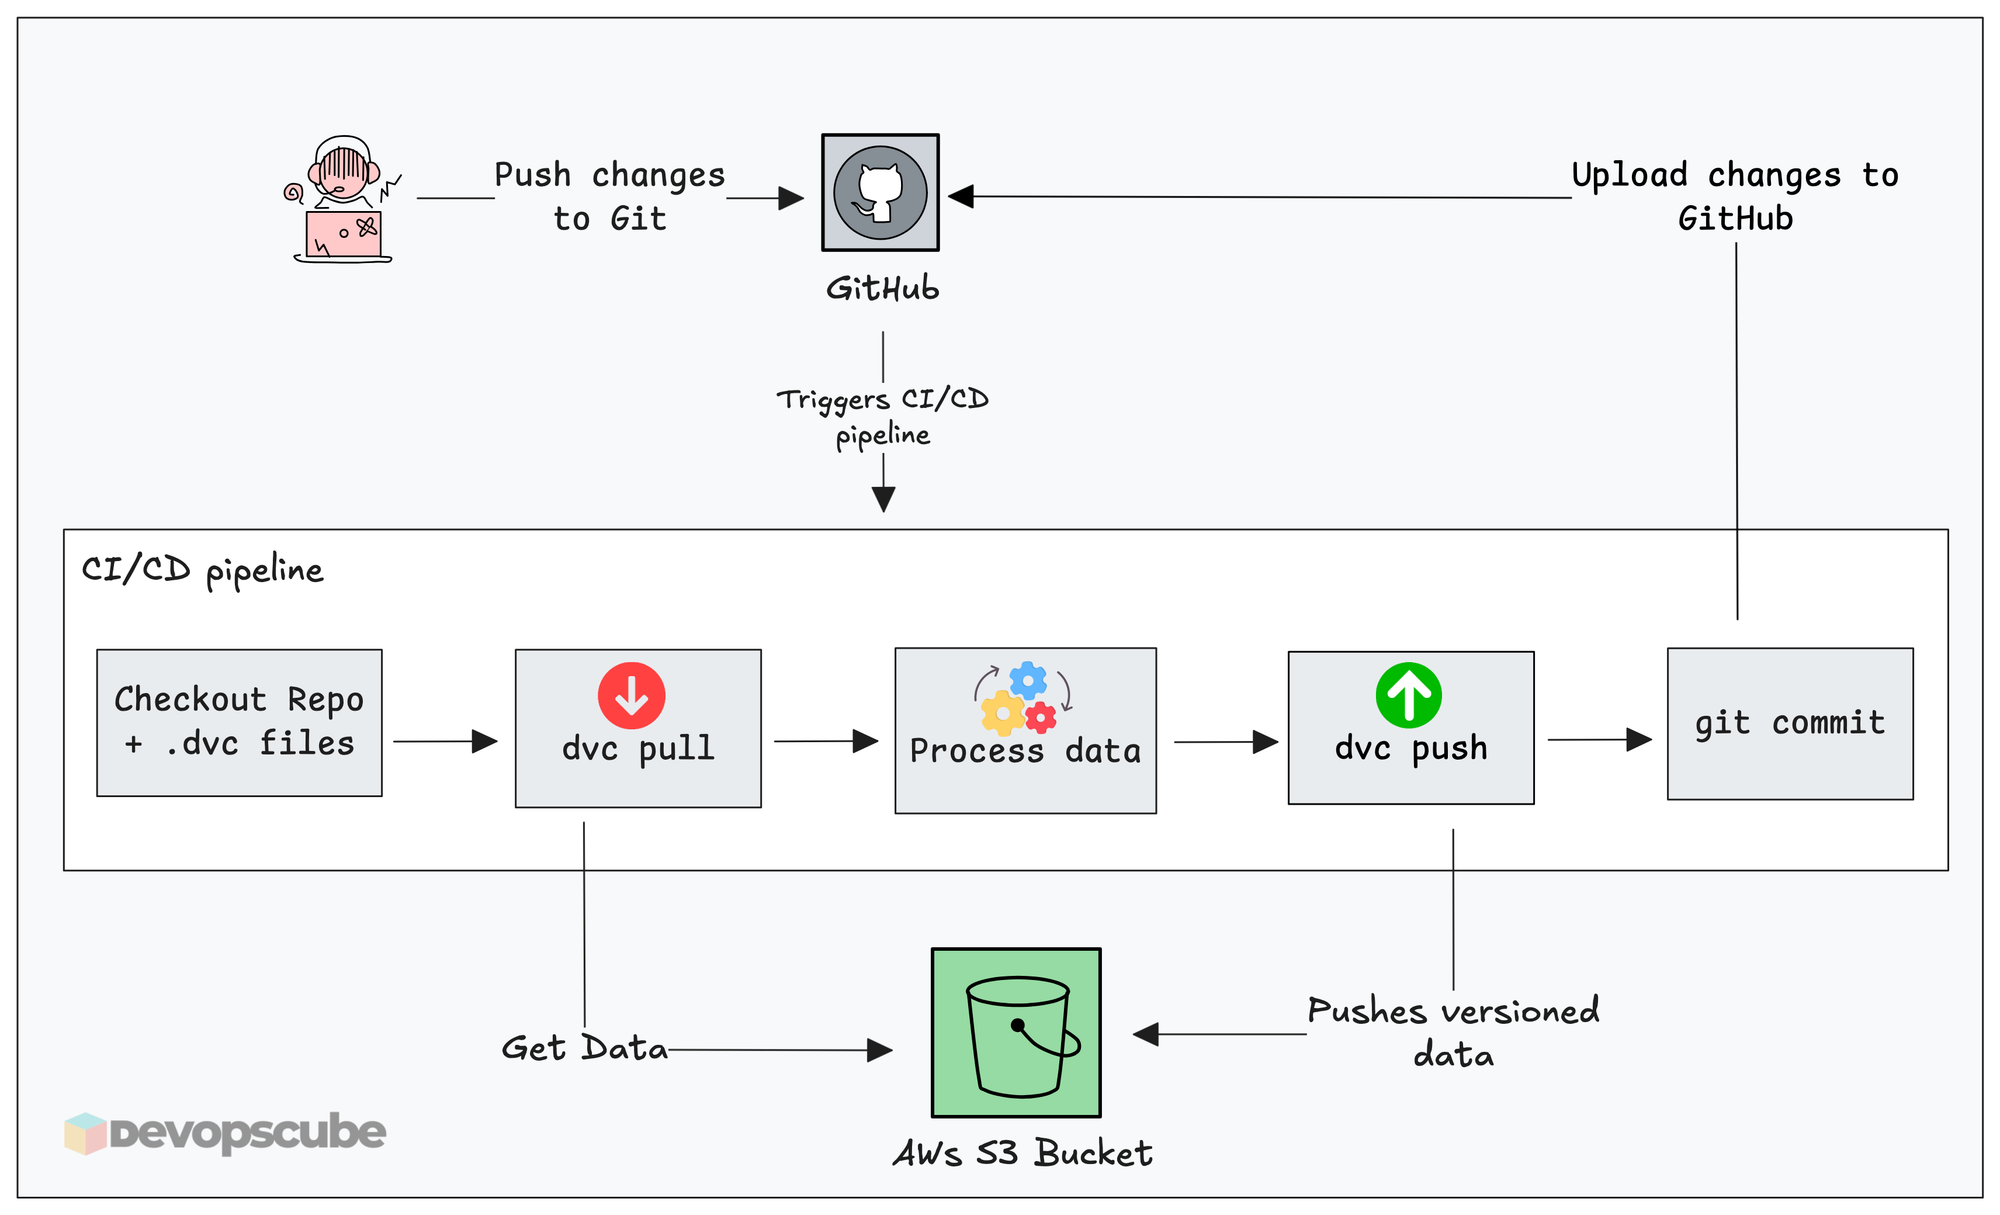
A typical automated workflow with DVC looks like this.
- A pipeline gets triggered ( For example, a scheduled job, PR merge or new raw data upload)
- The workflow starts and the runners clones the repository to their work directory
- It pulls raw data from the configured source storage
- Run the steps for data preparation
- Then run dvc add and dvc push to version, and push the new data to the remote DVC storage.
- The
.dvcpointer files are committed back to Git.
DVC in an Airflow DAG
The following image illustrates the high level workflow from an Airflow perspective.
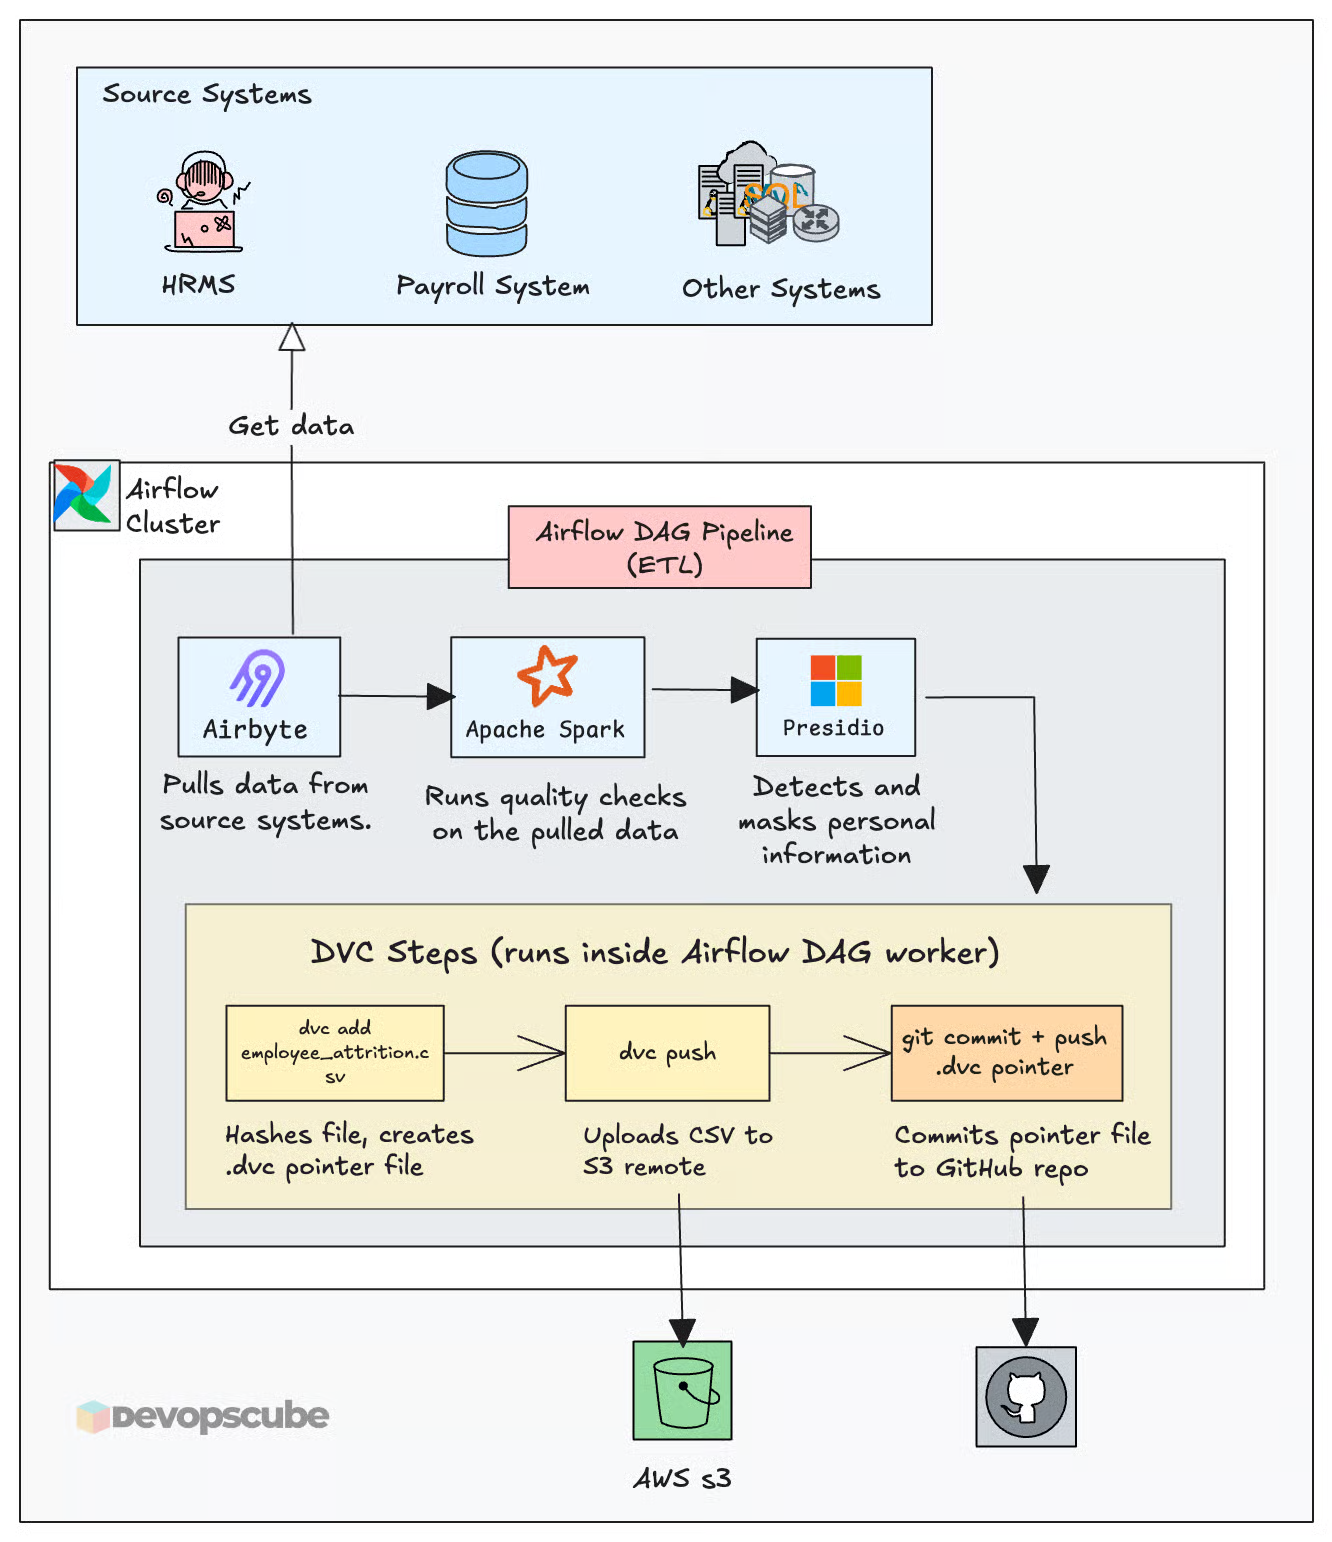
And, all these things to work, your CI/CD runners or Airflow workers need pull and push access to the Git and object storage you are going to use.
DVC Garbage Collection
Every dvc push adds a new version to S3. This means, the data size in your S3 DVC store keeps increasing over time and old version of DVC just sits there without any further use. To solve this, DVC provides a garbage collection command to remove files that are no longer referenced in the Git commit.
s3:DeleteObject permission to your IAM role.Always do a dry run first to see what will be deleted. This following command will list the files that will be deleted by using the garbage collection command.
dvc gc --remote <your_remote_name> --all-commits --dry-run
Once you have confirmed the output, run the following actual command.
dvc gc --remote <your_remote_name> --all-commits
This command not only removes old versions from the remote storage but also removes them from the local cache.
DVC Alternatives
DVC is not the only tool available for versioning data. Below are some of the alternatives to DVC.
- LakeFS - This versions the whole object storage instead of a single file, mostly suitable for large-scale dataset and data lake governance.
- GitLFS - Saves the versioned dataset on the hosting providers (GitHub) own LFS storage and saves the pointer file in Git. It is used for simpler setups.
Clean Up
If you no longer need the DVC configurations, run the following command.
dvc destroyThis removes the .dvc/ folder and all DVC configuration. Then commit and push the changes to clean up Git as well.
Conclusion
You now have a complete picture of how DVC works from initial setup to production integration. We looked at both developer experience and how DVC integrated with CI/CD and workflow automation tools.
In the next guide, we will build a full Airflow DAG on EKS that automates this entire workflow.
Over to you!
How are you versioning data now? Are you planning to use DVC in you projects? Comment below.