
![Etcd Backup and Restore on Kubernetes Cluster [Tutorial]](/content/images/size/w2000/format/webp/2025/03/etcd-1.png)
In this kubernetes tutorial, you will learn the etcd backup and restore on Kubernetes cluster with an etcd snapshot.
In Kubernetes architecture, etcd is an integral part of the cluster. All the cluster objects and their state is stored in etcd. Few things you should know about etcd from a Kubernetes perspective.
- It is a consistent, distributed, and secure key-value store.
- It uses raft protocol.
- Supports highly available architecture with stacked etcd.
- It stores kubernetes cluster configurations, all API objects, object states, and service discovery details.
If you want to understand more about etcd and how kubernetes uses it, I recommend reading the comprehensive Kubernetes Architecture post.
Also, if you consider Kubernetes design best practices, Kubernetes etcd backup and restore is one of the important aspects under the backup strategy.
Kubernetes etcd Backup Using etcdctl
Here is what you should know about etcd backup.
- etcd has a built-in snapshot mechanism.
etcdctlis the command line utility that interacts with etcd for snapshots.
Follow the steps given below to take an etcd snapshot.
Step 1: Log in to the control plane.
SSH into your control plane to backup ETCD.
Step 2: Install Required Tools
We need two tools called etcdctl and etcdutl to backup and restore ETCD.
If you don't have etcdctl and etcdutl installed in your cluster, install it using the following script.
ARCH=$(uname -m)
if [ "$ARCH" = "x86_64" ]; then
    ARCH_TYPE="amd64"
elif [ "$ARCH" = "aarch64" ]; then
    ARCH_TYPE="arm64"
else
    echo "Unsupported architecture: $ARCH"
    exit 1
fi

ETCD_VER=v3.6.7
DOWNLOAD_URL=https://storage.googleapis.com/etcd
DOWNLOAD_FILE=etcd-${ETCD_VER}-linux-${ARCH_TYPE}.tar.gz

mkdir -p /tmp/etcd-download
curl -L ${DOWNLOAD_URL}/${ETCD_VER}/${DOWNLOAD_FILE} -o /tmp/${DOWNLOAD_FILE}

tar xzvf /tmp/${DOWNLOAD_FILE} -C /tmp/etcd-download --strip-components=1

sudo mv /tmp/etcd-download/etcd /tmp/etcd-download/etcdctl /tmp/etcd-download/etcdutl /usr/local/bin/
rm -f /tmp/${DOWNLOAD_FILE}
rm -rf /tmp/etcd-download
Step 3: Verify the Installation
Run the following commands to verify the installation.
etcdctl version

etcdutl version
Step 4: Get Required Information for Backup
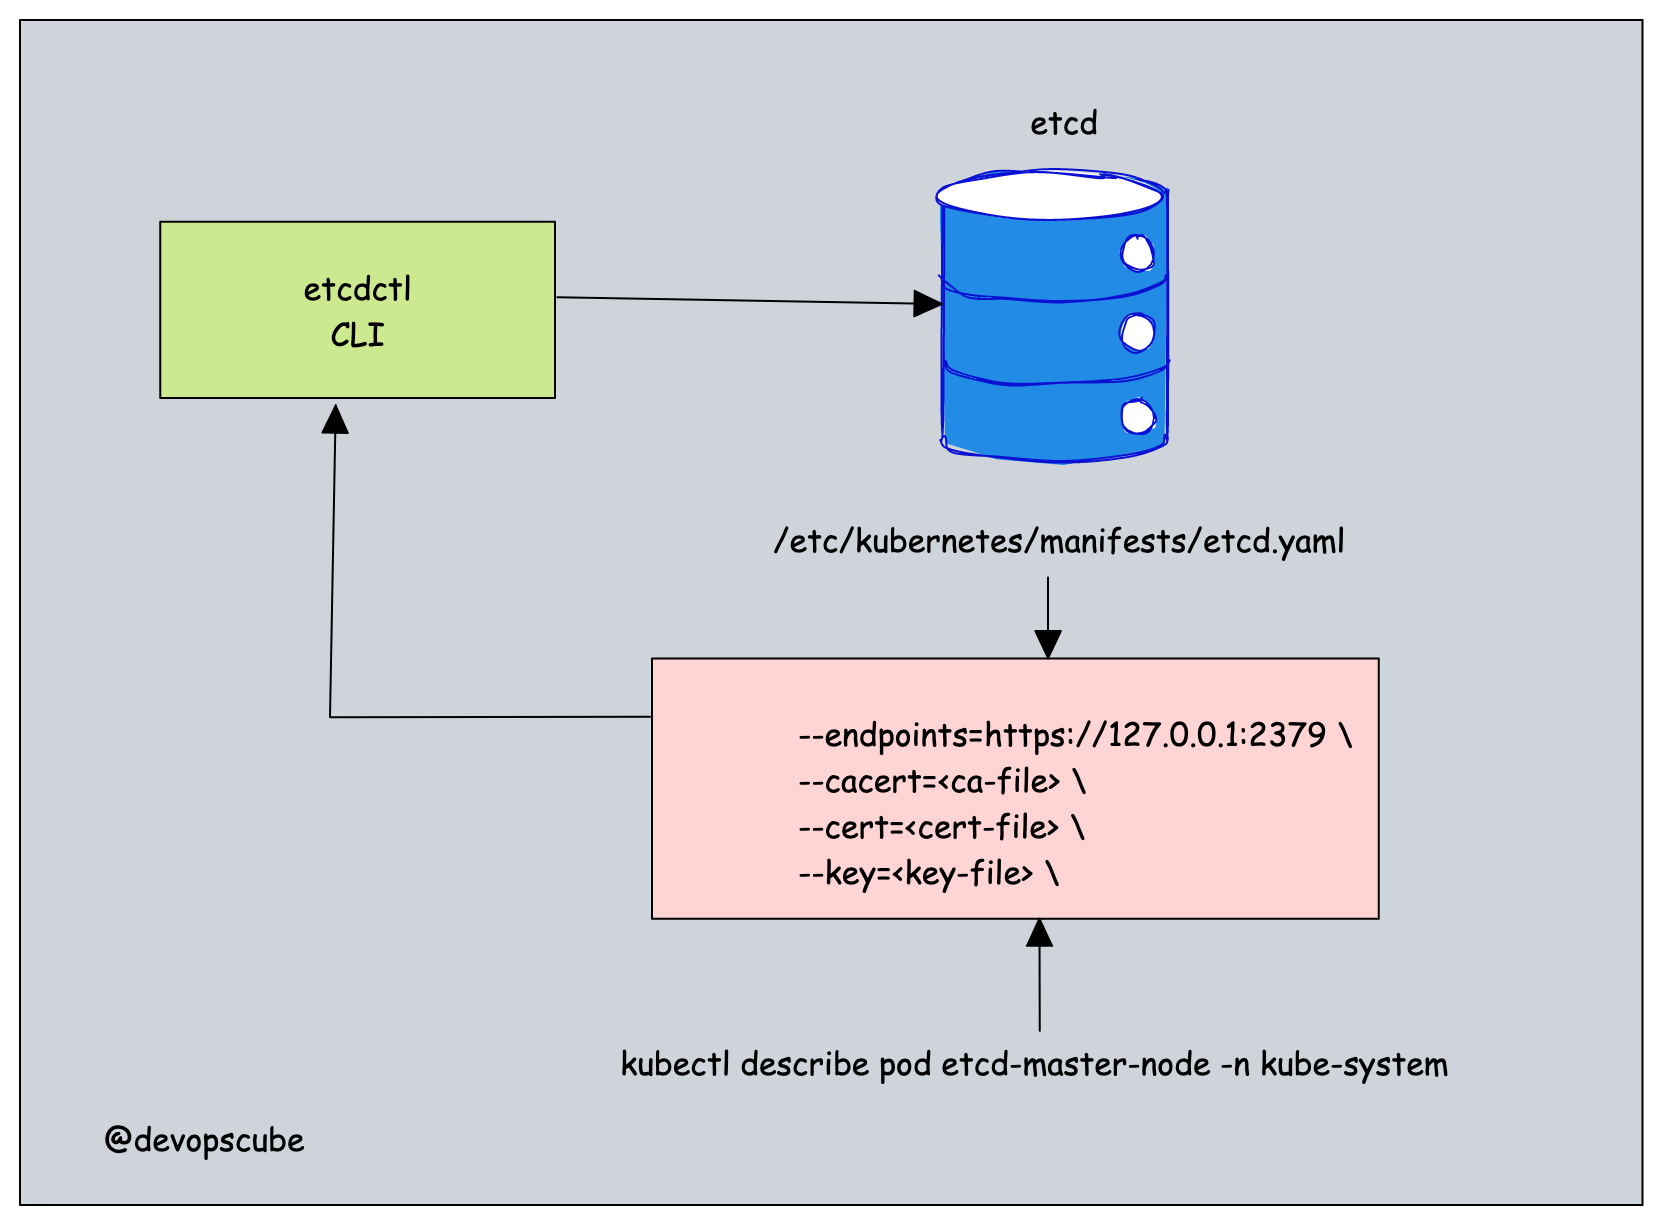
We need to get the following four pieces of information to etcdctl to take an etcd snapshot.
- etcd endpoint (--endpoints)
- ca certificate (--cacert)
- server certificate (--cert)
- server key (--key)
You can get the above details in two ways.
From the etcd static pod manifest file located at /etc/kubernetes/manifests/etcd.yaml the location.
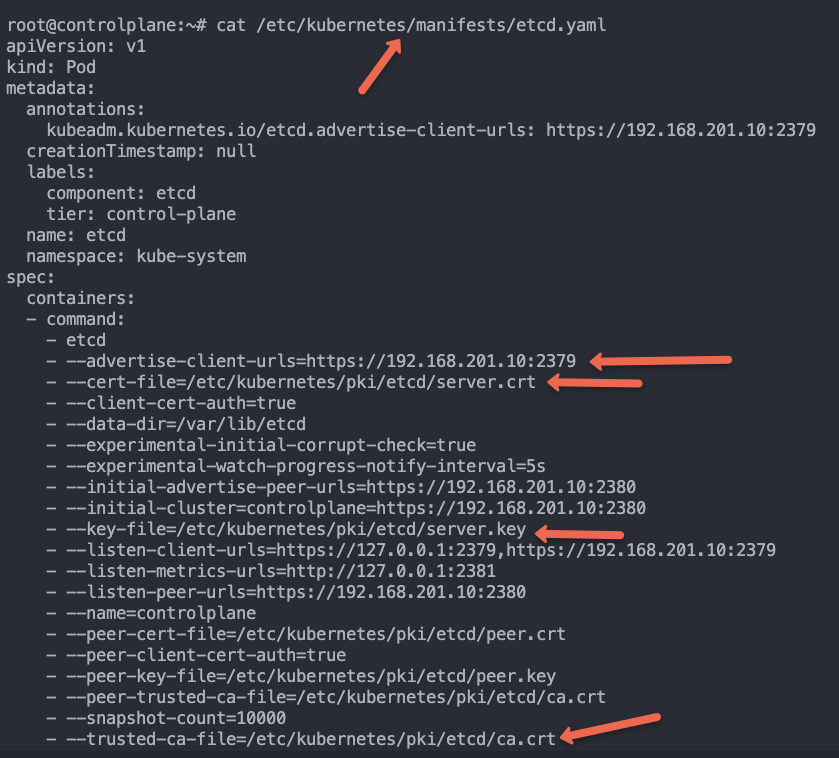
You can also get the above details by describing the etcd pod running in the kube-system namespace.
While describing the pod, replace etcd-master-node with your etcd pod name.
kubectl get po -n kube-system
kubectl describe pod etcd-master-node -n kube-system
Another way to view the etcd-server parameters faster is using the following command.
ps -aux | grep etcdChoose a method that you are comfortable with the get the cert details.
Step 4: Backup using etcdctl
To backup, take an etcd snapshot backup using the following command.
sudo etcdctl \
  --endpoints=<etcd endpoint> \
  --cacert=<ca-file> \
  --cert=<cert-file> \
  --key=<key-file> \
  snapshot save <backup-file-location>
Before running the backup command, create a backup directory where we will be saving the snapshot.
sudo mkdir -p /opt/backup/The command looks like the following when you add the actual location and parameters. Execute the command to perform a backup.
You can replace /opt/backup/etcd.db with the location and name of your choice.
sudo etcdctl \
  --endpoints=https://127.0.0.1:2379 \
  --cacert=/etc/kubernetes/pki/etcd/ca.crt \
  --cert=/etc/kubernetes/pki/etcd/server.crt \
  --key=/etc/kubernetes/pki/etcd/server.key \
  snapshot save /opt/backup/etcd.db
On a successful execution you will get a Snapshot saved at /opt/backup/etcd.db message as shown below.
root@master-node:/opt/backup# sudo etcdctl \
  --endpoints=https://192.168.201.10:2379 \
  --cacert=/etc/kubernetes/pki/etcd/ca.crt \
  --cert=/etc/kubernetes/pki/etcd/server.crt \
  --key=/etc/kubernetes/pki/etcd/server.key \
  snapshot save /opt/backup/etcd.db
2022-09-29 08:23:43.027261 I | clientv3: opened snapshot stream; downloading
2022-09-29 08:23:43.088264 I | clientv3: completed snapshot read; closing
Snapshot saved at /opt/backup/etcd.db
Also, you verify the snapshot snapshot status using the etcdutl command.
etcdutl --write-out=table snapshot status /opt/backup/etcd.dbHere is an example output.
+----------+----------+------------+------------+
|   HASH   | REVISION | TOTAL KEYS | TOTAL SIZE |
+----------+----------+------------+------------+
| b7147656 |    51465 |       1099 |     5.1 MB |
+----------+----------+------------+------------+
Kubernetes etcd Restore Using Snapshot Backup
Now we have the backup in the /opt/backup/etcd.db location. We will use the snapshot backup to restore etcd with the help of etcdutl.
Before restoring, you should stop the kube-apiserver and etcd pods. Because, the API server continously reads or writes to etcd, if API server is running during restore, it can cause data corruption.Step 1: Move Statis Pod Manifests
First, we need to move the manifest files of the API server and ETCD.
Since they are static, their pods will be recreated, even if you delete them.
Use the following commands to move the files to /tmp location.
sudo mv /etc/kubernetes/manifests/kube-apiserver.yaml /tmp/

sudo mv /etc/kubernetes/manifests/etcd.yaml /tmp/
Once the manifests are moved, the kube-apiserver and ETCD pods will be terminated within a few seconds.
You can verify this by running the crictl command. Make sure the API server and ETCD containers are no longer running. Wait until the containers are fully removed before proceeding.
crictl ps
Step 2: Restore ETCD using etcdutl
Now we have the backup in the /opt/backup/etcd.db location, let's restore it.
Given below is the etcdutl command to restore etcd.
sudo etcdctl snapshot restore <snapshot-location>Let's execute the etcd restore command. In my case /opt/backup/etcd.db is the backup file.
sudo etcdctl snapshot restore /opt/backup/etcd.dbIf you want to use a specific data directory for the restore, you can add the location using the --data-dir flag as shown below.
sudo etcdutl --data-dir /var/lib/etcd-from-backup \
  snapshot restore /opt/backup/etcd.db
If the restoration is successful, you will get the output logs with restored snapshot message as shown below.

After restoring the etcd snapshot to a new directory, we need to update etcd.yaml because it still references the old data path.
Generally, you should change only the hostPath. This keeps the internal container structure exactly as kubeadm expects it, while pointing it to your new data folder.
Edit the /tmp/etcd.yaml file modify the following sections and change the new directory in the volume section, as given below.
volumes:
  - name: etcd-data
    hostPath:
      path: /var/lib/etcd-from-backup
      type: DirectoryOrCreate
Then, move the manifest files back to the original static pod directory. This will redeploy the kube-apiserver and ETCD pods.
sudo mv /tmp/kube-apiserver.yaml /etc/kubernetes/manifests/

sudo mv /tmp/etcd.yaml /etc/kubernetes/manifests/
It will take around 10-15 seconds for the API server and ETCD to start running.
Once the Pods are back up, verify the cluster status. It is the ultimate test is whether kubectl can see the objects that were in the backup
$ kubectl get no

NAME           STATUS   ROLES           AGE     VERSION
controlplane   Ready    control-plane   3h13m   v1.34.0
node01         Ready    worker          3h11m   v1.34.0
node02         Ready    worker          3h11m   v1.34.0
You can also check the ETCD status using the following command. Replace the endpoint IP with your ETCD endpoint IP.
$ sudo etcdctl \
  --endpoints=https://192.168.201.10:2379 \
  --cacert=/etc/kubernetes/pki/etcd/ca.crt \
  --cert=/etc/kubernetes/pki/etcd/server.crt \
  --key=/etc/kubernetes/pki/etcd/server.key \
  endpoint health

https://192.168.201. 10:2379 is healthy: successfully committed proposal: took = 13.107842ms
etcd Backup FAQs
How to take etcd backup in Kubernetes?
To take the etcd backup, you need to the etcdctl command line utility. You need to use the etcdctl snapshot command with the etcd certificates to perform a backup operation.
Conclusion
In this blog, we learned Kubernetes etcd backup and restore using etcdctl and etcdutl command line utility.
etcd backup, and restore are essential tasks in Kubernetes cluster administration. Also, it is an important topic in the CKA certification exam.
If you are preparing for the CKA exam, do check out the CKA exam study guide and for the exam discount voucher, check the Kubernetes certification coupon.