


In this blog, you will learn how to install and configure ExternalDNS on Amazon EKS and automate DNS records in Route53 for Kubernetes Services and Ingress resources.
By the end of this blog, you will learn,
- How to set up ExternalDNS on EKS with Route53
- How to configure IAM for DNS automation
- How to test with Services and Ingress with SSL.
What is ExternalDNS and Why Use It?
When you work on EKS projects, you will have to expose services using Route 53 DNS (private or public). Normally, this is done manually by the DevOps or network team.
ExternalDNS automates this process. It manages DNS records for you and keeps them in sync with your Kubernetes resources.
Here is how it works.
- ExternalDNS runs inside the Kubernetes cluster as a Deployment.
- It continuously watches Kubernetes resources like Services and Ingress
- When it detects Service or Ingress resources with eternalDNS specific annotations with a DNS hostname, it creates corresponding DNS records.
- It does this by talking to your DNS providers API (for example, Route 53).
- When the resources are deleted, it automatically cleans up the associated DNS records (if enabled)
In short, it removes manual DNS management when deploying applications on EKS. Also, it gives you a GitOps-friendly workflow for DNS management.
ExternalDNS Workflow in AWK EKS
Now, let's understand how ExternalDNS works with EKS.
The following workflow explains how the ExternalDNS works on the EKS cluster
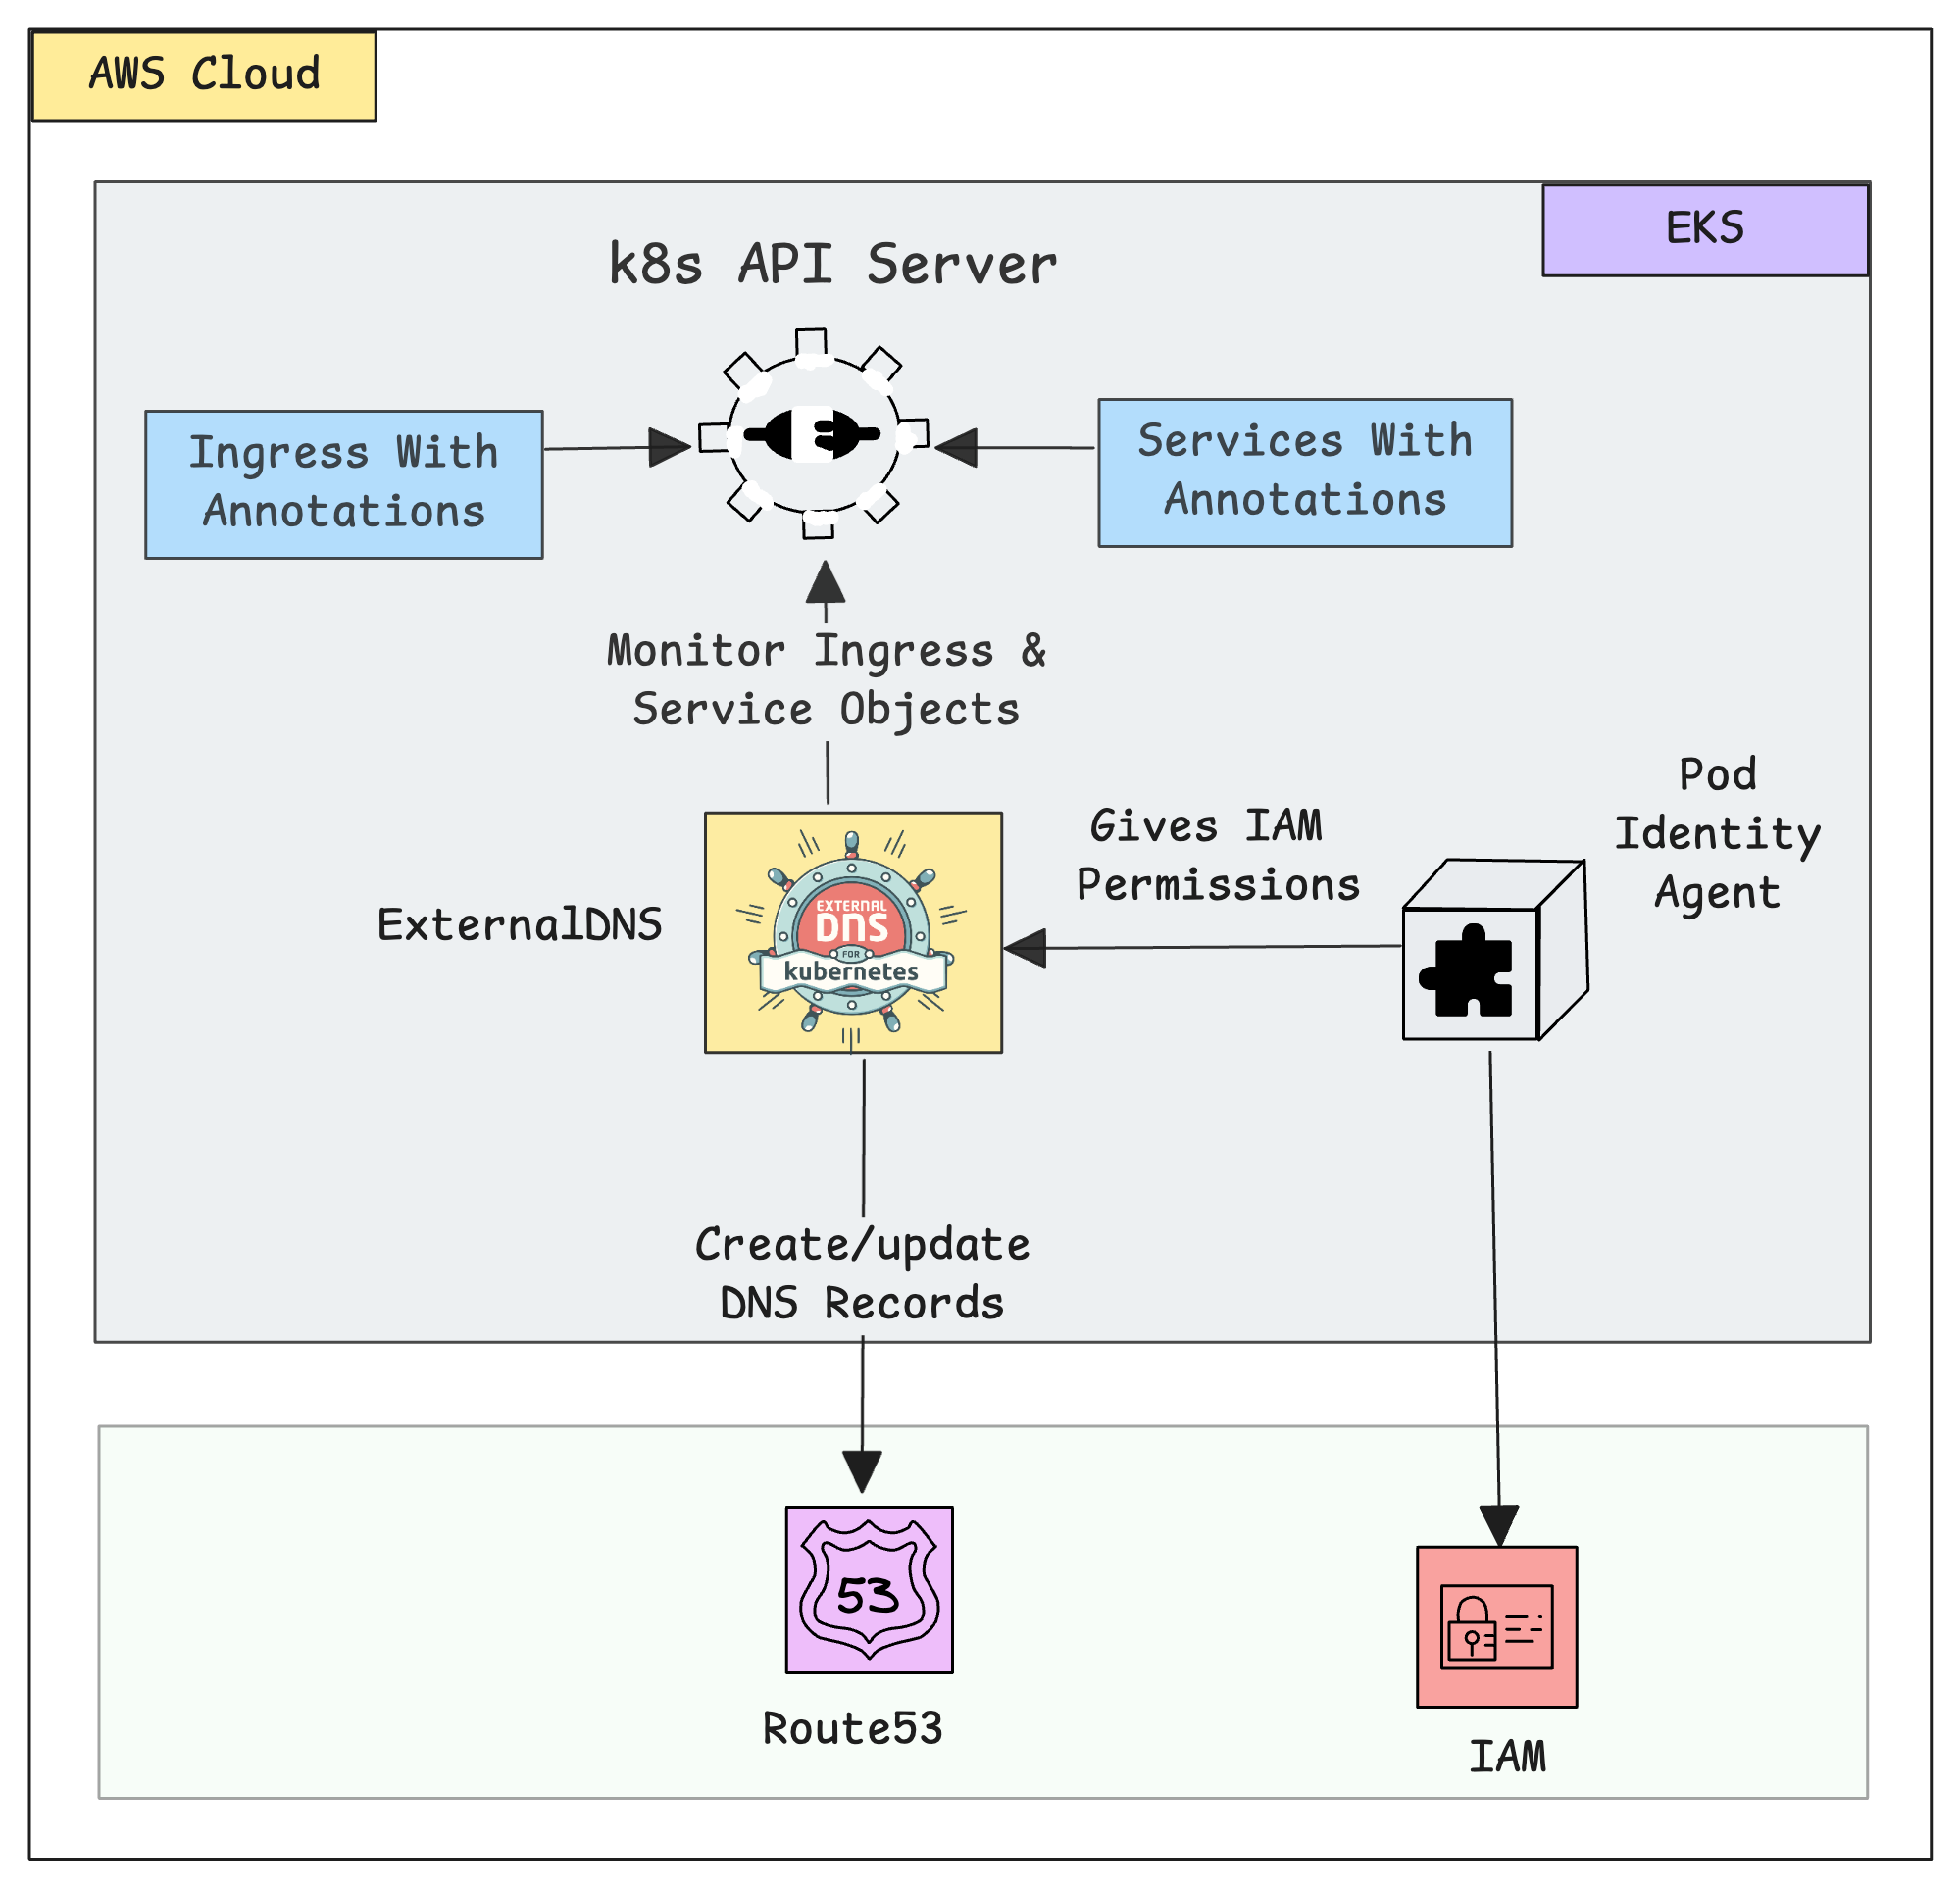
Here is how the ExternalDNS works in the EKS cluster.
- The ExternalDNS on the EKS cluster keeps watching the Ingress and Service objects.
- If any of these objects are created, including the ExternalDNS annotation with a domain name, ExternalDNS collects details of the domain name, node IP, or Load Balancer DNS. For example,
external-dns.alpha.kubernetes.io/hostname: app.devopscube.com - Using this information, it creates or updates the DNS records in Route 53.
- To allow ExternalDNS to make changes in Route 53, the Pod Identity Agent Plugin provides the necessary permissions from the assigned IAM Role.
Now, we can start the setup of the ExternalDNS on the EKS cluster.
Setup Prerequisites
To set up the ExternalDNS, we need the following requirements.
- EKS Cluster v1.30+
- Pod Identity Agent - (Must be available on EKS cluster)
- Valid Domain Name and DNS Server (e.g., Route53, Cloudflare, etc.)
- AWS Load Balancer Controller in the EKS cluster
- AWS CLI [Local Workstation]
- Helm [Local Workstation]
Once the prerequisites are ready, we can start the installation.
Step-by-Step Setup Guide
Before we install the ExternalDNS, we need to create an IAM Role for the External DNS to access Route53.
Step 1: Create an IAM Policy for External DNS
First, we need to give ExternalDNS permissions to manage Route53 records. We will do this by creating an IAM Policy using the following JSON.
cat << EOF >  eks_route53_policy.json
{
  "Version": "2012-10-17",
  "Statement": [
    {
      "Effect": "Allow",
      "Action": [
        "route53:ChangeResourceRecordSets"
      ],
      "Resource": [
        "arn:aws:route53:::hostedzone/*"
      ]
    },
    {
      "Effect": "Allow",
      "Action": [
        "route53:ListHostedZones",
        "route53:ListResourceRecordSets",
        "route53:ListTagsForResource"
      ],
      "Resource": [
        "*"
      ]
    }
  ]
}
EOF
Now, we can create the IAM Policy using the following command.
aws iam create-policy \
    --policy-name AllowExternalDNSUpdates \
    --policy-document file://eks_route53_policy.json
Export Policy ARN for the upcoming configuration
export POLICY_NAME="AllowExternalDNSUpdates"export POLICY_ARN=$(aws iam list-policies --query "Policies[?PolicyName=='${POLICY_NAME}'].Arn" --output text)
At this point, you have created an IAM Policy that allows ExternalDNS to manage Route53 records (create, update, list).
Step 2: Create an IAM Role for ExternalDNS
Before creating the role, we need a Trust Policy that is suitable for the Pod Identity Agent to identify the role.
cat <<EOF > trust-policy.json
{
  "Version": "2012-10-17",
  "Statement": [
    {
      "Effect": "Allow",
      "Principal": {
        "Service": "pods.eks.amazonaws.com"
      },
      "Action": [
        "sts:AssumeRole",
        "sts:TagSession"
      ]
    }
  ]
}
EOF
Next, we need an IAM Role that the ExternalDNS pods can assume. This role will be linked with our Service Account later.
aws iam create-role \
  --role-name externalDNSRole \
  --assume-role-policy-document file://"trust-policy.json"
Store the Role name and ARN as environment variables for the upcoming configurations.
export ROLE_NAME=externalDNSRoleexport ROLE_ARN=$(aws iam get-role --role-name $ROLE_NAME --query "Role.Arn" --output text)
Now, we have our IAM Role and Policy, so we need to attach the IAM Policy to the Role.
aws iam attach-role-policy \
  --policy-arn ${POLICY_ARN} \
  --role-name ${ROLE_NAME}
Now, the permission for the ExternalDNS is ready, so we need to attach this permission to the ExternalDNS Service Account.
Step 3: Create a Service Account for the External DNS
We are deploying the ExternalDNS on a dedicated namespace on Kubernetes, so we need to create a namespace.
export NAMESPACE=external-dnskubectl create ns ${NAMESPACE}Since ExternalDNS will run inside Kubernetes, we need a Service Account. It will later be associated with our IAM Role so the pods can use AWS permissions.
cat << EOF > externaldns-sa.yaml
apiVersion: v1
kind: ServiceAccount
metadata:
  name: external-dns
  namespace: external-dns
  labels:
    app.kubernetes.io/name: external-dns
EOF
To apply the manifest, use the following command.
kubectl apply -f externaldns-sa.yamlThe Service Account in the external-dns namespace is now ready. This has to be mapped to the IAM Role through Pod Identity.
Step 4: Pod Identity Association
Note: Assuming you already have the Pod Identity Agent Plugin on your EKS cluster.Create the necessary environment variables for the association.
export CLUSTER_NAME=eks-spot-cluster
export SERVICE_ACCOUNT=external-dns
Now, we can use the following command to perform the Pod Identity Association.
eksctl create podidentityassociation \
    --cluster $CLUSTER_NAME \
    --namespace $NAMESPACE \
    --service-account-name $SERVICE_ACCOUNT \
    --role-arn $ROLE_ARN
If you want to ensure that the Pod Identity Association is properly done, you can use the following command.
eksctl get podidentityassociations --cluster $CLUSTER_NAMEAt this point, your Service Account and IAM Role are connected through Pod Identity. ExternalDNS pods running with this Service Account will have permissions to update Route53.
Step 5: Install ExternalDNS
Now, we need to create a Deployment manifest to deploy the ExternalDNS.
To the major changes that you need to make to the following configuration.
--domain-filtershould be your Route53 hosted zone name.env.valueshould be the region where your EKS cluster is.
cat << EOF > external-dns.yaml
apiVersion: rbac.authorization.k8s.io/v1
kind: ClusterRole
metadata:
  name: external-dns
  labels:
    app.kubernetes.io/name: external-dns
rules:
- apiGroups: [""]
  resources: ["services","endpoints","nodes","pods"]
  verbs: ["get","list","watch"]
- apiGroups: ["discovery.k8s.io"]
  resources: ["endpointslices"]
  verbs: ["get","list","watch"]
- apiGroups: ["networking.k8s.io"]
  resources: ["ingresses","ingressclasses"]
  verbs: ["get","list","watch"]
- apiGroups: ["gateway.networking.k8s.io"]
  resources: ["gateways","httproutes","grpcroutes","tcproutes","udproutes","tlsroutes"]
  verbs: ["get","list","watch"]
---
apiVersion: rbac.authorization.k8s.io/v1
kind: ClusterRoleBinding
metadata:
  name: external-dns-viewer
  labels:
    app.kubernetes.io/name: external-dns
roleRef:
  apiGroup: rbac.authorization.k8s.io
  kind: ClusterRole
  name: external-dns
subjects:
  - kind: ServiceAccount
    name: external-dns
    namespace: external-dns
---

apiVersion: apps/v1
kind: Deployment
metadata:
  name: external-dns
  namespace: external-dns
  labels:
    app.kubernetes.io/name: external-dns
spec:
  strategy:
    type: Recreate
  selector:
    matchLabels:
      app.kubernetes.io/name: external-dns
  template:
    metadata:
      labels:
        app.kubernetes.io/name: external-dns
    spec:
      serviceAccountName: external-dns
      containers:
        - name: external-dns
          image: registry.k8s.io/external-dns/external-dns:v0.18.0
          args:
            - --source=service
            - --source=ingress
            - --domain-filter=devopsproject.dev
            - --provider=aws
            - --policy=upsert-only
            - --aws-zone-type=public
            - --registry=txt
            - --txt-owner-id=external-dns
          env:
            - name: AWS_DEFAULT_REGION
              value: us-west-2
EOF
Here,
-
--source- Defines what Kubernetes objects should watch. --domain-fiter- Defines which hosted zone should use.--provider- Which DNS provider should choose (e.g., Route53, CloudFlare, CoreDNS, etc). To view all available providers, refer to this official documentation.--aws-zone-type- Option to choose private or public hosted zone.--registry- This will create a record with the metadata of the DNS record creation, like who created this.--txt-owner-id- Defines the owner name of the DNS records.- We can give any name to this.
- If you are running multiple clusters, assign a different Owner ID to each to avoid conflicts between clusters.
--policy parameters is an important one. It fefines whether the created records should be deleted or not. upsert-only will create/update but will not delete. The
sync policy allows full synchronization. That means ExternalDNS will create, update, and delete DNS records. It ensures the DNS zone matches the current cluster resource state.To deploy the manifest, use the following command.
kubectl apply -f external-dns.yamlOnce the deployment is completed, use the following command to list them to ensure that the ExternalDNS is running without any issues.
kubectl -n external-dns get deploy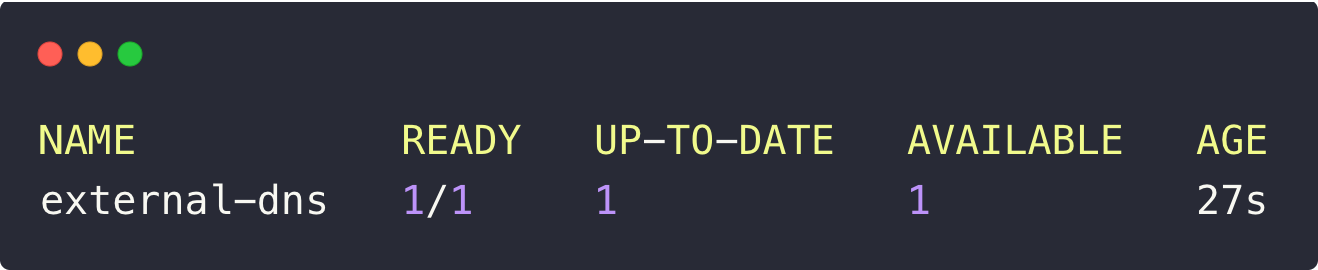
The output ensures that the deployment is running without any issues. It is now watching Services and Ingress resources, ready to sync DNS records in Route53 automatically.
We can not test whether the External DNS automatically manages the DNS records on Route53.
Testing with Services (NodePort & LoadBalancer)
ExternalDNS will create records for both the Kubernetes Service object and the Ingress object.
We can test both, but for that, we need a demo deployment.
cat <<EOF > test-deployment.yaml
apiVersion: apps/v1
kind: Deployment
metadata:
  name: nginx
spec:
  selector:
    matchLabels:
      app: nginx
  template:
    metadata:
      labels:
        app: nginx
    spec:
      containers:
      - image: nginx
        name: nginx
        ports:
        - containerPort: 80
          name: http
        - containerPort: 443
          name: https
EOF
To deploy this application, use the following command.
kubectl apply -f test-deployment.yamlTo create a DNS record for a service, we need to add an annotation (metadata.annotations.external-dns.alpha.kubernetes.io/hostname) with the domain name on the service configuration.
Now, we need to create a service for this application with the mentioned annotation.
Service with Type NodePort
The External DNS works with both service types, such as NodePort and LoadBalancer.
We will start with a NodePort Service and add a DNS annotation. ExternalDNS should automatically create the record in Route53.
Here is the service YAML.
cat <<EOF > np-svc.yaml
apiVersion: v1
kind: Service
metadata:
  name: nginx
  annotations:
    external-dns.alpha.kubernetes.io/hostname: nginx.devopsproject.dev
spec:
  type: NodePort
  selector:
    app: nginx
  ports:
    - name: http
      port: 80
      targetPort: 80
      nodePort: 32000
    - name: https
      port: 443
      targetPort: 443
      nodePort: 32443
EOF
To deploy this, use the following command.
kubectl apply -f np-svc.yamlOnce your service is created, ExternalDNS will create "A" and "TXT" DNS records for your service.
- A Record - Map the IP address with the host name.
- TXT Record - Stores the information about the DNS records, such as owner name, TTL, etc.
In this NodePort method, the ExternalDNS will map the IP address of the EKS worker nodes to the hostname, which you can check from the Route53 console.

The output confirms that the DNS records were automatically created in Route53.
Now, we can try to access our deployed application using this domain name.
For that,
Open the terminal on your local machine and run the curl command with the hostname.
Since this is a NodePort service, we need to add the NodePort number 32000 to the URL.
curl nginx.devopsproject.dev:32000Now, we get the following output.
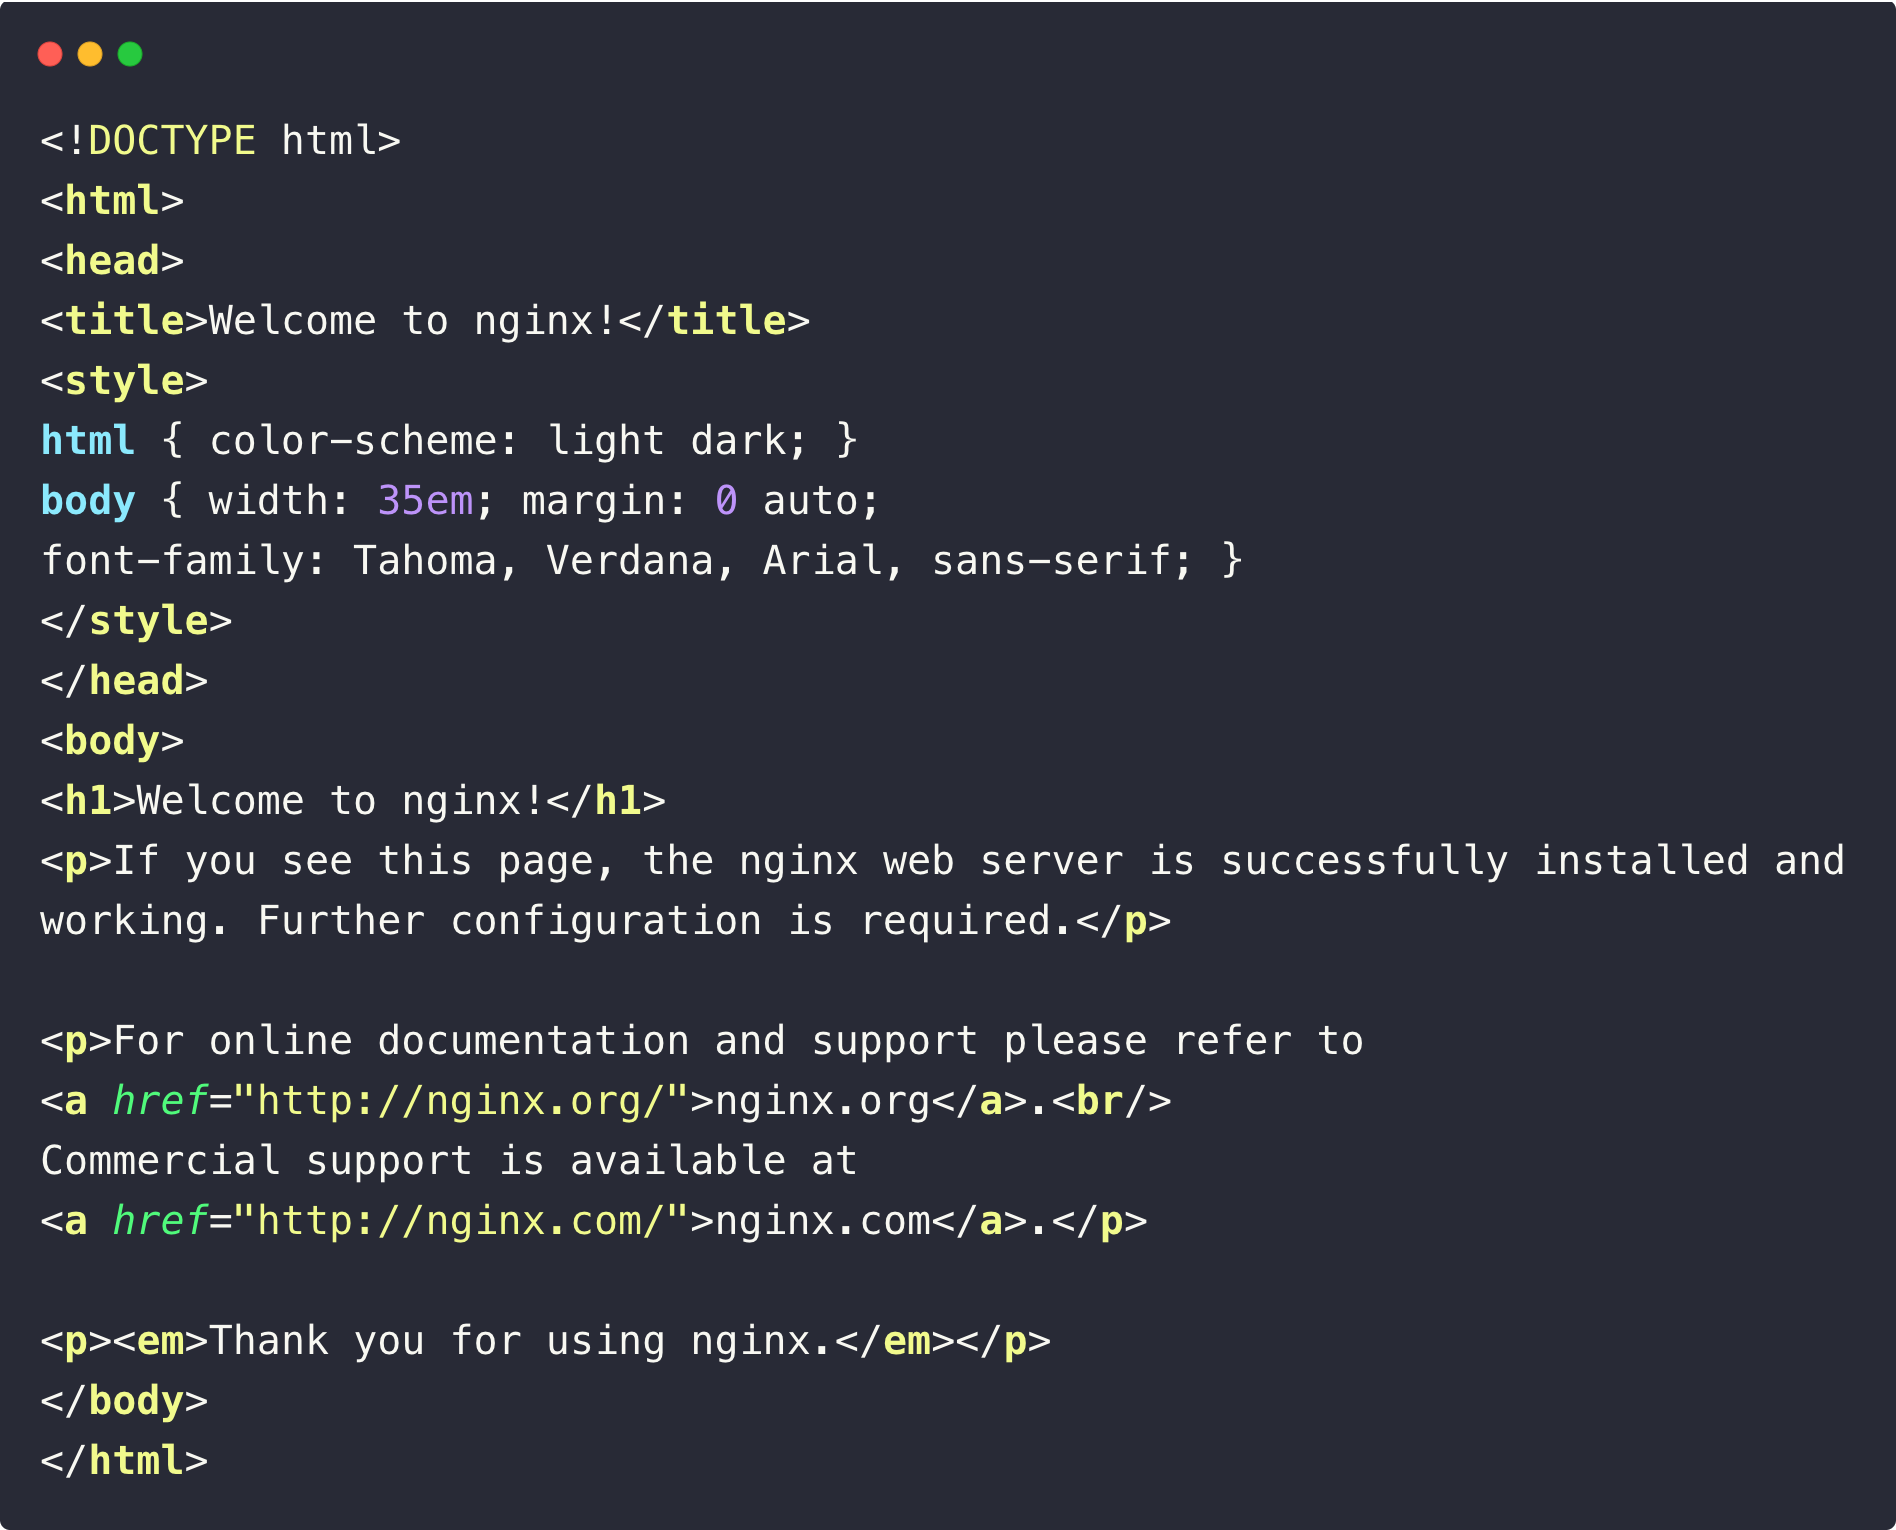
This ensures that the mapping is working correctly, so we can access the web page.
Next, we will test with the other service type, so delete this service using the following command.
kubectl delete -f np-svc.yamlAlso, remove the DNS records from Route53.
Note: Since we use the policy as --policy=upsert-only, the created DNS records won't be deleted automatically so we need to clean them up manually.Service with Type Load Balancer
To create a LoadBalancer service for the same deployment, use the following contents.
cat <<EOF > lb-svc.yaml
apiVersion: v1
kind: Service
metadata:
  name: nginx
  annotations:
    external-dns.alpha.kubernetes.io/hostname: nginx.devopsproject.dev
spec:
  type: LoadBalancer
  selector:
    app: nginx
  ports:
    - name: http
      port: 80
      targetPort: 80
EOF
To apply this service, use the following command.
kubectl apply -f lb-svc.yamlIn this service, an AWS Load Balancer is created to route the external traffic to the Kubernetes workload.
So the mapping will be done with the Load Balancer's DNS name instead of the worker nodes IP.
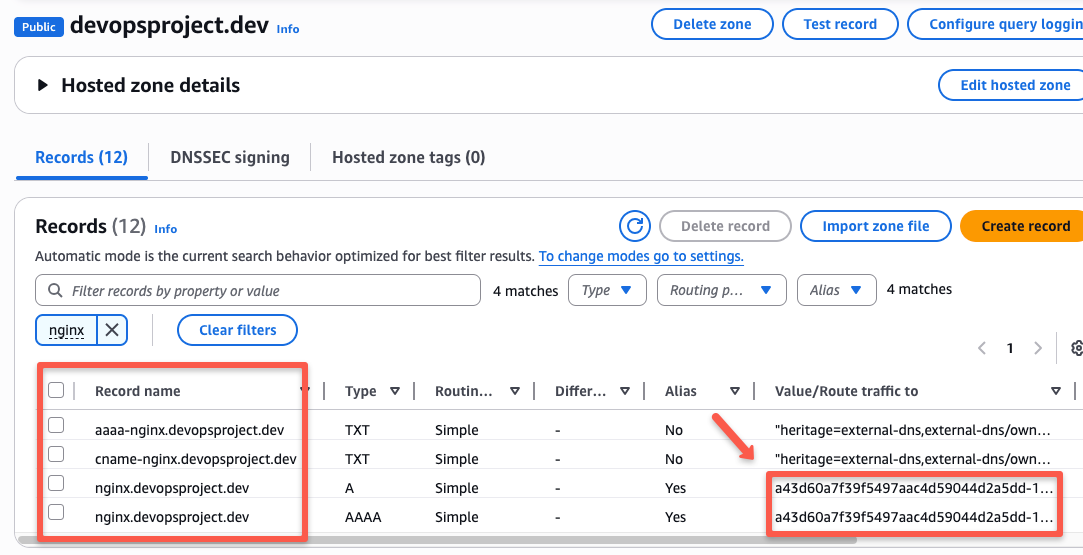
Here, you can see one more record along with the "A" record, which is the "AAAA" record.
"AAAA" record is nothing but mapping the IPv6 address with the domain name. But you can see that both values are the same for both of the records.
Now, we can access the application using the domain name, and this time we do not have to use the nodeport number because it is a Load balancer service.
curl nginx.devopsproject.dev
The output ensures that we can access the web page.
Next, we will try ExternalDNS with the Ingress object.
To delete this service, use the following command.
kubectl delete -f lb-svc.yamlDelete the related Route53 records as well from the console.
Testing with Ingress & TLS (ACM Integration)
External DNS not only works with services but also with the Ingress. You can use any method for the ingress (Nginx ingress or AWS Load Balancer controller)
Here, I am showing an example with the AWS Load Balancer controller.
Assuming, you already have the AWS Load Balancer controller on the EKS cluster, if you don't use the blog --> AWS Load Balancer Controller on EKS
Before creating an Ingress object, we need a service with type ClusterIP.
cat <<EOF > svc.yaml
apiVersion: v1
kind: Service
metadata:
  name: nginx
spec:
  type: ClusterIP
  selector:
    app: nginx
  ports:
    - name: http
      port: 80
      targetPort: 80
    - name: https
      port: 443
      targetPort: 443
EOF
To apply this service.
kubectl apply -f svc.yamlNow, we can create an Ingress object for the deployment.
cat << EOF > ingress.yaml
apiVersion: networking.k8s.io/v1
kind: Ingress
metadata:
  name: nginx-ingress
  namespace: default
  annotations:
    alb.ingress.kubernetes.io/scheme: internet-facing
    alb.ingress.kubernetes.io/healthcheck-path: /
    alb.ingress.kubernetes.io/target-type: 'ip'
    external-dns.alpha.kubernetes.io/hostname: nginx.devopsproject.dev
spec:
  ingressClassName: alb
  rules:
  - host: nginx.devopsproject.dev
    http:
      paths:
      - path: /
        pathType: Prefix
        backend:
          service:
            name: nginx
            port:
              number: 80
EOF
To apply this, use the following command.
kubectl apply -f ingress.yamlThis is also the same as the above one, but the difference is that here, the ALB controller provisions the Load Balancer in AWS.
Since the ALB controller creates an Application Load Balancer for the Ingress object, we can use the AWS ACM TLS certificates with configuration.
AWS Certificate Manager integration (Optional)
If you want to safeguard your application by encrypting it using the TLS certificate, we can use the certificates from the ACM service.
Assuming, you already have a TLS created on the AWS Certificate Manager. If not, please refer to this blog --> Setup SSL/TLS With AWS Certificate Manager
Now, we can configure this existing certificate on the Ingress object.
Here, you need to change the ARN of your ACM certificate.
cat << EOF > ingress.yaml
apiVersion: networking.k8s.io/v1
kind: Ingress
metadata:
  name: nginx-ingress
  namespace: default
  annotations:
    alb.ingress.kubernetes.io/scheme: internet-facing
    alb.ingress.kubernetes.io/certificate-arn: arn:aws:acm:us-west-2:<AWS ACCOUNT ID>:certificate/b7a364de-72e2-4a36-bb98-258e8d11a224
    alb.ingress.kubernetes.io/ssl-policy: ELBSecurityPolicy-2016-08
    alb.ingress.kubernetes.io/backend-protocol: HTTPS
    alb.ingress.kubernetes.io/healthcheck-path: /
    alb.ingress.kubernetes.io/target-type: 'ip'
    alb.ingress.kubernetes.io/listen-ports: '[{"HTTP":80,"HTTPS":  443}]'
    alb.ingress.kubernetes.io/actions.ssl-redirect: '{"Type": "redirect", "RedirectConfig": { "Protocol": "HTTPS", "Port": "443", "StatusCode": "HTTP_301"}}'
    external-dns.alpha.kubernetes.io/hostname: nginx.devopsproject.dev
spec:
  ingressClassName: alb
  rules:
  - host: nginx.devopsproject.dev
    http:
      paths:
      - path: /
        pathType: Prefix
        backend:
          service:
            name: nginx
            port:
              number: 443
EOF
To replace the existing ingress, use the following command.
kubectl replace -f ingress.yaml --forceNow, if you check over a browser, you can see that the validation of the certificate, which ensures that our connection is now secured.

This is how we secure our connection over the internet to the application in Kubernetes.
We can even automate the certificate creation using the Certificate Manager, for that you can refer to this blog.
Cleanup
Let's clean up the resources we created so you don't leave extra DNS records or workloads running.
First, delete the ingress.
kubectl delete -f ingress.yamlNow, we can delete the deployment and the service.
kubectl delete -f svc.yaml
kubectl delete -f test-deploy.yaml
Before we endup the blog, we can have a look at how to actually use ExternalDNS in a hybrid DNS method.
Best Practices
Here are some of the best practices of the ExternalDNS.
- Use different hosted zones if you are using multiple environments.
- Enable TXT registry and give different names for each ExternalDNS deployment if you are using multiple clusters.
- In our setup, use the Pod Identity Agent if you are using this on EKS instead of the IRSA to avoid the complexity of managing permissions.
- Use Prometheus to collect the metrics of the ExternalDNS to monitor.
- Add
--log-level=to generate logs so that we can identify if any issues occurred.
Conclusion
This is the high-level overview of the External DNS, and it really simplifies the DNS Record creation and management of the Kubernetes resources.
Explore all the deployment fields so that you can choose the required parameters and values as per your requirements.