In this blog, we will look at how to run containers inside a Kubernetes pod run as a non-root user.
We will look at pod and container-level security contexts to define non-root users.
SecurityContext in Kubernetes
To run pods as non-root users, first, you need to understand SecurityContext Kubernetes.
In Kubernetes, the securityContext configuration feature defines pod or container-level security settings. We will use securityContext it to run the container with a specific non-root user.
It is one of the simple and efficient ways to improve the security of your containers; it has two types:
- Pod-level - This security context applies to all the containers in the pod.
- Container-level - This security context applies to individual containers.
SecurityContext has many security options. We will use the runAsUser parameter specifically to control the user used by the container.
Container Image Configuration for Non-Root User Compatibility
Even if you set up a SecurityContext to enforce non-root user policies, the container image itself must support running as a non-root user.
This means the container image should be configured with the necessary user permissions and should not rely on root privileges to execute processes inside the container.
For example, if you are using a Nginx image, the Nginx process inside the image should be able to run as a non-root user, similar to how you would run a Nginx process as a non-root user in Linux.
This is because the nginx process inherently writes to several locations owned by the root user (like /var/log/nginx for logs or /var/cache/nginx for cache). Therefore, we need to modify the container image to assign specific permissions to a non-root user (e.g., nginxuser) to allow modification of these files.
You can configure it while building the Docker image. You can refer to building non-root container image guide to know more.
Also, if the process you run inside the container doesn’t need access to any files owned by root or root privileges, it won’t be a problem. For example, running a BusyBox container with a simple shell script doesn’t need an image-level non-root configuration unless you are writing to files owned by root.
Container Images With Non Root User
We need to use the following images to understand Pod Non-Root user implementation better.
Two images with non-root user configuration, one is exposed to port 8080 and the other to port 9090 to avoid port conflict.
Use the Dockerfile in this GitHub repo to create both images. Check the running containers as a non-root user guide to learn more about creating a Docker image with a non-root user.
Kubernetes Pod Non-Root User Configurations
When we say Kubernetes pod, it can have more than one container. You can apply the securityContext configuration at the pod and container levels.
To understand it better, we will look at the following use cases that use container images with non-root users:
- Running the pod with pod-level security context in which both container images have non-root users. (Should run without any issues)
- Running the pod with a pod-level security context, but in this one container image has a non-root user, and the other container image doesn't have a root user. (The one without root user should fail)
- Running the pod with a container-level security context involves running one container as a non-root user and the other as a root user (Both should run without any issues)
- Running pod with both pod-level and container-level security context (Container-level security context overrides the pod-level context)
Use Case 1: Running Containers as a non-root user with a pod with the pod-level security context
For this use case, we will use a container image that has non-root user configuration as part of its image.
We will run a pod with pod-level security context in which both container images have non-root users.
Create a file called pod-level.yaml and copy the below manifest file content.
apiVersion: v1
kind: Pod
metadata:
  name: testing-pod
spec:
  securityContext:
    runAsUser: 1001
  containers:
  - name: first-container
    image: techiescamp/nginx-non-root-01:1.0.0
    ports:
    - containerPort: 8080
  - name: second-container
    image: techiescamp/nginx-non-root-02:1.0.0
    ports:
- containerPort: 9090runAsNonRoot: true that will set the non-root user from the container image automatically.Then, run the following command to apply the manifest file to deploy the pod with pod-level security context.
kubectl apply -f pod-level.yamlNow, how to check if pod is running as root?
Once the pod is up and running, use the kubectl exec command with linux id command to check if the pod is running as root or non root user.
kubectl exec testing-pod -c first-container -- id

kubectl exec testing-pod -c second-container -- id
You will get the following output.
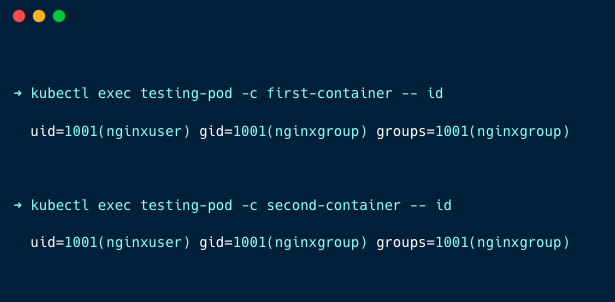
You can see both containers are running on UID 1001, which is the UID of non-root users.
Does this mean kubectl exec command logins as non root user?
When you use the kubectl exec command to start a session in a container running with a non-root user, you will be logged in as that non-root user.
This means that:
- Any commands you run will have the permissions of the non-root user that the container is using.
- You will not have root (superuser) privileges inside the container.
Use Case 2: Running the pod with a pod-level security context with only one container as non-root user
In the second use case, we will run a pod with a pod-level security context, but in this, one container has a non-root user, and the other container doesn't run as a root user.
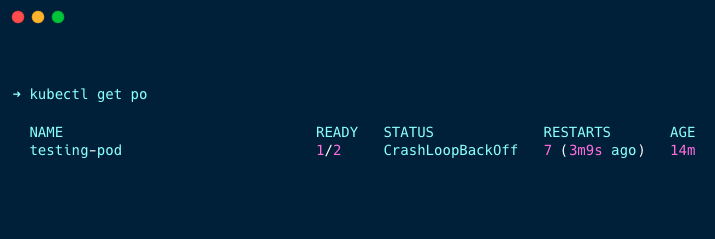
In this use case, we expect one of the containers that runs as root to end up in CrashLoopBackoff because of the pod level non-root user securityContext.
For this use case, use the same pod-level.yaml used in the above use case.
Just change the image of the first-contianer to the official Nginx image as given below.
apiVersion: v1
kind: Pod
metadata:
  name: testing-pod
spec:
  securityContext:
    runAsUser: 1001
  containers:
  - name: first-container
    image: nginx:latest
    ports:
    - containerPort: 8080
  - name: second-container
    image: techiescamp/nginx-non-root-02:1.0.0
    ports:
    - containerPort: 9090
We will be using the official nginx: latest image to test what happens if the container runs with an inactive user.
Apply the manifest file and check the pod's status using the following command.
kubectl get poYou can see that only one pod is ready, and another pod crashes continuously because the first container doesn't have a non-user with UID 1001.
If you want to run the container as a non-root user, you must first create the user during the container image creation.
The second container runs without any issues because it has a non-root user with UID 1001.
Run the following command to check the pod logs.
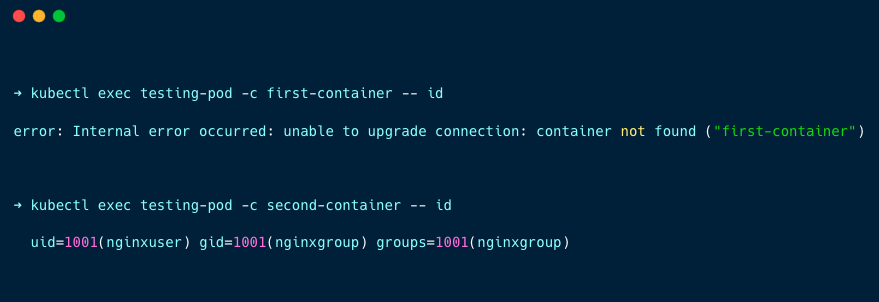
kubectl logs testing-podYou can see the following error because the UID we gave is only available for the second container, not for the first container.
2024/10/09 10:32:06 [emerg] 1#1: mkdir() "/var/cache/nginx/client_temp" failed (13: Permission denied)
nginx: [emerg] mkdir() "/var/cache/nginx/client_temp" failed (13: Permission denied)
Because of the unavailable UID, it doesn't have permission to access the directors to run Nginx.
If you check for the UID the containers are using, you will get the following output
Use Case 3: Running the pod with a container-level security context to use different users on containers
In the third use case, we will be running the pod with a container-level security context,
- run one container as a non-root user
- other as a root user.
Create a file called container-level.yaml and copy the manifest file content below.
apiVersion: v1
kind: Pod
metadata:
  name: testing-pod
spec:
  containers:
  - name: first-container
    image: techiescamp/nginx-non-root-01:1.0.0
    ports:
    - containerPort: 8080
    securityContext:
        runAsUser: 1001
  - name: second-container
    image: techiescamp/nginx-non-root-02:1.0.0
    ports:
    - containerPort: 9090
    securityContext:
        runAsUser: 0
In the above manifest file, the security content is given inside each container with a different UID, which tells the containers to run with a non-root user (1001) and a root user (0).
Run the following command to apply the manifest file to deploy the pod with the pod-level security context.
kubectl apply -f container-level.yamlOnce the pod is up and running, use the following command to check in which users the container is running.
kubectl exec testing-pod -c first-container -- id

kubectl exec testing-pod -c second-container -- id
You will get the following output.
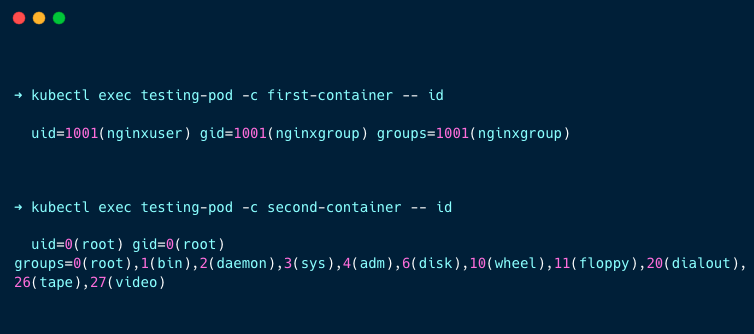
You can see the first container is running with the non-root user(1001), and the second container is running with the root user(0).
Use Case 4: Running pod with both pod-level and container-level security context
In the final use case, we will run the pod with pod-level and container-level security contexts.
We will specify to run as a non-root user in the pod-level security context and define one container to run as a root user using the container-level security context.
Create a file called pod.yaml and copy the manifest file content below.
apiVersion: v1
kind: Pod
metadata:
  name: testing-pod
spec:
  securityContext:
    runAsUser: 1001
  containers:
  - name: first-container
    image: techiescamp/nginx-non-root-01:1.0.0
    ports:
    - containerPort: 8080
  - name: second-container
    image: techiescamp/nginx-non-root-02:1.0.0
    ports:
    - containerPort: 9090
    securityContext:
        runAsUser: 0
As you can see in the above manifest, the first container is defined to run as a non-root user in the pod-level security context, and the second container is defined to run as a root user using the container-level security context.
Let's apply the manifest file and see what happens. Run the following command to apply the manifest file.
kubectl apply -f pod.yamlOnce the pod is up and running, use the following command to check in which users the container is running.
kubectl exec testing-pod -c first-container -- id

kubectl exec testing-pod -c second-container -- id
You will get the following output.
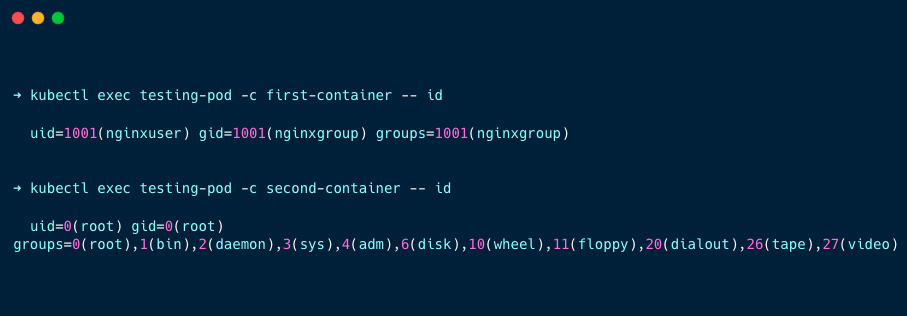
You can see the first container is running with the non-root user(1001), and the second container is running with the root user(0).
This means the container-level security context overrides the pod-level security context.
FAQ's
How to run pod with non-root user?
Using securityContext parameter and runAsUser subfield, you can run a pod with non root user. In the runAsUser parameter you can specify the username or userid.
Conclusion
Running pods as non-root use is one of the best security practice. It minimizes the risks associated with potential vulnerabilities by limiting the privileges of the application inside the container.
So to strengthen the overall security posture of your Kubernetes environment, you can implement this from the development stages. You can add checks using tools like Trivy in your Docker build pipelines to ensure container images are built with only with non-root users.
You can also prevent pods from deploying that doesnt run as non-root using kubernetes built-in admission controller called Pod Security Admission.
Also, implementing Kubernetes policy management tools like Kyverno to prevent pods from running as the root user by checking fields like runAsNonRoot. It can also validate existing workloads for security misconfigurations.
Now, we would like to know your thoughts?
Are you planning to implement non-root user pods in your environment?
Are you planning to implement policy management tools to ensure compliance?
Let us know the comments.

