In this blog we will look at detailed steps to provision different types of persistent volume on EKS using recommended EBS CSI Driver.
At the end of the guide, you will learn about the following.
- Usage of the EBS CSI Driver and its workflow
- Default and custom Storage Classes
- EBS Volume provisioning for persistent storage (hands-on tutorial)
- CSI Driver and Pod Identity Agent association
- Enabling CSI Driver in existing clusters.
This driver acts as an add-on in the EKS cluster to provision the EBS volumes, and the Pod Identity Agent helps the EBS CSI Controller to access the AWS EBS.
Setup Prerequisites
The prerequisites to follow this guide are as follows:
- EKS Cluster v1.30 or later
- eksctl utility installed on your workstation
- AWS CLI installed with admin privileges to EKS service.
EBS CSI Driver Workflow
The following workflow explains how the EBS CSI works with the Pod Identity Agent Plugin to provision a persistent EBS volume from the AWS Cloud for EKS.
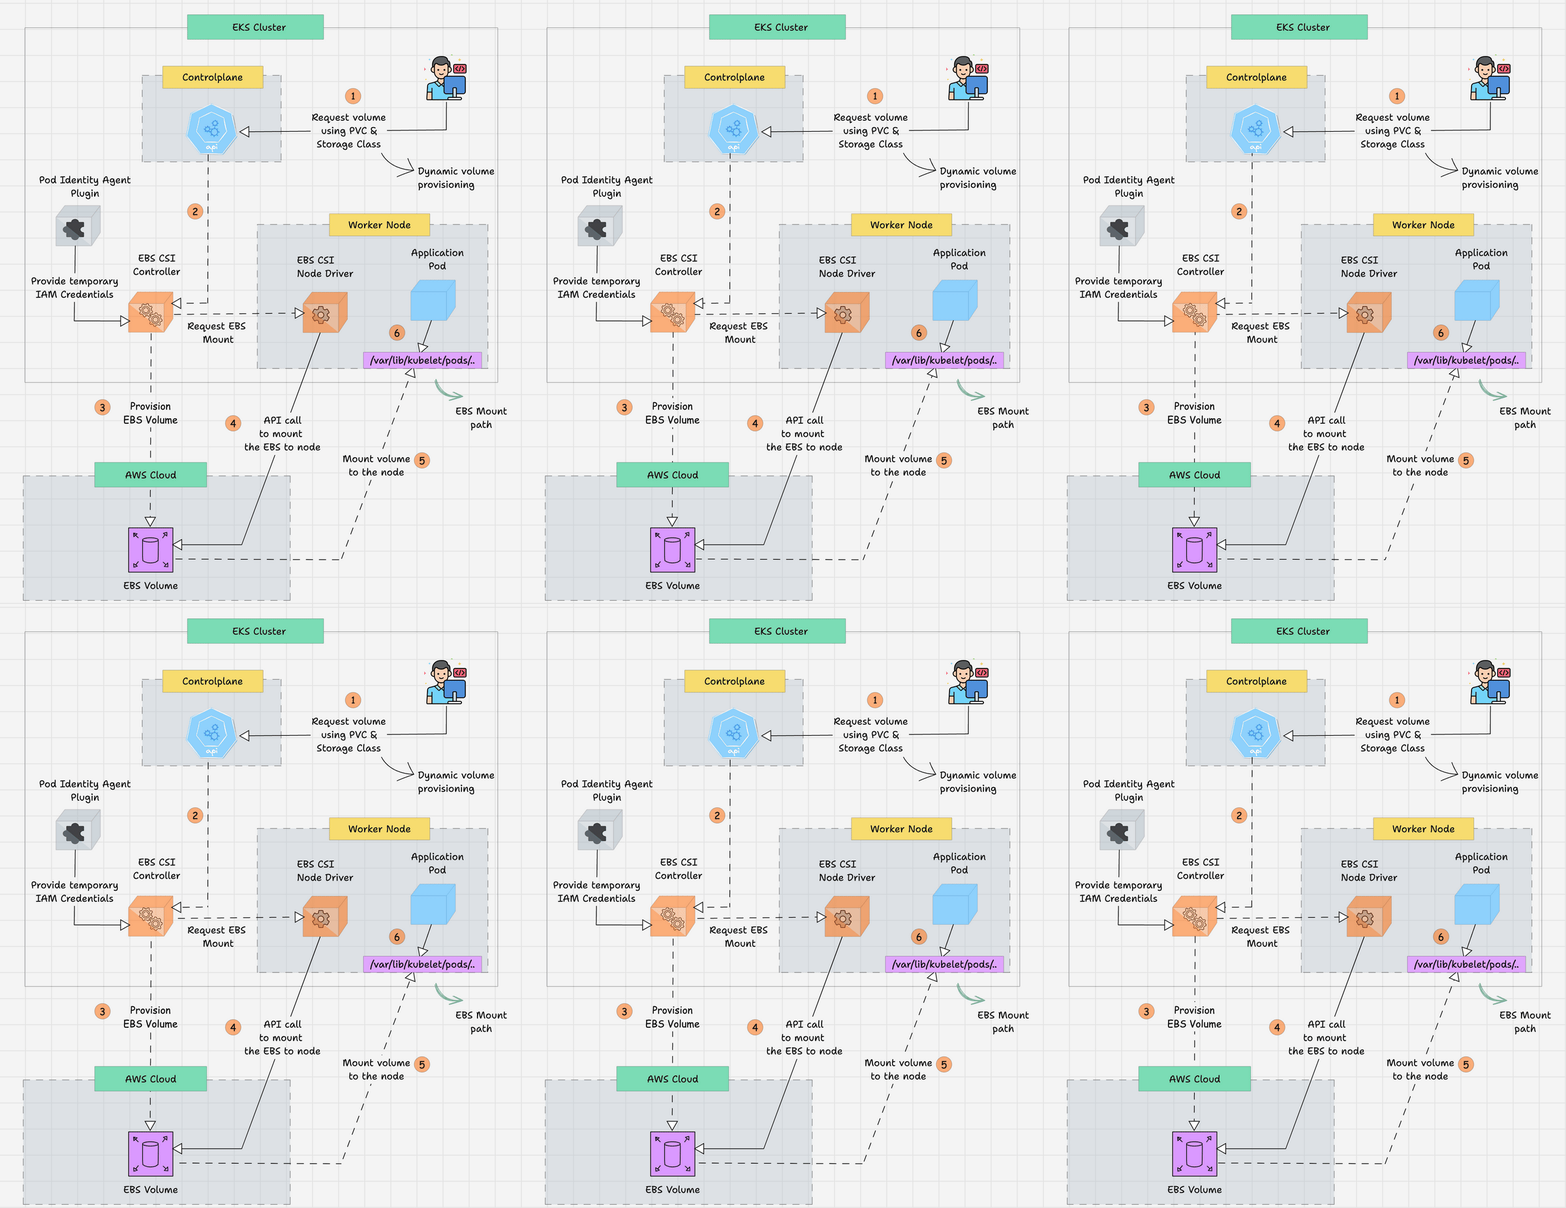
- The developer creates a Persistent Volume Claim (PVC) to get the required persistent storage for the Application Pod. The volume type and FS type will be mentioned in the StorageClass object.
- The request is routed from the Kubernetes API server in the control plane and then routed to the EBS CSI Controller to provision storage.
- The EBS CSI Controller needs to access the AWS EBS API to provision the EBS volume, so the EKS Pod Identity Plugin will provide the temporary credentials to the controller.
- The controller will validate the request and communicate with the AWS to provision an EBS volume.
- After provisioning the EBS volume, the EBS CSI Controller will get the EBS Volume ID and update the Persistent Volume. By the way, since it is dynamic provisioning, the PV will automatically be created.
- Also, the EBS Volume will not be attached to any Nodes until the Application Pod deployment, but the PV and PVC will be bound.
- When the Application Pod is created with the PVC, the EBS CSI Node driver, which is available in each node, requests that the provisioned EBS volume be attached to the particular node where the Application Pod will be run.
- Once the Node mounting is successfully completed, the CSI Node driver will get the node's EBS mount path from the AWS API, and then the Pod will start with the volume.
EKS Cluster With and Without CSI Driver
The key requirement for provisioning volumes with EBS is the EBS CSI Driver. Also it requires IAM privileges to manage EBS volumes for Persistent Volumes.
You can follow our EKS cluster creation using eksctl guide to spin up a cluster with EBS CSI Driver and associated IAM roles using pod Identity agent.
The following configuration in the eksctl YAML enables required permissions for EBS CSI Driver.
addons:
  - name: aws-ebs-csi-driver
    version: latest
  - name: eks-pod-identity-agent
    version: latest

addonsConfig:
   autoApplyPodIdentityAssociations: true
If you have an existing EKS cluster but don't have the EBS CSI Driver, the installation step is provided in the later section of this guide.
AWS EBS Volume as EKS Persistent Storage
Assuming you already have an EKS cluster with the EBS CSI Driver Plugin, you can start from step 1 to provision the Persistent Volume.
Step 1: Provision EBS Volume for EKS
We all know that the AWS EBS Volumes are zone-based, so keep that in mind if you provision an EBS volume as persistent storage for your Pods in the EKS Cluster.
The Node and the EBS volume should be in the same availability zone.
Choosing the type of EBS is also really important because it can affect the performance of your application or service.
EBS provides different types of storage, such as General-Purpose (SSD), Provisioned IOPS (SSD), Throughput-Optimized (HDD), Cold (HDD), and EBS Magnetic (HDD).
The default StorageClass comes with the General Purpose (SSD) gp2 type volumes, which have better IOPS and Throughput than HDD types.
When choosing the storage type, consider IOPS (Input/Output Operations Per Second) and Throughput.
If the application handles a high amount of transactional workloads such as Databases, then IOPS should be high.
In the EBS SSD-based storage types such as General Purpose (gp2, gp3) and Provisioned IOPS (Io1, Io2) have high IOPS, and can almost handle 16,000 to 256,000 Input/Output Per Second.
If the requirement is to store a larger amount of data for analysis or processing then HDD-based storage options would be good, and in this, Throughput Optimized (St1), Cold (Sc1) and Magnetic (standard) are the available options.
First, let me show you the default StorageClass in the EKS Cluster.
kubectl get storageclass
You will also get the same output; as I mentioned, the default storage type is gp2. In the next tab, you can see the PROVISIONER, which is kubernetes.io/aws-ebs.
But if we create a new StorageClass with this provisioner, we might face some errors, so instead of this, we use ebs.csi.aws.com as a provisioner.
Note: The default Storage Class (kubernetes.io/aws-ebs) also known as in-tree AWS EBS driver and will be deprecated in future.
I am creating a Storage Class with one of the high IOPS EBS volume types, which is Provisioned IOPS SSD (io2)
cat <<EOF > ebs-io2-volume.yaml
kind: StorageClass
apiVersion: storage.k8s.io/v1
metadata:
  name: io2-volume
provisioner: ebs.csi.aws.com
parameters:
  type: io2
  iopsPerGB: "50"
  fsType: ext4
volumeBindingMode: Immediate
EOF
I am using the volumeBindingMode as Immediate so that when someone creates a Persistent Volume Claim (PVC) that matches this Storage Class configuration, the PV and PVC will be immediately bound once the volume is provisioned.
Another option is WaitForFirstConsumer. In this, the bounding process waits until the pod is created because the Pod configuration should also match this configuration.
To deploy this configuration, use the following command.
kubectl apply -f ebs-io2-volume.yamlIf you check the available StorageClasses, you will see the new one on the list.
kubectl get storageclass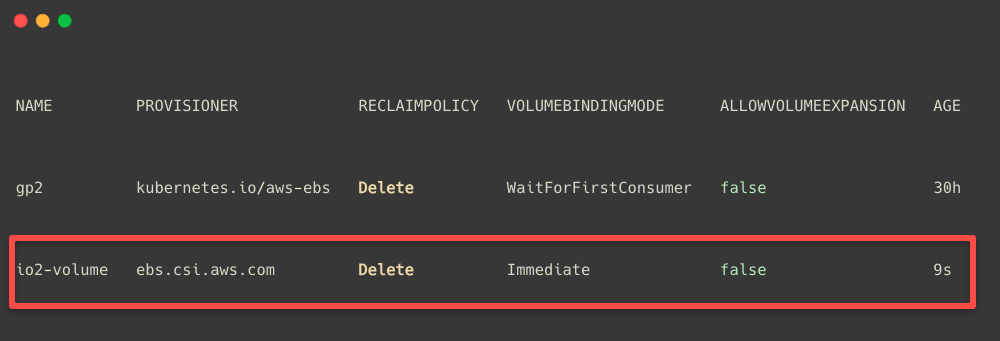
In most cases, we create a Persistent Volume(PV) first, then a Persistent Volume Claim (PVC) to get the required storage from the Persistent Volume.
In this case, we don't need PV but directly provision the volume only with a Persistent volume Claim, which is known as dynamic provisioning.
Now, we can create a PersistentVolumeClaim manifest io2-pvc.yaml with the required storage size, I am providing 12GB of storage for testing purposes.
cat <<EOF > io2-pvc.yaml
kind: PersistentVolumeClaim
apiVersion: v1
metadata:
  name: my-pvc
spec:
  accessModes:
    - ReadWriteOnce
  storageClassName: io2-volume
  resources:
    requests:
      storage: 12Gi
EOF
Here, you would have noticed the accessModes value is ReadWriteOnce; this means that only one Node (Volume attached node) can read and write on the volume because I have already mentioned that the EBS volumes are zone-specified.
Various access modes are available, but not every storage type supports all these access modes.
The available access modes are.
- ReadWriteOnce: This mode is suitable if only one node performs the read and write in the volume.
- ReadOnlyMany: This mode is suitable if many nodes need to read the contents but not to write.
- ReadWriteMany: This mode is for both; many nodes can read and write on the volume.
- ReadWriteOncePod: This mode is the same as the first one but is not a node; a pod can read and write on the volume.
To deploy this configuration, use the following command.
kubectl apply -f io2-pvc.yamlOnce the configuration is properly done, we can list the available PersistentVolumeClaims on our Cluster.
kubectl get pvc
This output ensures that the EBS volume is successfully created. We can also see other details such as capacity, access modes, storage class, etc.
We can see this provisioned volume from the AWS console as well.
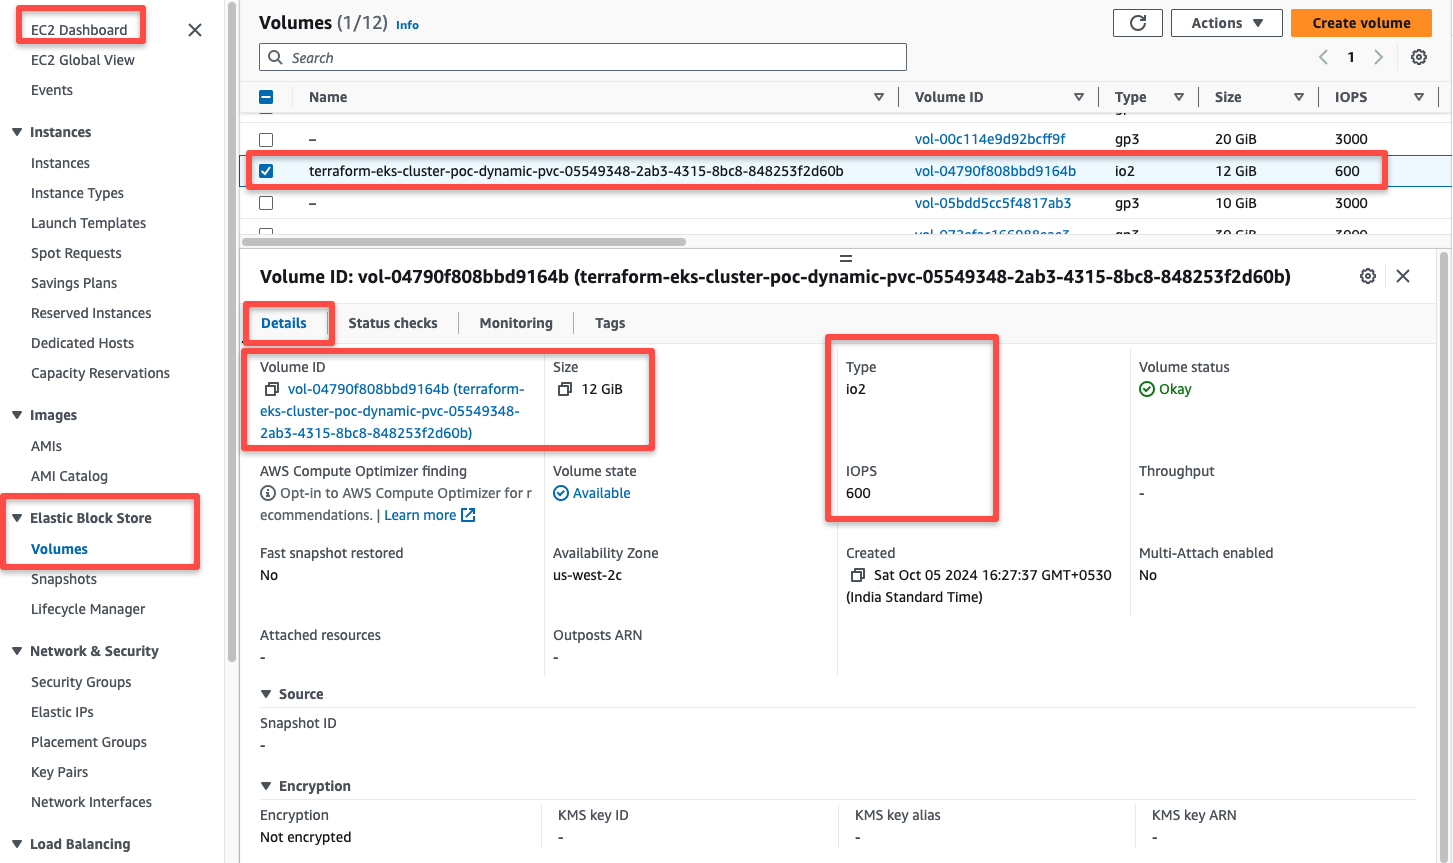
The EBS volume is in an Available state, so we can attach this as persistent volumes in the Pods.
Step 2: Attach Persistent Volume to a Pod
For testing purposes, I am creating an Nginx deployment and attaching the /usr/share/nginx/html directory of the container to the EBS volume.
cat <<EOF > deployment.yaml
apiVersion: apps/v1
kind: Deployment
metadata:
  name: io2-volume-deployment
  labels:
    app: io2-app
spec:
  replicas: 1
  selector:
    matchLabels:
      app: io2-app
  template:
    metadata:
      labels:
        app: io2-app
    spec:
      containers:
        - name: io2-container
          image: nginx:latest
          ports:
            - containerPort: 80
          volumeMounts:
            - name: io2-volume
              mountPath: /usr/share/nginx/html
      volumes:
        - name: io2-volume
          persistentVolumeClaim:
            claimName: my-pvc
EOF
kubectl apply -f deployment.yamlIf we check the EBS volume state in the AWS console after the successful deployment, it will be in use.
When creating the PVC, the EBS volume will be provisioned and when create a Pod with the PVC, the EBS volume will be attached with the node where the Pod is going to run.
This way, we can permanently store the data on the EBS volumes.
Setup the EBS CSI Driver in Existing EKS Cluster
If you have an existing EKS cluster without the EBS CSI Driver and Pod Identity Agent plugin for this hands-on, you can install and configure them using the following steps.
Before provisioning the EBS volume in the EKS cluster, we need to set up the Amazon EBS CSI Driver on the cluster.
Step 1: Check IAM OIDC Provider Integration
Note: If OIDC has already been added to your cluster, you can ignore this step.
The EBS CSI driver needs dedicated IAM privileges to provision EBS volumes when requested for PVCs.
However, you can use the OIDC provider to add IAM Permission to the EKS Pods.
When we create an EKS Cluster, an OIDC provider ID is also generated.
You can get it from the Identity Providers section in the IAM portal, as shown below.
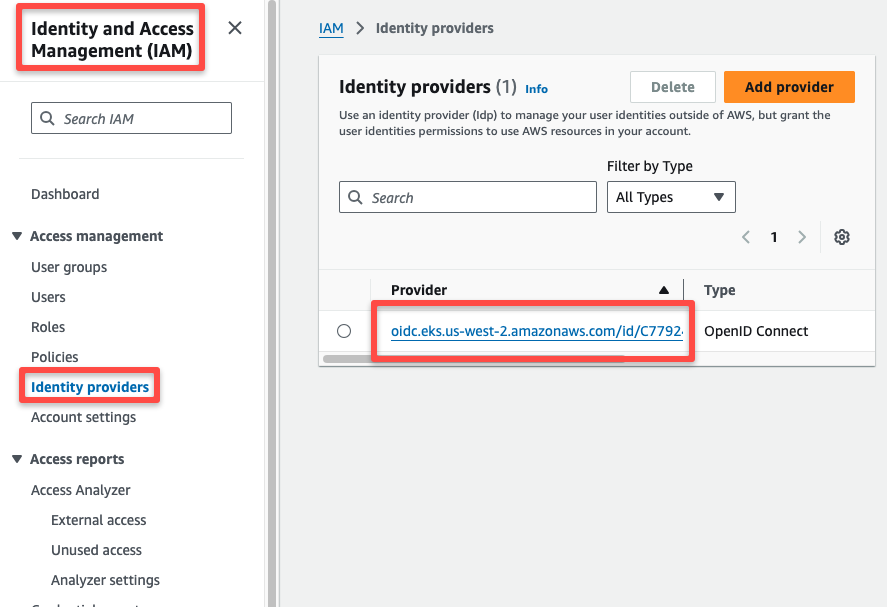
Let's list the available clusters in the AWS account, us-west-2 region.
aws eks list-clusters --region us-west-2This will show you the available clusters in the particular region.
Set the Region and the Cluster Name as environment variables.
export REGION=us-west-2
export CLUSTER_NAME=terraform-eks-cluster-poc
Check whether the IAM OIDC Provider is associated with the cluster or use the following command to associate the OIDC provider.
eksctl utils associate-iam-oidc-provider --region=$REGION --cluster=$CLUSTER_NAME --approveYou will get the prompt IAM Open ID Connect provider is already associated with cluster If the OIDC association is already present in the cluster.
Step 2: Install AWS EBS CSI Driver
Use the following command to install the EBS CSI Driver on the EKS Cluster.
eksctl create addon --cluster $CLUSTER_NAME --region $REGION --name aws-ebs-csi-driverThe EBS CSI add-on will be created with the necessary permissions, as seen in the AWS Console.
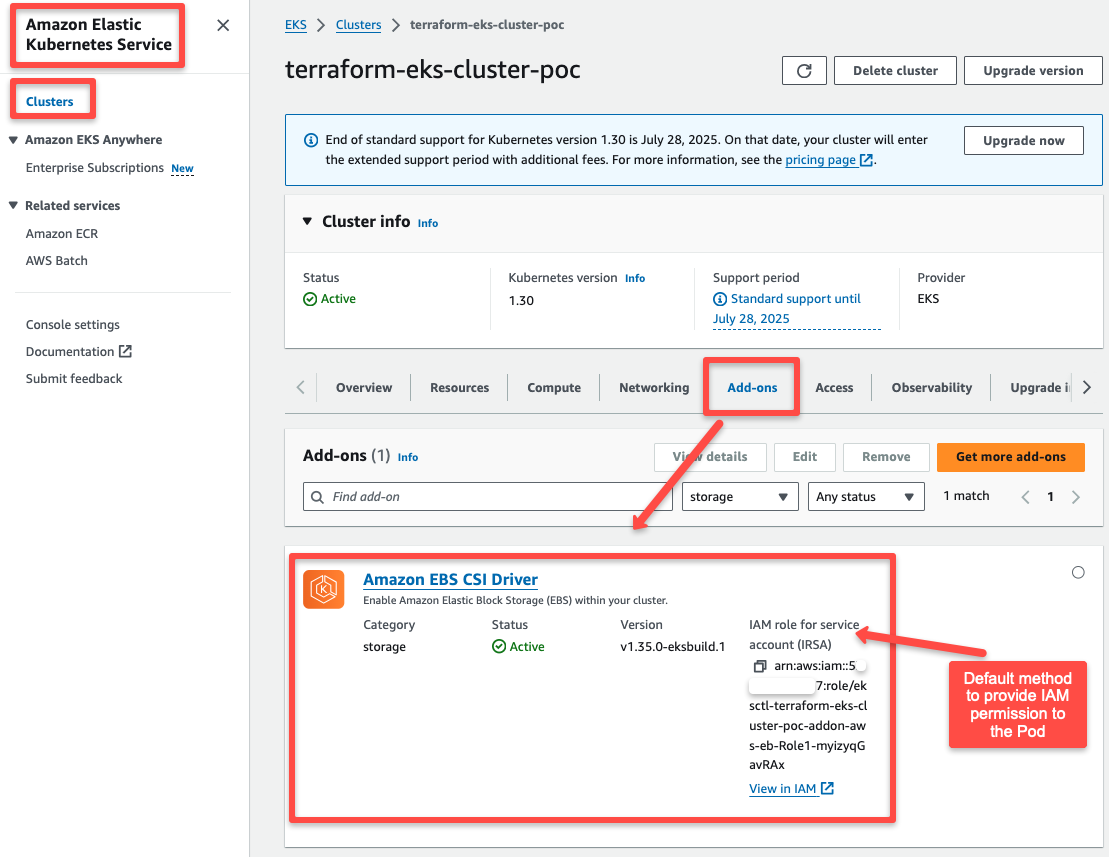
Important Note: The current IAM permissions are attached to the drivers using the IAM Role for Service Account (IRSA) method. However, the IRSA method is deprecated, so we will use the Pod Identity Agent to assign IAM roles to pods, which will be done in the next step
The IAM Role and Policy will be automatically created for the CSI Driver. As shown below, you can check them from the IAM console.
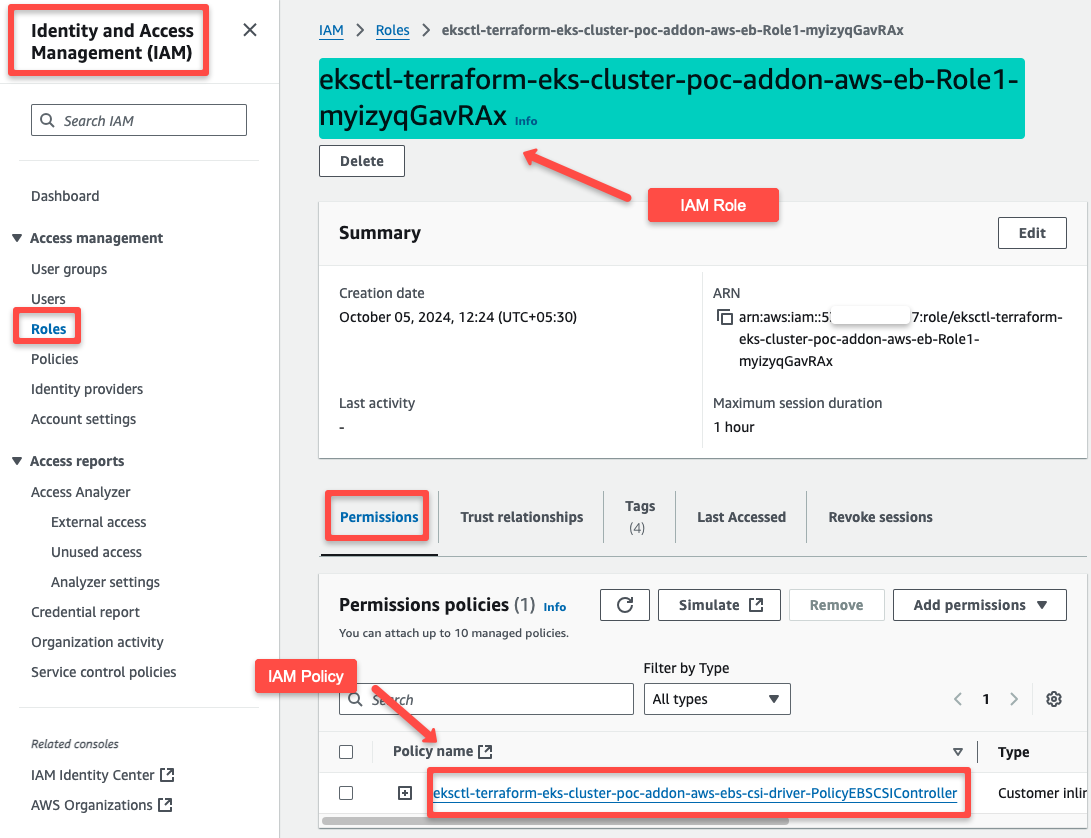
You can view all the permissions if you click the + symbol of the Policy.
If you check the Trust relationships, you will see the following information related to the OIDC.
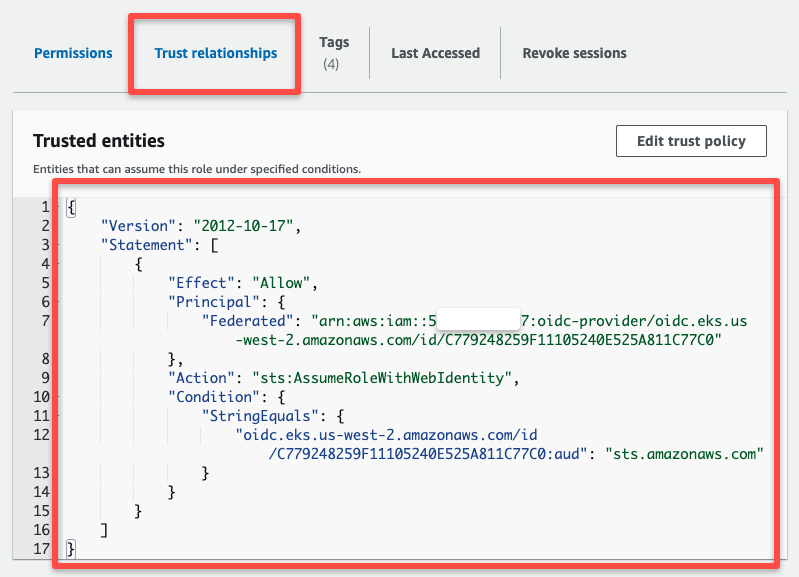
The EBS CSI Driver runs as Pods in the Cluster, so let's check the running Pods.
kubectl get pods -n kube-system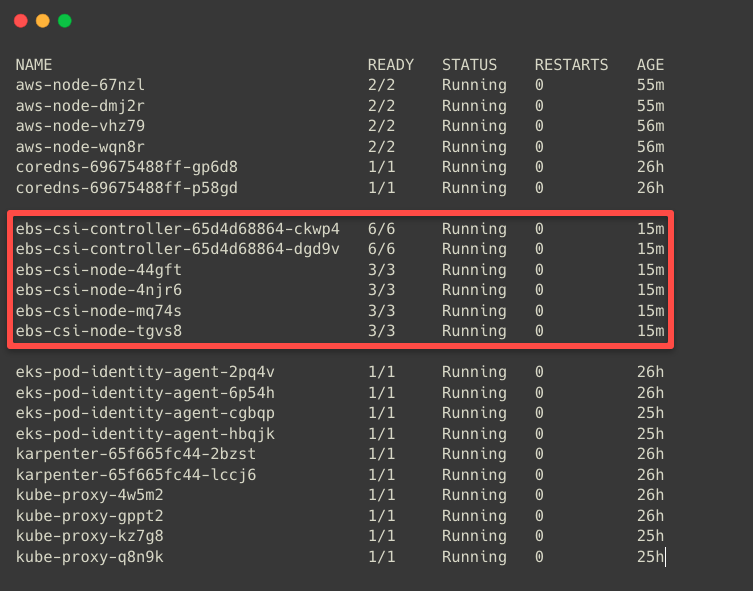
I have four-node clusters, which is why the four CSI Node Drivers are running.
The EBS CSI Controller Pods will deploy on any of the Nodes. The EBS CSI Node Drivers is a DaemonSet and will be available in each worker node.
Now that the Amazon EBS CSI Plugin has been successfully installed.
we can provision the EBS volumes from the EKS Cluster.
If we describe the EBS CSI Driver's Service Account, we can see the annotation of the AWS IAM Role.
kubectl -n kube-system describe sa ebs-csi-controller-sa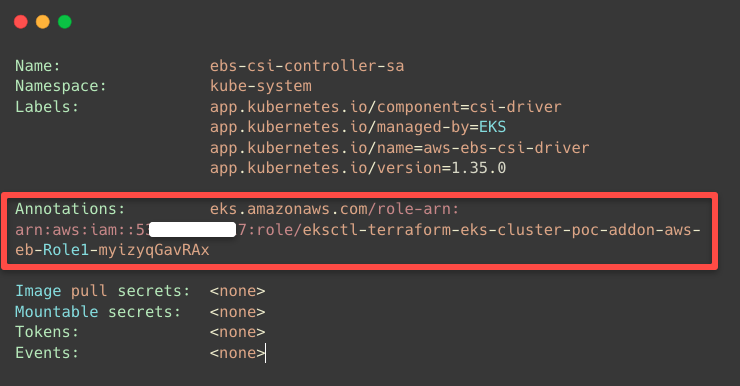
Step 3: Migrate to Pod Identity
However, providing AWS IAM Permissions to a Pod using IRSA is deprecated, so we are migrating this to the EKS Pod Identity Agent.
First, we need to ensure the Pod Identity Agent Plugin is installed in the EKS Cluster.
aws eks list-addons --cluster-name $CLUSTER_NAME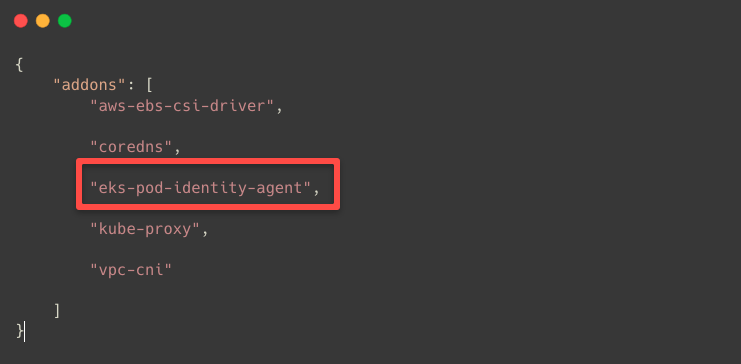
If the Plugin is not available, install it using the following command.
aws eks create-addon --cluster-name $CLUSTER_NAME --addon-name eks-pod-identity-agentOnce the Pod Identity Agent is available, we can migrate everything from IRSA to Pod Identity.
eksctl utils migrate-to-pod-identity --cluster $CLUSTER_NAME --approveAfter the successful migration, we can list the Pod Identity Associations.
eksctl get podidentityassociation --cluster $CLUSTER_NAMEor
aws eks list-pod-identity-associations --cluster-name $CLUSTER_NAME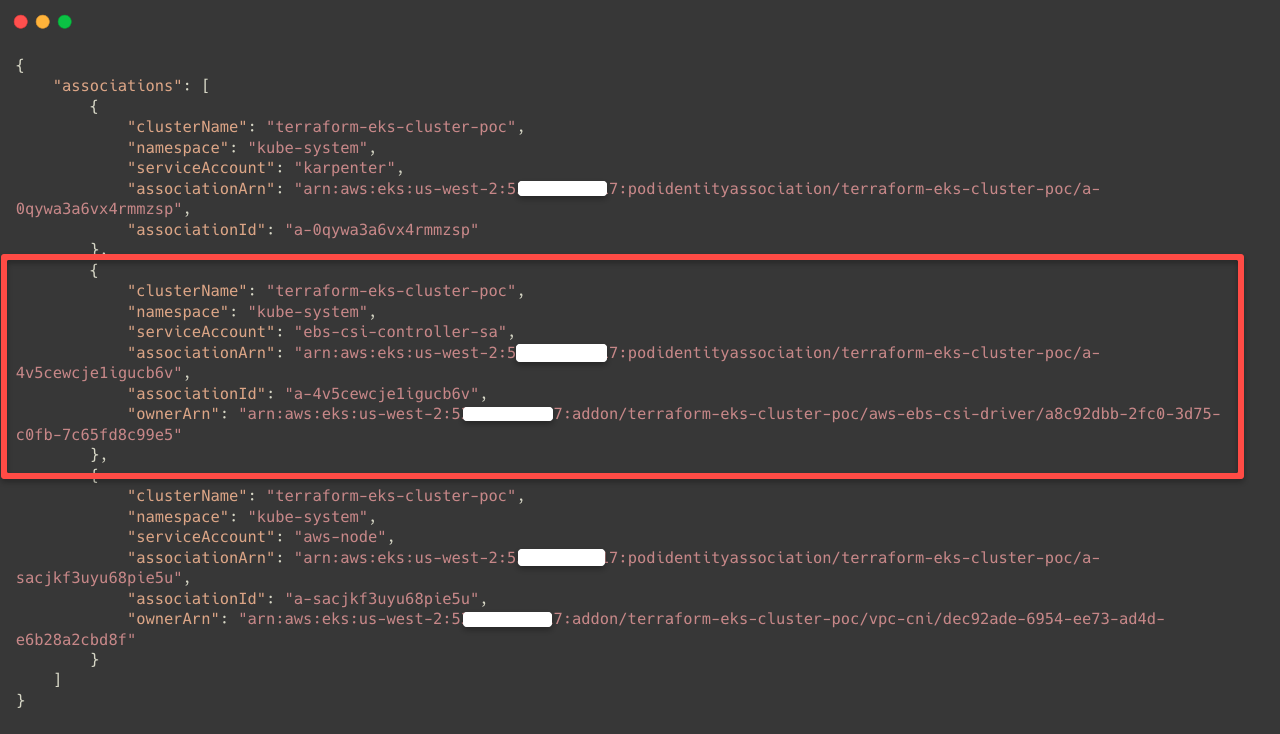
Now, we cannot see the annotation in the Service Account.
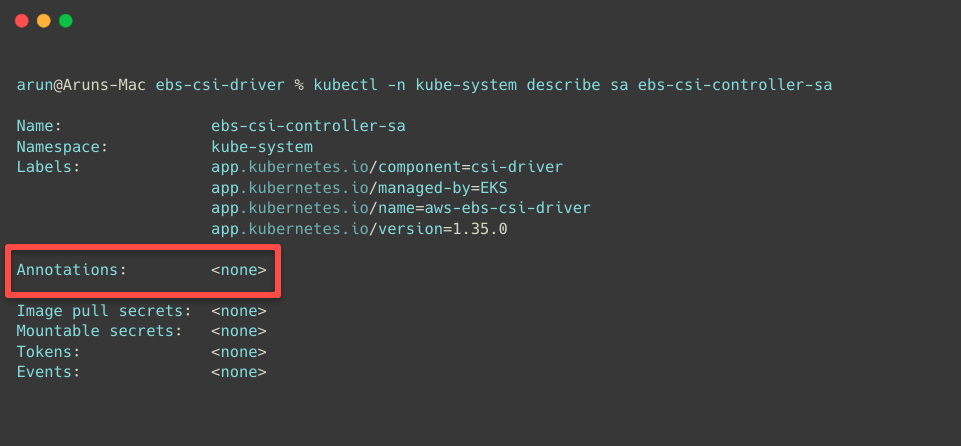
We can see some changes if we check the Trust relationship of the IAM Role, which is related to the Pod Identity Agent.
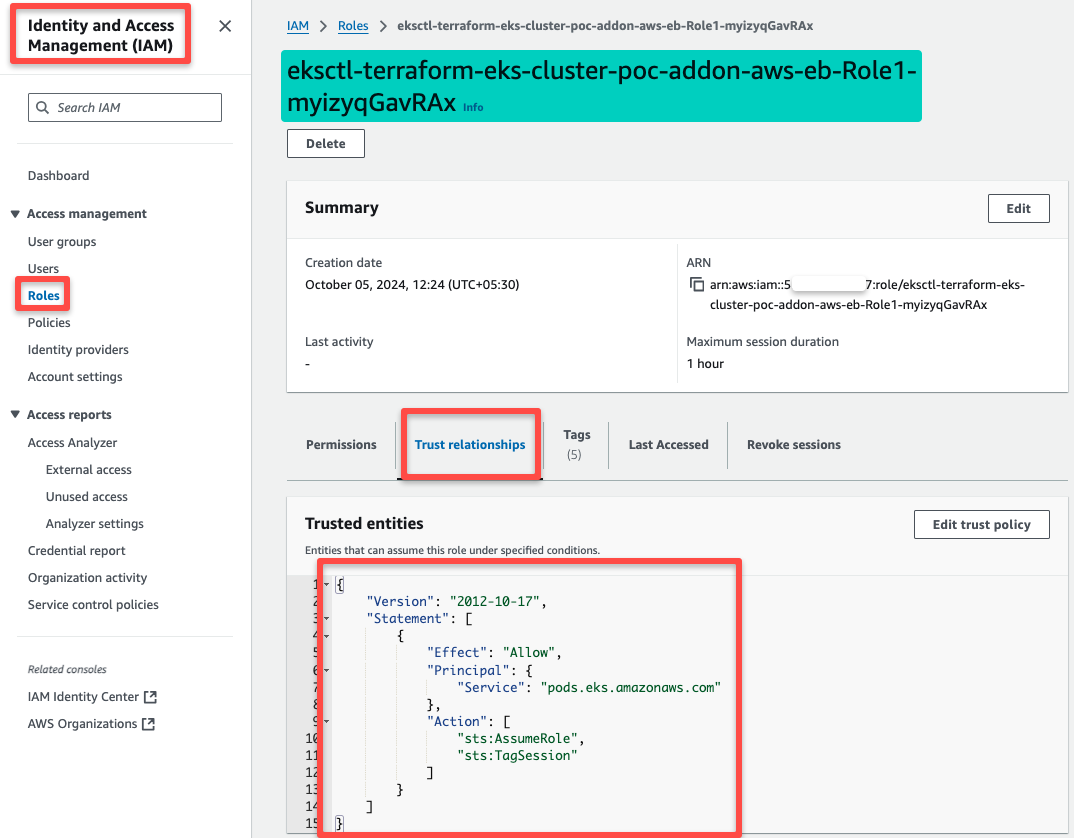
We can even check the add-on's update history and ensure the Pod Identity Association is properly configured.
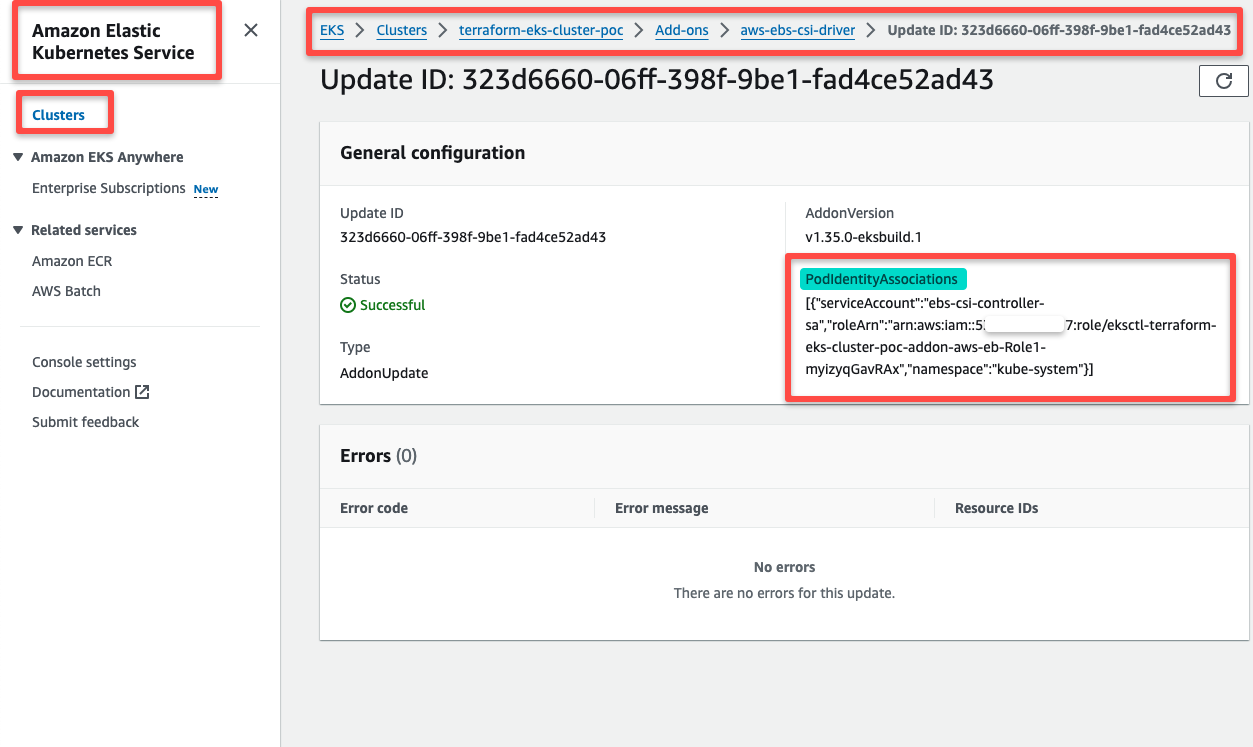
Now the EBS CSI Driver is successfully installed on the existing EKS cluster with the Pod Identity Agent, and is ready to provision the EBS volumes for the EKS cluster.
Conclusion
This will help your EKS Pod data be permanently stored in the EBS volumes and give you an overall idea of the EBS CSI Driver and its configurations.
Choose the appropriate volume type for your workload. Depending on the underlying storage you choose for the persistent storage, some configurations will be changed in the StorageClass manifest.
Always remember to back up the storage. In EBS, we can take snapshots or use the AWS Backup service to take backups. We can also try third-party backup options.
If you are looking for NFS based storage solution, check out the EFS on EKS guide for the full setup.


