

In this blog, we will look at a Kubernetes feature called Node Feature Discovery.
At the end of this blog, you will learn the following:
- What is NFD in Kubernetes
- NFD Architecture
- Hands on NFD
- Label Filtering to avoid label explosion.
- Key Use Cases
What is Node Feature Discovery?
By default, every Kubernetes node comes with a few basic built-in labels that are automatically added by the kubelet.
For example,
- kubernetes.io/hostname=<node-name>
- kubernetes.io/os=linux
- kubernetes.io/arch=amd64
If your cluster runs on a cloud provider like AWS EKS, you will also see extra labels that describe the cloud environment, such as:
- topology.kubernetes.io/region=ap-south-1
- topology.kubernetes.io/zone=ap-south-1a
- node.kubernetes.io/instance-type=t3.medium
These labels are useful for scheduling, automation, and workload placement.
For instance, you can schedule a Pod to run only in a certain region or on a specific instance type.
However, notice that these default labels don’t include any details about the hardware, kernel, or device features of the node.
Thats where Node Feature Discovery (NFD) comes in.
Node Feature Discovery is a Kubernetes add-on that automatically detects and labels node-level features such as CPU flags, memory, kernel version, network adapters, and GPU capabilities.
If you have used Ansible facts before, NFD works in a similar way.
Just like Ansible gathers system information and provides it as metadata, NFD collects system details from Kubernetes nodes and exposes them as node labels.
Node Feature Discovery Architecture
Node Feature Discovery has 4 components:
- nfd-master
- nfd-worker
- nfd-topology-updater
- nfd-gc
The workflow overview for Node Feature Discovery is given below.
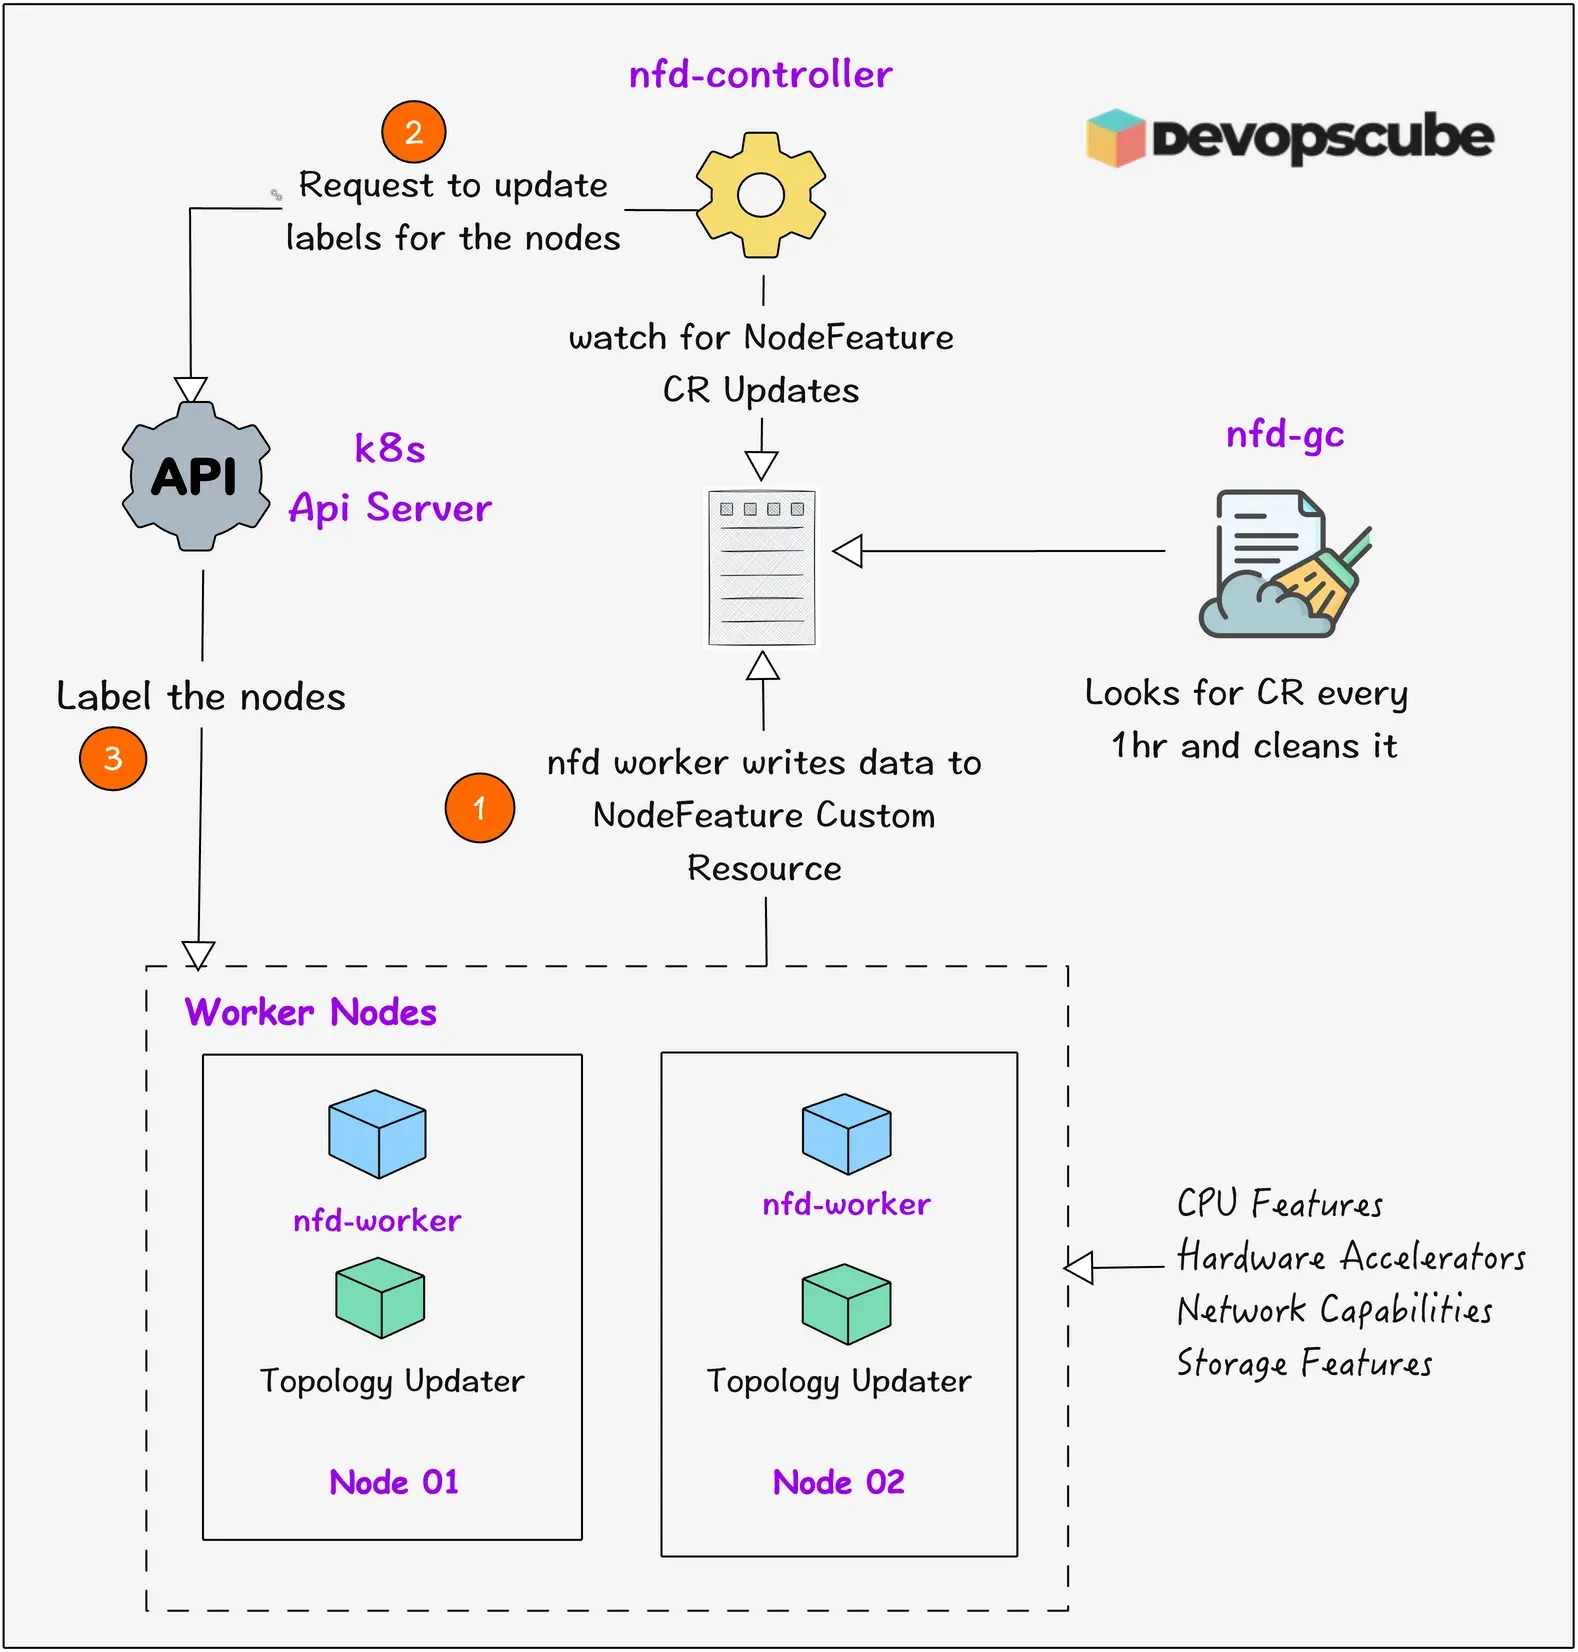
Here is how it all works together.
- nfd-worker runs as a DaemonSet on each node. It scans multiple sources (CPU, memory, PCI, etc.) and writes raw feature data into NodeFeature custom resources.
- At regular intervals (default ~60s), workers update NodeFeature CRs to reflect changes.
- nfd-master runs as a Deployment (usually a single replica). It watches these NodeFeature CRs, applies any filtering or rules, and updates the actual Node objects (labels, taints, extended resources) via the Kubernetes API.
- nfd-topology-updater (if enabled) also runs as a DaemonSet. It collects NUMA, CPU, memory, and device topology from nodes and publishes NodeResourceTopology objects so that Topology Manager can do NUMA-aware scheduling.
- nfd-gc (Garbage Collector) ensures that for any node that has left the cluster, its corresponding NodeFeature or NodeResourceTopology objects are removed. The default garbage collection interval is 1 hour.
Prerequisites
Below are the prerequisites required before going to the next section.
- A running Kubernetes cluster
- Helm is installed in your system
Install Node Feature Discovery
We are going to install Node Feature Discovery using Helm.
Before installing Node Feature Discovery, check the current labels on your node.
kubectl get no --show-labels | grep multi-node-cluster-worker2 I have given one of the node's names, update it to your nodes name before running the command.
$ kubectl get no --show-labels | grep multi-node-cluster-worker2

multi-node-cluster-worker2         Ready    <none>          8m10s   v1.33.0   beta.kubernetes.io/arch=amd64,beta.kubernetes.io/os=linux,kubernetes.io/arch=amd64,kubernetes.io/hostname=multi-node-cluster-worker2,kubernetes.io/os=linux
Now, run the following command to install Node Feature Discovery.
helm install -n node-feature-discovery --create-namespace nfd oci://registry.k8s.io/nfd/charts/node-feature-discovery --version 0.18.1If you want to deploy the topologyUpdater pod, add the flags --set topologyUpdater.createCRDs=true and --set topologyUpdater.enable=true in the above command.
For example,
helm install -n node-feature-discovery --create-namespace nfd oci://registry.k8s.io/nfd/charts/node-feature-discovery --version 0.18.1 --set topologyUpdater.createCRDs=true --set topologyUpdater.enable=trueFor other installation options, refer to the official documentation.
Run the following command to check if the pods are created and running.
kubectl get po -n node-feature-discoveryYou will get the following output.
NAME                                                 READY   STATUS    RESTARTS   AGE

nfd-node-feature-discovery-gc-b765d6879-drf85        1/1     Running   0          75s
nfd-node-feature-discovery-master-78b957b755-jbncc   1/1     Running   0          75s
nfd-node-feature-discovery-worker-9vgt7              1/1     Running   0          75s
nfd-node-feature-discovery-worker-w476p              1/1     Running   0          75s
Once the pods start running, run the following command to check the nodes labels again.
$ kubectl get no --show-labels | grep multi-node-cluster-worker2

multi-node-cluster-worker2         Ready    <none>          11m   v1.33.0   beta.kubernetes.io/arch=amd64,beta.kubernetes.io/os=linux,feature.node.kubernetes.io/cpu-cpuid.ADX=true,feature.node.kubernetes.io/cpu-cpuid.AESNI=true,feature.node.kubernetes.io/cpu-cpuid.AVX2=true,feature.node.kubernetes.io/cpu-cpuid.AVX=true,feature.node.kubernetes.io/cpu-cpuid.CMPXCHG8=true,feature.node.kubernetes.io/cpu-cpuid.FMA3=true,feature.node.kubernetes.io/cpu-cpuid.FXSR=true,feature.node.kubernetes.io/cpu-cpuid.FXSROPT=true,feature.node.kubernetes.io/cpu-cpuid.HYPERVISOR=true,feature.node.kubernetes.io/cpu-cpuid.LAHF=true,feature.node.kubernetes.io/cpu-cpuid.MOVBE=true,feature.node.kubernetes.io/cpu-cpuid.OSXSAVE=true,feature.node.kubernetes.io/cpu-cpuid.SYSCALL=true,feature.node.kubernetes.io/cpu-cpuid.SYSEE=true,feature.node.kubernetes.io/cpu-cpuid.X87=true,feature.node.kubernetes.io/cpu-cpuid.XGETBV1=true,feature.node.kubernetes.io/cpu-cpuid.XSAVE=true,feature.node.kubernetes.io/cpu-cpuid.XSAVEC=true,feature.node.kubernetes.io/cpu-cpuid.XSAVEOPT=true,feature.node.kubernetes.io/cpu-hardware_multithreading=false,feature.node.kubernetes.io/cpu-model.family=6,feature.node.kubernetes.io/cpu-model.id=158,feature.node.kubernetes.io/cpu-model.vendor_id=Intel,feature.node.kubernetes.io/kernel-config.NO_HZ=true,feature.node.kubernetes.io/kernel-config.NO_HZ_FULL=true,feature.node.kubernetes.io/kernel-version.full=6.10.14-linuxkit,feature.node.kubernetes.io/kernel-version.major=6,feature.node.kubernetes.io/kernel-version.minor=10,feature.node.kubernetes.io/kernel-version.revision=14,feature.node.kubernetes.io/memory-swap=true,feature.node.kubernetes.io/storage-nonrotationaldisk=true,feature.node.kubernetes.io/system-os_release.ID=debian,feature.node.kubernetes.io/system-os_release.VERSION_ID.major=12,feature.node.kubernetes.io/system-os_release.VERSION_ID=12,kubernetes.io/arch=amd64,kubernetes.io/hostname=multi-node-cluster-worker2,kubernetes.io/os=linux
Advance Node Label Filtering
By default NFD gets all available features and updates in the node. This leads to label explosion. Meaning, too many labels are created on your Kubernetes nodes.
Too many labels make node metadata big, which can slow down API responses.
To mitigate this, you can limit or filter what NFD labels.
During the NFD installation, you can control the label filtering using the --set worker.config.core.labelSources flag.
Lets say, you only need to label the available features on cpu, you can use the flag --set worker.config.core.labelSources="{cpu}" to filter the components labels you need.
For example,
helm install -n node-feature-discovery --create-namespace nfd oci://registry.k8s.io/nfd/charts/node-feature-discovery --version 0.18.1 --set worker.config.core.labelSources="{cpu}"For advanced filtering, you need to download the Helm values file.
helm show values oci://registry.k8s.io/nfd/charts/node-feature-discovery --version 0.18.1 -n node-feature-discovery > values.yamlThen go to the master configuration section and add the following.
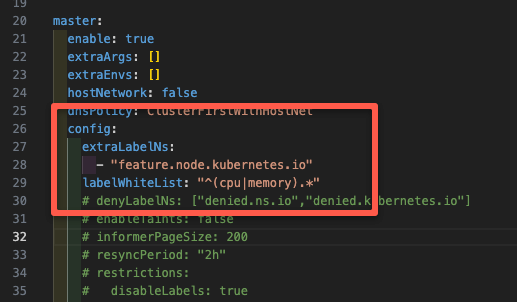
For example, I am going to whitelist only the labels for CPU and memory.
config:
  extraLabelNs:
    - "feature.node.kubernetes.io"
  labelWhiteList: "^(cpu|memory).*"
Once the configuration is added under the master, as shown below.
Run the following Helm upgrade command.
helm upgrade nfd oci://registry.k8s.io/nfd/charts/node-feature-discovery --version 0.18.1 -n node-feature-discovery -f values.yamlThis will restart the master pod and add only the labels of CPU and Memory to the nodes.
$ kubectl get no --show-labels | grep multi-node-cluster-worker2

multi-node-cluster-worker2         Ready    <none>          172m   v1.33.0   beta.kubernetes.io/arch=amd64,beta.kubernetes.io/os=linux,feature.node.kubernetes.io/cpu-cpuid.ADX=true,feature.node.kubernetes.io/cpu-cpuid.AESNI=true,feature.node.kubernetes.io/cpu-cpuid.AVX2=true,feature.node.kubernetes.io/cpu-cpuid.AVX=true,feature.node.kubernetes.io/cpu-cpuid.CMPXCHG8=true,feature.node.kubernetes.io/cpu-cpuid.FMA3=true,feature.node.kubernetes.io/cpu-cpuid.FXSR=true,feature.node.kubernetes.io/cpu-cpuid.FXSROPT=true,feature.node.kubernetes.io/cpu-cpuid.HYPERVISOR=true,feature.node.kubernetes.io/cpu-cpuid.LAHF=true,feature.node.kubernetes.io/cpu-cpuid.MOVBE=true,feature.node.kubernetes.io/cpu-cpuid.OSXSAVE=true,feature.node.kubernetes.io/cpu-cpuid.SYSCALL=true,feature.node.kubernetes.io/cpu-cpuid.SYSEE=true,feature.node.kubernetes.io/cpu-cpuid.X87=true,feature.node.kubernetes.io/cpu-cpuid.XGETBV1=true,feature.node.kubernetes.io/cpu-cpuid.XSAVE=true,feature.node.kubernetes.io/cpu-cpuid.XSAVEC=true,feature.node.kubernetes.io/cpu-cpuid.XSAVEOPT=true,feature.node.kubernetes.io/cpu-hardware_multithreading=false,feature.node.kubernetes.io/cpu-model.family=6,feature.node.kubernetes.io/cpu-model.id=158,feature.node.kubernetes.io/cpu-model.vendor_id=Intel,feature.node.kubernetes.io/memory-swap=true,kubernetes.io/arch=amd64,kubernetes.io/hostname=multi-node-cluster-worker2,kubernetes.io/os=linux
How to deploy pods in a specific Node using NFD Labels?
You can use any of the NFD generated labels in the nodeSelector to deploy the workloads in this node.
As an example, let's deploy the nginx pod in the node that has swap enabled.
multi-node-cluster-worker2 already has swap enabled and NFD has enabled the swap label.First,c reate a YAML file nfd.yaml and copy the following content.
apiVersion: v1
kind: Pod
metadata:
  name: nginx
spec:
  containers:
  - name: nginx
    image: nginx:latest
  nodeSelector:
    feature.node.kubernetes.io/memory-swap: "true"
Use the command below to apply the manifest.
kubectl apply -f nfd.yamlThen, run the following command to check, in which node the pod is deployed.
kubectl get po -o wideYou will get the following output.
NAME   READY  STATUS   RESTARTS  AGE  IP          NODE

nginx  1/1    Running  0         4m   10.244.1.3  multi-node-cluster-worker2
You can see the pod is deployed in the node, which has swap enabled.
Clean Up
If you no longer need this, run the following command.
helm delete -n node-feature-discovery nfdNFD Real World Use Cases
Lets look at three key use cases for NFD so that you understand it better.
1. Detecting Nodes with Swap Enabled
One simple and practical use case of NFD is to automatically detect nodes with swap enabled.
In our Kubernetes Swap newsletter, I explained how NFD can label such nodes.
Once installed, NFD adds labels that indicate whether swap is turned on or off for each node.
This makes it easy to schedule or monitor Pods based on swap status.
2. Scheduling AI and GPU Workloads
Another common use case is AI and GPU workload scheduling.
For Kubernetes AI/ML use cases, NFD works together with the Kubernetes Device Plugin framework (for example, the NVIDIA device plugin) to Detect GPU presence and capabilities and ddd GPU-related labels to nodes
This makes it possible to schedule machine learning or deep learning workloads only on GPU-enabled nodes.
3. NUMA-Aware Scheduling and CPU Pinning
For high-performance or latency-sensitive applications, NFD provides the detailed hardware topology data needed for the following.
- NUMA-aware scheduling, where Pods are placed close to the memory and devices they use. (Typically used in AI/ML inference, Databases etc)
- CPU pinning, where specific CPU cores are dedicated to certain workloads (Used in Real-time applications like VoIP, Telecom workloads etc)
This helps achieve better performance and resource efficiency in compute-heavy environments.
In short, NFD acts as the hardware awareness layer for Kubernetes.
You can use NFD for any scenario where your application requires special hardware features such as certain GPUs, CPUs, kernel modules, or network devices.
Conclusion
NFD is not required for every Kubernetes setup.
But when you are running AI/ML, or network-heavy workloads, it can come in handy.
It helps Kubernetes understand what your nodes are truly capable of, so pods land exactly where they perform best.
Over to you!
Try out NFD and see if it adds value to your projects.