


In this step by step blog, you will learn to set up and configure ingress for Istio mesh using Kubernetes Gateway API with examples.
Here is what you will learn by the end of this blog.
- How to use the Kubernetes Gateway API with Istio
- How to expose services running inside an Istio service mesh using a Gateway.
- Configure canary traffic splitting using HTTPRoute weights.
- Add Istio traffic policies like circuit breaking using DestinationRule.
- Validate end-to-end traffic flow from an external client.
- How Gateway API and the GAMMA initiative extend the same model to internal (east-west) mesh traffic.
Using Gateway API for Istio Ingress
Istio is a service mesh that primarily manages the internal traffic, meaning the service-to-service communication (east-west traffic).
However, we also need to handle north-south traffic (external to internal). To do that, we need an ingress setup similar to native Kubernetes.
For this, Istio provides its own Gateway + VirtualService API to handle ingress/egress.
However, Istio now supports the Kubernetes Gateway API for handling external traffic. Also it is intended to become the default API in the future for managing ingress/egress traffic in Istio-enabled clusters.
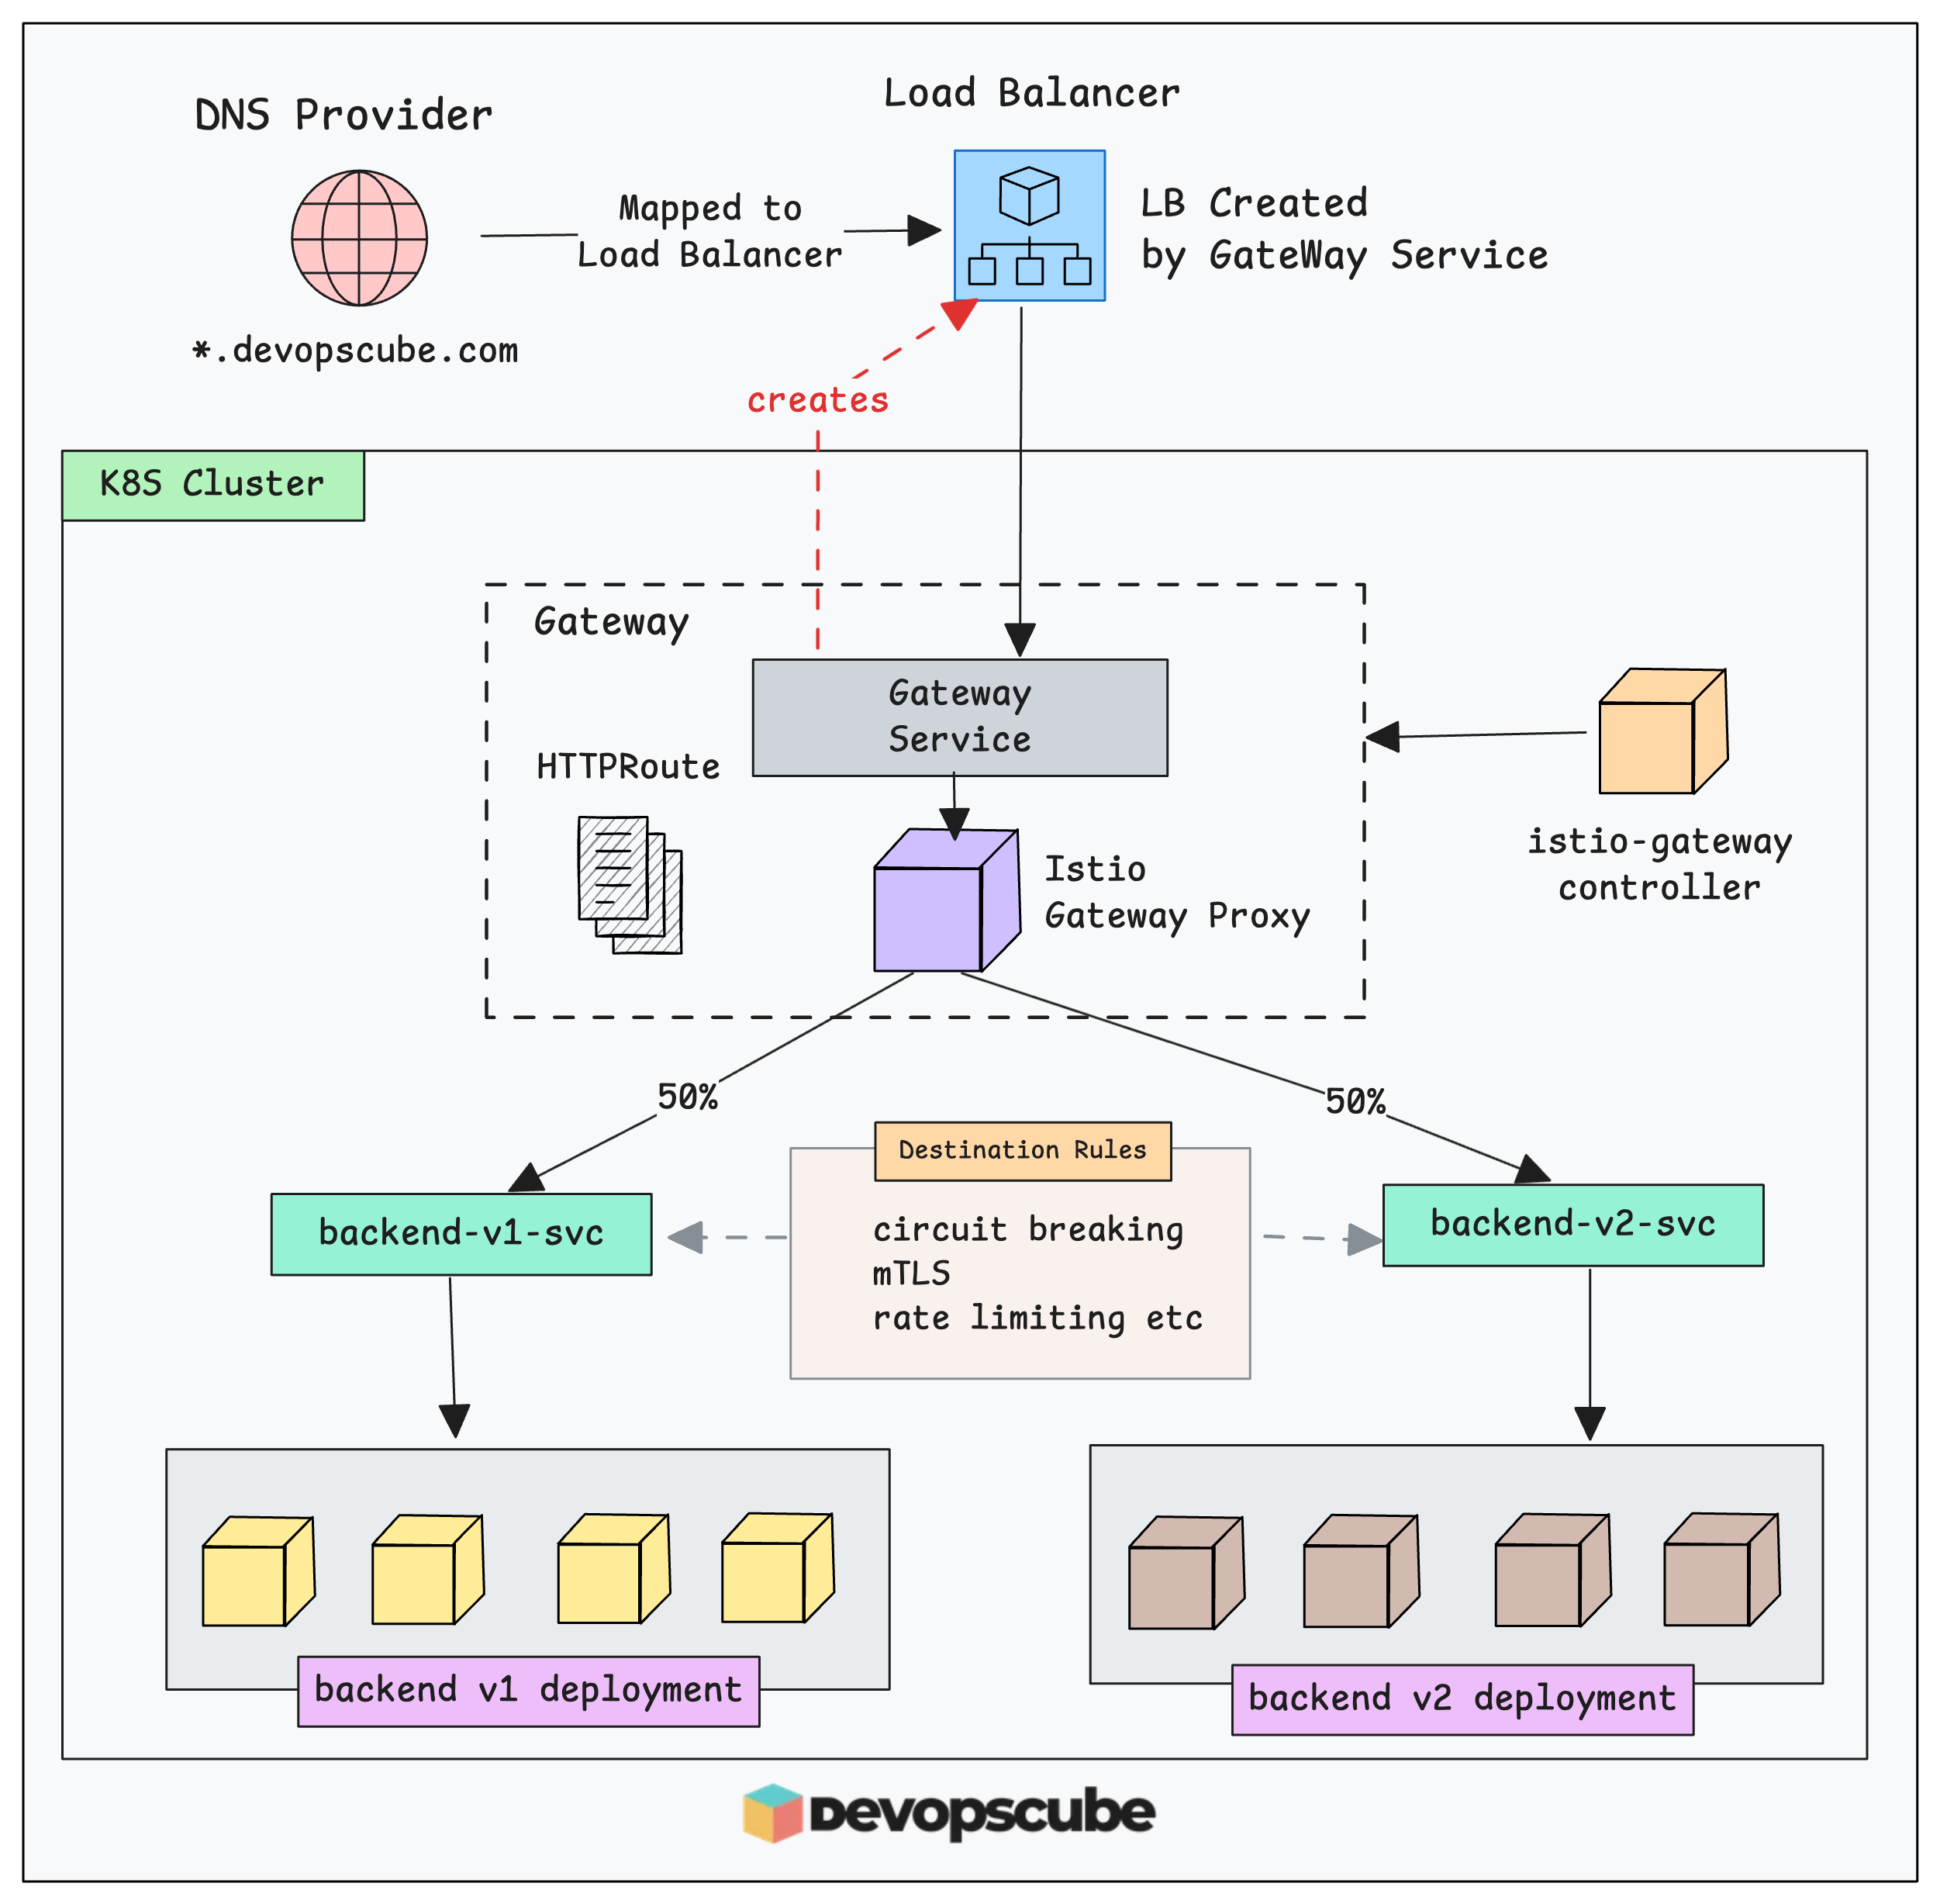
The image below shows the high-level architecture of what we are going to build. Once you finish the setup, come back to this diagram. It will make more sense then.
Although there is support, here is what the official Istio documentation says about using the Gateway API for ingress:
While the Gateway APIs offer a lot of rich routing functionality, it does not yet cover 100% of Istio’s feature set. (istio.io)Now, lets understand the Gateway API integration practically.
Setup Prerequisites
To get started with this setup you need an Istio-enabled Kubernetes cluster.
We have covered the full Istio setup using sidecar mode in a detailed blog. Please refer to the following guide for that setup.
Set up Istio on a Kubernetes ClusterSo please make sure to deploy them as well.
Install Gateway API CRD's
The first step is to install the Kubernetes Gateway API CRDs. This way Kubernetes understands the Gateway API custom objects and Istio can watch for those Gateway API objects and act on them.
To install the Gateway API CRDs, use the following command.
kubectl apply -f https://github.com/kubernetes-sigs/gateway-api/releases/download/v1.3.0/standard-install.yaml
Once the installation is completed, we can list them to ensure the installation.
$ kubectl get crds | grep gateway

gatewayclasses.gateway.networking.k8s.io     2025-05-21T13:49:23Z
gateways.gateway.networking.k8s.io           2025-05-21T13:49:29Z
grpcroutes.gateway.networking.k8s.io         2025-05-21T13:49:32Z
httproutes.gateway.networking.k8s.io         2025-05-21T13:49:35Z
referencegrants.gateway.networking.k8s.io    2025-05-21T13:49:36Z
The output confirms that the CRDs have been successfully installed and that they are used to define the routing rules.
However, since we are using Istio, its built-in gateway controller acts as a Gateway API controller. So we do not need to install a separate controller.
Default Istio GatewayClass
To use Gateway API, the first thing that we need is the GatewayClass. It tells Kubernetes which controller will implement the gateways. In our case its the istio gateway-controller.
When we install Istio on a Kubernetes cluster, it automatically creates a GatewayClass.
You can list the GatewayClasses using the following command.
$ kubectl get gc

NAME           CONTROLLER                    ACCEPTED   AGE
istio          istio.io/gateway-controller   True       3h43m
istio-remote   istio.io/unmanaged-gateway    True       3h43m
Here, you can see two Gateway Classes.
istio- This is Istio's built-in controller that manages Gateway resources. It creates and manages actual gateway pods (like istio-ingressgateway) in your cluster.istio-remote- It references gateways that exist in another. Meaning the controller is in another cluster and especially useful for the multi cluster mesh management.
Next, let’s deploy a demo application that we will use to test ingress connectivity using the Gateway API.
Deploy Demo Application
For this demo, we are using the same application deployment from the Istio setup blog.
If you are already following that blog and have the demo app running, you can skip this step. Otherwise, you can follow the deployment instructions here.
Use the following manifest to deploy the demo apps and its related service endpoints (backend-v1 & backend-v2).
cat <<'EOF' | kubectl apply -f -
apiVersion: v1
kind: Namespace
metadata:
  labels:
    istio-injection: enabled
  name: istio-test
---
apiVersion: apps/v1
kind: Deployment
metadata:
  name: backend-v1
  namespace: istio-test
spec:
  replicas: 3
  selector:
    matchLabels: { app: backend, version: v1 }
  template:
    metadata:
      labels: { app: backend, version: v1 }
    spec:
      containers:
      - name: echo
        image: hashicorp/http-echo
        args: ["-text=hello from backend v1"]
        ports:
        - containerPort: 5678
---
apiVersion: apps/v1
kind: Deployment
metadata:
  name: backend-v2
  namespace: istio-test
spec:
  replicas: 2
  selector:
    matchLabels: { app: backend, version: v2 }
  template:
    metadata:
      labels: { app: backend, version: v2 }
    spec:
      containers:
      - name: echo
        image: hashicorp/http-echo
        args: ["-text=hello from backend v2"]
        ports:
        - containerPort: 5678
---
apiVersion: v1
kind: Service
metadata:
  name: backend-v1
  namespace: istio-test
spec:
  selector:
    app: backend
    version: v1
  ports:
  - name: http
    port: 80
    targetPort: 5678
---
apiVersion: v1
kind: Service
metadata:
  name: backend-v2
  namespace: istio-test
spec:
  selector:
    app: backend
    version: v2
  ports:
  - name: http
    port: 80
    targetPort: 5678
EOF
Once the deployment is completed, ensure that the resources are running without any issues as given below.
$ kubectl -n istio-test get po,svc

NAME                              READY   STATUS    RESTARTS   AGE
pod/backend-v1-7c88547fc6-9755x   2/2     Running   0          10s
pod/backend-v1-7c88547fc6-97hvg   2/2     Running   0          10s
pod/backend-v1-7c88547fc6-tdjb2   2/2     Running   0          10s
pod/backend-v2-86c767bf6b-9vplh   2/2     Running   0          10s
pod/backend-v2-86c767bf6b-bs2kg   2/2     Running   0          10s

NAME                 TYPE        CLUSTER-IP       EXTERNAL-IP   PORT(S)   AGE
service/backend-v1   ClusterIP   10.100.171.193   <none>        80/TCP    10s
service/backend-v2   ClusterIP   10.100.185.97    <none>        80/TCP    9s
Creating Istio Ingress With Gateway API
Now that the required application and other basic setup is ready, we can start configuring ingress using Gateway API objects.
Follow the steps given below.
Step 1: Create a Gateway
Gateway is a Custom Resource of Gateway API where we define what type of traffic the Controller should handle.
For this demo, we will use the following.
- Traffic type - HTTP
- Protocol - 80
- Gateway Class - istio
When we deploy a Gateway object, the Gateway controller (Istio controller) creates an Envoy proxy pod to route traffic to your backend pods. It also creates an external load balancer (on the cloud) so that external traffic can reach the proxy.
Copy the following code on your terminal to create a Gateway YAML configuration file.
Please update these annotations based on the cloud provider you are using. The rest of the configuration remains the same.
cat << EOF > istio-gateway.yaml
apiVersion: gateway.networking.k8s.io/v1
kind: Gateway
metadata:
  name: istio-gateway
  namespace: istio-test
  annotations:
    service.beta.kubernetes.io/aws-load-balancer-type: "nlb"
spec:
  gatewayClassName: istio
  listeners:
  - name: http
    protocol: HTTP
    port: 80
    allowedRoutes:
      namespaces:
        from: Same
EOF
To apply this configuration, use the following command.
kubectl apply -f istio-gateway.yamlIt will deploy a proxy pod (Data plane controller) and service type LoadBalancer in the istio-test namespace.
Use the following command to validate that the proxy pod and service are deployed.
$ kubectl get po,svc -n istio-test -l gateway.networking.k8s.io/gateway-name=istio-gateway


NAME                                       READY   STATUS    RESTARTS   AGE
pod/istio-gateway-istio-67584dc449-qmkpx   1/1     Running   0          4m31s

NAME                          TYPE           CLUSTER-IP     EXTERNAL-IP                                                                     PORT(S)                        AGE
service/istio-gateway-istio   LoadBalancer   10.100.77.16   ad8805f370c854e749a18ed03f2bb2e0-4940c029a9c83906.elb.us-west-2.amazonaws.com   15021:31161/TCP,80:31432/TCP   4m31s
If you describe the Proxy pod, you will see istio/proxyv2 image being used. It is a envoy based proxy.
Now use the following command list the Gateway object and see its created and valid.
$ kubectl -n istio-test get gateway

NAME            CLASS   ADDRESS                                                                         PROGRAMMED   AGE
istio-gateway   istio   ad8805f370c854e749a18ed03f2bb2e0-4940c029a9c83906.elb.us-west-2.amazonaws.com   True         17s
In the above output, ...9a9c83906.elb.us-west-2.amazonaws.com is the DNS name of the created Network Load Balancer. If you are using Google Cloud or Azure, you will see the respective load balancer endpoint instead.
Now our gateway is ready. This means traffic from external sources can reach the cluster through the Gateway load balancer that was created.
Next, we need to configure routes so that the gateway proxy pod inside the cluster knows which pods to send the traffic to and how it should route that traffic.
Step 2: Create an HTTPRoute
HTTPRoute is another Gateway API Custom Resource to defines the routing rules (where to send the traffic internally).
In the HTTPRoute configuration, we will primarily define the following.
- The Gateway that we created in previous step.
- A hostname
- The backend services (Demo app services
backend-v1&backend-v1) - Define weights (50 - 50) to split the traffic between two services (canary based)
Even if you do not have one continue with the following hostname configurations. We will cover local DNS resolution in the next steps.
To create a HTTPRoute manifest, copy the following in the terminal.
cat << EOF > istio-httproute.yaml
apiVersion: gateway.networking.k8s.io/v1
kind: HTTPRoute
metadata:
  name: backend-route
  namespace: istio-test
spec:
  parentRefs:
  - name: istio-gateway
    namespace: istio-test
  hostnames:
  - "test.devopscube.com"
  rules:
  - matches:
    - path:
        type: PathPrefix
        value: /
    backendRefs:
    - name: backend-v1
      port: 80
      weight: 50
    - name: backend-v2
      port: 80
      weight: 50
EOF
To apply this, use the following command. It will create a HttpRoute in the istio-test namespace.
kubectl apply -f istio-httproute.yamlNow, validate the HttpRoute resource using the following command.
$ kubectl -n istio-test get httproutes

NAME            HOSTNAMES                 AGE
backend-route   ["test.devopscube.com"]   85s
Now that we have defined the routing rules, the gateway proxy pod knows which Kubernetes service endpoint to send the traffic to and how to split it in a canary style.
Step 4: Create a Destination Rule
The Gateway API standard doesn't yet have mature features for circuit breaking or connection pooling.
So, if you want to use Istio features like circuit breaking, custom load-balancing algorithms, mTLS or rate limiting at the application service level, you need to add Istio DestinationRule resources for those services.
Istio DestinationRule defines policies that apply to traffic intended for a service after routing has occurred.
For example, in our DestinationRule we are going to define ROUND_ROBIN algorithm, maxConnections and Outlier Detection.
Copy the following to the terminal to create the DestinationRule
cat << EOF > istio-destinationrule.yaml
apiVersion: networking.istio.io/v1beta1
kind: DestinationRule
metadata:
  name: backend-destination-rule
  namespace: istio-test
spec:
  host: backend-v1.istio-test.svc.cluster.local
  trafficPolicy:
    loadBalancer:
      simple: ROUND_ROBIN
    connectionPool:
      tcp:
        maxConnections: 100
      http:
        http1MaxPendingRequests: 50
        http2MaxRequests: 100
        maxRequestsPerConnection: 2
    outlierDetection:
      consecutive5xxErrors: 5
      interval: 30s
      baseEjectionTime: 30s
      maxEjectionPercent: 50
---
apiVersion: networking.istio.io/v1beta1
kind: DestinationRule
metadata:
  name: backend-v2-destination-rule
  namespace: istio-test
spec:
  host: backend-v2.istio-test.svc.cluster.local
  trafficPolicy:
    loadBalancer:
      simple: ROUND_ROBIN
    connectionPool:
      tcp:
        maxConnections: 100
      http:
        http1MaxPendingRequests: 50
        http2MaxRequests: 100
        maxRequestsPerConnection: 2
    outlierDetection:
      consecutive5xxErrors: 5
      interval: 30s
      baseEjectionTime: 30s
      maxEjectionPercent: 50
EOF
To apply, use the following command.
kubectl apply -f istio-destinationrule.yamlIt creates two destination rules for each backend services. Both uses the same traffic policy configurations.
Now list the DestinationRule resources and validate it.
$ kubectl -n istio-test get destinationrules

NAME                          HOST                                      AGE
backend-destination-rule      backend-v1.istio-test.svc.cluster.local   106m
backend-v2-destination-rule   backend-v2.istio-test.svc.cluster.local   106m
Step 5: Configure Local DNS Resolution (Optional)
Now, we are going to create a temporary DNS entry on our local machine so that we can test the traffic with the test.devopscube.com hostname we used in the HttpRoute.
If your load balancer endpoint is a DNS name, get the public IP of the load balancer using the following command.
dig +short <Load Balancer DNS Name>You will get a similar like output.
$ dig +short ad8805f370c854e749a18ed03f2bb2e0-4940c029a9c83906.elb.us-west-2.amazonaws.com

35.95.166.48
Now, open the /etc/hosts on your local machine and paste IP and the hostname name you have given in the HTTPRoute config.
For example,
35.95.166.48 test.devopscube.comHere is how it looks
$ sudo vim /etc/hosts
Password:

$ cat /etc/hosts

##
# Host Database
#
# localhost is used to configure the loopback interface
# when the system is booting.  Do not change this entry.
##
127.0.0.1       localhost
255.255.255.255 broadcasthost
::1             localhost

35.95.166.48 test.devopscube.com
Once the IP is mapped with the hostname, save the file and exit.
Now our entire ingress configuration is ready. The next step is to validate the end-to-end traffic flow.
Step 4: Validate the Ingress Traffic Flow
Now lets test the complete ingress traffic flow.
The following linux script runs the curl test.devopscube.com command 10 times in a row. This helps us validate whether the canary traffic split is happening between the v1 and v2 services as configured in the HttpRoute
for i in {1..10}; do curl test.devopscube.com; doneThe following output shows that the external traffic is properly routed to both backend services.
$ for i in {1..10}; do curl test.devopscube.com; done

hello from backend v1
hello from backend v2
hello from backend v2
hello from backend v1
hello from backend v2
hello from backend v2
hello from backend v1
hello from backend v1
hello from backend v2
hello from backend v1
Conclusion
In this blog we have covered how to configure Istio + Kubernetes Gateway API to manage ingress (north-south) traffic in a Kubernetes cluster. We practically walked through how a Gateway + HTTPRoute can expose Istio mesh services externally.
With the graduation of mesh support in Gateway API, Gateway API supports internal (east-west) traffic routing inside a service mesh via the GAMMA Initiative (Gateway API for Mesh Management and Administration).
That means Gateway API is no longer limited just to ingress/egress.
You can use HTTPRoute, GRPCRoute, etc..to declare how services talk to each other inside the Istio service mesh. This actually brings consistency to both external and internal traffic management.
Refer the Managing East-West Traffic with Gateway API blog to see it in action.
If you want a real world example, you can look at Careem use case. They recently migrated to Istio with Gateway API + GAMMA to enable a “define-once, route-everywhere” model.
Also, in Istio ambient mesh mode, the Waypoint porxy for L7 traffic managment is managed through Gateway API.