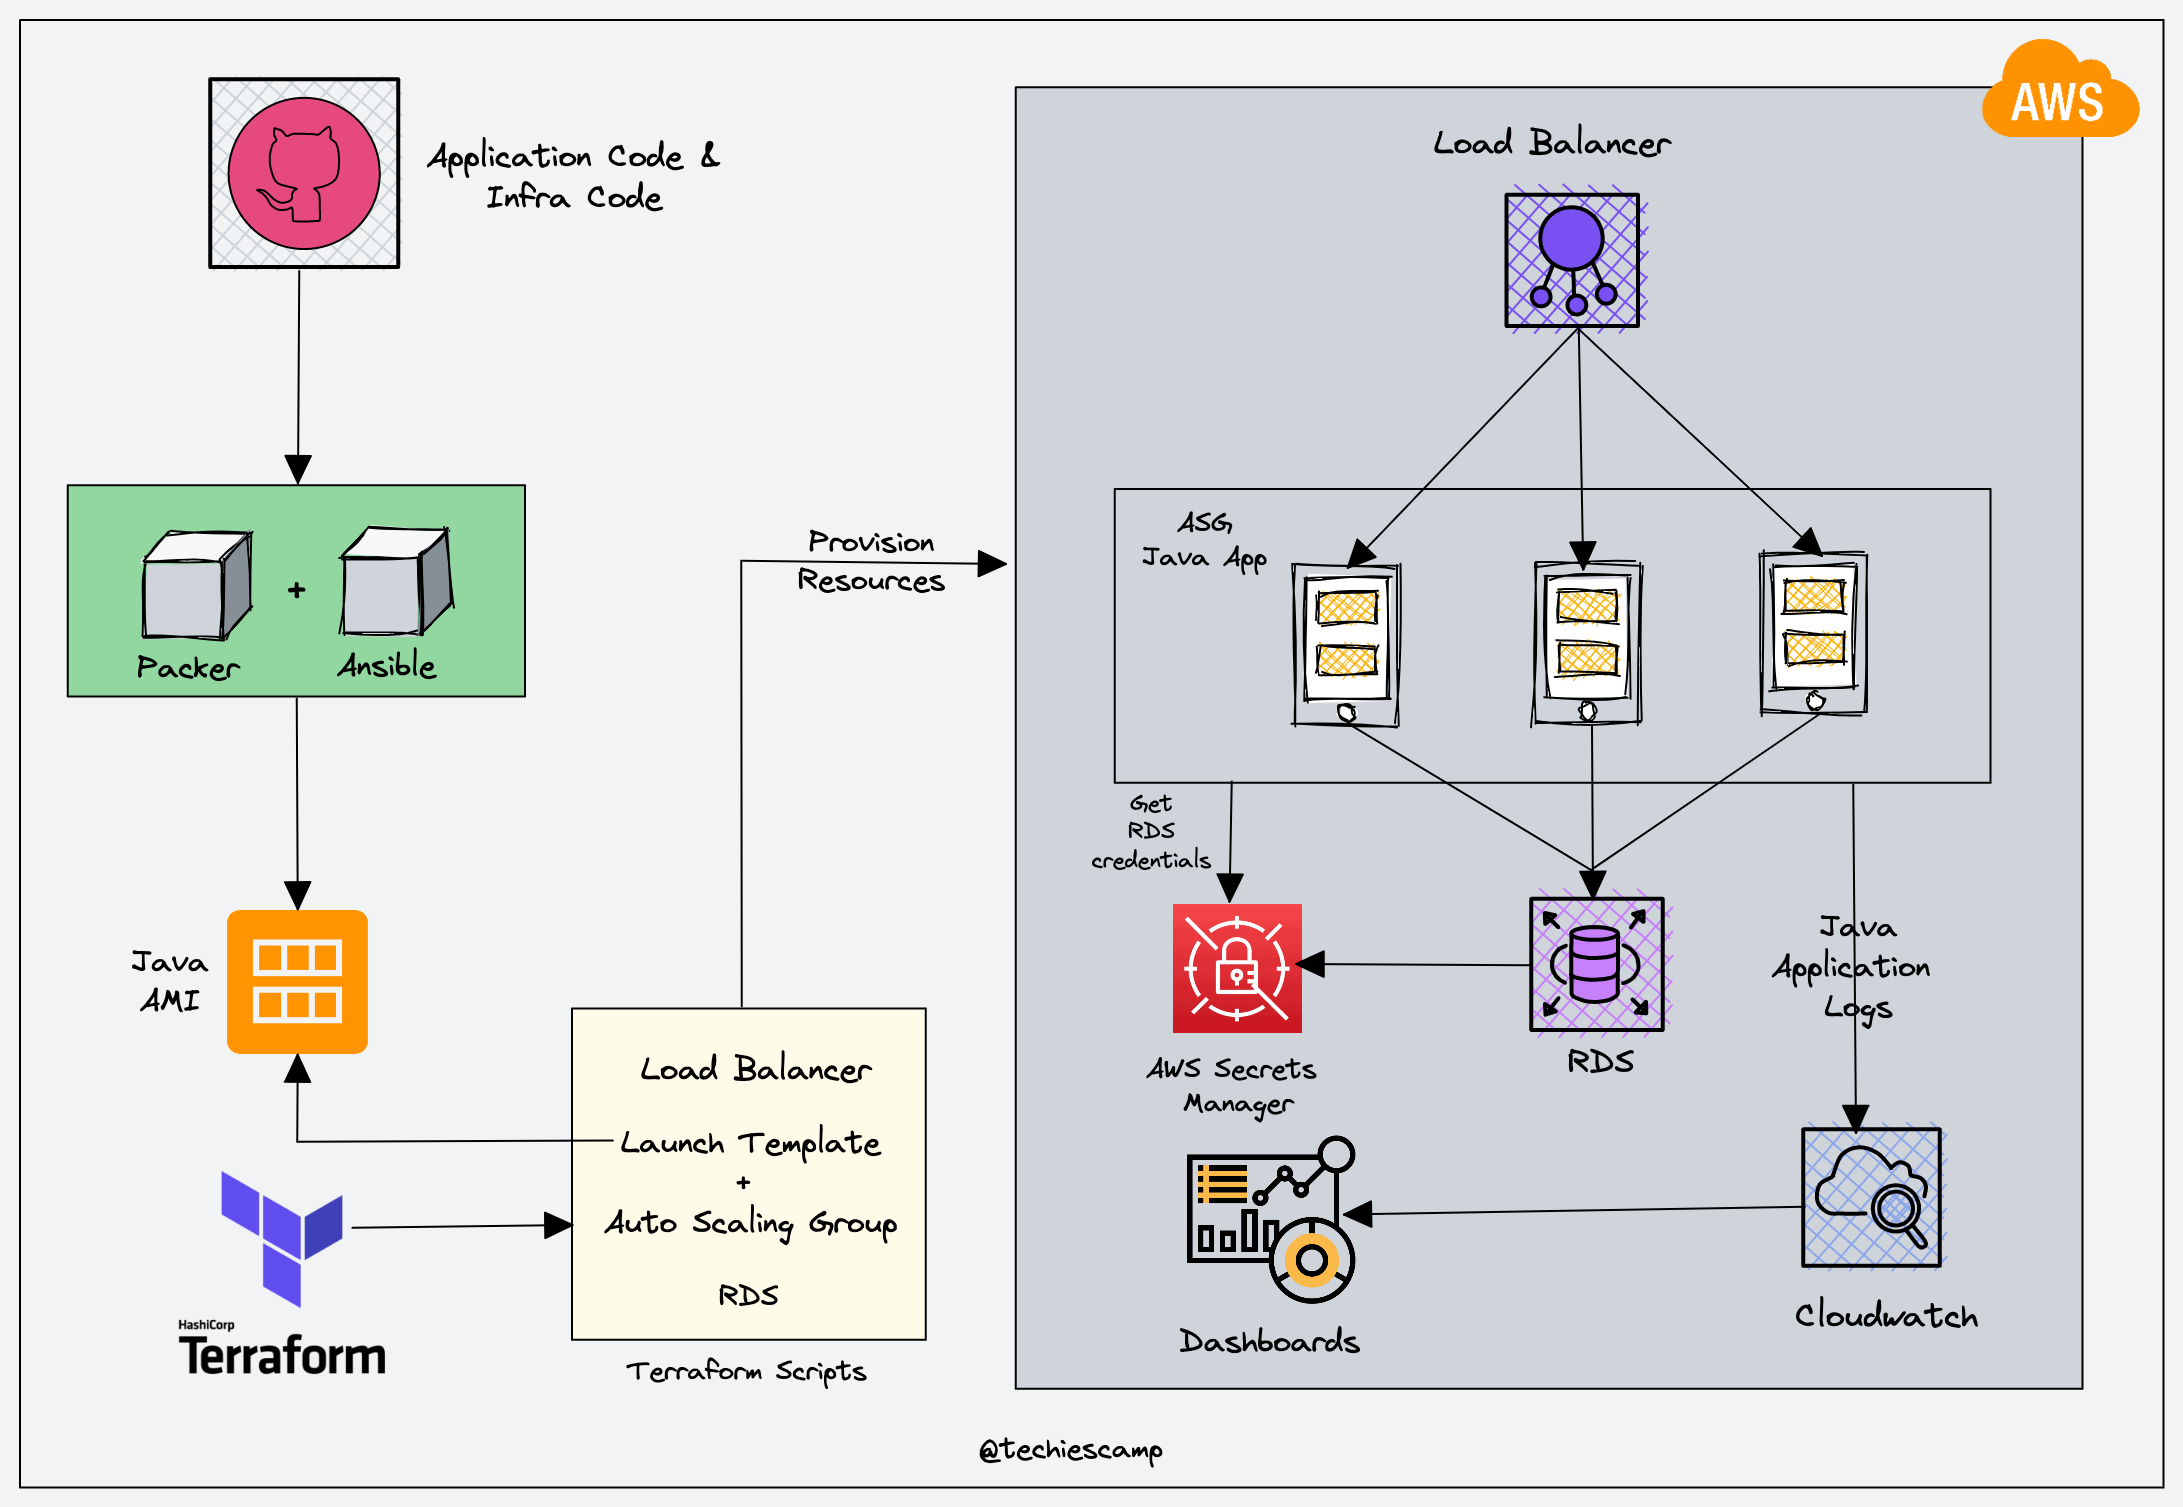
In this DevOps Project, you will learn about how to set up a scalable Java application with ASG, ALB, and RDS using Terraform
Tools & Services Used
For this setup, I have used the following DevOps Tools
- GitHub: Repository to store IaC
- Packer: To build Java application AMIs
- Ansible: To configure java application during the AMI building process
- Terraform: To provision AWS resources
- Python Boto3: To retrieve RDS credentials from AWS secrets manager.
Following are the AWS services used.
- IAM: To create IAM Role/Instance Profile for Java Application Instance.
- RDS: For application database
- AWS Secrets Manager: To store RDS credential during RDS launch.
- AWS Parameter Store: To get the RDS endpoint.
- Autoscaling Group: To deploy the Java application.
- Application Load Balancer: To have a static DNS endpoint for the java application running in the autoscaling group.
Setup Architecture
Setup Prerequisites
Before starting the setup, you will need the following tools and utilities installed and configured on your workstation.
- Packer
- Ansible
- Terraform
- JDK-17
- Maven-v3.9.4
- AWS CLI, configured with default region as us-west-2 and AWS credentials that have admin access to the AWS account.
We will be using the default VPC in the us-west-2 (Oregon) region. There will be four default subnets. We will be using three subnets from the following three availability zones:
- us-west-2a
- us-west-2b
- us-west-2c
Ensure you have an existing key pair in your AWS account for the Oregon region. We will use it with instances to enable SSH access.
Build Java Application
Clone this repository to your local system to build a Java Application.
git clone github.com/pet-clinic-project/pet-clinic-app.gitCD into pet-clinic-app folder and run the below command to build the application.
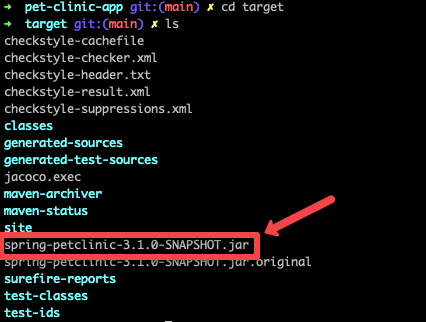
mvn clean installAfter the build process finishes you can see a new folder named target, CD into the target folder you can find the JAR file for the application as given below
Provision AWS Services
Clone this repository to your local system and the code for this project is in the 03-scalable-java-app folder.
https://github.com/techiescamp/devops-projects.gitThe folders and files inside the project folder are listed below.
.
├── README.md
├── ansible
│   ├── files
│   │   ├── application.properties
│   │   ├── properties.py
│   │   └── start.sh
│   ├── java-app.pkr.hcl
│   ├── java-app.yml
│   ├── roles
│   │   └── java
│   │       └── tasks
│   │           ├── app.yml
│   │           ├── backends.yml
│   │           ├── cloudwatch.yml
│   │           ├── java.yml
│   │           ├── main.yml
│   │           └── python.yml
│   └── templates
│       ├── config.json.j2
│       └── index.html.j2
└── terraform
    ├── alb-asg
    │   ├── main.tf
    │   ├── terraform.tfstate
    │   ├── terraform.tfstate.backup
    │   └── variable.tf
    ├── modules
    │   ├── alb-asg
    │   │   ├── alb.tf
    │   │   ├── asg.tf
    │   │   ├── iam-policy.tf
    │   │   └── variable.tf
    │   └── rds
    │       ├── main.tf
    │       ├── outputs.tf
    │       └── variables.tf
    ├── rds
    │   ├── main.tf
    │   ├── terraform.tfstate
    │   ├── terraform.tfstate.backup
    │   └── variables.tf
    └── vars
        ├── alb-asg.tfvars
        └── rds.tfvars
Provision Java Application AMI
The first step is to provision an AMI for your Java Application. CD into the ansible folder and follow the below steps before creating the AMI.
STEP 1: Copy your JAR file inside the ansible/files folder and specify the name of your JAR file in the ansible/java-app.yml file as shown below.
---
- name: Install Java
  hosts: all
  become: yes
  remote_user: ubuntu

  vars:
    source_dir: files
    dest_dir: /home/ubuntu/
    files:
      - properties.py
      - start.sh
      - pet-clinic-1.0.1.jar

  roles:
    - java
pet-clinic-1.0.1.jar is the name of my JAR file, you make sure to replace with the name of your Jar file.
STEP 2: Modify the Python script ansible/files/properties.py
import boto3
import json

region = 'us-west-2'
parameter_store = '/dev/petclinic/rds_endpoint'
secret_name_tag = 'dev-rds-db'
file_path = "/opt/application.properties"

ssm = boto3.client('ssm', region_name=region)

rds_endpoint = ssm.get_parameter(Name=parameter_store)['Parameter']['Value']

secrets_client = boto3.client('secretsmanager', region_name=region)

secrets_list = secrets_client.list_secrets()
secret_arn = None
for secret in secrets_list['SecretList']:
    if 'Tags' in secret:
        for tag in secret['Tags']:
            if tag['Key'] == 'Name' and tag['Value'] == secret_name_tag:
                secret_arn = secret['ARN']
                break

if secret_arn is None:
    print(f"Secret with name tag '{secret_name_tag}' not found.")
    exit(1)

response = secrets_client.get_secret_value(SecretId=secret_arn)
secret_value = response['SecretString']

secret_data = json.loads(secret_value)

with open(file_path, 'r') as f:
    file_contents = f.read()

file_contents = file_contents.replace("spring.datasource.url=jdbc:mysql://localhost:3306/petclinic", f"spring.datasource.url=jdbc:mysql://{rds_endpoint}")
file_contents = file_contents.replace("spring.datasource.username=petclinic", f"spring.datasource.username={secret_data['username']}")
file_contents = file_contents.replace("spring.datasource.password=petclinic", f"spring.datasource.password={secret_data['password']}")


with open(file_path, 'w') as f:
        f.write(file_contents)
This Python script retrieves your RDS username and password from the secret manager and RDS endpoint from the parameter store.
First it creates an ssm client and retrieves the RDS endpoint from the Parameter Store. Then it creates a secret manager client and lists the secrets in the secrets manager, then uses the name tag to identify the secret which contains the username and password from the RDS database.
It updates the ansible/files/application.properties configuration file with the username, password, and endpoint, so that your application can connect to the RDS database.
STEP 3: Update your JAR file name inside the startup script ansible/files/start.sh
#!/bin/bash

JAR_FILE=/home/ubuntu/pet-clinic-1.0.1.jar
APP_PROPERTIES=/opt/application.properties
PROPERTIES_SCRIPT=/home/ubuntu/properties.py

sudo python3 ${PROPERTIES_SCRIPT}

sudo java -jar "${JAR_FILE}" --spring.config.location="${APP_PROPERTIES}" --spring.profiles.active=mysql &
By running this script it will run the ansible/files/properties.py and then run the Java application and connect it with the RDS database.
Replace pet-clinic-1.0.1.jar with your JAR file name.
STEP 4: Update the Packer template ansible/java-app.pkr.hcl
variable "ami_id" {
  type    = string
  default = "ami-03f65b8614a860c29"
}

locals {
    app_name = "java-app-1.0.1"
}

source "amazon-ebs" "java-app" {
  ami_name      = "PACKER-${local.app_name}"
  instance_type = "t2.medium"
  region        = "us-west-2"
  source_ami    = "${var.ami_id}"
  ssh_username  = "ubuntu"
  tags = {
    Env  = "DEMO"
    Name = "PACKER-${local.app_name}"
  }
}

build {
  sources = ["source.amazon-ebs.java-app"]

  provisioner "ansible" {
    playbook_file = "java-app.yml"
  }

}
In this template update the ami_id, app_name, and instance_type you are going to use.
STEP 5: Now, validate your packer template using the command
packer validate java-app.pkr.hclSTEP 6: If the packer template is valid build your AMI using the command
packer build java-app.pkr.hclOnce your AMI is provisioned move on to the next process.
RDS Provisioning
After provisioning the AMI, start provisioning the RDS database for the application. CD into the terraform folder and follow the steps.
Step 1: Modify terraform/vars/rds.tfvars file
CD into the terraform/vars folder and update the rds.tfvars file with vpc, subnets, and other configurations.
# Network Vars
region              = "us-west-2"
vpc_id              = "vpc-0a5ca4a92c2e10163"
subnet_ids          = ["subnet-058a7514ba8adbb07", "subnet-032f5077729435858", "subnet-0dbcd1ac168414927"]
multi_az            = false
publicly_accessible = true

# DB Vars
db_engine                   = "mysql"
db_storage_type             = "gp2"
db_username                 = "techiescamp"
db_instance_class           = "db.t2.micro"
db_storage_size             = 20
set_secret_manager_password = true
set_db_password             = false
db_password                 = "rdssecret"

# Security Group Vars
ingress_from_port   = 3306
ingress_to_port     = 3306
ingress_protocol    = "tcp"
ingress_cidr_blocks = ["0.0.0.0/0"]

egress_from_port   = 0
egress_to_port     = 0
egress_protocol    = "-1"
egress_cidr_blocks = ["0.0.0.0/0"]

# Backup vars
backup_retention_period  = 7
delete_automated_backups = true
copy_tags_to_snapshot    = true
skip_final_snapshot      = true
apply_immediately        = true

# Parameter store
parameter_store_secret_name = "/dev/petclinic/rds_endpoint"
type                        = "String"

# Tag Vars
owner       = "techiescamp"
environment = "dev"
cost_center = "techiescamp-commerce"
application = "rds"
STEP 2: After modifying terraform/vars/rds.tfvars with your configurations, initialize Terraform inside the terraform/rds folder.
terraform initSTEP 3: Before start provisioning RDS make sure you have given the right configurations using the plan command.
terraform plan -var-file=../vars/rds.tfvarsSTEP 4: Start provisioning RDS
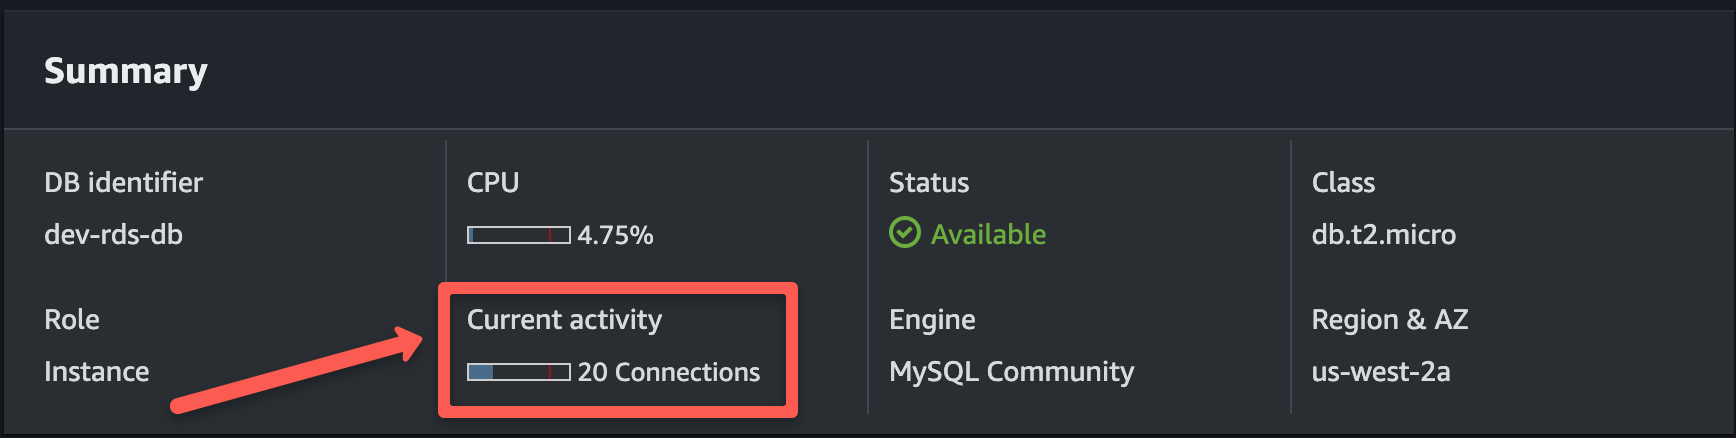
terraform apply -var-file=../vars/rds.tfvarsAfter the code runs successfully, validate that the RDS database has provisioned and active. Also check if the RDS endpoint is stored in the Parameter Store.
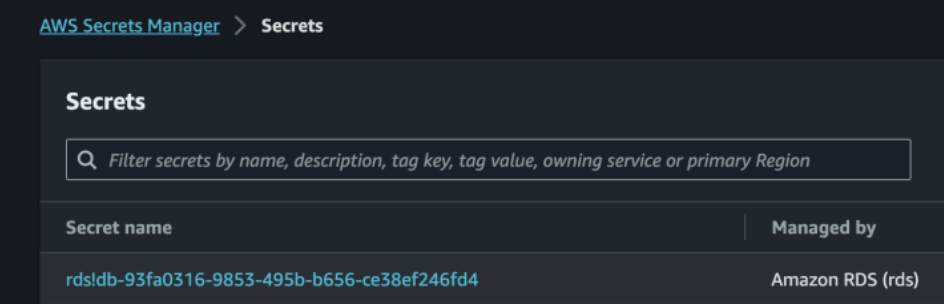
RDS username and password will be stored in the Secret Manager with a long random name as shown below.
ALB and ASG Provisioning
After provisioning the RDS database, start provisioning the ALB and ASG by following the steps below.
Step 1: Modify terraform/vars/alb-asg.tfvars file
CD into the terraform/vars/ folder and update the alb-asg.tfvars fil with vpc, subnets, ami-id, key, and other configurations with your configuration.
#Network
region  = "us-west-2"
vpc_id  = "vpc-0a5ca4a92c2e10163"
subnets = ["subnet-058a7514ba8adbb07", "subnet-032f5077729435858", "subnet-0dbcd1ac168414927"]

#alb_sg
ingress_alb_from_port   = 80
ingress_alb_to_port     = 80
ingress_alb_protocol    = "tcp"
ingress_alb_cidr_blocks = ["0.0.0.0/0"]
egress_alb_from_port    = 0
egress_alb_to_port      = 0
egress_alb_protocol     = "-1"
egress_alb_cidr_blocks  = ["0.0.0.0/0"]

#alb
internal          = false
loadbalancer_type = "application"

#target_group
target_group_port                = 8080
target_group_protocol            = "HTTP"
target_type                      = "instance"
load_balancing_algorithm         = "round_robin"
health_check_path                = "/"
health_check_port                = 8080
health_check_protocol            = "HTTP"
health_check_interval            = 30
health_check_timeout             = 5
health_check_healthy_threshold   = 2
health_check_unhealthy_threshold = 2

#instance_sg
ingress_asg_cidr_from_port = 22
ingress_asg_cidr_to_port   = 22
ingress_asg_cidr_protocol  = "tcp"
ingress_asg_cidr_blocks    = ["0.0.0.0/0"]
ingress_asg_sg_from_port   = 8080
ingress_asg_sg_to_port     = 8080
ingress_asg_sg_protocol    = "tcp"
egress_asg_from_port       = 0
egress_asg_to_port         = 0
egress_asg_protocol        = "-1"
egress_asg_cidr_blocks     = ["0.0.0.0/0"]

#asg
max_size         = 3
min_size         = 1
desired_capacity = 2

#listener
listener_port     = 80
listener_protocol = "HTTP"
listener_type     = "forward"

#launch_template
ami_id               = "ami-0f7a74cccd5a223bc"
instance_type        = "t2.medium"
key_name             = "techiescamp"
user_data            = <<-EOF
#!/bin/bash
bash /home/ubuntu/start.sh
EOF
public_access        = true
instance_warmup_time = 30
target_value         = 50

owner       = "techiescamp"
environment = "dev"
cost_center = "techiescamp-commerce"
application = "pet-clinic"
Each instance will have an IAM role attached to it while provisioning. I attached an IAM role with admin permissions, you can modify the IAM role in the /terraform/modules/alb-asg/iam-policy.tf file with the permissions you require.
STEP 2: After modifying alb-asg.tfvars with your configurations, initialize Terraform inside the terraform/alb-asg folder.
terraform initSTEP 3: Before start provisioning ALB and ASG make sure you have given the right configurations using the plan command.
terraform plan -var-file=../vars/alb-asg.tfvarsSTEP 4: Start provisioning ALB and ASG
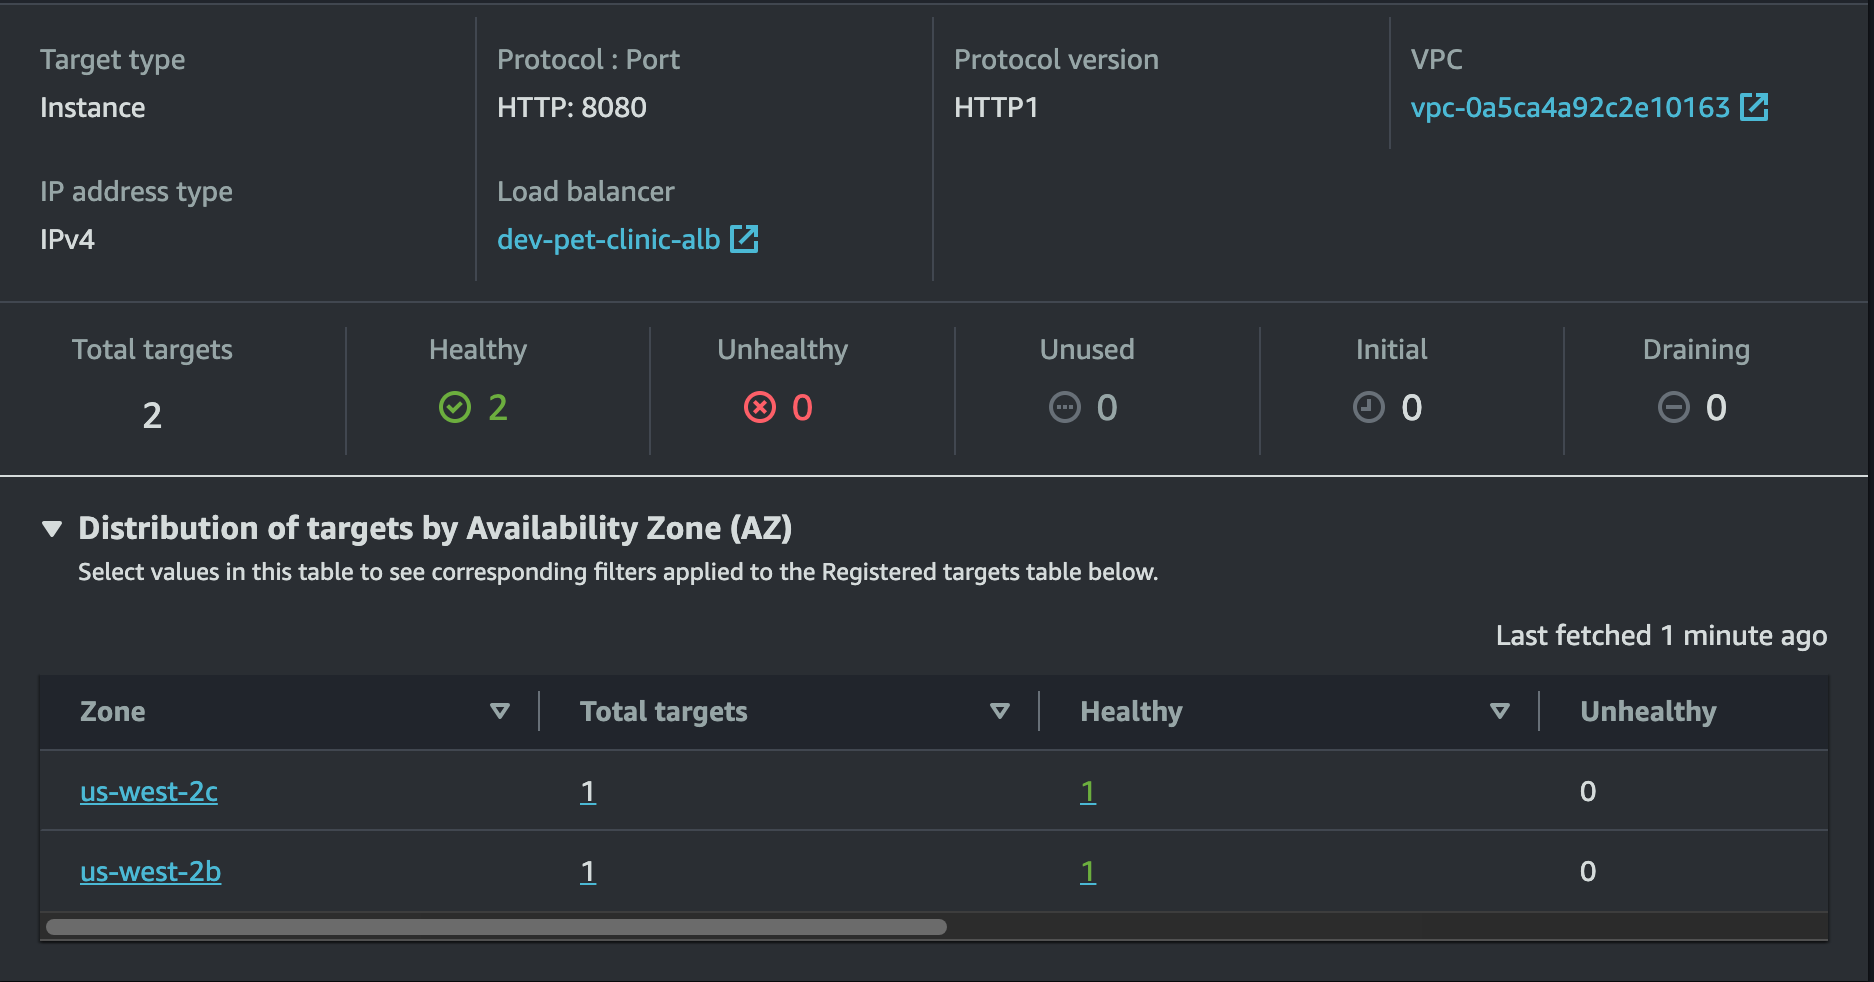
terraform apply -var-file=../vars/alb-asg.tfvarsAfter the code runs successfully, validate ALB and ASG has provisioned. And you can check the health of your instance in the target group.
If your instances are healthy try to access your application in the browser using the load-balancer DNS as shown below.
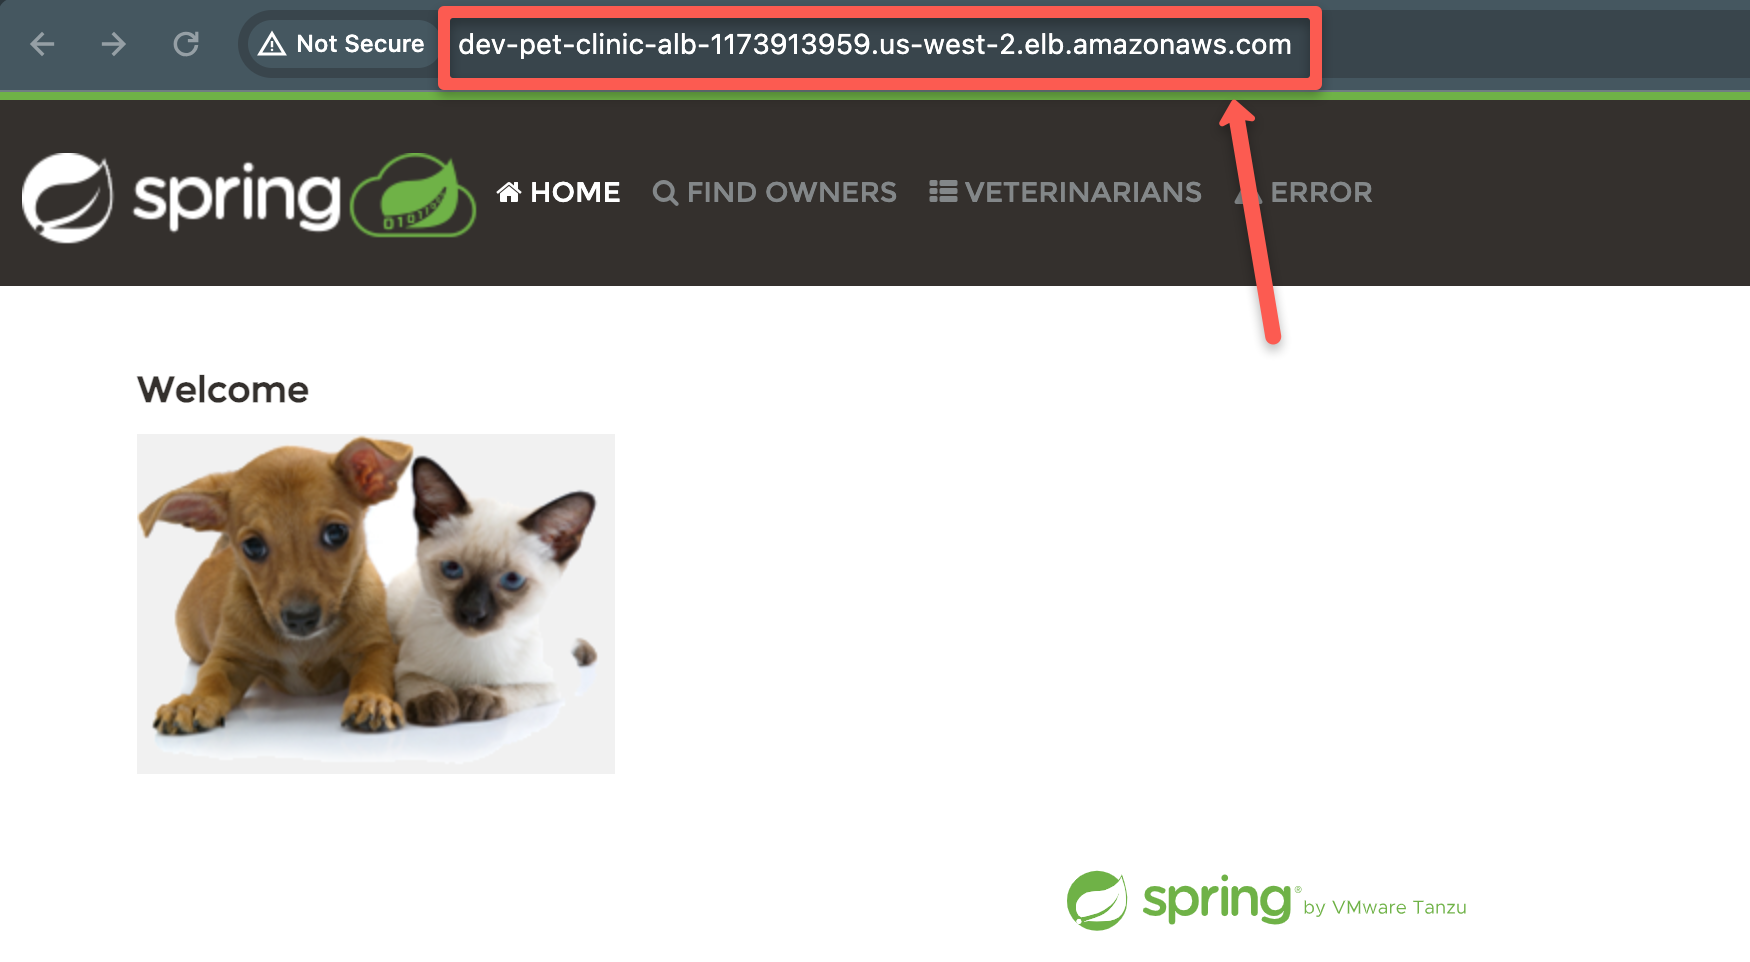
Make sure your instances are connected to the RDS database.