

In this detailed guide you will learn to setup Terraform s3 Backend With DynamoDB Locking with all the best practices.
Prerequisites
Following are the prerequisites for the setup.
- AWS Account
- AWS CLI access with AWS admin permissions
- Terraform installed on your system.
All the code examples used in this guide are part of the Terraform AWS Git Repository. Clone/Fork the repository for your reference.
git clone https://github.com/techiescamp/terraform-s3-backendNote: The ami used for example in this guide is from the us-west-2 region. If you are using a different regions for testing, replace the ec2 ami accordingly.
Need for Terraform Remote State & State Lock
Terraform remote state refers to storing the state file in a remote location such as an s3 bucket instead of local workstation.
With remote state you can collaborate with other developers. Also CI/CD systems can make use of the centralised state file during provisioning and deployments.
In this example, we are considering s3 as the remote state backend and DynamoDB for state locking mechanism.
So what is state lock?
We need state locking to ensure one terraform process modifies the resource at a time. If multiple terraform process uses the same state file, it could lead to conflicts and inconsistencies in the state file. (race conditions)
To avoid conflict if more than one team member is deploying a change simultaneously, we use the locking mechanism of the DynamoDB table.
Here is how DynamoDB state locking works.
- When terraform wants to modify a resources, it acquires a lock in DynamoDB by creating an entry in DynamoDB table with a specific lock ID (e.g., "lock-abc123").
- If the lock is successfull, terraform gets the access to the state file from s3
- Once all the resource modications are done, Terraform updates the state file and releases the DynamoDB lock.
For example, when the developer X executes the terraform code, DynamoDB will lock the state and developer Y should wait until the execution is completed.
Also, DynamoDB has a timeout period to prevent permanent lock-outs. This is helpful in cases where a lock is acquired by terraform and it holds the lock due to abnormal process termination.
The following animated gif shows the terraform s3 backend workflow with DynamoDB locking feature.
Lets get started with remote state hands-on setup.
Creating Terraform S3 backend
Follow the steps given below for configuration the s3 backed. We will use terraform to provision all the required resources for the backend configuration.
1. Provision S3 Bucket
First we need to create a S3 bucket.
The major advantage of using a remote backend for the state file is its native encryption and versioning mechanism.
Here is the Terraform code to provision an S3 bucket with versioning enabled so that the state file will not be overridden. Replace terraform-state-test-976 with a unique bucket name.
terraform {
  required_providers {
    aws = {
      source  = "hashicorp/aws"
    }
  }
}

provider "aws" {
  region = "us-west-2"
}

resource "aws_s3_bucket" "terraform-state" {
  bucket = "terraform-state-dcube"
}

resource "aws_s3_bucket_versioning" "terraform-state" {
  bucket = aws_s3_bucket.terraform-state.id
  versioning_configuration {
    status = "Enabled"
  }
}
Now, to initialize the Terraform code, use the following command:
terrafrom initTo provision the S3 bucket, use the following command:
terraform applyNow, the bucket will be created in S3 and we can see the bucket in the console.
2. Create DynamoDb Table for State Locking
Now we need to create a DynamoDB Table named state_lock_table to implement state locking functionality.
terraform {
  required_providers {
    aws = {
      source  = "hashicorp/aws"
    }
  }
}

provider "aws" {
  region = "us-west-2"
}

resource "aws_dynamodb_table" "state_lock_table" {
  name           = "terraform_state_lock"
  billing_mode   = "PAY_PER_REQUEST"
  hash_key       = "LockID"
  attribute {
    name = "LockID"
    type = "S"
  }
}
PROVISIONED and PAY_PER_REQUEST are the types of billing modes available in the DynamoDB table. PAY_PER_REQUEST means that you only pay for the actual read and write requests made to the table, rather than provisioning a fixed capacity. These options depends upon your requirements.
hash_key = "LockID" defines the partition key (also known as the hash key) for the DynamoDB table. The partition key is used to uniquely identify each item in the table. Here, the partition key is set to LockID.
type = "S" means, data type string.
Now, Initialize and deploy the code.
terraform init

terraform apply
To see the Database, open DynamoDB and choose the Tables tab.

3. Adding Backend s3 Configuration To Terraform
Now that we have the S3 bucket and DynamoDB table ready, we can test the remote state in Terraform configuration.
Please refer to the official documentation for more details.
The confirmation is fairly simple. Along with the provider config, add the backend configuration as given below.
terraform {
  required_providers {
    aws = {
      source  = "hashicorp/aws"
      version = "~> 5.52.0"
    }
  }

  backend "s3" {
    bucket         	   = "terraform-state-dcube"
    key              	   = "state/dev/resource.tfstate"
    region         	   = "us-west-2"
    encrypt        	   = true
    dynamodb_table         = "terraform_state_lock"
  }
}
Initialize the Terraform backend by running the following command
terraform initNow, when you initialize terraform you will get a prompt to confirm the migration of the state to the S3 backend. Type "yes" to proceed.
Now your Terraform state is store in s3 bucket and when you run play and apply commands as usual, the s3 backend will be used for state management.
Methods to Add Backend Configuration
There is more than one way to implement s3 backend Terraform configuration. Let's look at each method.
Note: For demonstration purposes, I have added ec2 instance creation in us-west region. Change the ec2 resource parameters as per your requirement.
Method 1: Add configuration block inside the Terraform code
In this method, you have to add the remote backend configuration in the main.tf file where you have the resource declarations.
terraform {
  required_providers {
    aws = {
      source  = "hashicorp/aws"
    }
  }
}

provider "aws" {
  region = "us-west-2"
}

terraform {
  backend "s3" {
    bucket         = "terraform-state-dcube"
    region         = "us-west-2"
    dynamodb_table = "terraform_state_lock"
    key            = "dev/ec2.tfstate"
    encrypt        = true
  }
}

resource "aws_instance" "terraform-state-test" {
  ami           = "ami-0cf2b4e024cdb6960"
  instance_type = "t2.micro"
}
Here, the first block highlighted in bold the backend configuration. It is followed by a resource to create an aws instance.
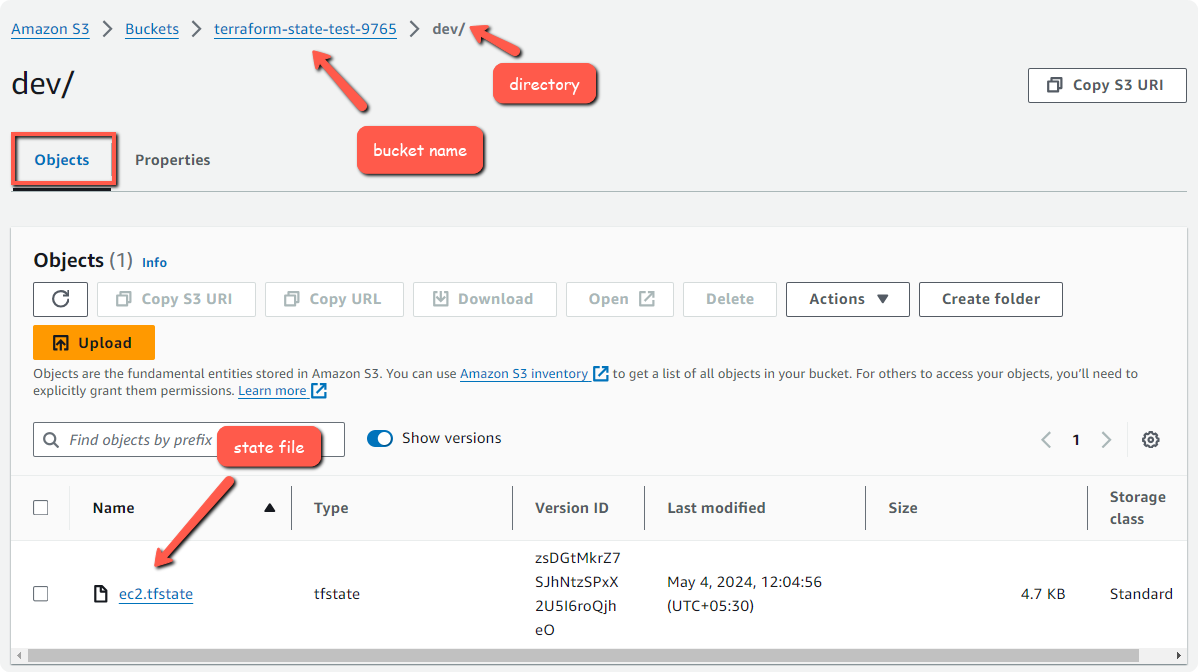
If you are managing multiple environments such as dev, prod, test, and qa then you need to separate them by directory to keep the state files on the S3 bucket.
In the backend configuration, the value of key is dev/ec2.tfstate, dev is the directory and ec2.tfstate is the custom state file name for better understanding.
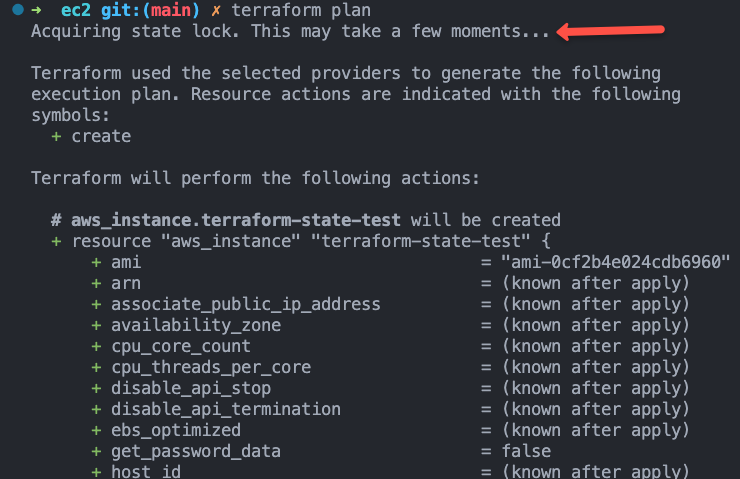
Lets deploy the ec2 instance with the s3 backed and state lock to validate the remote state.
terraform init
terraform plan
terraform apply
As shown in the image below, when you run the plan you will see a message "Acquiring state lock"
Check the S3 bucket to ensure that the state file is stored in the Bucket.
We have enabled the encryption so that the state file will be secure. Also you should provide IAM s3 bucket access to only required members.
Once the state file is stored in the Bucket, then the next time when you perform a plan or apply, Terraform will fetch the state from the bucket and after the execution the current state will be updated on the Bucket as a new file.
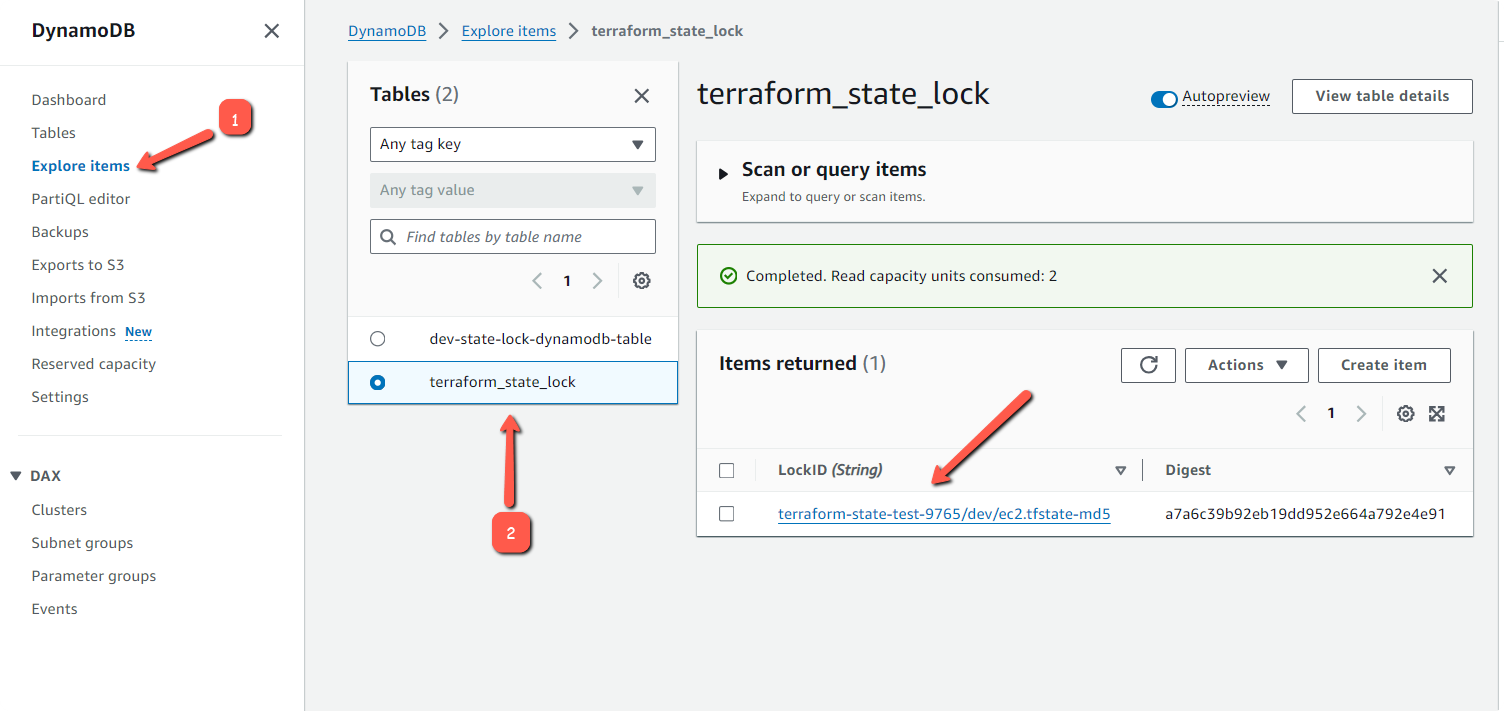
You can also check DynamoDB table lock entry data using Explore Table Items option.
Clean up the instance.
terraform destroyYou can also add the backend configuration to a different backend.tf file in the same directory as main.tf. Terraform will automatically pick up the backend configuration from the file.
ec2
├── backend.tf
└── main.tf
Method 2: Dynamically Pass Backend Parameters Using terraform init Command
When it comes to real world project use cases, we cannot hard code the backend parameters to the terraform configuration file. The CI/CD system should be able to dynamically pass the backend parameters in the run time.
This way you can manipulate the remote state file location, environment names and other parameters in the run time based on your requirements.
Here, you add the backend block inside the Terraform configuration file, but you don't mention any other backend details inside the file except the backend type as given below.
terraform {
  required_providers {
    aws = {
      source  = "hashicorp/aws"
    }
  }
}

provider "aws" {
  region = "us-west-2"
}

terraform {
  backend "s3" {
  }
}

resource "aws_instance" "terraform-state-test" {
  ami           = "ami-0cf2b4e024cdb6960"
  instance_type = "t2.micro"
}
The remaining backend information will be given with the terraform initialization command as given below.
terraform init \
    -backend-config="key=dev/ec2.tfstate" \
    -backend-config="bucket=terraform-state-dcube" \
    -backend-config="region=us-west-2" \
    -backend-config="dynamodb_table=terraform_state_lock"
After the initialization, you can directly perform terraform apply or terraform destroy command.
Note: Terraform backend configuration does not support variables, locals, or data sources
Method 3: Use the Backend Configuration From File
In this method, you can store the backend configurations in a separate file, and use the path of the file with the initialization command.
You don't have to remember backend configuration details, every time you initialize the command, also keeping them in a separate file gives you more isolation.
The backend configuration block should be present inside the Terraform main file is necessary for this method too.
terraform {
  required_providers {
    aws = {
      source  = "hashicorp/aws"
    }
  }
}

provider "aws" {
  region = "us-west-2"
}

terraform {
  backend "s3" {}
}

resource "aws_instance" "terraform-state-test" {
  ami           = "ami-0cf2b4e024cdb6960"
  instance_type = "t2.micro"
}
We have to create a file backend.hcl to store the common backend configuration details.
bucket         = "terraform-state-test-9765"
region         = "us-west-2"
dynamodb_table = "terraform_state_lock"
encrypt        = true
Now, we can initialize the Terraform code with key value and the absolute path of the backend configuration file.
terraform init -backend-config="key=dev/jenkins-agent.tfstate" \
-backend-config=backend.hcl
Terraform State Versioning Test
We know that the S3 Bucket has a Terraform state file of the EC2 deployment. To test state versioning, we will modify the ec2 resource by adding a instance tag.
terraform {
  required_providers {
    aws = {
      source  = "hashicorp/aws"
    }
  }
}

provider "aws" {
  region = "us-west-2"
}

terraform {
  backend "s3" {
    bucket         = "terraform-state-test-9765"
    region         = "us-west-2"
    dynamodb_table = "terraform_state_lock"
    key            = "dev/ec2.tfstate"
    encrypt        = true
  }
}

resource "aws_instance" "terraform-state-test" {
  ami           = "ami-0cf2b4e024cdb6960"
  instance_type = "t2.micro"
  tags = {
     Name = "test-instance"
  }
}
Initialize and apply the Terraform code.
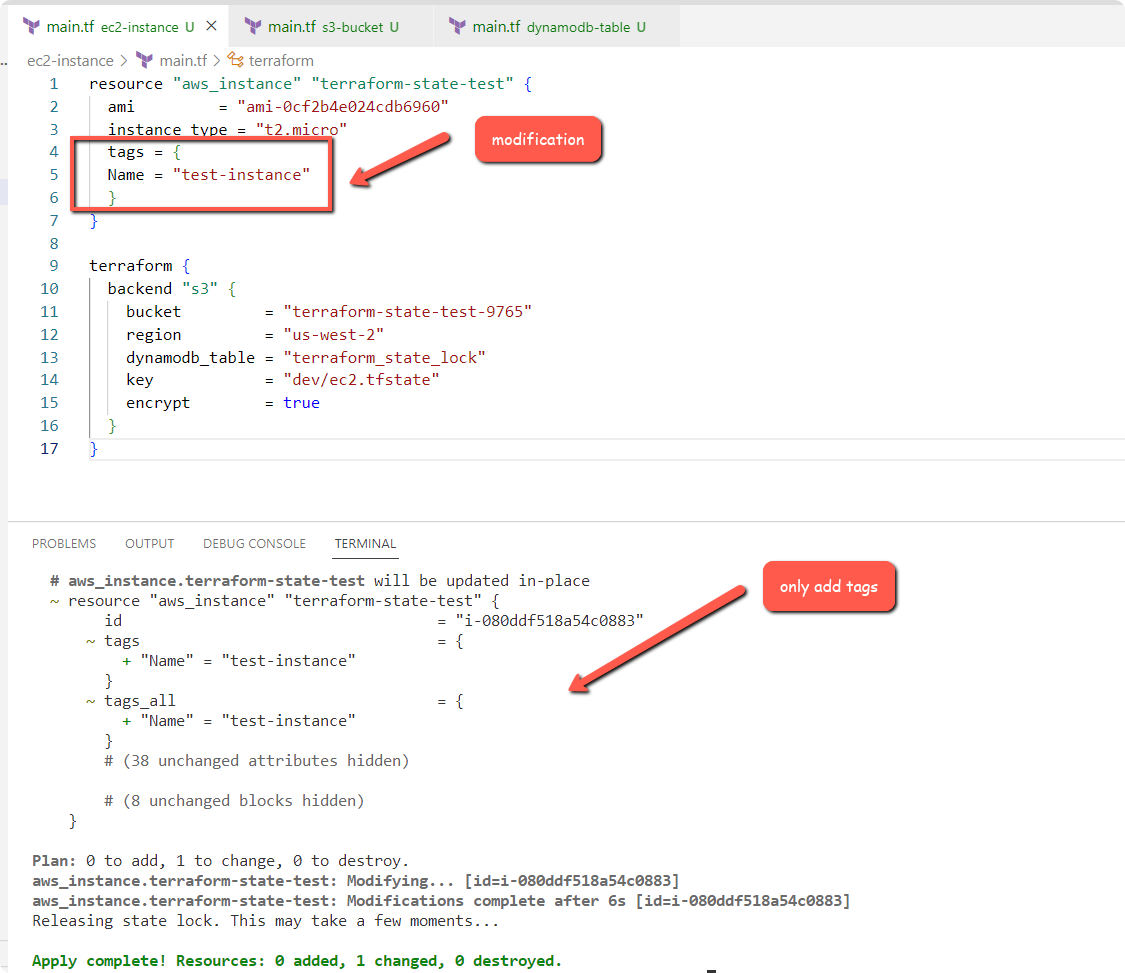
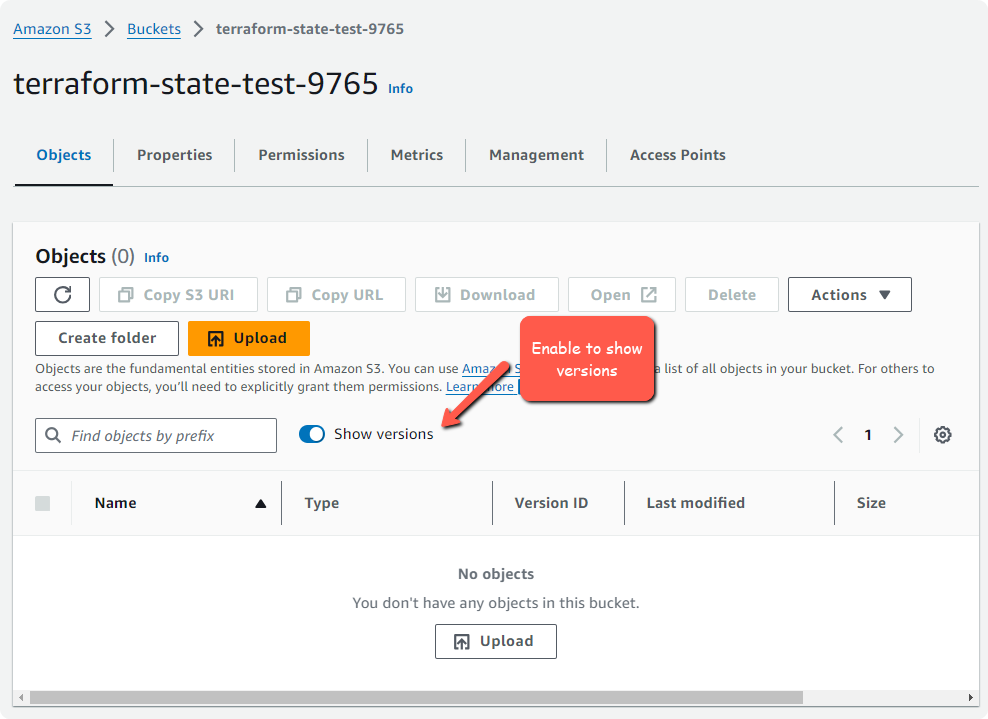
Now, the state file will be modified. We can check the state file versions from the S3 Bucket as shown below.
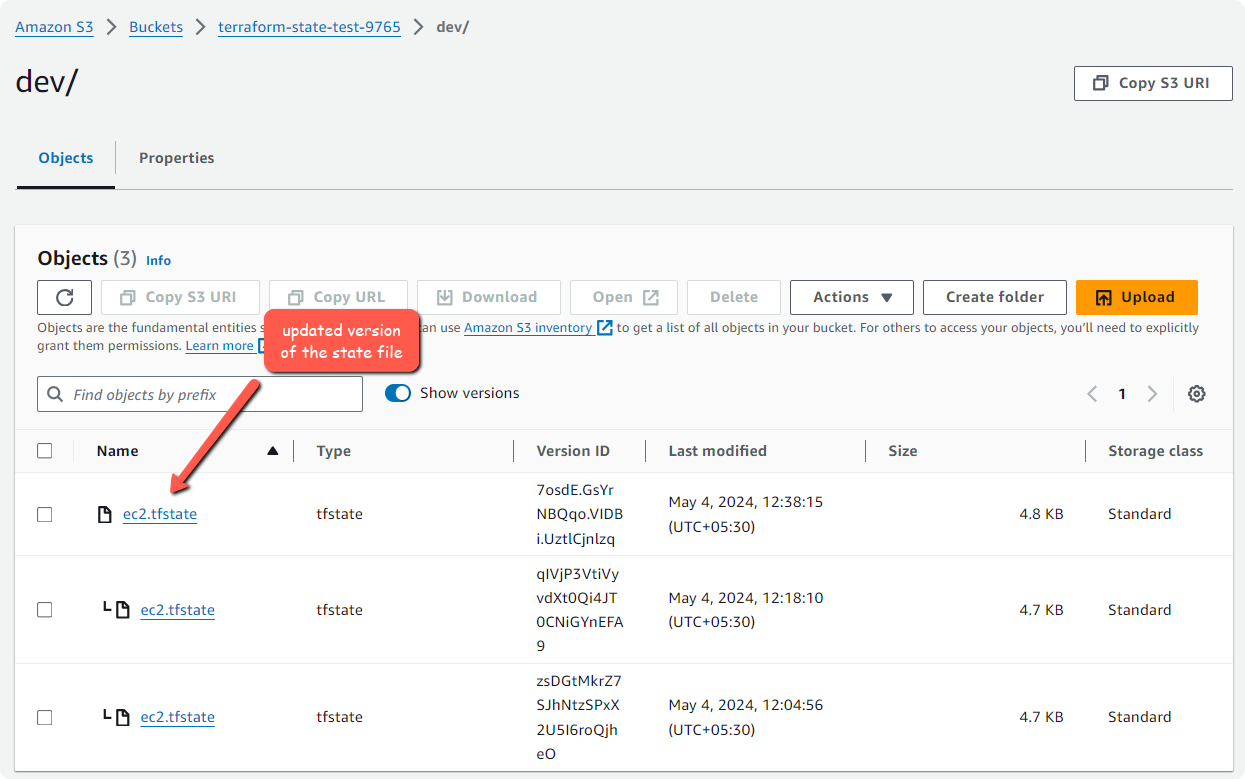
Enable versioning will help to go back to the previous state versions if required.
Overriding State Lock
There are situation where you might end up having lock issues.
You can override the terrform state lock using -lock=false while executing terraform commands as given below.
Note: It is not a recommended approach and you have to cautious while using the flag in actual project environments.
terraform init -lock=false
terraform plan -lock=false
terraform apply -lock=false
Migrating State to S3 Backend
If you have an existing state file in your local system or a server, you can migrate it to s3 backend.
Note: Before performing the migration, It is a best practice to perform the backup of the local state. If something goes wrong during the migration, you can restore the state file from the backup.
To perform the migration, first you need to add the s3 remote backend configuration as explained in this guide.
Then run terraform init -migrate-state
terraform init -migrate-stateTerraform will prompt for confirmation. Type yes to proceed.
Terraform will now migrate all the local state file to s3 bucket provided in the backend configuration.
Conclusion
I believe this guide gave you an overall idea of how to manage your Terraform remote state file using s3 and DynamoDB. You can try all the backend configuration methods and choose one that satisfies your requirements.
If you face any issues or if you need any suggestion, drop a comment below.
