


In this step-by-step guide, you will learn to setup a self-hosted Pritunl VPN in an AWS EC2 instance.
By the end of this guide, you will learn:
- How to install and configure Pritunl
- How to create and set up VPN users (clients)
- How to connect and authenticate users using a VPN client app
- How to configure split tunneling to route only AWS traffic through the VPN
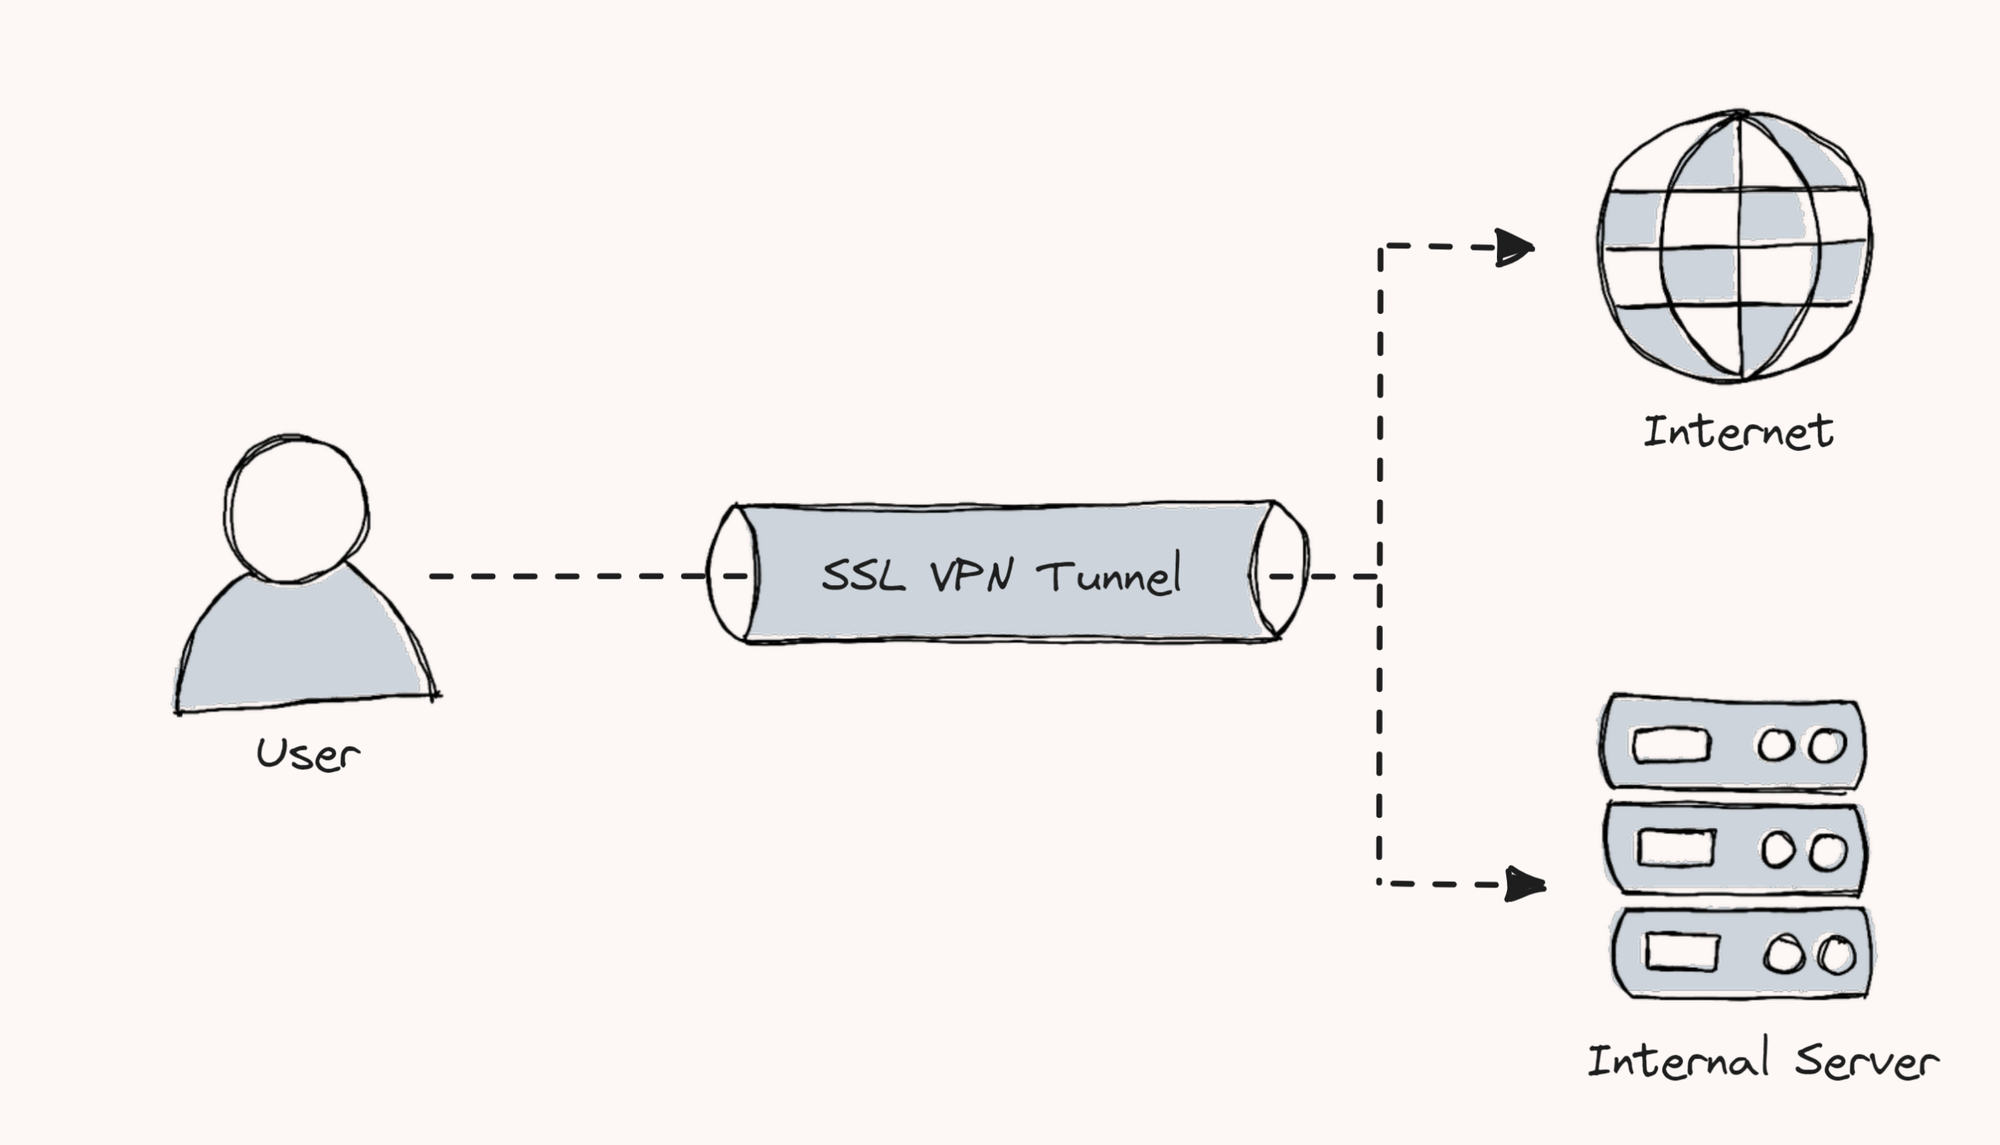
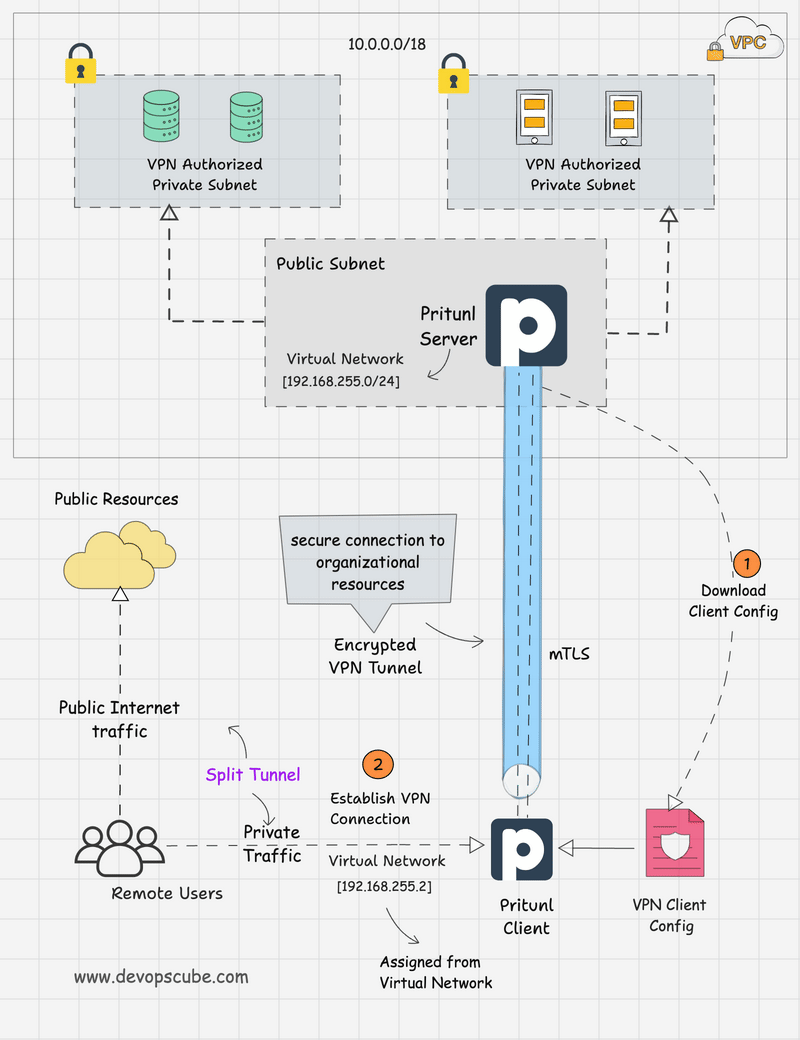
Before we dive in to the setup, lets understand the Pritunl VPN workflow.
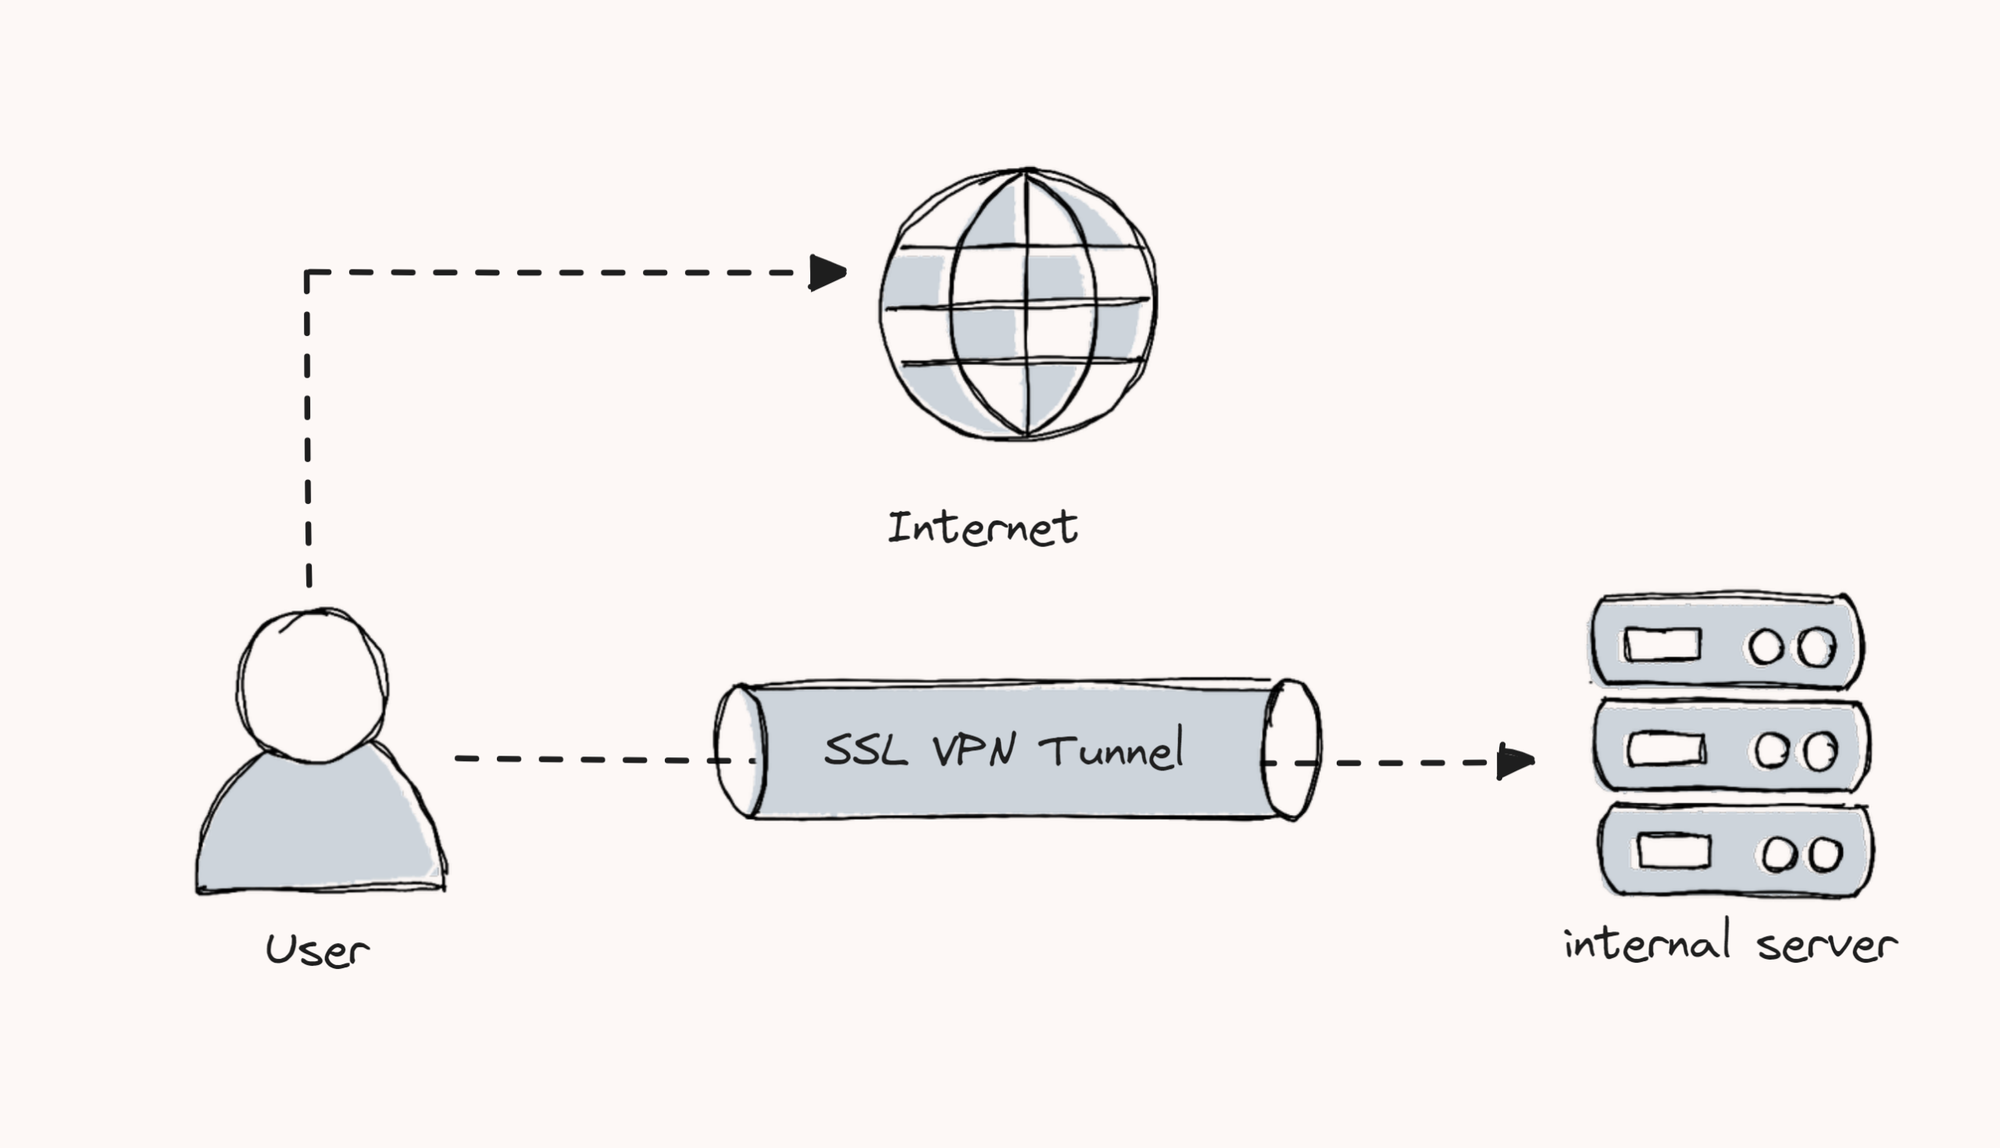
Pritunl VPN Workflow
The following diagram shows the traffic flow to access AWS private resources using the Pritunl VPN server.
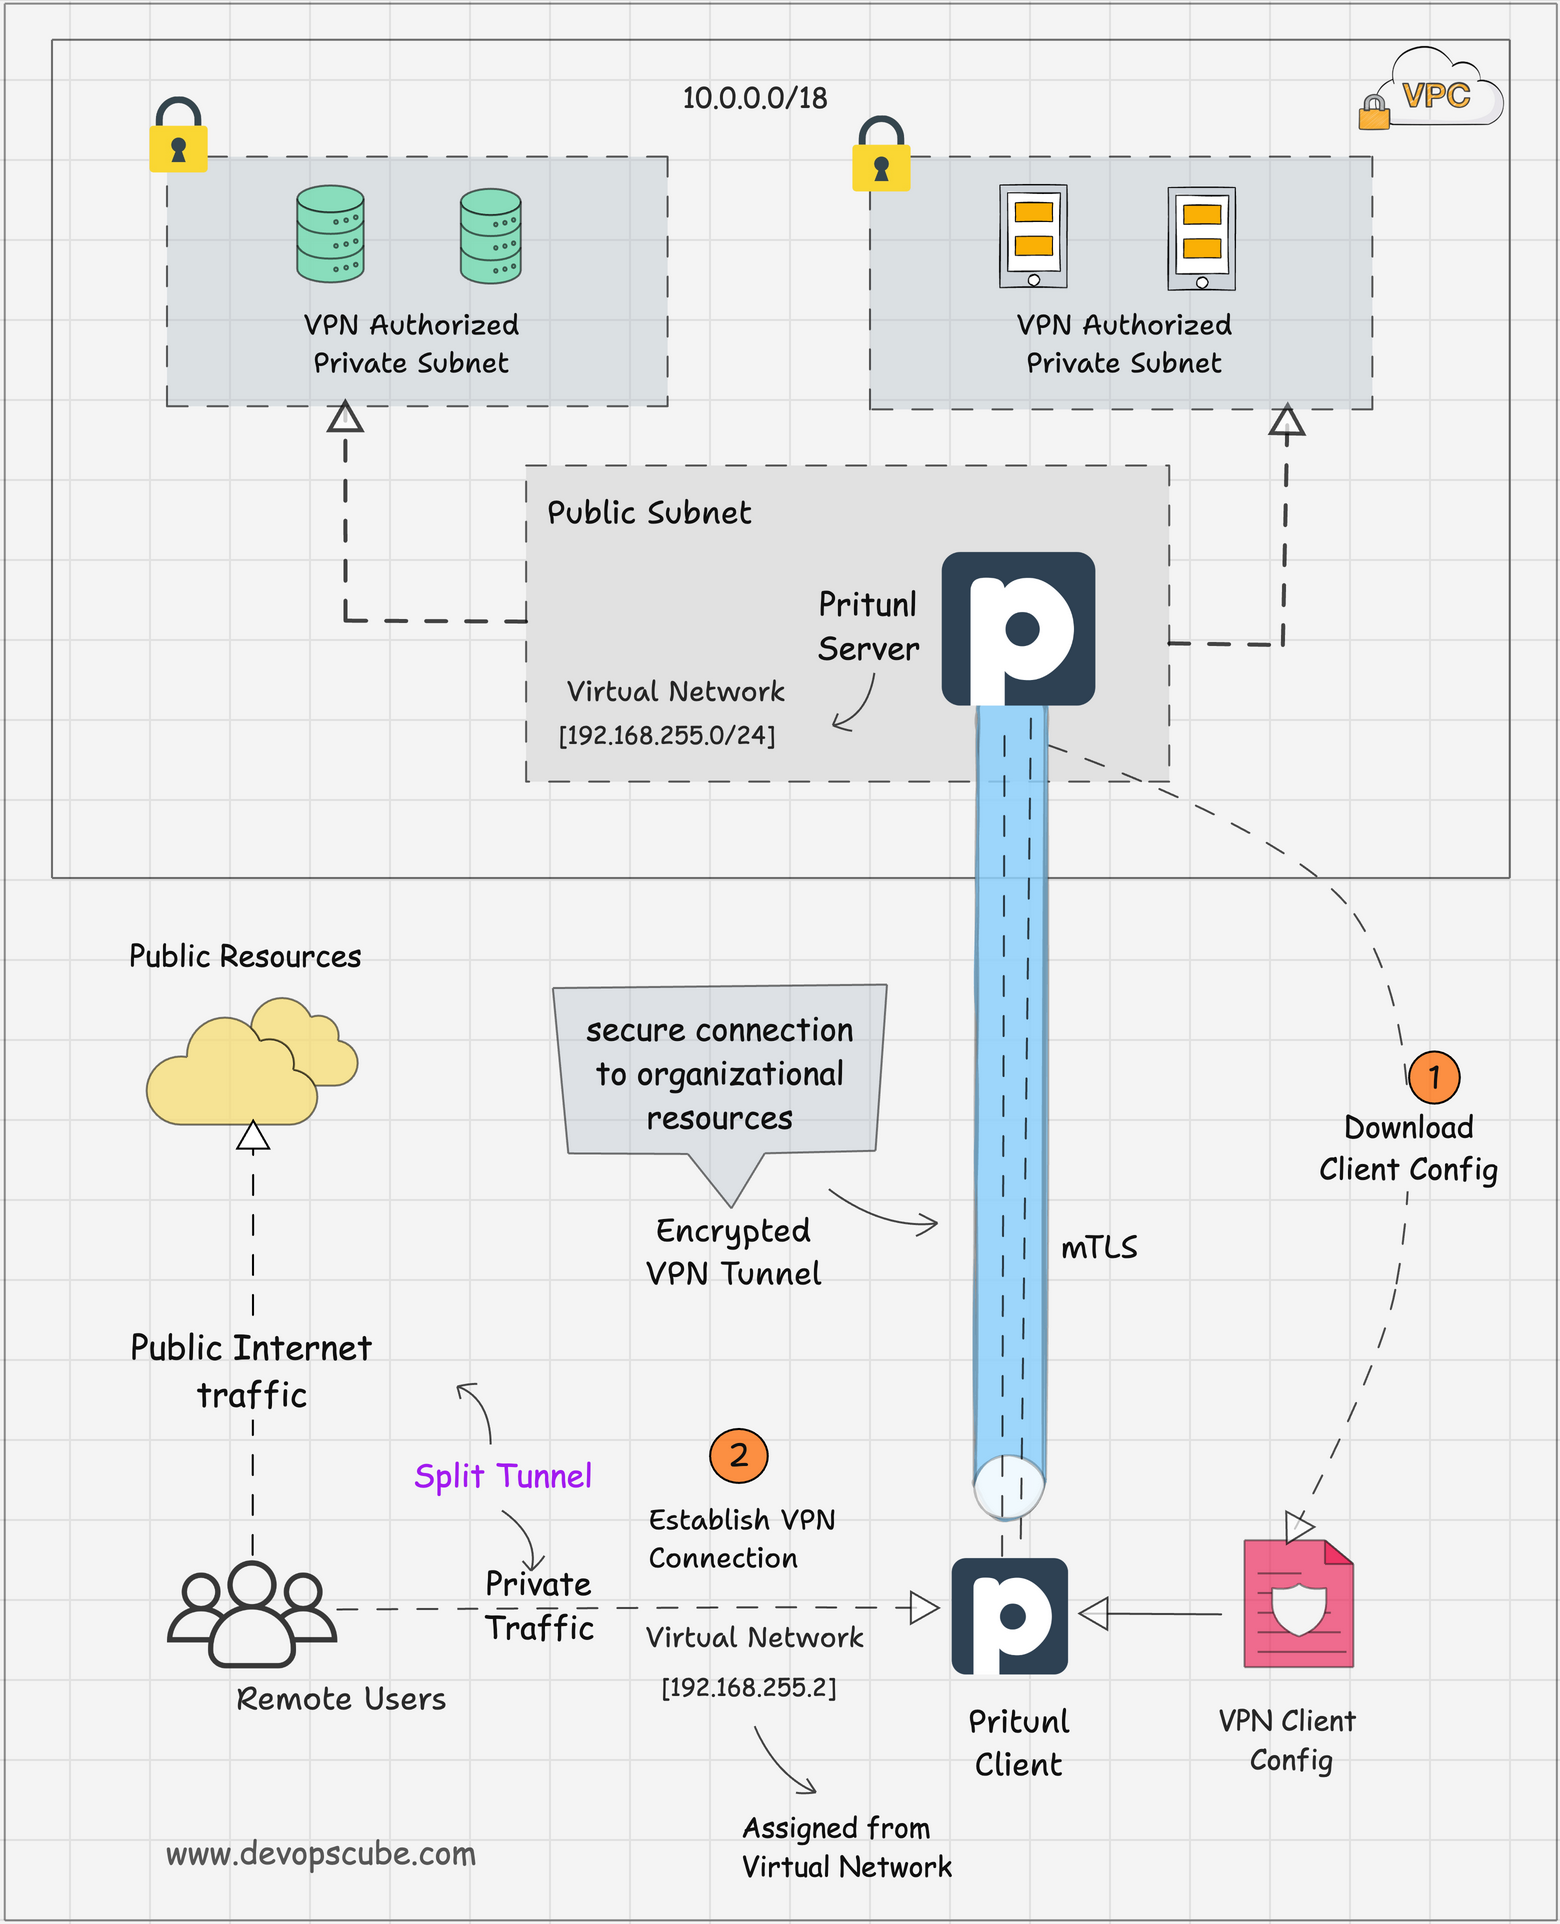
Here is how it works.
- The user first establishes a VPN tunnel to the Pritunl server residing in the AWS public subnet using the Pritunl VPN client.
- Once authenticated, a secure, encrypted tunnel gets created over the internet from the local workstation to the pritunl VPN server.
- When the user tries to access any AWS private resources from the networks configured in Pritunl, the connection from the local workstation reaches the VPN server over an encrypted tunnel, and then the traffic gets decrypted to reach the AWS private resources.
Set up Pritunl VPN on EC2 instance
For setting up the Pritunl, I am choosing an Ubuntu based t3 medium instance.
A t3.medium instance type, can handle almost 250 client connections and provides a decent performance.
Also, Pritunl requires a MongoDB database to store the user data and VPN configuration.
In this setup, we are installing MongoDB on the same EC2 instance. For production HA setups, it is better to keep the Database in a dedicated instance.
Lets get started with the setup.
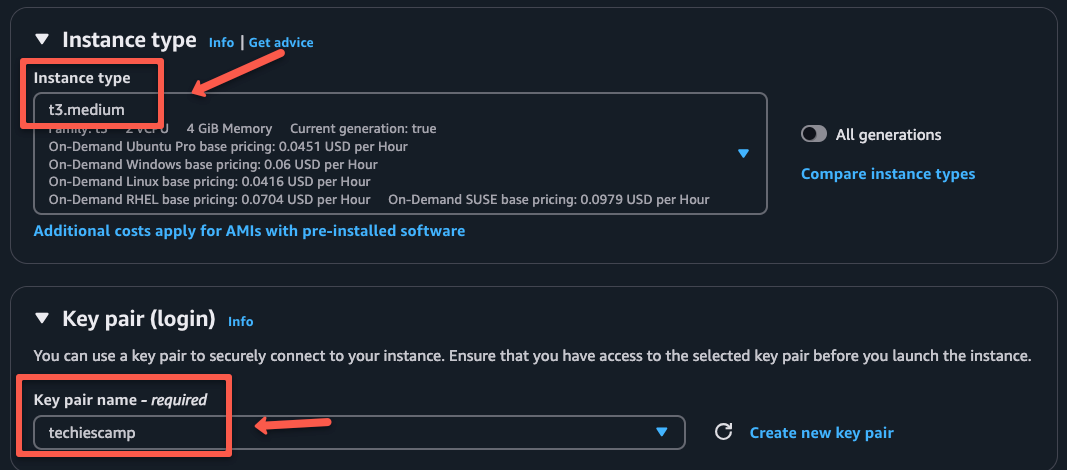
Step 1: Create an EC2 Instance
Go to the AWS EC2 dashboard and spin up a new EC2 instance with the following configuration.
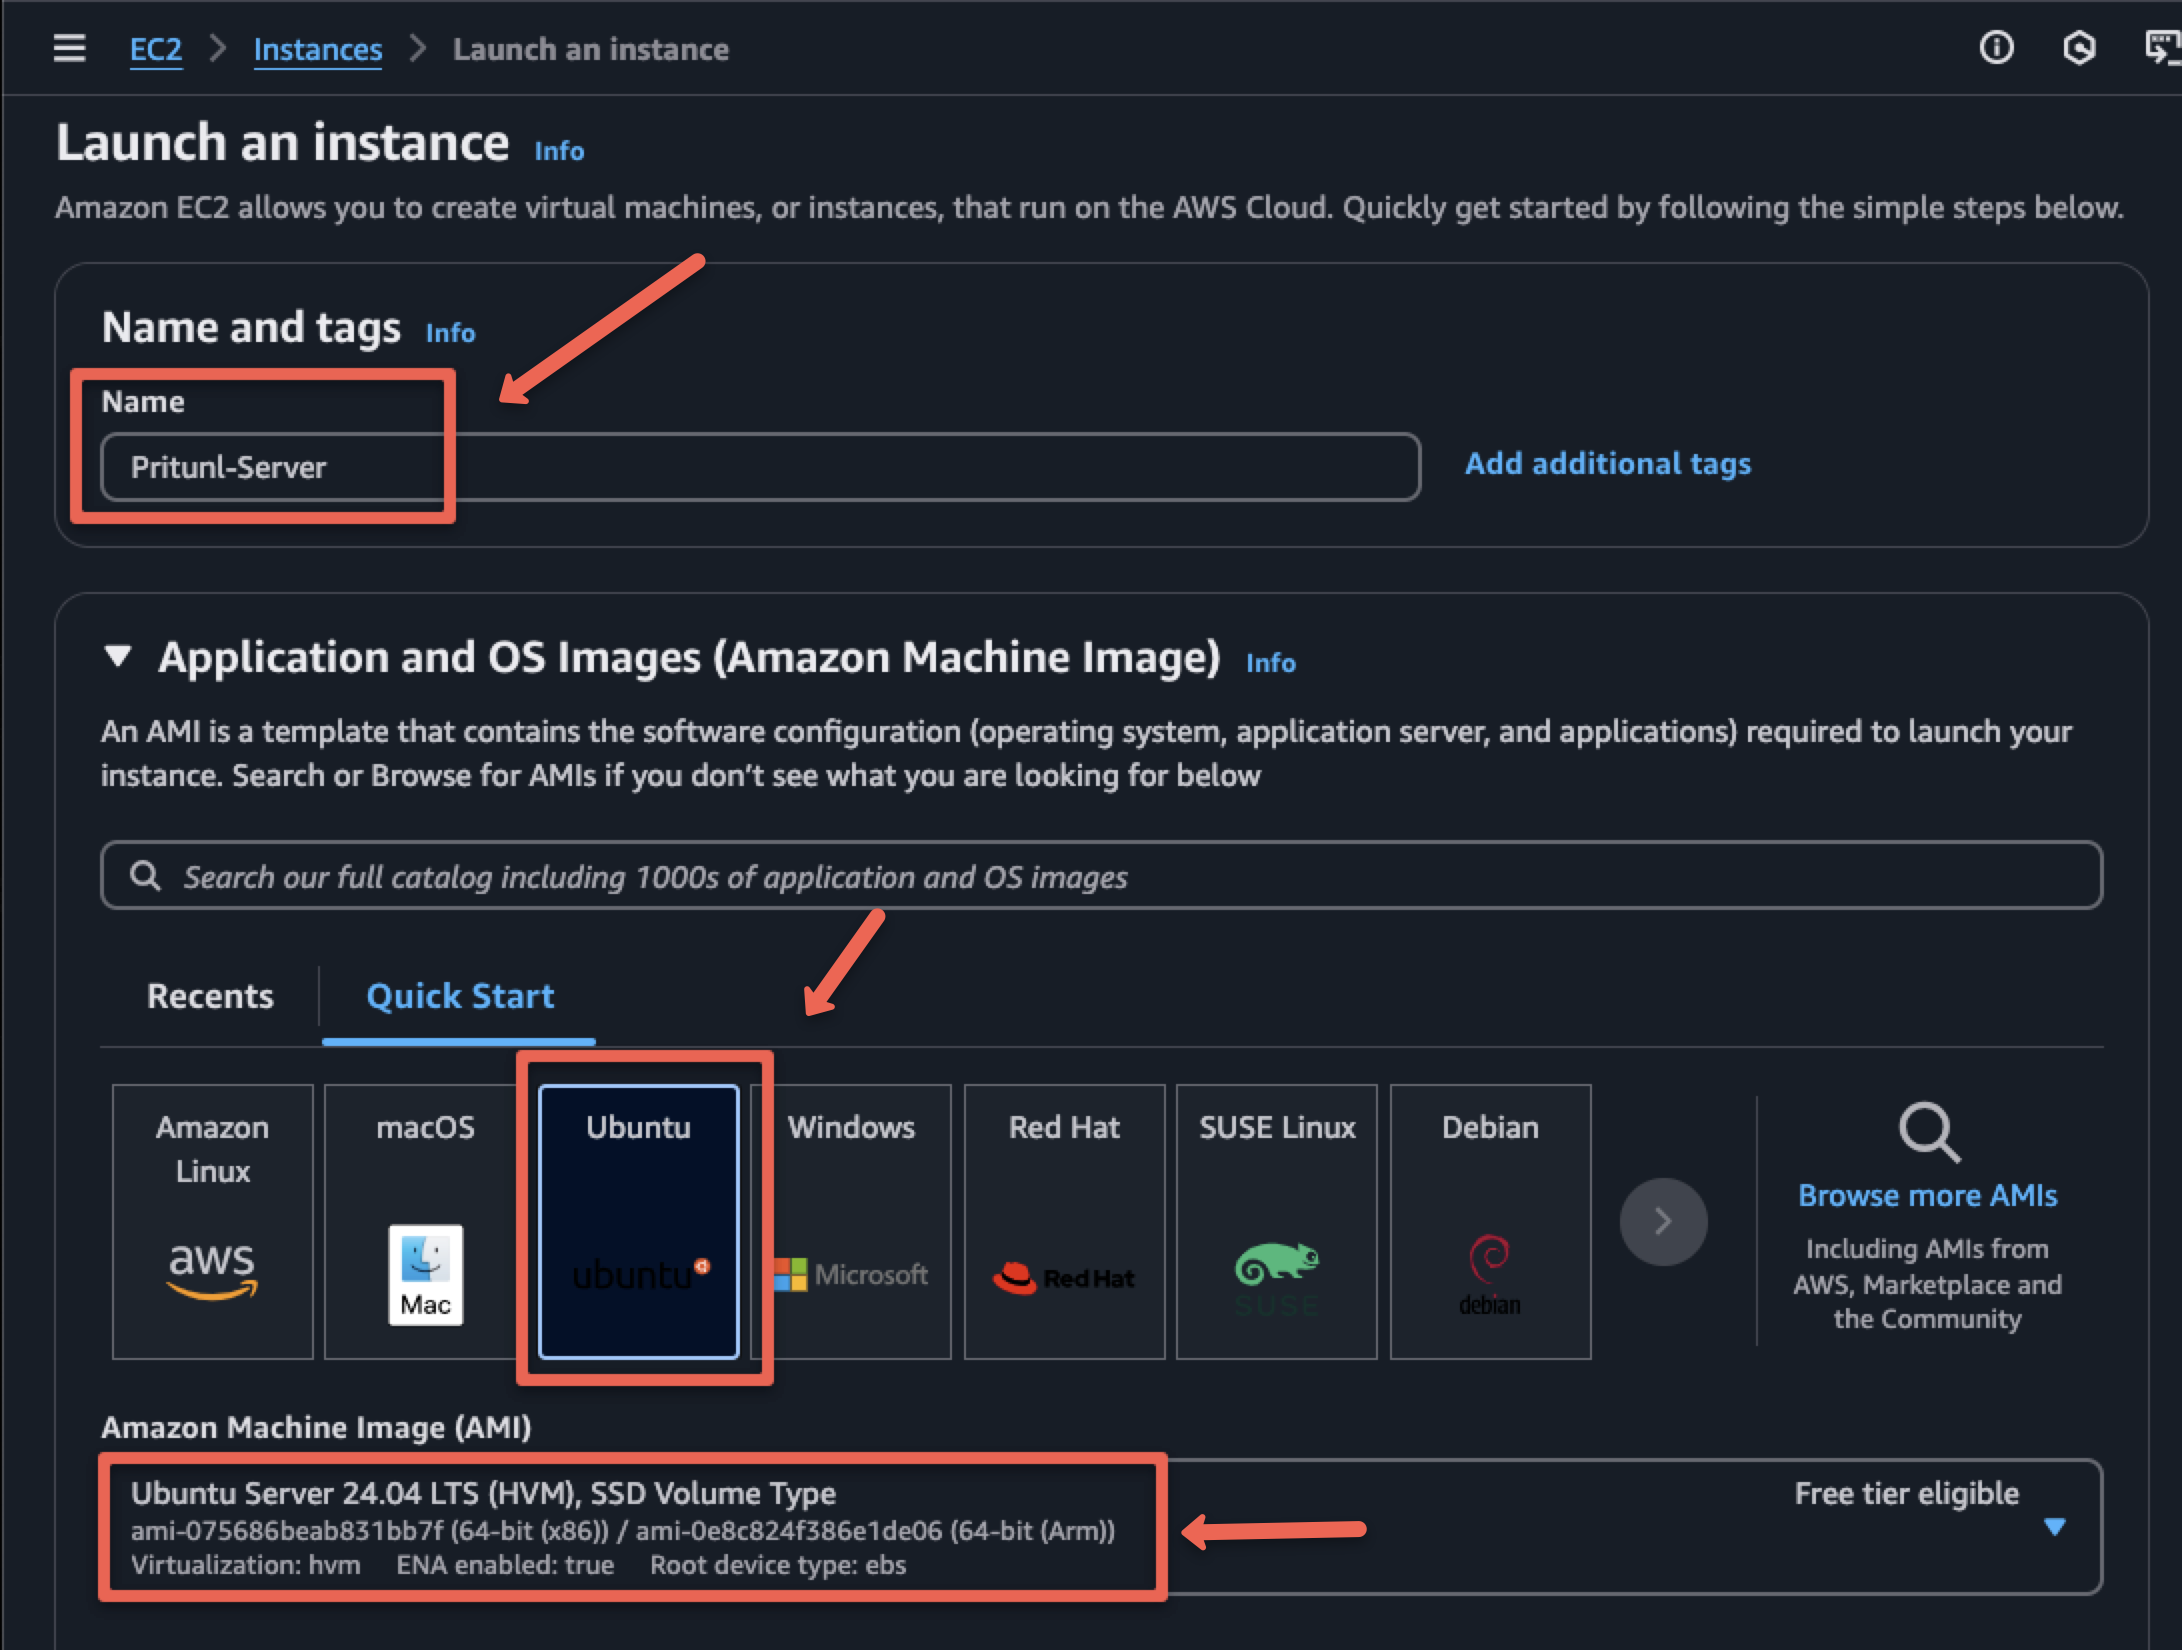
Select the Instance type as t3.medium instance type and select the key pairs.
If you don't have an existing key, create a new one for the server.
Step 2: Choosing VPC
I am choosing the default VPC for this setup.
If you are using a custom VPC, make sure the selected subnet is a public subnets the Auto-assign public IP option is enabled.
Also, I am selecting the default security group. I will add some rules for access in the latter part of the configuration. You can choose to create a new security group as per your requirements.
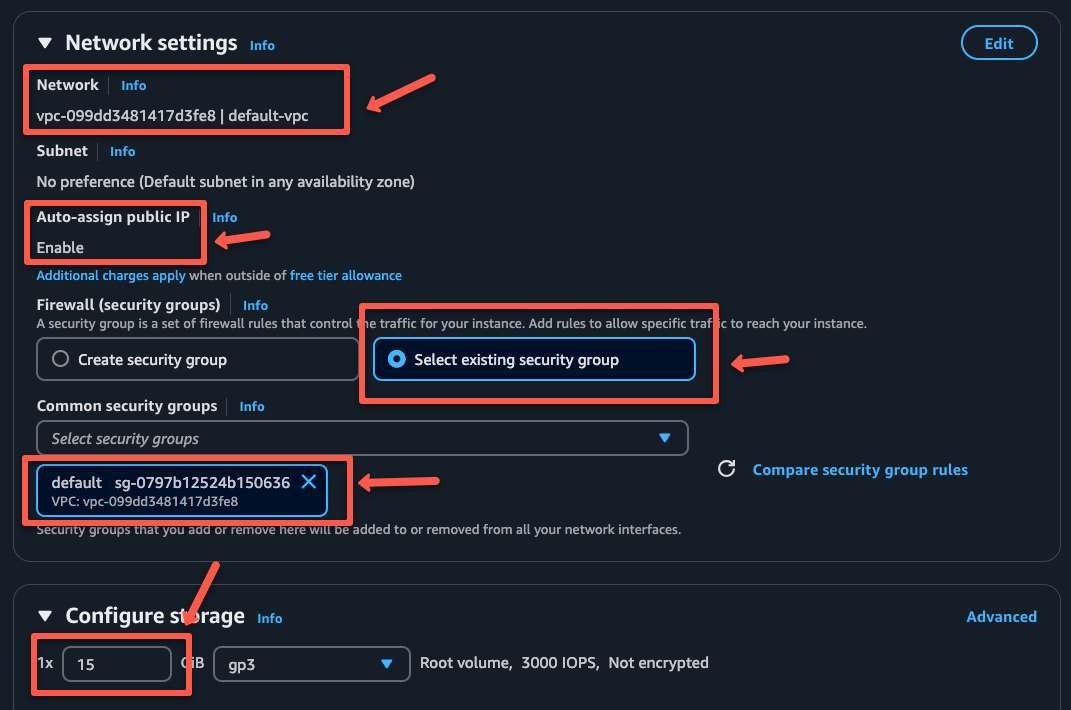
After configuring everything, click the Launch instance to create the EC2 instance.
After configuring everything, click the Launch instance to create the EC2 instance.
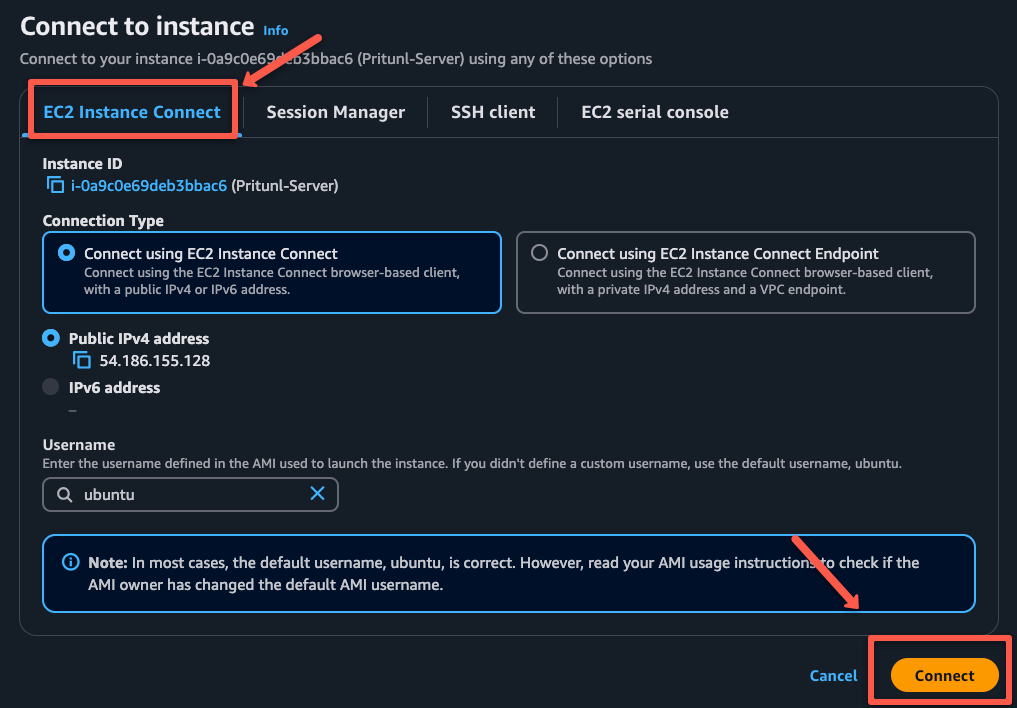
It will take a few minutes to up the server, then you can use the ec2 instance connect or SSH into the instance from the local machine using the pem key.
For now, I’m using the web terminal in the browser to connect to the instance.
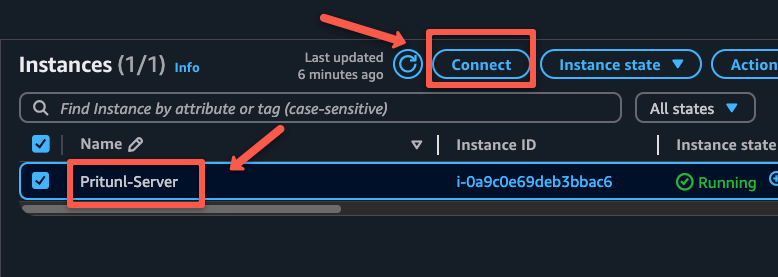
I am using the ec2 instance connect option.
Step 3: Add Pritunl, OpenVPN and MongoDB Repositories
First, add the necessary repositories to install Pritunl, OpenVPN, and MongoDB.
Add the MongoDB repo:
sudo tee /etc/apt/sources.list.d/mongodb-org.list << EOF
deb [ signed-by=/usr/share/keyrings/mongodb-server-8.0.gpg ] https://repo.mongodb.org/apt/ubuntu noble/mongodb-org/8.0 multiverse
EOF
Add the the OpenVPN repo:
sudo tee /etc/apt/sources.list.d/openvpn.list << EOF
deb [ signed-by=/usr/share/keyrings/openvpn-repo.gpg ] https://build.openvpn.net/debian/openvpn/stable noble main
EOF
Add the Pritunl VPN server repo:
sudo tee /etc/apt/sources.list.d/pritunl.list << EOF
deb [ signed-by=/usr/share/keyrings/pritunl.gpg ] https://repo.pritunl.com/stable/apt noble main
EOF
Step 4: Add GPG keys
Install the GPG tools to handle the key verification for package sources.
sudo apt --assume-yes install gnupg
Add GPG keys for the packages.
Download the GPG key of the MongoDB package:
curl -fsSL https://www.mongodb.org/static/pgp/server-8.0.asc | sudo gpg -o /usr/share/keyrings/mongodb-server-8.0.gpg --dearmor --yes
Download the OpenVPN GPG key:
curl -fsSL https://raw.githubusercontent.com/pritunl/pgp/master/pritunl_repo_pub.asc | sudo gpg -o /usr/share/keyrings/pritunl.gpg --dearmor --yes
Download the Pritunl package GPG key:
curl -fsSL https://raw.githubusercontent.com/pritunl/pgp/master/pritunl_repo_pub.asc | sudo gpg -o /usr/share/keyrings/pritunl.gpg --dearmor --yes
Step 5: Install Pritunl, OpenVPN, MongoDB, and Wireguard
Pritunl is not a VPN server itself. Instead, it acts as a management layer for VPN servers like OpenVPN and WireGuard.
It handles user management, connection routing, and provides a web interface.
First, update the package list and then install the required packages:
sudo apt update
sudo apt --assume-yes install pritunl openvpn mongodb-org wireguard wireguard-tools
Now, disable the firewall to avoid the connection issues.
sudo ufw disable
Start and enable the Pritunl and MongoDB services.
sudo systemctl start pritunl mongod
sudo systemctl enable pritunl mongod
By default, Pritunl uses OpenVPN.
It generates a temporary OpenVPN configuration in the
/tmp directory.You can view the connection details using the
--management argument in that temporary config file.Step 6: Set Up the Pritunl Web Interface
Pritunl offers a user-friendly web interface for the configurations as well as the connection check.
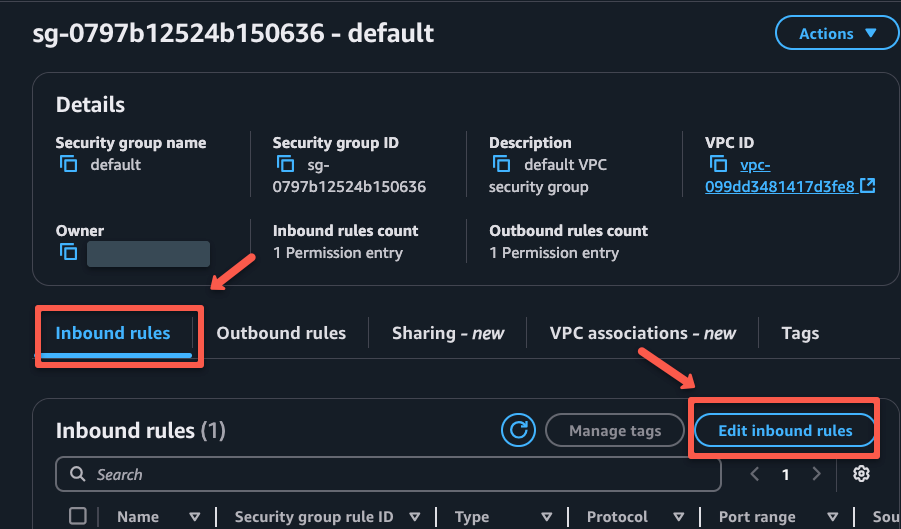
To access the web interface, ports 80 and 443 should be enabled on the security group.
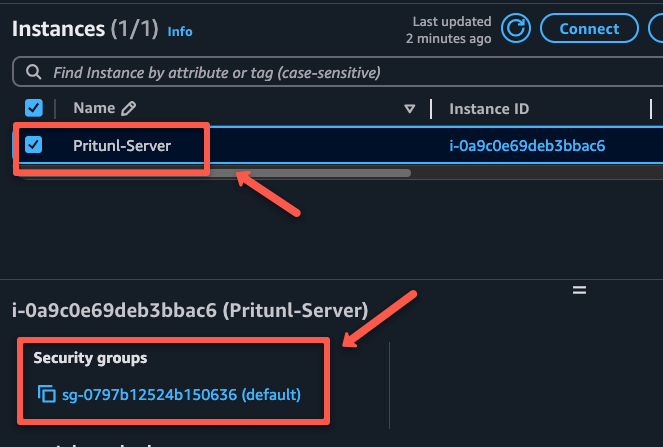
Edit the inbound rules of the security group to add the rules.
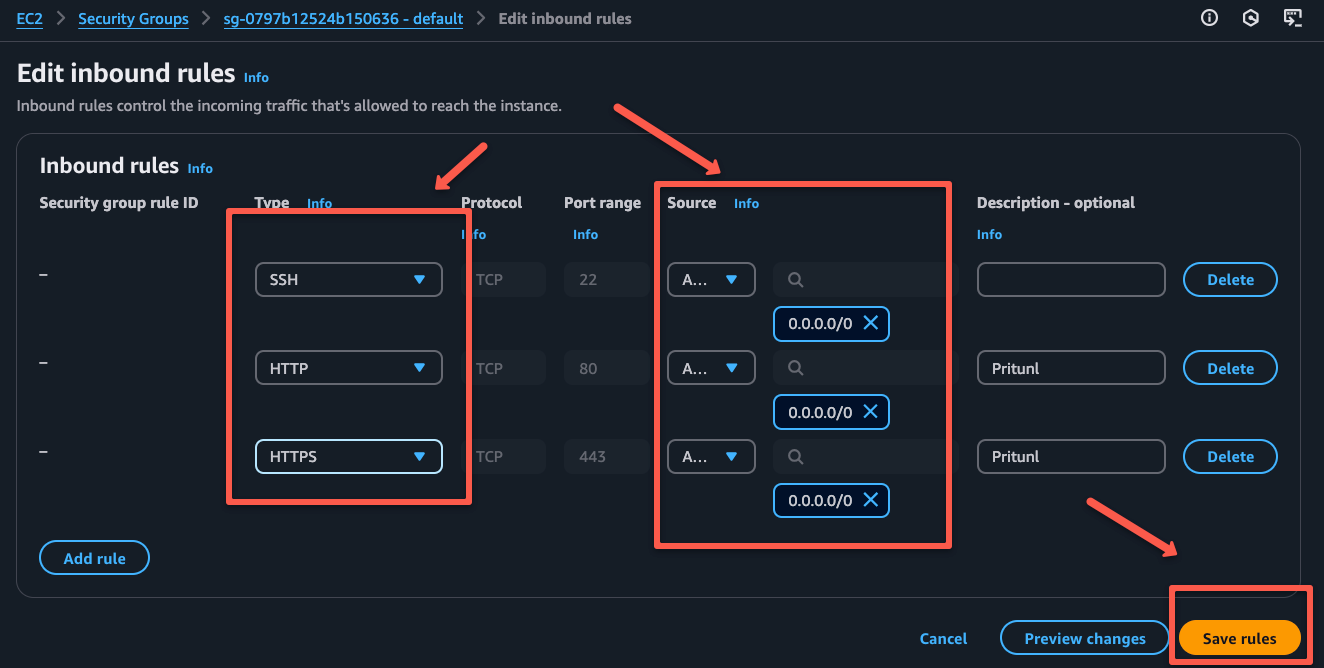
We can use the public IP of the Pritunl VPN server to access the dashboard.
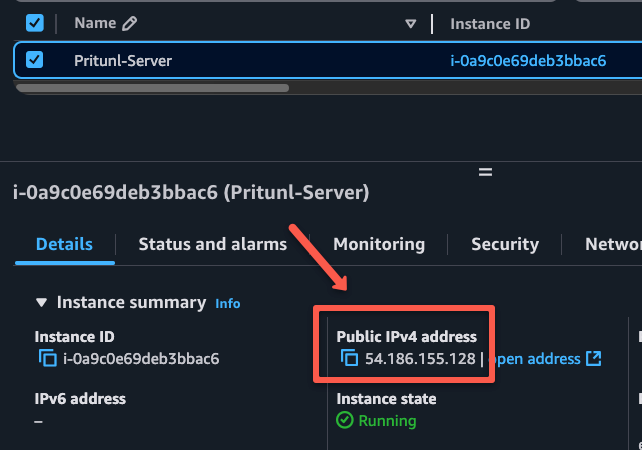
Note down the public IP and open any web browser and paste the IP address.
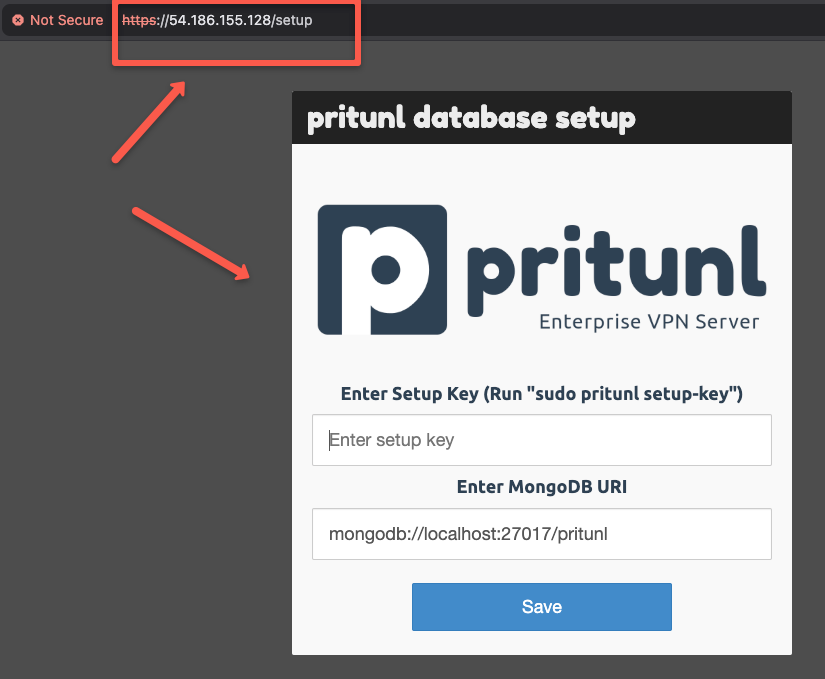
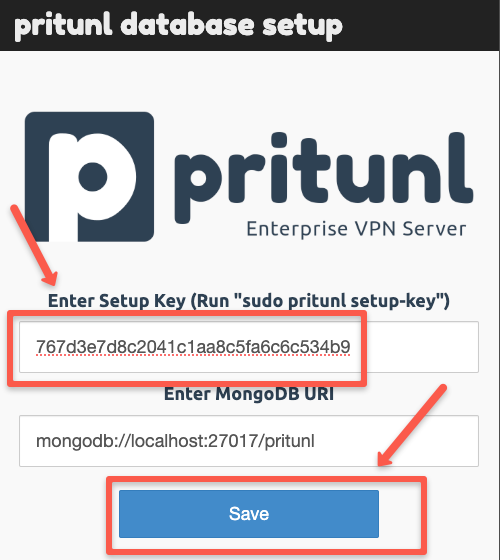
Here, one thing you can notice is that MongoDB is automatically configured with the Pritunl server.
27017 so, Pritunl has the predefined configuration in /etc/pritunl.conf as localhost:27017But, if you are using a dedicated MongoDB server, you need to modify the
mongodb_uri on the /etc/pritunl.conf with the external database server details.To get the Pritunl server setup key, use the following command.
sudo pritunl setup-key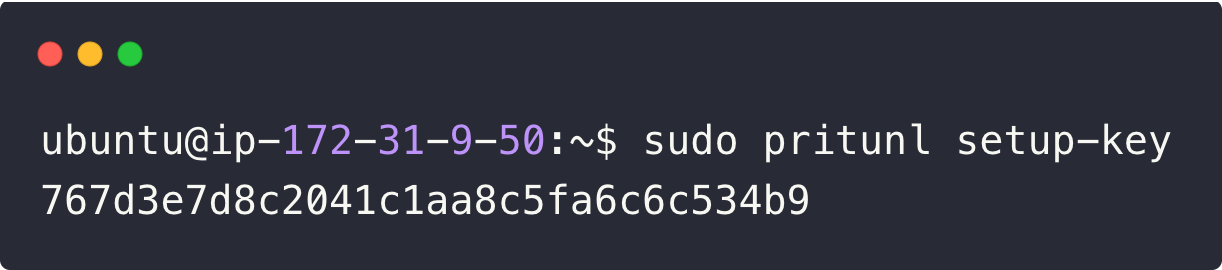
The setup key differs for each deployment, so copy yours from the Pritunl server CLI and paste it into the dashboard.
The next page will prompt you to provide the default username and password.
Use the following command to get the default credentials.
sudo pritunl default-password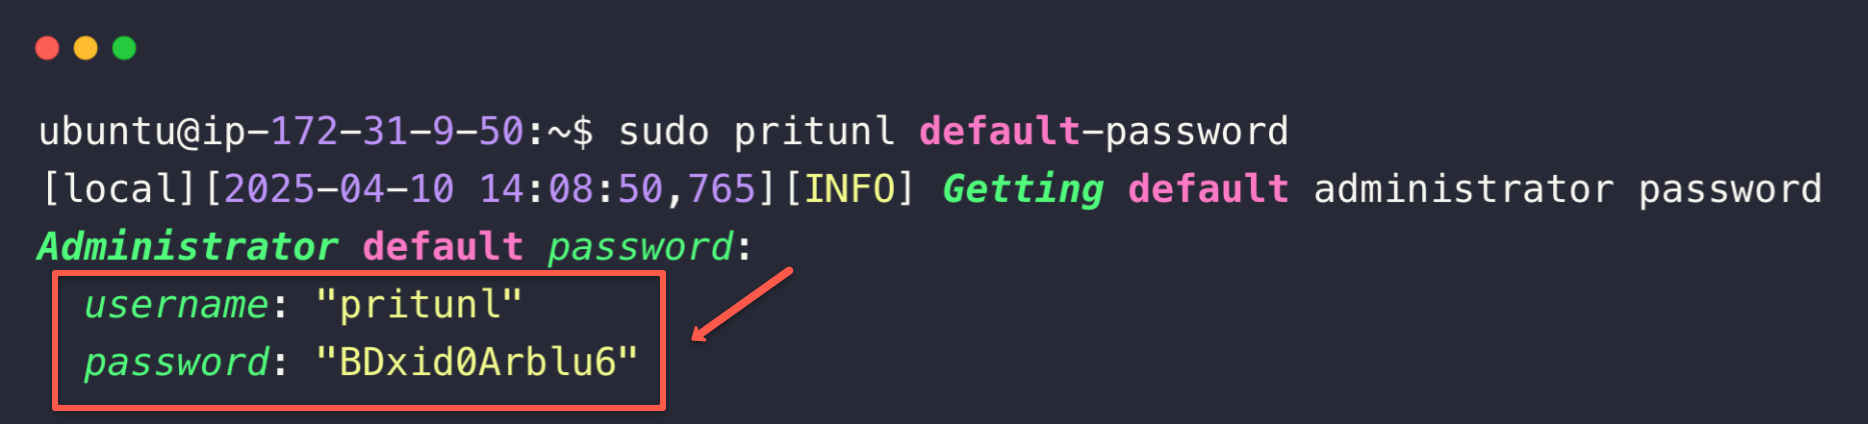
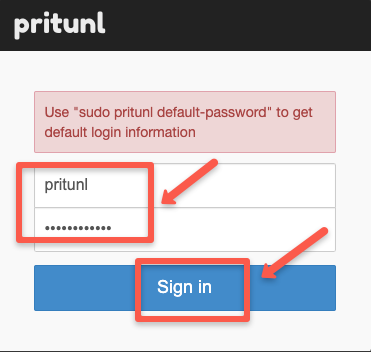
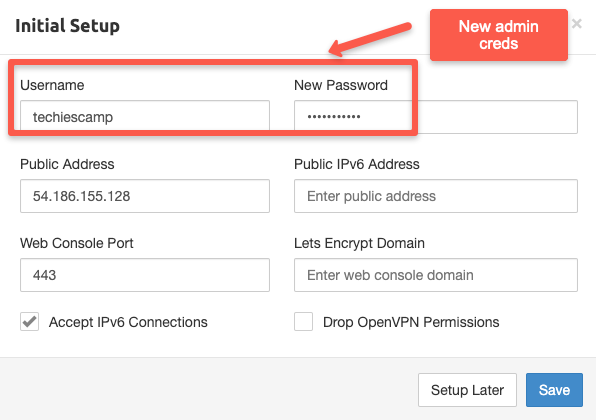
We need to provide this information on the login dashboard, which will again prompt you to provide new admin credentials.
Step 7: Configure the Pritunl VPN Server
The configuration starts with the creation of an organization, which will organize the configurations. We can create multiple organizations if necessary.
Navigate to the Users tab and click the Add Organization button to create a new organization.
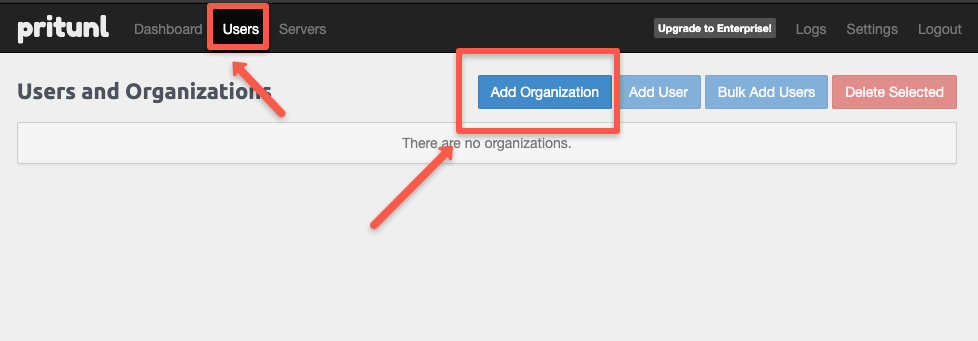
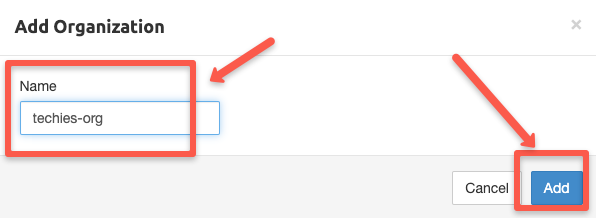
Give a name for the organization
Next, we must create a server to configure the port and DNS server details.
Navigate to the Servers tab and click the Add Server button to create a new server.

On the Server Configuration tab, you need to provide a name for the server. You can also configure the DNS server details, port, protocol, virtual network, and authentication options.
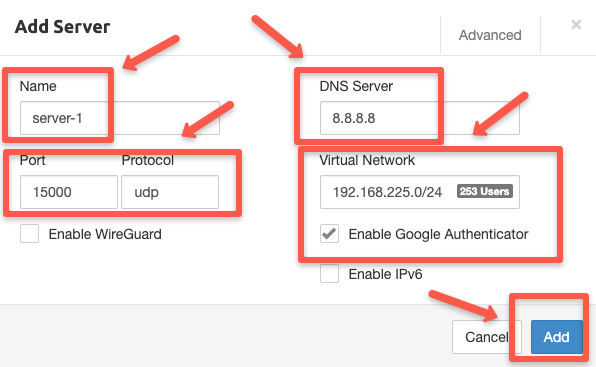
This network range should be range that shouldn't be the same range in users network or network used in AWS VPCs that is part of VPN. Or else IP conflicts may occur.
Once the server configurations are completed, we need to bind the organization with the server.
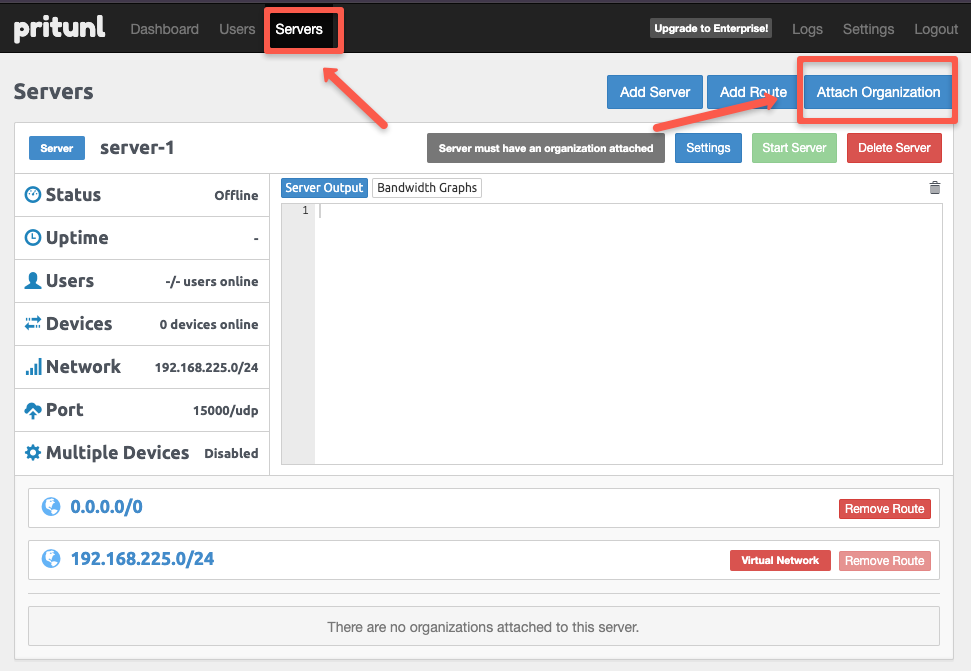
Select the organization name and the server name to attach the organization to the server.

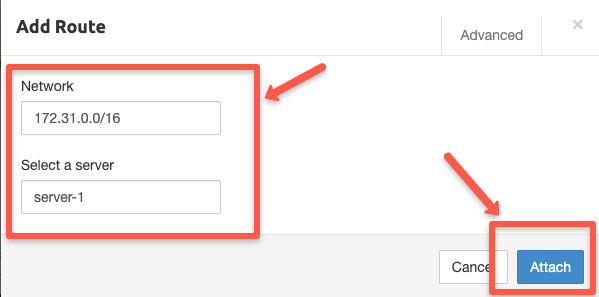
We need to provide information about the AWS Private subnets that we want to connect with securely.
You can add the entire VPC or specify only the subnets you want to access from your local workstation. This depends on your VPC setup, VPN requirements, and the design of your project.
This defines which network the VPN server should provide secure and encrypted access to.
Navigate to the Add Route button on the Server tab.
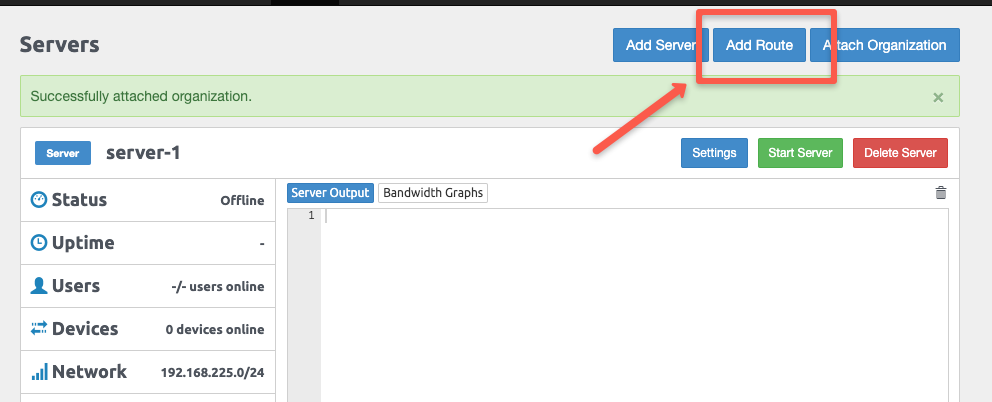
For testing purposes, I am adding the VPC CIDR.
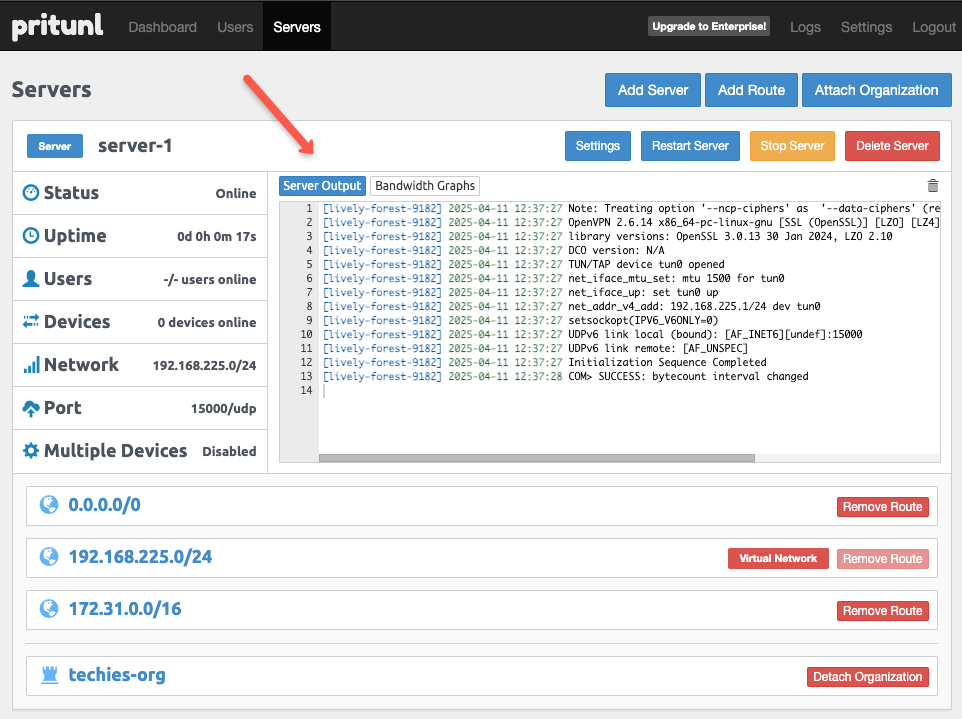
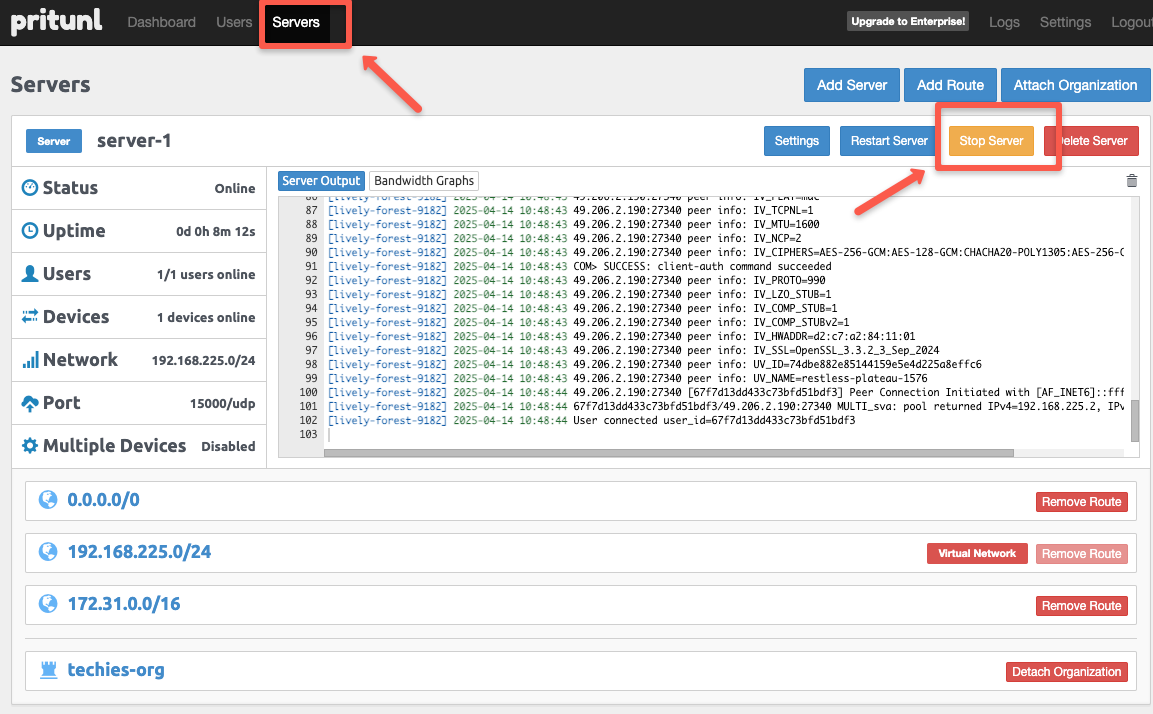
All the VPN configurations are complete now. You can start the VPN Server using the start server option as highlighted below.
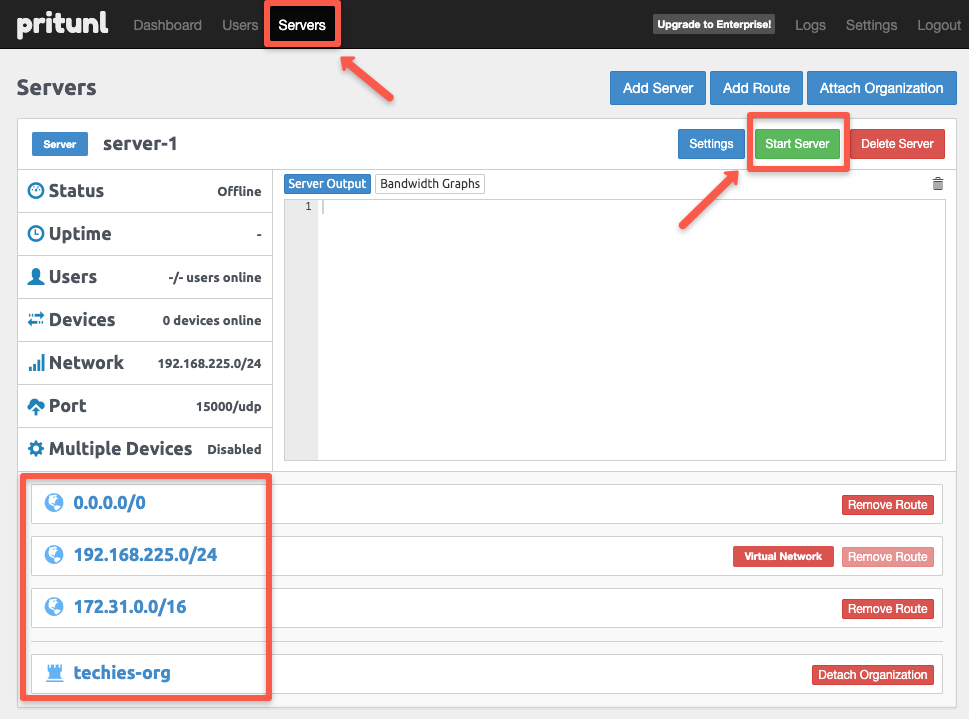
On the dashboard, we can see the logs of the connection and the status of the server.
Step 8: Create Pritunl Users on Server
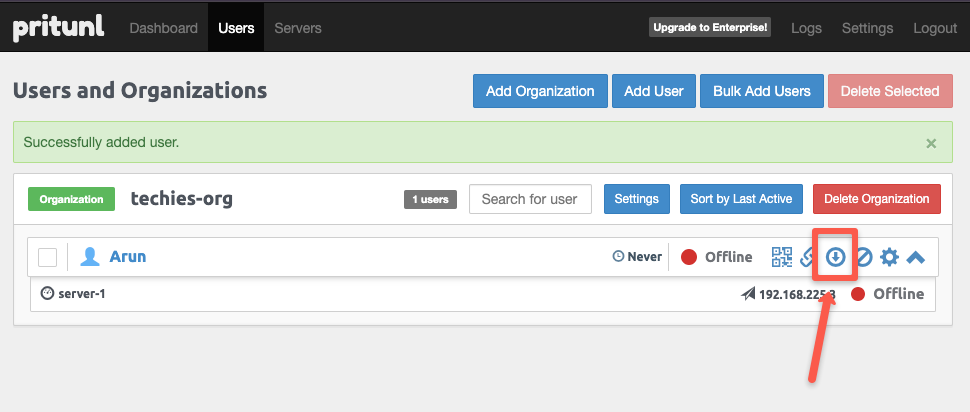
The server is up and running.
Now you need to create user (clients) and user configurations for VPN server access.
Navigate to the Users tab and select Add User to add new users.
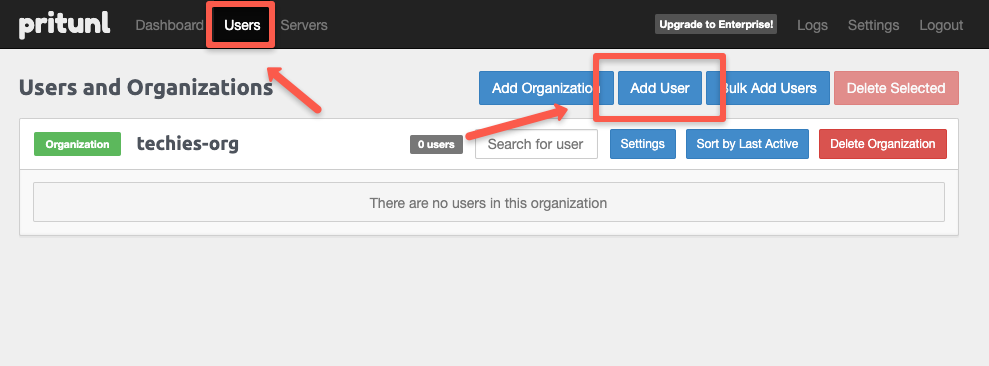
Give a user name on the user creation tab, and select the organization if you have multiple.
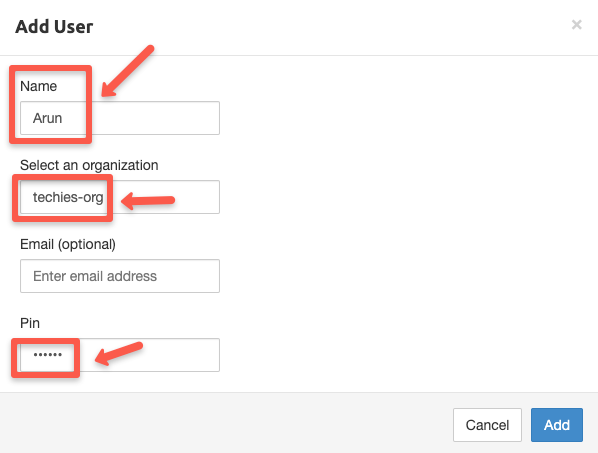
Note: Email and PIN information are optional.
We can create multiple users as per our requirements. Pritunl doesn't have any limitations.
During the user creation, a user profile will also be created, which will be necessary to make a connection from local to the VPN Server.
You need to download that.
The downloaded client configuration will be used with Pritunl client app that we configure in the next section.
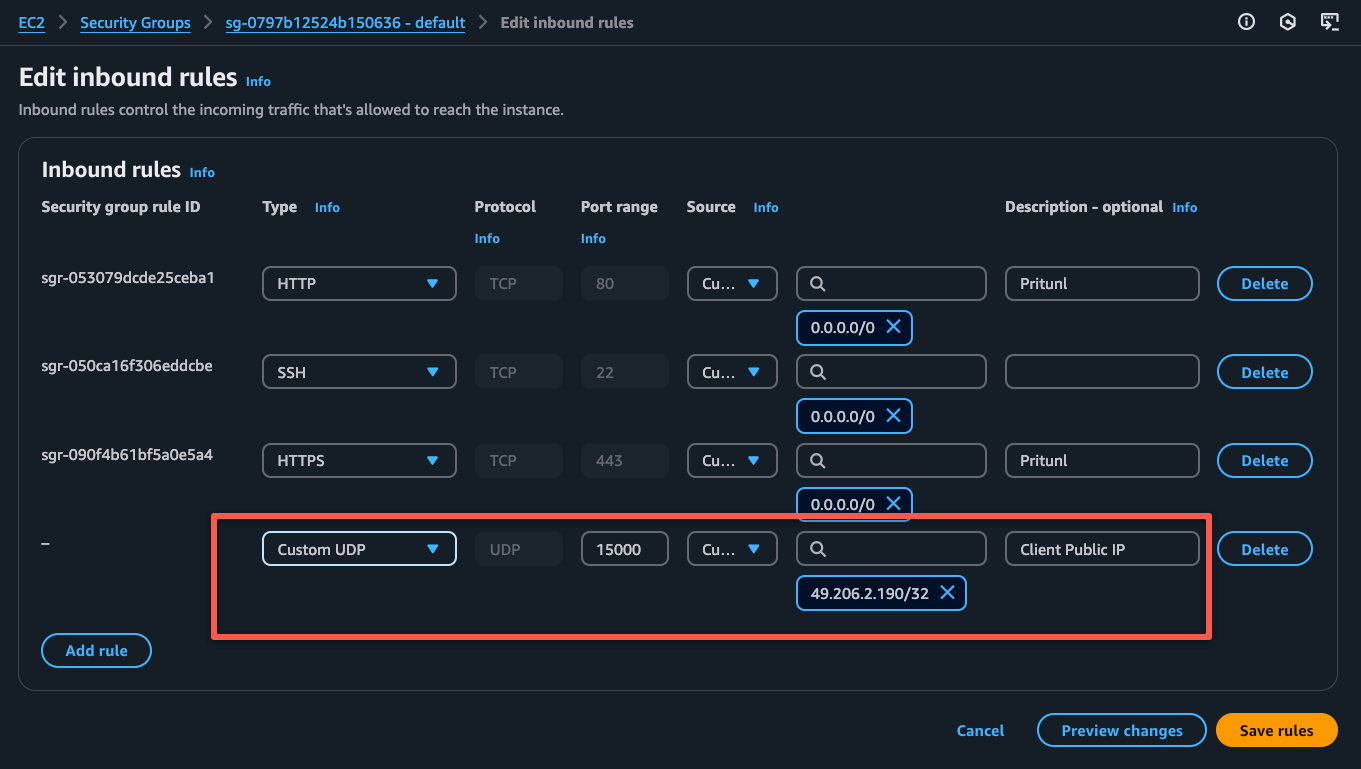
15000 of the VPN Server.You need to ensure that the VPN server port
15000 is open for the client in the Pritunl servers security group. Lets add port to the security group limiting access only to the public IP of the workstation.
To get the public IP of your workstation, use the following command on the terminal
curl ifconfig.meThis command will work on Mac, Windows CMD, and Linux CLI.
Once get the workstations public IP, update the server's security group with the public IP address.
Server side configurations for the client are completed. Next we need to download the Pritunl client app on our local workstation.
Step 9: Download the Install Pritunl Client
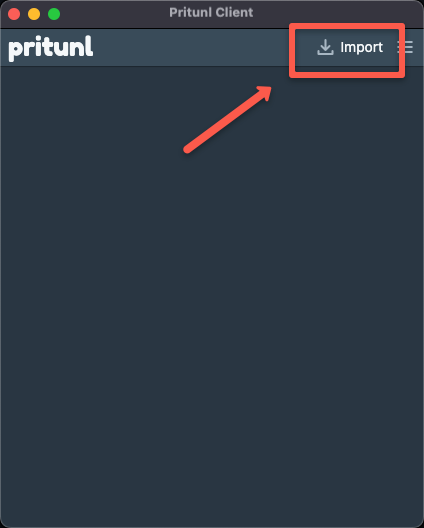
You can use the official Pritunl client page to download the client, and choose the appropriate one for your operating system.
After the download is complete, open the VPN client application and import the profile you downloaded earlier.
After importing the client profile, click the Connect button to make a connection between the local workstation and the VPN server.
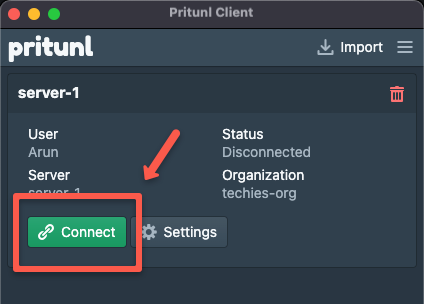
If you have enabled PIN or Google authentication, you will be prompted to provide them.
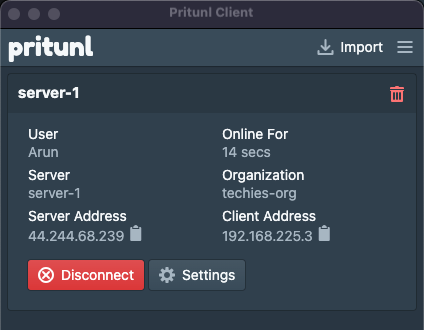
The connection is established.
However, this is a full-tunnel VPN connection, which means not only AWS traffic but all internet access will be routed through the VPN and encrypted.
This can impact the performance of regular non-AWS internet traffic.
To avoid this, you can configure a split-tunnel VPN. This setup allows normal internet traffic to flow directly, while only AWS-specific traffic is routed through the VPN and encrypted.
Step 10: Configure Split Tunnel VPN
The split tunnel configuration will route the VPN traffic only to the AWS network that you have configured( For example, VPC CIDR 172.31.0.0/16)
If the VPN server is running and you need to modify its configuration, you must stop the server before making any changes.
On the Servers tab, click the Stop Server button to stop the server.
The route 0.0.0.0/0 indicates, all the traffic should go through the VPN tunnel, so we need to remove that from the existing routes.
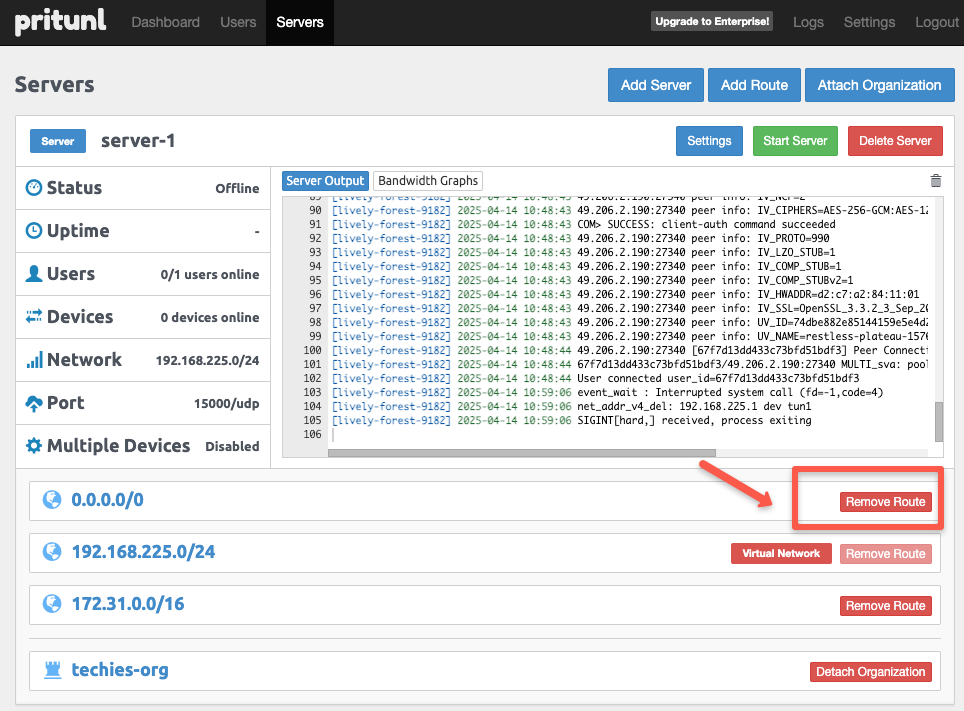
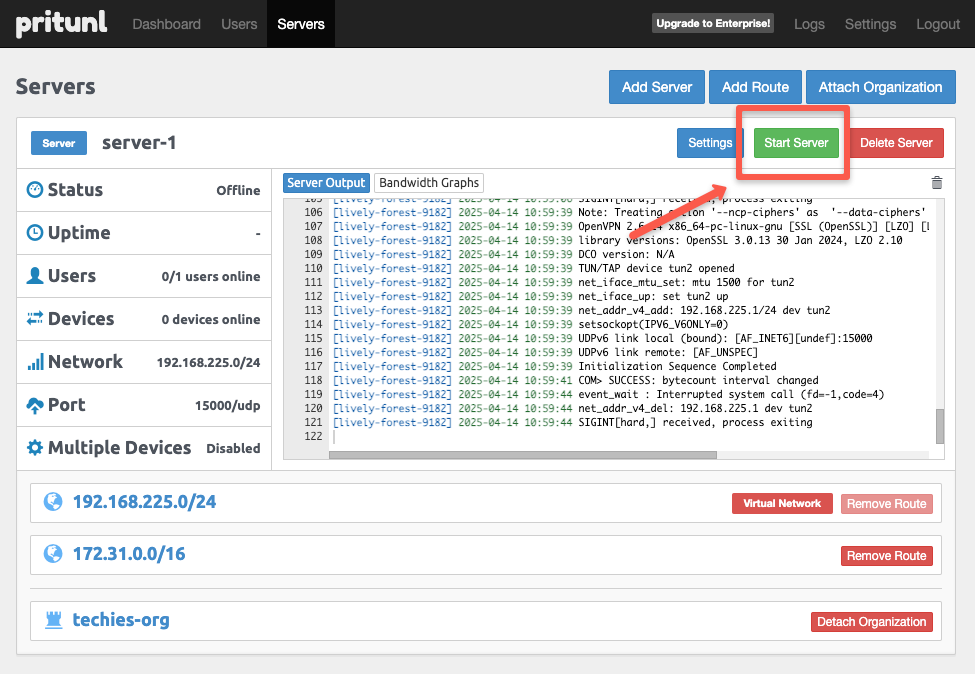
Once the route is removed, we need to start the server again to update the modified changes to the server.
Step 11: Validating Pritunl VPN Setup
To validate the Pritunl setup, you need to test connectivity to AWS ec2 instance using its private IP.
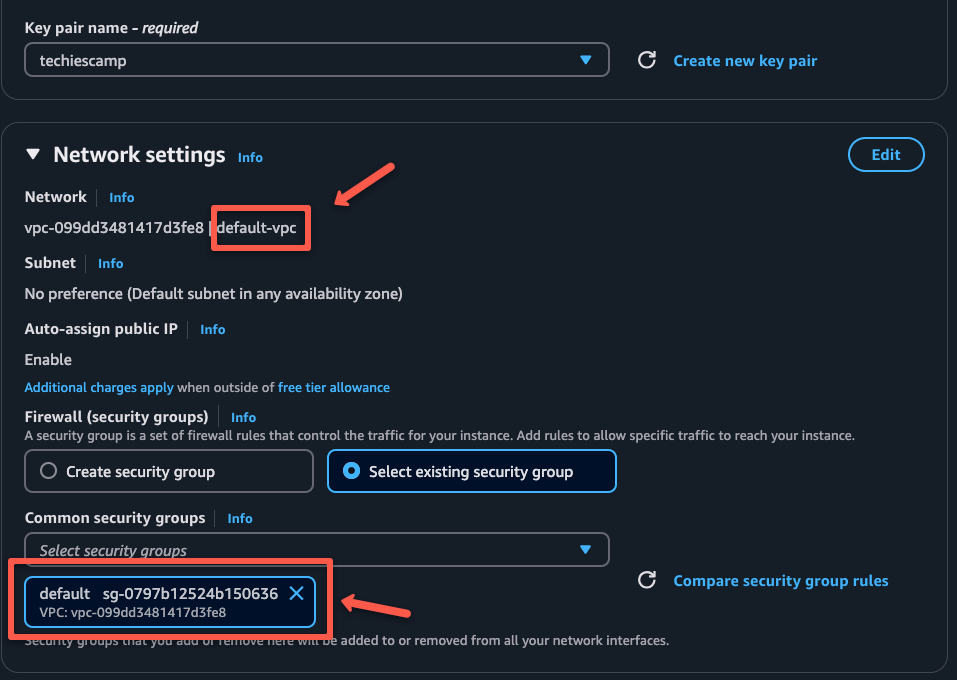
For this, you need create an EC2 instance in a private subnet that is configured in the pritunl server.
Lets create a instance.
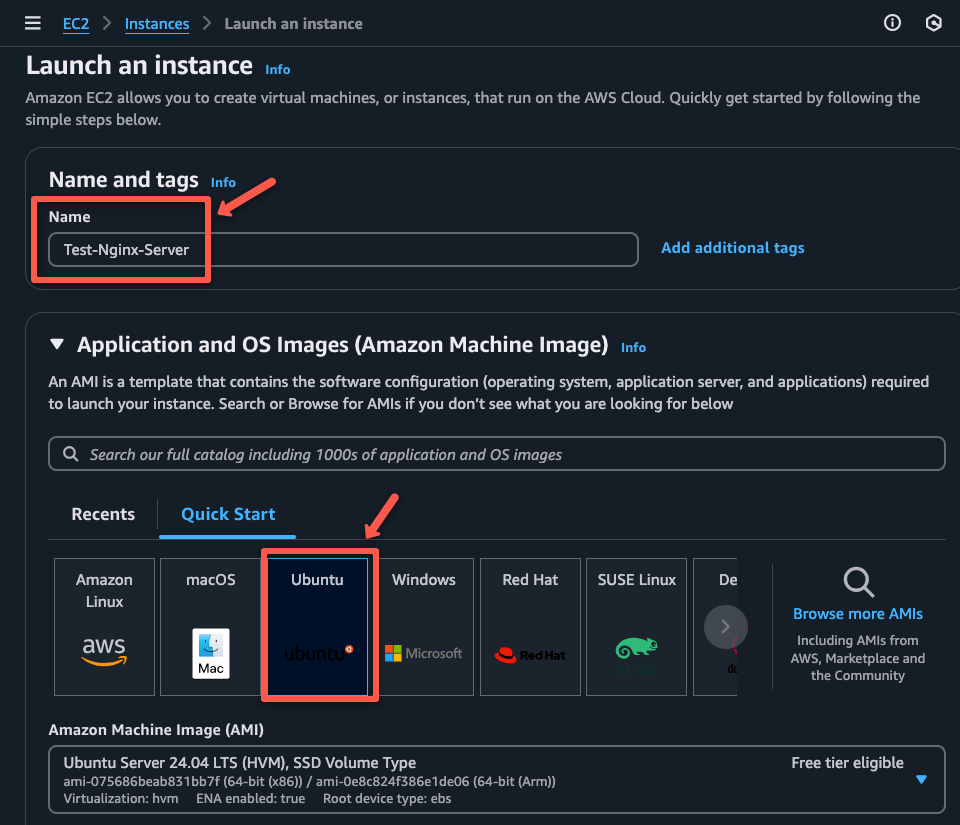
Choosing the default VPC and security group.
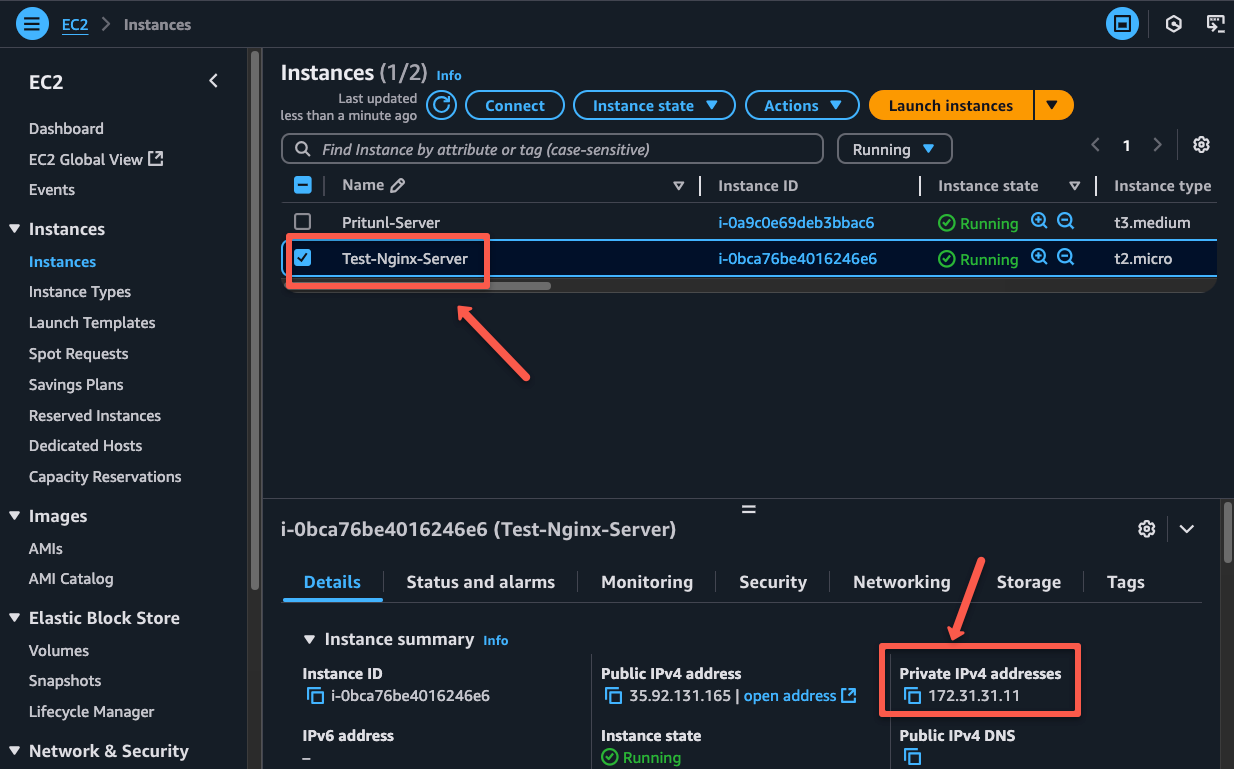
Once the test server is up and running, note down the private IP of the server to validate the VPN setup.
Now, try SSH with the private IP from your local workstation
ssh -i <PATH_TO_KEY_PAIRS> ubuntu@<PRIVATE_IP>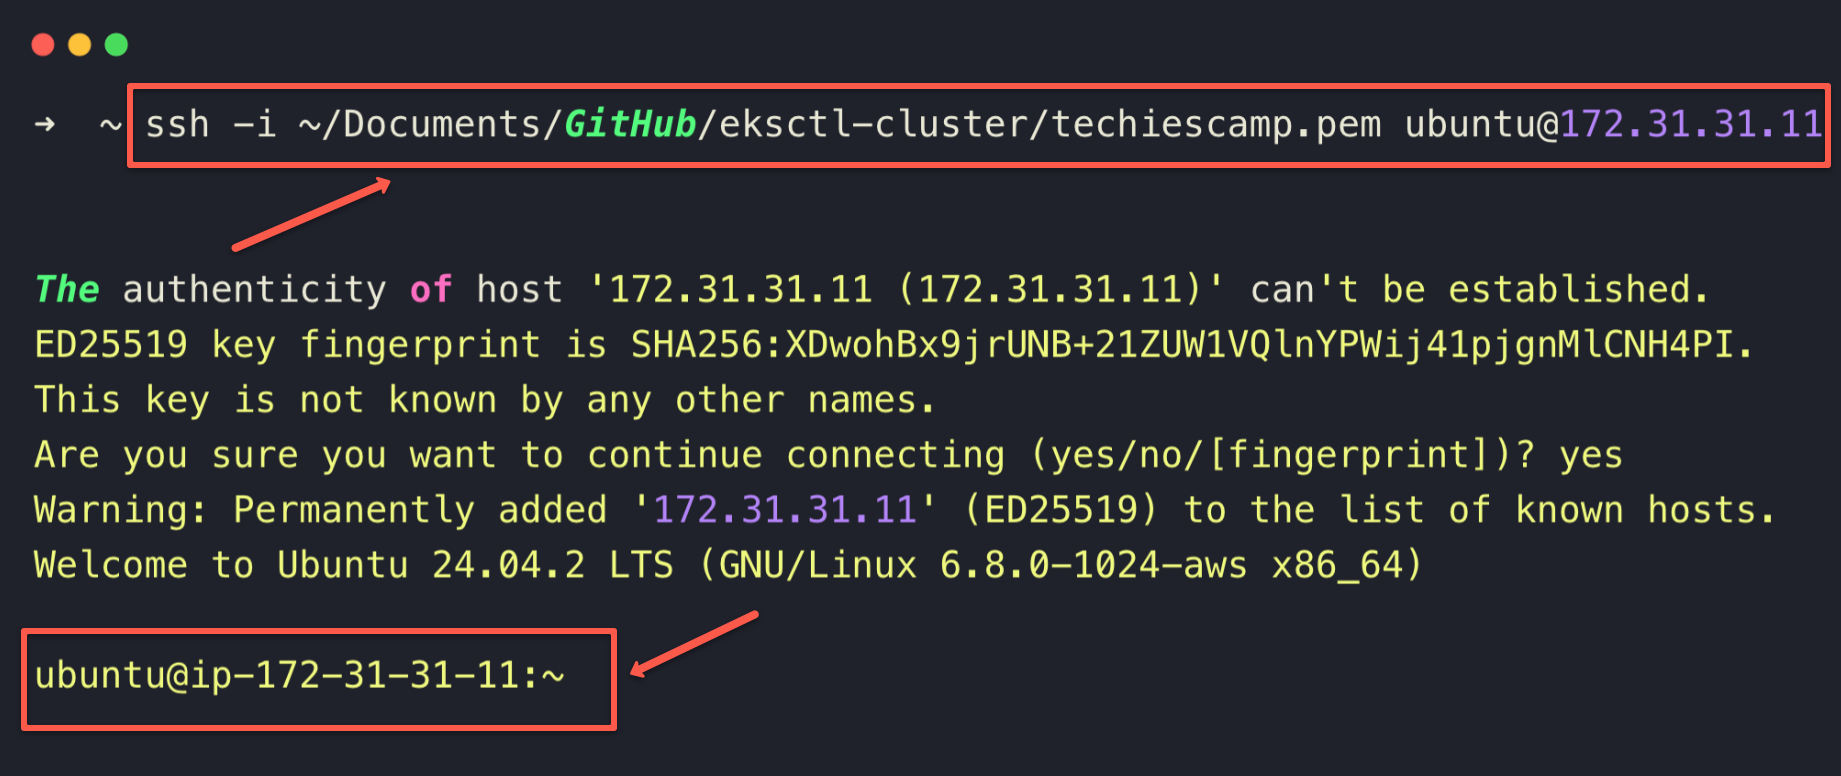
If all configurations are correct, you should be able to SSH into the EC2 instance without any errors, as shown below.
Once connected, install a simple Nginx server on the ec2 server to test HTTP access
sudo apt update && sudo apt install nginx -yTo ensure the Nginx, web server is installed and running properly, check the status.
systemctl status nginx.service
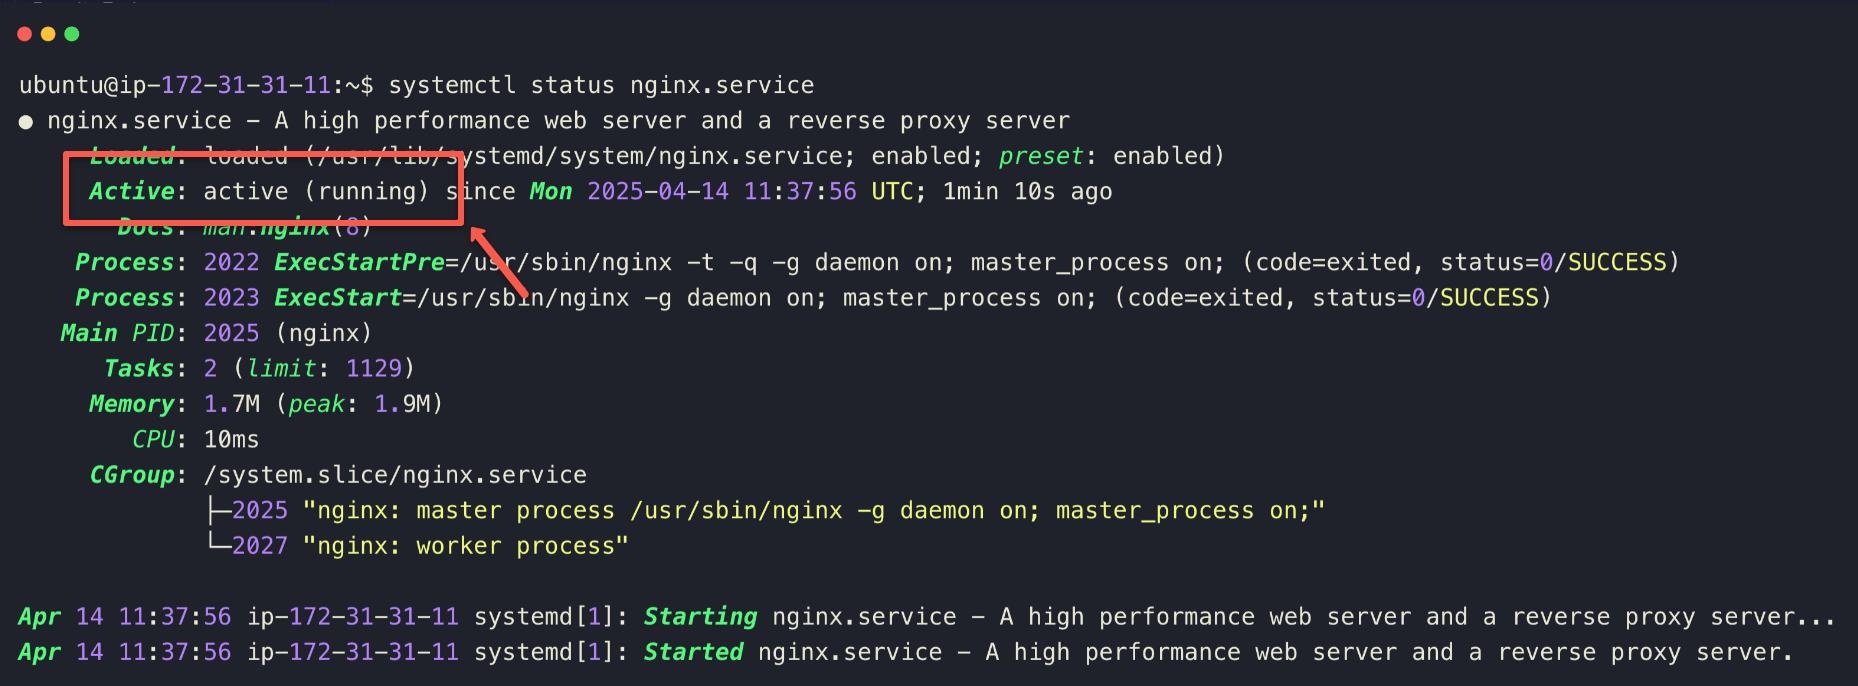
The web server is in running state.
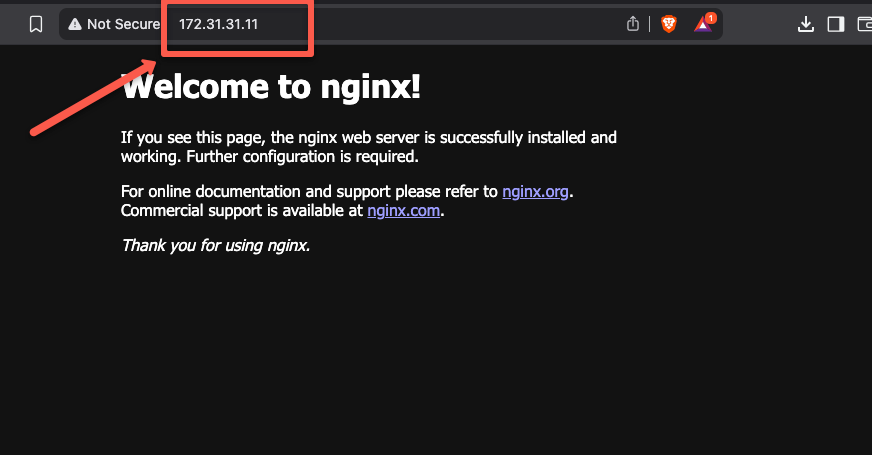
Now, open any browser in your workstation and paste the private IP as a URL to access the default nginx homepage as shown below
Also, wee can use the VPC Peering to connect various VPCs to communicate each other over the VPN server.
The following image shows the entire workflow of our Pritunl setup and traffic flow.
Pritunl AMI Automation Using Packer
In real-world scenarios, you may need to deploy Pritunl in different environments.
Instead of setting up the Pritunl VPN server manually each time, you can automate the process by creating a custom AMI using Packer and Ansible.
Packer is an open-source tool that will help automate the creation of AMI.
To use the Packer, we need to install it in the local workstation, I am providing the official documentation to install Packer.
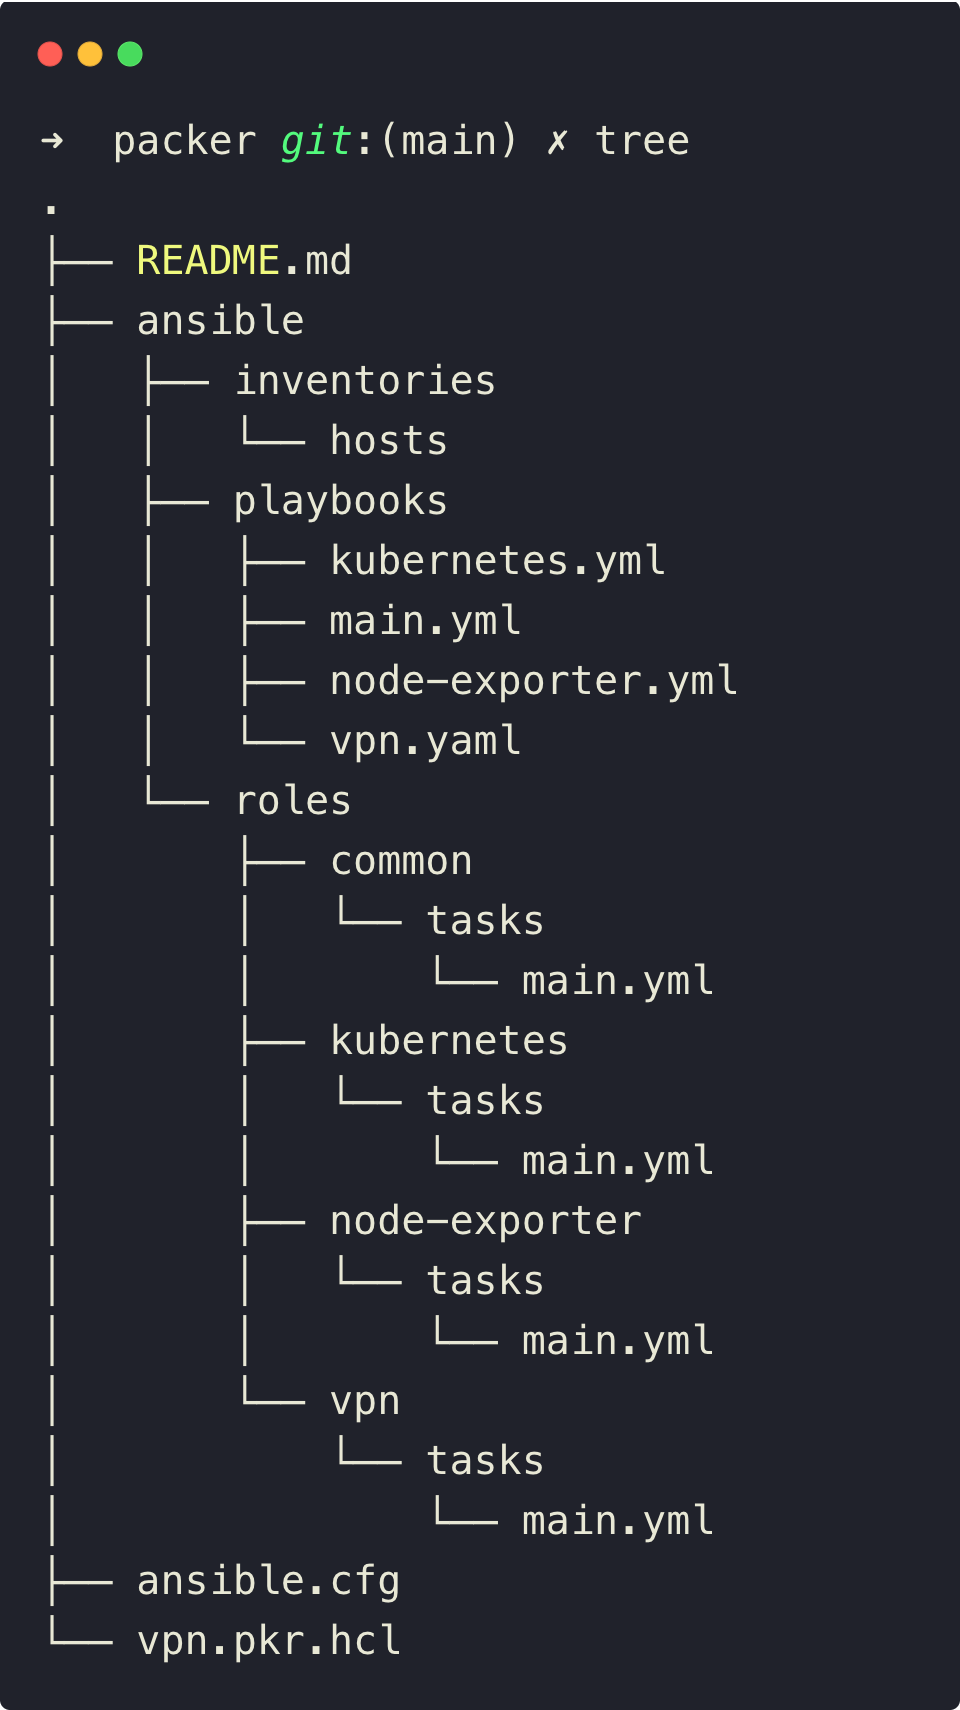
You can download the Packer configuration from this GitHub repo.
The following is the directory structure of the Packer configuration.
Packer launches a temporary server on AWS, and Ansible installs packages such as Pritunl, MongoDB, etc. on that server.
After installing everything, Packer creates an Amazon Machine Image (AMI)
You can use that AMI at any time so that all the packages will be pre-installed on that server.
After pull the repo from the GitHub, open the following directory.
cd packerTo initialize, use the following command.
packer init .To run the configuration.
packer build vpn.pkr.hclThe build will take some time to complete. Once it is completed, we can see that AMI in the AMIs section of the EC2 dashboard.
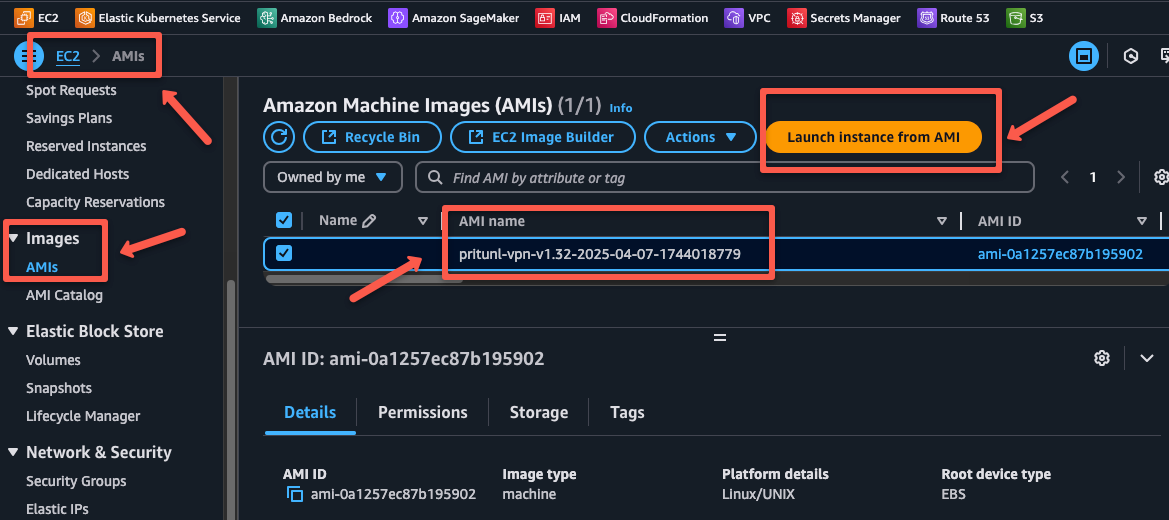
We can click the launch icon to launch the Pritunl VPN Server instance.
Pritunl Performance Requirements for Production
For production grade Pritunl VPN setup, it is recommended to use high CPU EC2 instances types (e.g., C5) that can handle large number of connections.
Also, a dedicated MongoDB servers on optimized EC2 instances will provide good performance (e.g., r3).
To get more information about the production scaling, please refer to this official documentation.
Pritunl Vs OpenVPN
As compared to free openVPN server, Pritunl setup and mangement is very easy.
Also, the free version of OpenVPN doesnt have a web UI for user management. Whereas Pritunl offers webUI for easy mangement.
Conclusion
AWS offers various solutions, such as Client VPN Endpoint, and Site-to-Site VPN etc.
These managed services are good for big or growing projects because they scale based on the connections, and management is quite easy.
Pritunl on the other hand is a cost-effective poor-mans soltion that is suitable for small projects. It also offers subscription options for enterprises, with various authentication mechanisms, features, and performance.
Hope this guide was useful!
If you face any issues during the setup or have any queries, do let us know in the comments. We will help you out.
