

This Kubernetes deployment tutorial guide will explain the key concepts in a Kubernetes YAML specification with an Nginx example deployment.
Introduction:
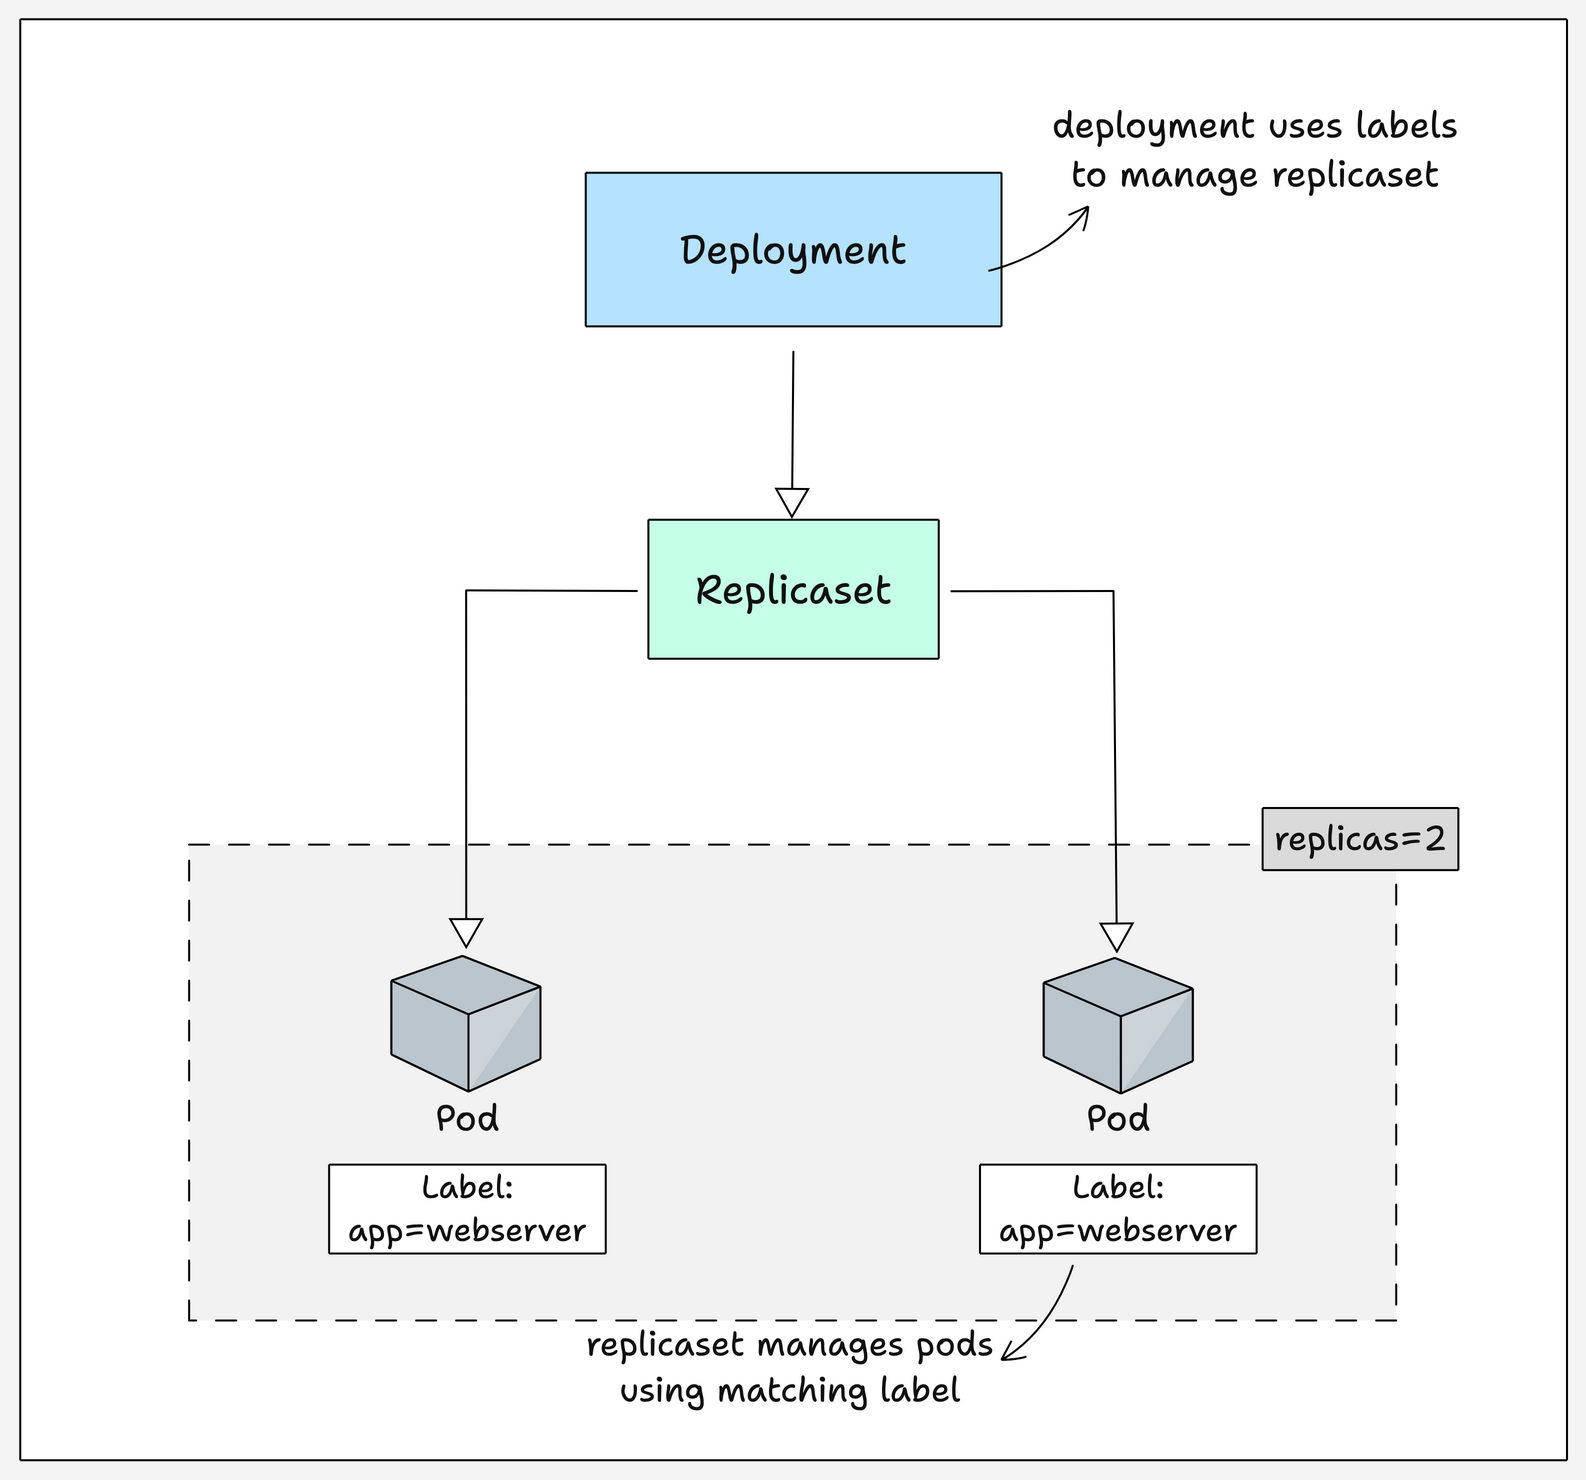
In Kubernetes, pods are the basic units that get deployed in the cluster. Kubernetes deployment is an abstraction layer for the pods.
The main purpose of the deployment object is to maintain the resources declared in the deployment configuration in its desired state. A deployment configuration can be of YAML or JSON format.
Given below is the simple Kubernetes deployment architecture.
Key Things To Understand
- A Deployment can schedule multiple pods. A pod as a unit cannot scale by itself.
- A Deployment represents a single purpose with a group of PODs.
- A single POD can have multiple containers and these containers inside a single POD shares the same IP and can talk to each other using localhost address.
- To access a Deployment with one or many PODs, you need a Kubernetes Service endpoint mapped to the deployment using labels and selectors.
- A deployment should have only stateless services. Any application that requires state management should be deployed as a Kubernetes StatefulSet.
Deployment YAML:
Kubernetes deployment Yaml contains the following main specifications.
- apiVersion
- Kind
- metadata
- spec
Now let's look at each specification in detail.
Note: In Kubernetes, everything persistent is defined as an object. Example: Deployments, services, Replica Set, Configmap, Jobs etc
apiVersion
This specifies the API version of the Kubernetes deployment object. It varies between each Kubernetes version.
How To Use the Right API version: Kubernetes contains three API versions.
- Alpha: This is the early release candidate. It might contain bugs and there is no guarantee that it will work in the future. Example:
scalingpolicy.kope.io/v1alpha1 - Beta: The API's become beta once its alpha tested. It will be in continuous development & testing until it becomes stable. Beta versions will most likely go into the Kubernetes main APIs.Example:
batch/v1beta1 - Stable: The APIs which does not contain alpha and beta goes into the stable category. Only stable versions are recommended to be used in production systems. Example:
apps/v1
These APIs could belong to different API groups.
An example list of Kubernetes APIs from different API groups from Kubernetes version 1.10.6 is shown below. Deployment object belongs to apps API group. You can list these API on http://localhost:8001/ using the kubectl proxy.
{
  "paths": [
    "/api",
    "/api/v1",
    "/apis",
    "/apis/",
    "/apis/admissionregistration.k8s.io",
    "/apis/admissionregistration.k8s.io/v1beta1",
    "/apis/apiextensions.k8s.io",
    "/apis/apiextensions.k8s.io/v1beta1",
    "/apis/apiregistration.k8s.io",
    "/apis/apiregistration.k8s.io/v1",
    "/apis/apiregistration.k8s.io/v1beta1",
    "/apis/apps",
    "/apis/apps/v1",
    "/apis/apps/v1beta1",
    "/apis/apps/v1beta2",
    "/apis/authentication.k8s.io",
    "/apis/authentication.k8s.io/v1",
    "/apis/authentication.k8s.io/v1beta1",
    "/apis/authorization.k8s.io",
    "/apis/authorization.k8s.io/v1",
    "/apis/authorization.k8s.io/v1beta1",
    "/apis/autoscaling",
    "/apis/autoscaling/v1",
    "/apis/autoscaling/v2beta1",
    "/apis/batch",
    "/apis/batch/v1",
    "/apis/batch/v1beta1",
    "/apis/certificates.k8s.io",
    "/apis/certificates.k8s.io/v1beta1",
    "/apis/cloud.google.com",
    "/apis/cloud.google.com/v1beta1",
    "/apis/extensions",
    "/apis/extensions/v1beta1",
    "/apis/metrics.k8s.io",
    "/apis/metrics.k8s.io/v1beta1",
    "/apis/networking.k8s.io",
    "/apis/networking.k8s.io/v1",
    "/apis/policy",
    "/apis/policy/v1beta1",
    "/apis/rbac.authorization.k8s.io",
    "/apis/rbac.authorization.k8s.io/v1",
    "/apis/rbac.authorization.k8s.io/v1beta1",
    "/apis/scalingpolicy.kope.io",
    "/apis/scalingpolicy.kope.io/v1alpha1",
    "/apis/storage.k8s.io",
    "/apis/storage.k8s.io/v1",
    "/apis/storage.k8s.io/v1beta1"
    ]
}
Kind
Kind describes the type of the object/resource to be created. In our case its a deployment object. Following are the main list of objects/resources supported by Kubernetes.
componentstatuses
configmaps
daemonsets
deployments
events
endpoints
horizontalpodautoscalers
ingress
jobs
limitranges
namespaces
nodes
pods
persistentvolumes
persistentvolumeclaims
resourcequotas
replicasets
replicationcontrollers
serviceaccounts
services
Metadata
It is a set of data to uniquely identify a Kubernetes object. Following are the key metadata that can be added to an object.
labels
name
namespace
annotations
Let's have a look at each metadata type
- Labels: Key-value pairs primarily used to group and categorize deployment object. It is intended for an object to object grouping and mapping using selectors. For example, kubernetes service uses the pod labels in its selectors to send traffic to the right pods. We will see more about labels and selectors in the service creation section.
- Name: It represents the name of the deployment to be created.
- Namespace: Name of the namespace where you want to create the deployment.
- Annotations: key-value pairs like labels, however, used for different use cases. You can add any information to annotations. For example, you can have an annotation like
"monitoring" : "trueand external sources will be able to find all the objects with this annotation to scrape its metrics. Objects without this annotation will be omitted.
There are other system generated metadata such us UUID, timestamp, resource version etc. that gets added to each deployment.
Example metadata
metadata:
  name: resource-name
  namespace: deployment-demo
  labels:
    app: web
    platform: java
    release: 18.0
  annotations:
    monitoring: true
    prod: true
Spec
Under spec, we declare the desired state and characteristics of the object we want to have. For example, in deployment spec, we would specify the number of replicas, image name etc. Kubernetes will make sure all the declaration under the spec is brought to the desired state.
Spec has three important subfields.
- Replicas: It will make sure the numbers of pods running all the time for the deployment. Example,
spec: replicas: 3- Selector: It defines the labels that match the pods for the deployments to manage. Example,
selector:
    matchLabels:
app: nginx- Template: It has its own metadata and spec. Spec will have all the container information a pod should have. Container image info, port information, ENV variables, command arguments etc. Example,
template:
    metadata:
      labels:
        app: nginx
    spec:
      containers:
        - image: nginx
          name: nginx
Advanced Options on a Deployment
In this section, we will look into the advanced options on a deployment that we will use in every project where we use deployments.
Let's look at the options one by one in detail.
Deployment Strategies
Deployment strategy in a deployment defines how new pods can replace old pods when new changes are made.
There are two deployment strategies:
- RollingUpdate
- Recreate
RollingUpdate
When using this strategy, the new pods will be created one after another by deleting the old pods one by one.
For example, if the deployment has 3 pods when a change is made, it terminates one old pod and creates a new pod.
When the new pod starts running, it then again deletes another old pod and creates a new one. This process is repeated until all pods are rolled out.
We can control the maximum number of pods that can be unavailable using maxUnavailable and the maximum pods that can be created above the desired replica using maxSurge.
spec:
  strategy:
   type: RollingUpdate
   rollingUpdate:
     maxSurge: 1
     maxUnavailable: 1
Recreate
If you are using this strategy, when a new change is made, it deletes all pods at once and creates new pods.
strategy:
  type: Recreate
Using ConfigMap and Secret in Deployments
It's very important not to hardcode sensitive data and configuration values in application code.
That's where ConfigMap and Secret help you, use secrets to store sensitive data and configmaps to store non-sensitive configuration values.
When creating a deployment, you can either use the data in a secret, a configmap, and an environment variable or mount them as a volume.
An example of using data in a secret and a configmap as an environment variable is shown below.
spec:
  containers:
      envFrom:
      - configMapRef:
          name: app-config
      - secretRef:
          name: app-secrets
Setting Resource Requests and Limits
Setting up resource requests and limits in deployment is important, it tells the cluster how much CPU and memory each deployment's pods are going to use.
- Resource request - minimum resources the pods are going to use.
- Resource limit - maximum resource it can use.
An example of a resource request and limit block is given below.
spec:
  containers:
    resources:
      requests:
        memory: "64Mi"
        cpu: "250m"
      limits:
        memory: "128Mi"
        cpu: "500m"
Adding Health Check Probes
There are three health check probes, they are:
startupProbe
We use a startup probe for an application that takes more time to start, and other health check probes won't start until the startup probe check is successful.
If this probe fails, the pod gets terminated, and a new pod will be created.
livenessProbe
This probe is used to check if the application is running without any issues.
If the application is not running or crashed, the pod gets restarted.
readinessProbe
This probe checks if the application is receiving traffic.
If the application fails to receive traffic, the pod will be removed from the service endpoint.
Given below is an example of how the health check probes are used in a deployment.
spec:
  containers:

    startupProbe:
      httpGet:
        path: /startup
        port: 8080
      failureThreshold: 30
      periodSeconds: 10

    livenessProbe:
      httpGet:
        path: /health
        port: 8080
      initialDelaySeconds: 5
      periodSeconds: 10
    readinessProbe:
      httpGet:
        path: /ready
        port: 8080
      initialDelaySeconds: 5
      periodSeconds: 10
Mounting Persistent Volume
Applications need storage to store their data so the data is persistent even if the pods get restarted.
You can create PV and PVC and mount the volume in the directory where your application writes its data.
Below is an example of mounting PV in your application.
spec:
  template:
    spec:
      containers:
          volumeMounts:
            - name: test-storage
              mountPath: /data
      volumes:
        - name: test-storage
          persistentVolumeClaim:
            claimName: test-pvc
Not just PV, you can also mount secrets and configmaps as volumes.
Kubernetes Example Deployment
Since we have looked at the basics let start with an example deployment. We will do the following in this section.
- Create a namespace
- Create a Nginx Deployment
- Create a Nginx Service
- Expose and access the Nginx Service
Note: Few of the operations we perform in this example can be performed with just kubectl and without a YAML Declaration. However, we are using the YAML specifications for all operations to understand it better.
Exercise Folder
To begin the exercise, create a folder names deployment-demo and cd into that folder. Create all the exercise files in this folder.
mkdir deployment-demo && cd deployment-demoCreate a Namespace
Let's create a YAML named namespace.yaml file for creating the namespace.
apiVersion: v1
kind: Namespace
metadata:
  name: deployment-demo
  labels:
    apps: web-based
  annotations:
    type: demo
Use kubectl command to create the namespace.
kubectl create -f namespace.yamlEquivalent kubectl command
kubectl create namespace deployment-demoAssign Resource Quota To Namespace
Now let's assign some resource quota limits to our newly created namespace. This will make sure the pods deployed in this namespace will not consume more system resources than mentioned in the resource quota.
Create a file named resourceQuota.yaml. Here is the resource quota YAML contents.
apiVersion: v1
kind: ResourceQuota
metadata:
  name: mem-cpu-quota
  namespace: deployment-demo
spec:
  hard:
    requests.cpu: "4"
    requests.memory: 8Gi
    limits.cpu: "8"
    limits.memory: 16Gi
Create the resource quota using the YAML.
kubectl create -f resourceQuota.yamlNow, let's describe the namespace to check if the resource quota has been applied to the deployment-demo namespace.
kubectl describe ns deployment-demoThe output should look like the following.
Name:         deployment-demo
Labels:       apps=web-based
Annotations:  type=demo
Status:       Active

Resource Quotas
 Name:            mem-cpu-quota
 Resource         Used  Hard
 --------         ---   ---
 limits.cpu       0     2
 limits.memory    0     2Gi
 requests.cpu     0     1
 requests.memory  0     1Gi
Create a Deployment
We will use the public Nginx image for this deployment.
Create a file named deployment.yaml and copy the following YAML to the file.
Note: This deployment YAML has minimal required information we discussed above. You can have more specification in the deployment YAML based on the requirement.
apiVersion: apps/v1
kind: Deployment
metadata:
  name: nginx
  labels:
    app: nginx
  namespace: deployment-demo
  annotations:
    monitoring: "true"
spec:
  replicas: 1
  selector:
    matchLabels:
      app: nginx
  template:
    metadata:
      labels:
        app: nginx
    spec:
      containers:
      - image: nginx
        name: nginx
        ports:
        - containerPort: 80
        resources:
          limits:
            memory: "2Gi"
            cpu: "1000m"
          requests:
            memory: "1Gi"
            cpu: "500m"
Under containers, we have defined its resource limits, requests and container port (one exposed in Dockerfile).
Create the deployment using kubectl
kubectl create -f deployment.yamlCheck the deployment
kubectl get deployments -n deployment-demoEven though we have added minimal information, after deployment, Kubernetes will add more information to the deployment such as resourceVersion, uid, status etc.
You can check it by describing the deployment in YAML format using the kubectl command.
kubectl get deployment nginx -n deployment-demo --output yamlCreate a Service and Expose The Deployment
Now that we have a running deployment, we will create a Kubernetes service of type NodePort ( 30500) pointing to the nginx deployment. Using NodePort you will be able to access the Nginx service on all the kubernetes node on port 30500.
Create a file named service.yaml and copy the following contents.
apiVersion: v1
kind: Service
metadata:
  labels:
    app: nginx
  name: nginx
  namespace: deployment-demo
spec:
  ports:
  - nodePort: 30500
    port: 80
    protocol: TCP
    targetPort: 80
  selector:
    app: nginx
  type: NodePort
Service is the best example for explaining labels and selectors. In this service, we have a selector with "app" = "nginx" label. Using this, the service will be able to match the pods in our nginx deployment as the deployment and the pods have the same label. So automatically all the requests coming to the nginx service will be sent to the nginx deployment.
Let's create the service using kubectl command.
kubectl create -f service.yamlYou can view the service created using kubectl command.
kubectl get services -n deployment-demoNow, you will be able to access the nginx service on any one of the kubernetes node IP on port 30500
For example,
http://35.134.110.153:30500/