

Permissions in Linux plays an important part in administration as well as application configuration. Whether you are a system administrator or a developer, it is mandatory to understand how permissions work in Linux systems.
Linux File Permissions
At times, even will get confused about the numbers and notations used for setting up file permissions. In this article, we will learn the concepts and commands involved in Linux file permissions from a beginner perspective.
Before diving into commands, you should understand the basic notations used for representing permissions.
Read, Write and Execute
The read, write and execute Permissions are denoted by letters r, w and x
Octal Notation
Read, Write and Execute can also be denoted using Octal.
Read (r) - 4
Write (w) - 2
Execute (1) - 1
Let's say a file has read, write and execute permissions, then you can denote that in a number as 7 (ie, 4+2+1=7). You will understand about this more in the following sections.
User, Group and Others (UGO)
User - The owner of the file. Mostly, one who created the file. Group - The group which the file belongs to. Others - Everyone other than the user and the group.
Listing Permissions
Every file has a permission associated with it. To list the assigned permissions for files (also hidden files) in your current directory, use the following command.
ls -laOutput:
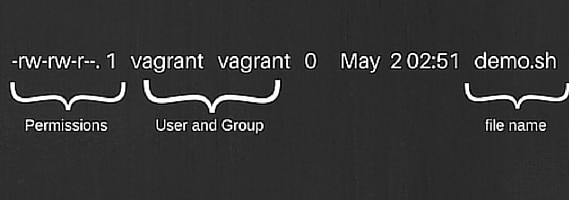
[vagrant@centos7 ~]$ ls -l
-rw-rw-r--. 1 vagrant vagrant 0 May  2 02:51 demo.sh
-rw-r--r--. 1 root    root    0 May  2 03:14 rootsfile.txt
drwxrwxr-x. 2 vagrant vagrant 4096 May 2 03:17 demodir- The first set represents the permission for the user (who created or owns the file).
- The second set represents the permissions for the group the file is associated with.
- The third set represents anyone other than the user and group.
Also Read: Linux commands every developer should know
In the above output, the first line shows the permissions of the demo.sh file. It shows that it is a regular file and permissions as follows.
- first set(rw-) -> the user has only read and write permissions.
- The second set(rw-) -> the group has read and write permissions.
- The third set(r--) --> Other have only read access to the file.
Have a look at the following image for better understanding.
Changing permissions of a file
"chmod" command is used for changing the permission of a file/directory. You need two parameters for chmod command as shown below.
chmod (permission-to-be-assigned) (path-to-file)Permissions can be assigned using "+" and "-" symbols. Lets look at some examples.
1. To assign user permissions use “u+”” (eg: u+x, u+xw, u+rwx) with the chmod command as shown below.
chmod u+x demo.sh
chmod u+rw demo.sh
chmod u+rwx demo.sh
2. To revoke the access given to the user, you can use “u-” command as shown below. This will unset all the given permissions.
chmod u-x demo.sh
chmod u-rw demo.sh
chmod u-rwx demo.sh
In the same way, you can replace “u” with “g” and “o” for assigning permissions to groups and others.
3. To assign permissions for ugo at the same time, you can use the following syntax.
chmod ugo+x demo.shChanging permissions Using Octals
We have seen how octal can be user to represent permissions. Have a look at the image below to get more ideas about octal representation.
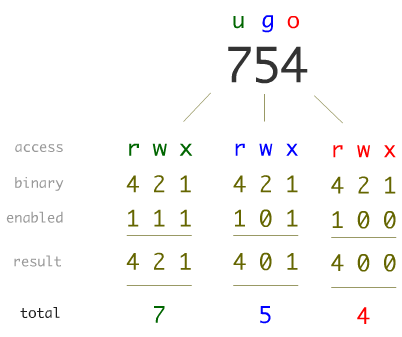
While using octal, we represent the permissions using three numbers. First for the user, second for the group and the third one for others.
- To give the user all permissions use the following form.
chmod 700 demo.sh2. To give the user all permissions, the group just read/write and others only read, use the following command.
chmod 764 demo.shIn this manner, you can assign different permissions to users, groups and others.
Change Permissions Recursively
At some point, you might want to change the permissions of the folder, its subfolder, and files. For example, you uploaded the website files to apache webserver and you want to change the permissions of all the files and folders in the images folder. In this case, you have to apply the permission change Recursively using "-R" flag with the "chmod" command as shown below.
chmod -R 755 demodirSticky bit Permission
The sticky bit is a Permission bit for a file or a folder. It is set, only the file or directory owner and the root will be able to delete it. This permission is very useful in scenarios where you want to share a folder with multiple users. Sticky bit avoids deliberate and accidental deletion of files by other users.
setting Up Stickybit
You can set a sticky bit on a file or a folder using "t" or "1". Here is an example.
chmod +t demo.sh
chmod 1755 demo.sh
In the above command, 1 represents sticky bit and 755 represents the normal file permissions. To ensure that sticky bit is assigned, user “ls -la” command and see if a T flag is added to the permission block as shown below.
-bash-4.2$ ls -l
-rwxr-xr-t. 1 vagrant vagrant 0 May  2 02:51 demo.sh