> ## Content Index
> Fetch the complete content index at: https://devopscube.com/llms.txt
> Use this file to discover other available public pages before exploring further.
# Helm Chart Tutorial: A Simple Guide for Beginners
- URL: https://devopscube.com/create-helm-chart/
- Published: 2026-06-19T01:52:00.000Z
- Updated: 2026-07-02T16:41:27.000Z
- Author: Aman Jaiswal
- Tags: Kubernetes, devops, helm, #Migrated-1741795015845, #wp, #wp-post, #Import 2025-03-12 15:57, #blog, #syntax-highlight
Learn how to create a Helm chart with our easy-to-follow Helm Chart tutorial. This guide covers structure, components, and best practices.
Helm is an open-source project under the [Cloud Native Computing Foundation (CNCF)](https://www.cncf.io/?ref=devopscube.com). It is widely used by organizations to package and deploy Kubernetes applications.
So if you want to learn Helm chart basics and get hands-on with creating a Helm chart from scratch, you will love this guide.
## Prerequisites
To get started with Helm charts, you need to have the following.
1. A working [Kubernetes cluster](https://devopscube.com/setup-kubernetes-cluster-kubeadm/)
2. [Helm installed](https://devopscube.com/install-configure-helm-kubernetes/) on your workstation
3. A valid [kubeconfig](https://devopscube.com/kubernetes-kubeconfig-file/) to connect to the cluster
4. Working [knowledge of Kubernetes](https://devopscube.com/kubernetes-tutorials-beginners/) and YAML.
💡
Helm follows a client-only architecture. The `helm` CLI you install on your workstation is the Helm client. It connects directly to your cluster using your local [kubeconfig](https://devopscube.com/kubernetes-kubeconfig-file/) credentials
## What is Helm Chart?
A Helm chart is a combination of [Kubernetes YAML manifest ](https://devopscube.com/create-kubernetes-yaml/)templates and Helm-specific files. You can call it a Helm package.
Since the Kubernetes YAML manifest files can be templated, you don't have to maintain multiple Helm charts of different environments. Helm uses the [go templating engine](https://pkg.go.dev/text/template?ref=devopscube.com) for the templating functionality.
**Why should we use Helm Charts?**
For understanding, let's use a very basic example of a website frontend deployment using Nginx on Kubernetes.
Let's assume you have four different environments in your project. **Dev, QA, Staging**, and **Prod**. Each environment will have different parameters for Nginx deployment. For example,
1. In Dev and QA you might need only one replica.
2. In staging and production, you will have more replicas with pod autoscaling.
3. The ingress routing rules will be different in each environment.
4. The config and secrets will be different for each environment.
Because of the change in configs and deployment parameters for each environment, you need to maintain different Nginx deployment files for each environment.
Or you will have a single deployment file and you will need to write custom shell or python scripts to replace values based on the environment.
However, it is not a scalable approach. Here is where the helm chart comes into the picture.
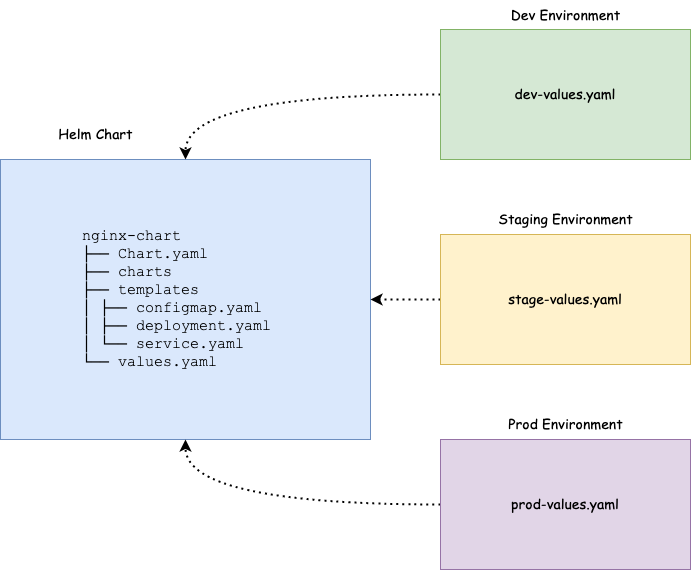
Click to view in HD
You just need to have a **single Helm chart** and you can modify the Kubernetes deployment **parameters of each environment** by just changing a single values file. Helm will take care of applying the values to the templates.
We will learn more about it practically in the next sections.
At a high level, Helm Charts reduce the complexity, and kubernetes manifest redundancy of each environment `(dev, uat, cug, prod)` with only one template.
## Understanding Helm Chart Structure
To understand the Helm chart, let's take an example of Nginx based Kubernetes deployment. To deploy Nginx on Kubernetes, typically you would have the following YAML files.
```bash
nginx-deployment
├── configmap.yaml
├── deployment.yaml
├── ingress.yaml
└── service.yaml
```
Now if we create a Helm Chart for the above Nginx deployment, it will have the following directory structure.
```bash
nginx-chart/
|-- Chart.yaml
|-- charts
|-- templates
| |-- NOTES.txt
| |-- _helpers.tpl
| |-- deployment.yaml
| |-- configmap.yaml
| |-- ingress.yaml
| |-- service.yaml
| `-- tests
| `-- test-connection.yaml
`-- values.yaml
```
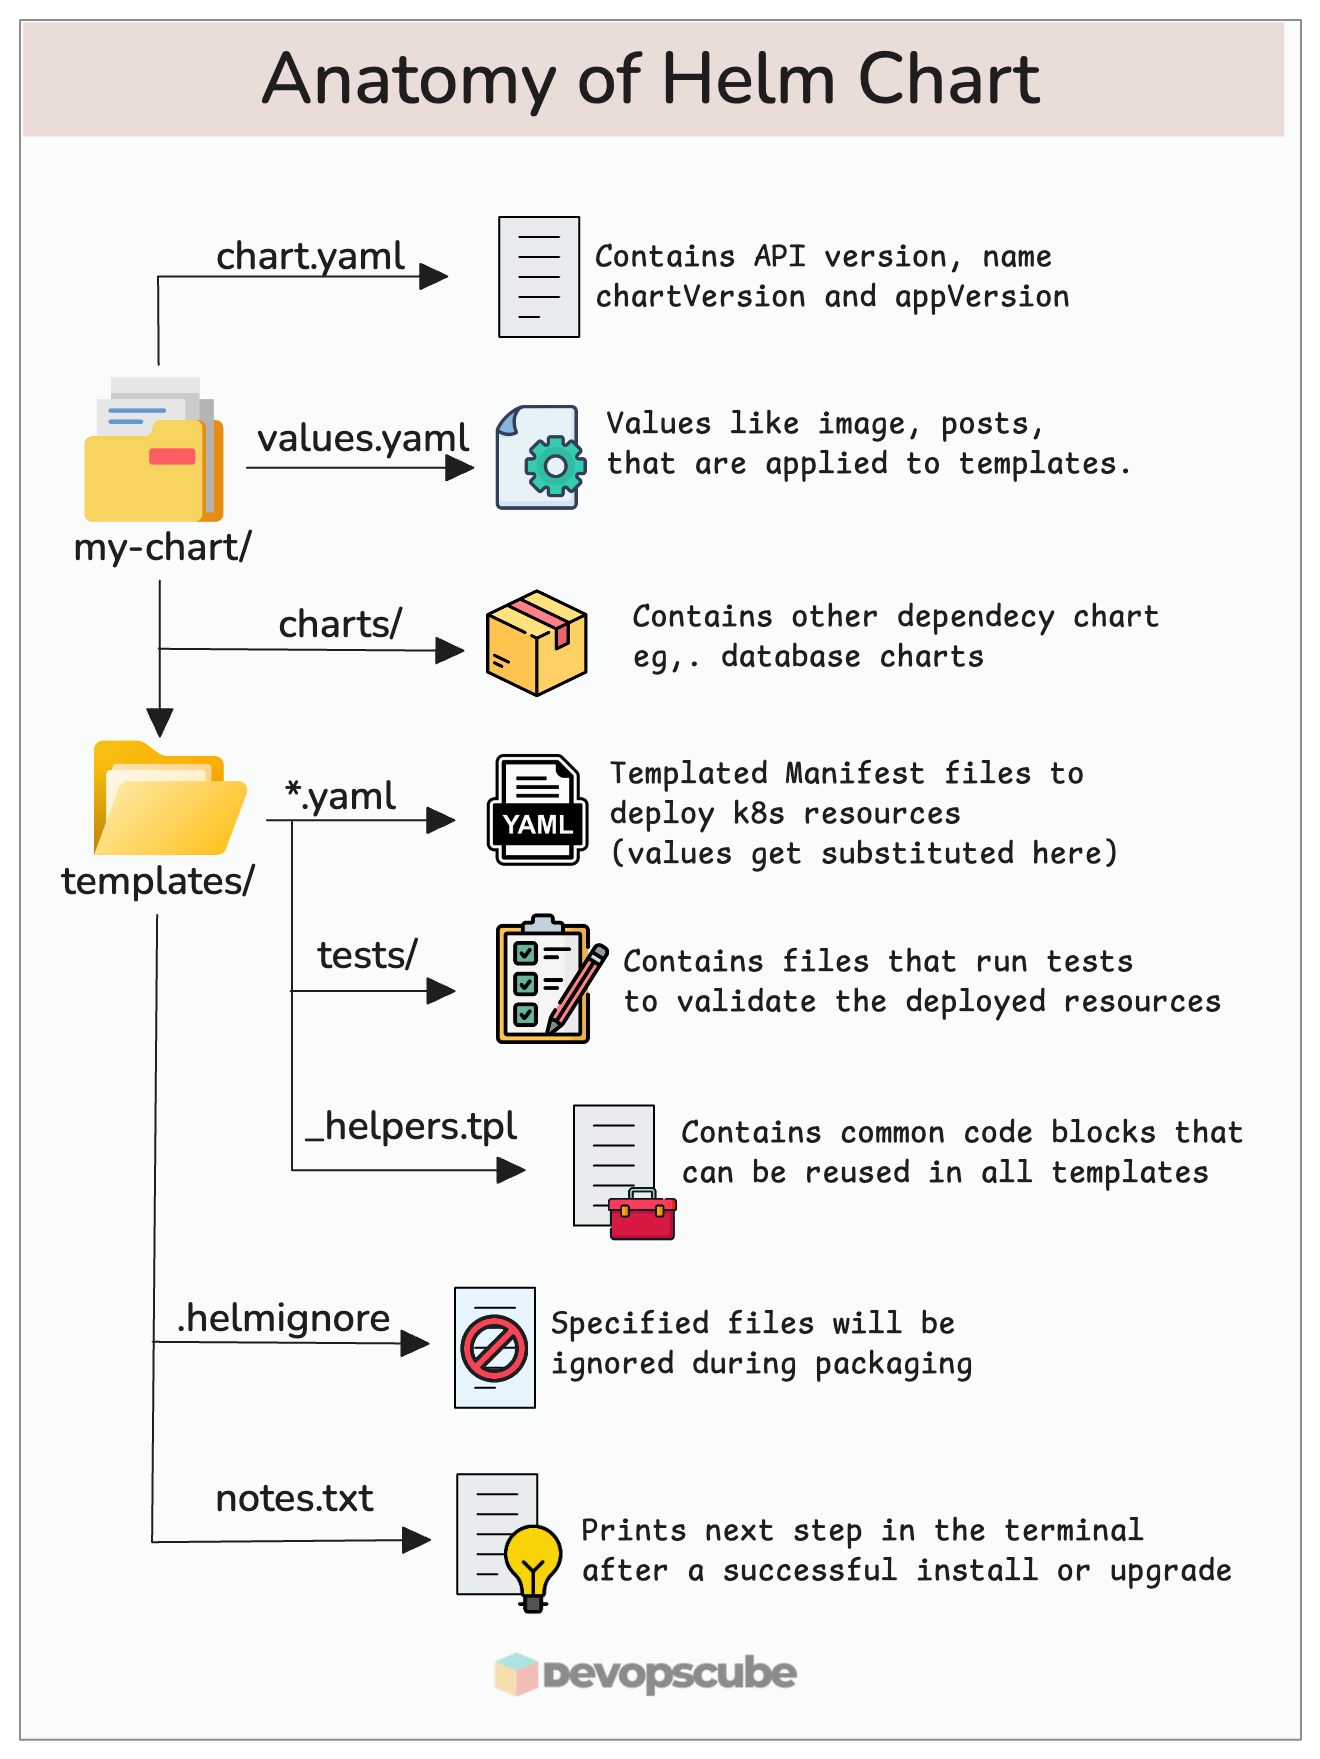
As you can see, the deployment YAML files are part of the template directory (highlighted in bold) and there are helm-specific files and folders. Let’s look at each file and directory inside a helm chart and understand its importance.
1. **.helmignore:** It is used to define all the files that we don’t want to include in the helm chart. It works similarly to the `.gitignore` file.
2. **Chart.yaml:** It contains information about the helm chart like version, name, description, etc.
3. **templates:** This directory contains all the Kubernetes manifest files that form Kubernetes applications. These manifest files can be templated to access values from **`values.yaml`** file. It is similar to Ansible templates.
4. **values.yaml**: In this file, we define the values for the templates. For example, image name, replica count, HPA values, etc.
5. **charts:** We can add another chart’s structure inside this directory if our main charts have some dependency on others. By default this directory is empty.
6. **templates/NOTES.txt:** This is a plaintext file that supports Go templating to [print post installation instructions for the helm chart.](https://devopscube.com/helm-notes-txt-file/)
7. **templates/\_helpers.tpl:** There are scenarios where same logic gets repeated in Helm templates. For example, labels. In such cases you can maintain [**reusable template functions**](https://devopscube.com/%5Fhelpers-tpl-file-in-helm-charts/) to avoid repeating the same blocks again in your chart.
8. **templates/tests/:** We can define tests in our charts to validate that your chart works as expected when it is installed.
## Helm Chart Tutorial GitHub Repo
The example Helm chart and manifests used in this Helm Chart Tutorial are hosted on the [Helm Chart GitHub repo](https://github.com/techiescamp/helm-tutorial?ref=devopscube.com). You can clone it and use it to follow along with the guide.
```bash
git clone https://github.com/techiescamp/helm-tutorial.git
```
## Create Helm Chart From Scratch
To get hands-on with Helm chart creation, let's **create an Nginx Helm chart** from scratch.
Execute the following command to create the chart boilerplate. It creates a chart with the name `nginx-chart` with default files and folders.
```bash
helm create nginx-chart
```
If you check the created chart, it will have the following files and directories.
```bash
nginx-chart
│ ├── Chart.yaml
│ ├── charts
│ ├── templates
│ │ ├── NOTES.txt
│ │ ├── _helpers.tpl
│ │ ├── deployment.yaml
│ │ ├── hpa.yaml
│ │ ├── ingress.yaml
│ │ ├── service.yaml
│ │ ├── serviceaccount.yaml
│ │ └── tests
│ │ └── test-connection.yaml
│ └── values.yaml
```
Let's cd into the generated chart directory.
```bash
cd nginx-chart
```
We'll **edit the files one by one** according to our deployment requirements.
### Chart.yaml
As mentioned above, we put the details of our chart in `Chart.yaml` file. Replace the default contents of `chart.yaml `with the following.
```bash
apiVersion: v2
name: nginx-chart
description: My First Helm Chart
type: application
version: 0.1.0
appVersion: "1.0.0"
maintainers:
- email: contact@devopscube.com
name: devopscube
```
1. **apiVersion**: This denotes the chart API version v2 is for Helm 3 and above, and v1 is for previous versions.
2. **name:** Denotes the name of the chart.
3. **description:** Denotes the description of the helm chart.
4. **Type**: The chart type can be either ‘**application**’ or ‘**library**’. Application charts are what you deploy on Kubernetes. Helm Library charts are re-usable charts that can be used with other charts. A similar concept of libraries in programming.
5. **Version**: This denotes the chart version.
6. **appVersion**: This denotes the version number of our application (Nginx).
7. **maintainers:** Information about the owner of the chart.
We should increment the `version` and `appVersion` each time we make changes to the application. There are some other fields like dependencies, icons, etc.
### templates
There are multiple files in **`templates`** directory created by Helm. In our case, we will work on simple Kubernetes Nginx deployment.
Let's remove all default files from the template directory.
```bash
rm -rf templates/*
```
We will add our Nginx YAML files and change them to the template for better understanding.
First `cd` in to the templates directory.
```bash
cd templates
```
Create a **`deployment.yaml`** file and copy the following contents.
```yaml
apiVersion: apps/v1
kind: Deployment
metadata:
name: release-name-nginx
labels:
app: nginx
spec:
replicas: 1
selector:
matchLabels:
app: nginx
template:
metadata:
labels:
app: nginx
spec:
containers:
- name: nginx-chart
image: "nginx:1.16.0"
imagePullPolicy: IfNotPresent
ports:
- name: http
containerPort: 80
protocol: TCP
volumeMounts:
- name: nginx-index-file
mountPath: /usr/share/nginx/html/
volumes:
- name: nginx-index-file
configMap:
name: index-html-configmap
```
If you see the above YAML file, the values are static. The idea of a helm chart is to template the YAML files so that we can **reuse them in multiple environments** by dynamically assigning values to them.
To template a value, all you need to do is add the **object parameter** inside curly braces as shown below. It is called a **template directive** and the syntax is specific to the **Go templating**
```yaml
{{ .Object.Parameter }}
```
First Let's understand what is an Object. Following are the three Objects we are going to use in this example.
1. **Release**: Every helm chart will be deployed with a release name. If you want to use the release name or access **release-related dynamic values** inside the template, you can use the release object.
2. **Chart**: If you want to use any values you mentioned in the **chart.yaml**, you can use the chart object.
3. **Values**: All parameters inside **values.yaml** file can be accessed using the Values object.
To know more about supported Objects check the [Helm Builtin Object](https://helm.sh/docs/chart%5Ftemplate%5Fguide/builtin%5Fobjects/?ref=devopscube.com) document.
The following image shows how the built-in objects are getting substituted inside a template.
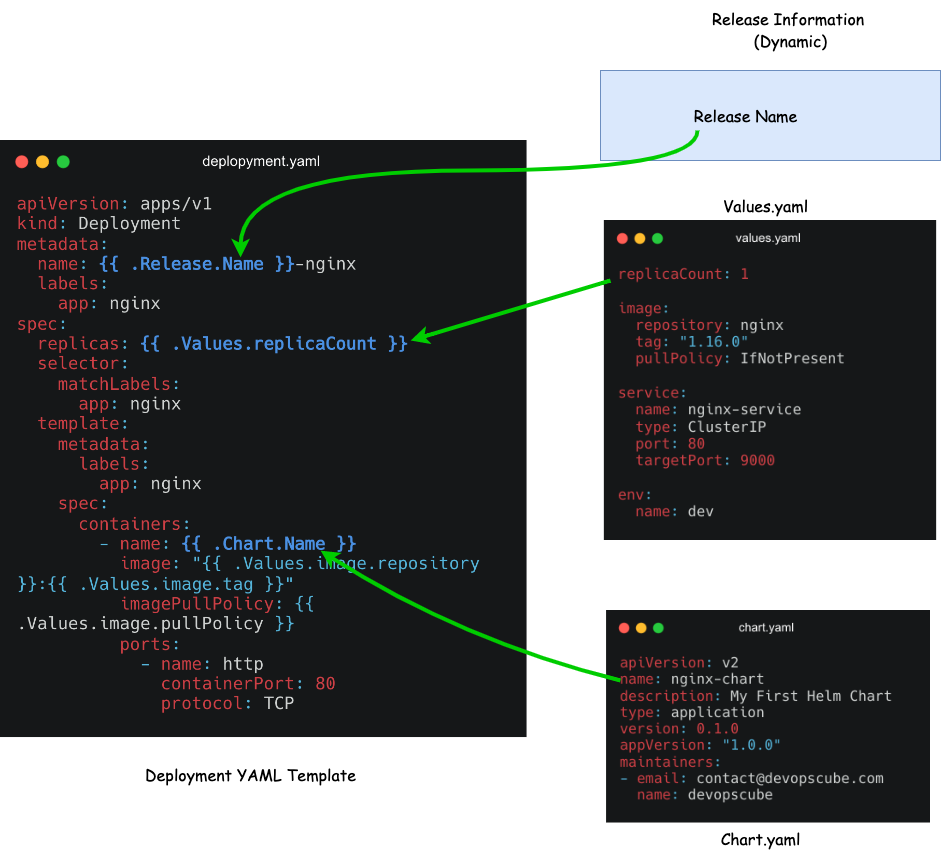
Click to view in HD
First, you need to figure out what values could change or what you want to templatize. I am choosing **name**, **replicas, container name, image,** **imagePullPolicy** and **configMap Name** which I have highlighted in the YAML file in bold.
1. **name:** `name: {{ .Release.Name }}-nginx` : We need to change the deployment name every time as Helm does not allow us to install releases with the same name.
So we will templatize the name of the deployment with the release name and interpolate **\-nginx** along with it. Now if we create a release using the name **frontend**, the deployment name will be **frontend-nginx**. This way, we will have guaranteed unique names.
2. **container name**: `{{ .Chart.Name }}`: For the container name, we will use the Chart object and use the chart name from the **chart.yaml** as the container name.
3. **Replicas:` ` `{{ .Values.replicaCount }}`** We will access the replica value from the **values.yaml** file.
4. **image:** `"{{ .Values.image.repository }}:{{ .Values.image.tag }}"` Here we are using multiple template directives in a single line and accessing the repository and tag information under the image key from the Values file.
5. **configMap Name:** `{{ .Release.Name }}-index-html-configmap.` Here we are adding the release name to the configmap.
Similarly, you can templatize the required values in the YAML file.
#### Create a deployment template
Here is our final **`deployment.yaml`** file after applying the templates. Replace the deployment file contents with the following.
```yaml
apiVersion: apps/v1
kind: Deployment
metadata:
name: {{ .Release.Name }}-nginx
labels:
app: nginx
spec:
replicas: {{ .Values.replicaCount }}
selector:
matchLabels:
app: nginx
template:
metadata:
labels:
app: nginx
spec:
containers:
- name: {{ .Chart.Name }}
image: "{{ .Values.image.repository }}:{{ .Values.image.tag }}"
imagePullPolicy: {{ .Values.image.pullPolicy }}
ports:
- name: http
containerPort: 80
protocol: TCP
volumeMounts:
- name: nginx-index-file
mountPath: /usr/share/nginx/html/
volumes:
- name: nginx-index-file
configMap:
name: {{ .Release.Name }}-index-html-configmap
```
#### Create a Service template
In the same we will also create a **`service.yaml`** template with the following content.
```yaml
apiVersion: v1
kind: Service
metadata:
name: {{ .Release.Name }}-service
spec:
selector:
app.kubernetes.io/instance: {{ .Release.Name }}
type: {{ .Values.service.type }}
ports:
- protocol: {{ .Values.service.protocol | default "TCP" }}
port: {{ .Values.service.port }}
targetPort: {{ .Values.service.targetPort }}
```
In the **protocol template directive**, you can see a pipe `( | )` . It is used to define the default value of the protocol as TCP. It means, if we dont't define the protocol value in `values.yaml` file or if it is empty, it will take TCP as a default value for protocol.
#### Create a Configmap template
Create a **`configmap.yaml`** and add the following contents to it. Here we are replacing the default Nginx **index.html** page with a custom HTML page. Also, we added a template directive to replace the environment name in HTML.
```yaml
apiVersion: v1
kind: ConfigMap
metadata:
name: {{ .Release.Name }}-index-html-configmap
namespace: default
data:
index.html: |
Welcome
Hi! I got deployed in {{ .Values.env.name }} Environment using Helm Chart
Linting ./nginx
[INFO] Chart.yaml: icon is recommended
1 chart(s) linted, 0 chart(s) failed
```
To validate if the values are getting substituted in the templates, you can render the templated YAML files with the values using the following command. It will generate and display all the manifest files with the substituted values.
```bash
helm template .
```
We can also use `--dry-run` command to check. This will pretend to install the chart to the cluster and if there is some issue it will show the error.
If you are still inside the `nginx-chart`you're folder, move out of the folder and run the following command.
```bash
helm install --dry-run my-release nginx-chart
```
If everything is good, then you will see the manifest output that will be deployed into the cluster.
## Deploy the Helm Chart
When you deploy the chart, Helm will read the chart and configuration values from the `values.yaml` file and generate the manifest files. Then it will send these files to the Kubernetes API server, and Kubernetes will create the requested resources in the cluster.
Now we are ready to install the chart.
Make sure to run the Helm commands from a directory outside the `helm-chart` folder.
Run the following Helm install command where **`frontend`** is release name and **`nginx-chart`** is the chart name. It installs **`nginx-chart`** in the default namespace
```bash
helm install frontend nginx-chart
```
You will get the following output, once its deployed.
```bash
NAME: frontend
LAST DEPLOYED: Mon Jan 12 06:20:20 2026
NAMESPACE: default
STATUS: deployed
REVISION: 1
DESCRIPTION: Install complete
TEST SUITE: None
```
Now you can check the release list using this command.
```bash
$ helm list
NAME NAMESPACE REVISION UPDATED STATUS CHART APP VERSION
frontend default 1 2026-01-12 06:20:20.865280236 +0000 UTC deployed nginx-chart-0.1.0 1.16.0
```
You can also use `ls` instead of `list`Helm.
Run the kubectl commands to check the deployment, services, and pods.
```bash
kubectl get deploy,svc,cm,po
```
We can see the deployment **`frontend-nginx`**, **`nginx-service`** and pods are up and running as shown below.
```bash
NAME READY UP-TO-DATE AVAILABLE AGE
deployment.apps/frontend-nginx 2/2 2 2 22m
NAME TYPE CLUSTER-IP EXTERNAL-IP PORT(S) AGE
service/frontend-service ClusterIP 10.106.34.74 80/TCP 22m
service/kubernetes ClusterIP 10.96.0.1 443/TCP 24d
NAME DATA AGE
configmap/frontend-index-html-configmap 1 22m
configmap/kube-root-ca.crt 1 24d
NAME READY STATUS RESTARTS AGE
pod/frontend-nginx-6ff9d468d5-5sts5 1/1 Running 0 22m
pod/frontend-nginx-6ff9d468d5-rhkb5 1/1 Running 0 22m
```
We discussed how a single helm chart can be used for multiple environments using different **`values.yaml `**files.
To install a Helm chart with an external `**values.yaml**` file, you can use the following command with the `--values` flag and path of the values file.
```bash
helm install frontend nginx-chart --values env/prod-values.yaml
```
When you have Helm as part of your CI/CD pipeline, you can write custom logic to pass the required values file depending on the environment.
## Upgrade & Rollback Helm
Now suppose you want to modify the chart and install the updated version, we can use the following command:
```bash
helm upgrade frontend nginx-chart
```
For example, we have changed the replicas from 2 to 1\. You can see the revision number is 2 and only 1 pod is running.
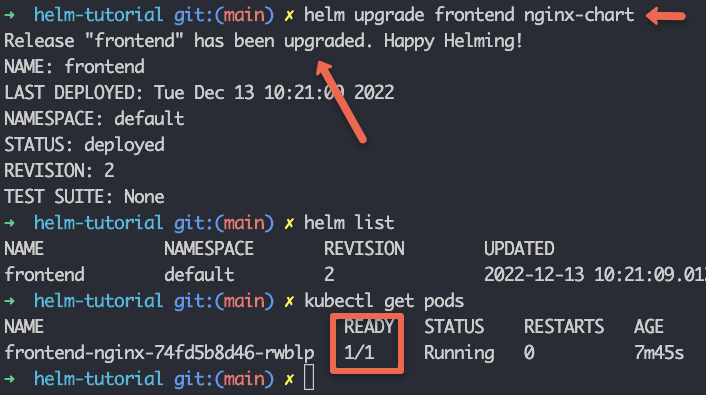
Now if we want to roll back the changes that we have just done and deploy the previous one again, we can use the rollback command to do that.
```bash
helm rollback frontend
```
The above command will roll back the Helm release to the previous one.
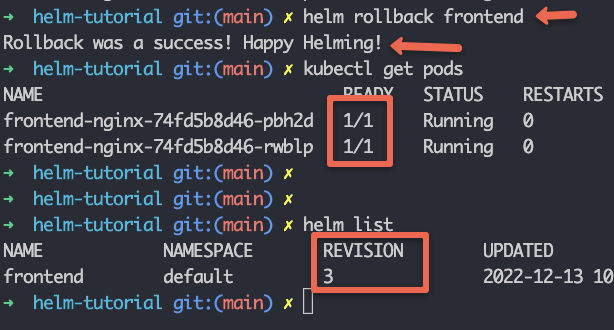
After the rollback, we can see 2 pods are running again. Note that Helm takes the rollback as a new revision, that's why we're getting the revision as 3.
💡
All the ****release history** will be saved as Kubernetes secrets in the same namespace where you deployed the Helm chart
If we want to roll back to the specific version we can put the revision number like this.
```bash
helm rollback
```
For example,
```bash
helm rollback frontend 2
```
## Uninstall The Helm Chart
To uninstall the Helm release, use the uninstall command. It will remove all of the resources associated with the last release of the chart.
```bash
helm uninstall frontend
```
If you have deployed the release in a specific namespace, you can pass the namespace flag with the uninstall command as given below.
```bash
helm uninstall --namespace
```
## Package the Helm Chart
We can package the chart and deploy it to Github, S3, or any helm chart repository like [Artifact Hub.](https://artifacthub.io/?ref=devopscube.com)
Execute the following command to package the **`nginx-chart`**.
```bash
helm package chart-name/
```
For example,
```bash
helm package nginx-chart
Successfully packaged chart and saved it to: /home/vagrant/helm-tutorial/nginx-chart-0.1.0.tgz
```
When you package it, it follows [semver 2](https://semver.org/?ref=devopscube.com) version guidelines.
💡
Modern Helm versions let you store and share packaged charts in OCI-compliant registries like GitHub Container Registry, Docker Hub or cloud-specific registries (ECR, ACR, GAR), the same way you push and pull container images.
## Debugging Helm Charts
We can use the following commands to debug the helm charts and templates.
1. **`helm lint:`** This command takes a path to a chart and runs a series of tests to verify that the chart is well-formed.
2. **`helm get values:`** This command will output the release values installed to the cluster.
3. **`helm install --dry-run:`** Using this function we can check all the resource manifests and ensure that all the templates are working fine.
4. **`helm get manifest:`** This command will output the manifests that are running in the cluster.
5. **`helm diff:`** It will output the differences between the two revisions.
```bash
helm diff revision frontend 1 2
```
The helm diff command is not available by default, it's a plugin that you have to [install](https://github.com/databus23/helm-diff?ref=devopscube.com) to use it.
## Helm Repositories
In the above example, we built a Helm chart and deployed it.
But the official Helm charts of tools will be stored in Helm repositories, so we have to add the Helm repositories to our work environment and deploy the charts.
Below are some of the commonly used Helm repository based commands.
- To add a repository to your system, use the helm repo add command, it command stucture is given below.
```bash
helm repo add
```
- To list all the available repositories added to your system
```bash
helm repo list
```
- Respositories will be updated with new changes often, to sync the locally added repository with the official repository, you can use the update command.
```bash
helm repo update
```
- And if you want to pull the entire chart package and untar it without installing, use the following command.
```bash
helm pull / --untar
```
## Helm Chart Possible Errors
If you try to install an existing Helm package, you will get the following error.
```bash
level=ERROR msg="release name check failed" error="cannot reuse a name that is still in use"
Error: INSTALLATION FAILED: release name check failed: cannot reuse a name that is still in use
```
To update or upgrade the release, you need to run the upgrade command.
If you try to install a chart from a different location without giving the absolute path of the chart, you will get the following error.
```bash
Error: non-absolute URLs should be in form of repo_name/path_to_chart
```
To rectify this, you should execute the helm command from the directory where you have the chart or provide the absolute path or relative path of the chart directory.
## Helm Charts Best Practices
Following are some of the best practices to be followed when developing a Helm chart.
1. Document your chart by adding comments and a **README** file as documentation is essential for ensuring maintainable Helm charts.
2. We should name the Kubernetes manifest files after the Kind of object i.e. deployment, service, secret, ingress, etc.
3. Put the chart name in lowercase only, and if it has more than one word, then separate them with hyphens (-)
4. In values.yaml file field name should be in lowercase.
5. Always wrap the string values between quote signs.
6. Use Helm version 4 for simpler and more secure releases. Check [this document](https://helm.sh/docs/overview?ref=devopscube.com) for more details
Also, to learn more best practices, checkout the [Helm best practices](https://devopscube.com/helm-best-practices-essential-tips-to-know/) guide.
## Helm Cheat Sheet
Here’s a quick reference list of common Helm commands you can use in your day-to-day Helm workflows.
#### helm install
Installs a Helm chart onto your Kubernetes cluster.
```bash
helm install
```
#### helm upgrade
Updates your existing Helm release with new chart changes or updated values.
```bash
helm upgrade
```
#### helm rollback
Rolls back a Helm release to a previous revision.
```bash
helm rollback
```
#### **helm test**
Runs the tests defined in the Helm chart’s `templates/tests` directory against your release.
```bash
helm test
```
#### **helm lint**
Checks a chart for possible issues like formatting or missing fields.
```bash
helm lint
```
#### helm template
Renders a chart to show the Kubernetes manifests without installing them. Useful for debugging your templates.
```bash
helm template
```
#### **helm list (helm ls)**
Lists all the currently installed releases in the specified namespace (defaults to the current namespace).
```bash
helm list
```
#### **helm uninstall**
Uninstalls a Helm release, removing all the associated Kubernetes resources from your cluster.
```bash
helm uninstall
```
## Helm Chart FAQ's
### What is a Helm Library chart?
A library chart is a reusable chart that only contains template helpers. You cannot install it directly. Other charts import it as a dependency to avoid duplicating common template logic.
## Conclusion
To summarize,
1. We discussed the Helm Chart and its structure in detail.
2. We created a Helm chart from scratch and deployed it.
3. Also learned how to upgrade, roll back, and uninstall it.
Helm is a very useful package manager for Kubernetes. When you have different environments with custom deployment requirements, Helm provides a great way to templatize kubernetes manifests as per our needs.
Helm-specific functionalities like chart dependencies and chart reusability make it one of the good kubernetes tools.
Also, if you are preparing for [CKA](https://devopscube.com/cka-exam-study-guide/) or [CKAD certification](https://devopscube.com/ckad-exam-study-guide/), Helm is an important topic for the exam.
An alternative to Helm is Kustomize. It does not use templating, but it uses the concept of overlays. Refer to the [Kustomize tutorial](https://devopscube.com/kustomize-tutorial/) to learn more.
Also, if you check our[ learning kubernetes](https://devopscube.com/learn-kubernetes-complete-roadmap/) guide, we have mentioned Helm as a must-learn tool for Kubernetes package management.