This beginner’s guide focuses on the step-by-step process of setting up Docker image build in Kubernetes pod using Kaniko image builder.
When it comes to CI/CD, there could be VM & container-based applications. Ideally, one would use existing VM infrastructure to build Docker images. However, if you have a containerized infrastructure, it is better to utilize it for the CI/CD workflow.
Building Docker in Docker
In CI, one of the main stages is to build the Docker images. In containerized builds, you can use Docker in the Docker workflow. You can check out the Docker in Docker article to understand more.
But this approach has the following disadvantages.
- The Docker build containers run in privileged mode. It is a big security concern and it is kind of an open door to malicious attacks.
- Kubernetes removed Docker from its core. So, mounting
docker.sockto the host will not work in the future, unless you add a docker to all the Kubernetes Nodes.
These issues can be resolved using Kaniko.
There is one more utility called podman which can run and create containers without root privileges. You can check out the podman tutorial to understand more.
Build Docker Image In Kubernetes Using Kaniko
kaniko is an open-source container image-building tool created by Google.
It does not require privileged access to the host for building container images.
Here is how Kaniko works,
- There is a dedicated Kaniko executer image that builds the container images. It is recommended to use the gcr.io/kaniko-project/executor image to avoid any possible issues. Because this image contains only static go binary and logic to push/pull images from/to registry.
- kaniko accepts three arguments. A Dockerfile, build context, and a remote Docker registry.
- When you deploy the kaniko image, it reads the Dockerfile and extracts the base image file system using the FROM instruction.
- Then, it executes each instruction from the Dockerfile and takes a snapshot in the userspace.
- After each snapshot, kaniko appends only the changed image layers to the base image and updates the image metadata. It happens for all the instructions in the Dockerfile.
- Finally, it pushes the image to the given registry.
As you can see, all the image-building operations happen inside the Kaniko container’s userspace and it does not require any privileged access to the host.
Kaniko supports the following type of build context.
- GCS Bucket
- S3 Bucket
- Azure Blob Storage
- Local Directory
- Local Tar
- Standard Input
- Git Repository
For this blog, I will use the Github repo as a context.
Also, you can push to any container registry.
Building Docker Image With, Kaniko, Github, Docker Registry & Kubernetes
To demonstrate the Kaniko workflow, I will use publicly available tools to build Docker images on kubernetes using Kaniko.
Here is what you need
- A valid Github repo with a Dockerfile: kaniko will use the repository URL path as the Dockerfile context
- A valid docker hub account: For kaniko pod to authenticate and push the built Docker image.
- Access to Kubernetes cluster: To deploy kaniko pod and create docker registry secret.
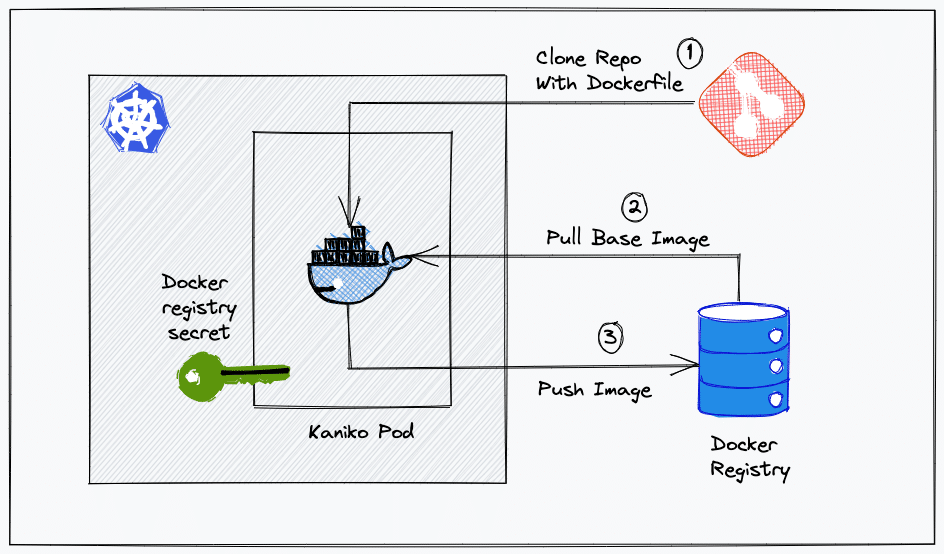
The following image shows the workflow we are going to build.
Create Dockerhub Kubernetes Secret
We have to create a kubernetes secret of type docker-registry for the kaniko pod to authenticate the Docker hub registry and push the image.
Use the following command format to create the docker registry secret. Replace the parameters marked in bold.
kubectl create secret docker-registry dockercred \
    --docker-server=https://index.docker.io/v1/ \
    --docker-username=<dockerhub-username> \
    --docker-password=<dockerhub-password>\
    --docker-email=<dockerhub-email>
This secret gets mounted to the kaniko pod for it to authenticate the Docker registry to push the built image.
Note: If you have a self hosted docker regpository, you can replace the server URL wiht your docker registry API endpoint.
Deploy Kaniko Pod To Build Docker Image
Now, let’s test the kaniko image builder using a pod deployment.
I have hosted the manifest and Dockerfile in the public GitHub repository. It is a simple Dockerfile with update instructions.
I will use that repository for demonstration. You can fork it or create your own repo with similar configurations.
https://github.com/scriptcamp/kubernetes-kanikoSave the following manifest as pod.yaml
apiVersion: v1
kind: Pod
metadata:
  name: kaniko
spec:
  containers:
  - name: kaniko
    image: gcr.io/kaniko-project/executor:latest
    args:
    - "--context=git://github.com/scriptcamp/kubernetes-kaniko"
    - "--destination=<dockerhub-username>/kaniko-demo-image:1.0"
    volumeMounts:
    - name: kaniko-secret
      mountPath: /kaniko/.docker
  restartPolicy: Never
  volumes:
  - name: kaniko-secret
    secret:
      secretName: dockercred
      items:
        - key: .dockerconfigjson
path: config.json- –context: This is the location of the Dockerfile. In our case, the Dockerfile is located in the root of the repository. So I have given the git URL of the repository. If you are using a private git repository, then you can use
GIT_USERNAMEandGIT_PASSWORD(API token) variables to authenticate git repository. - –destination: Here, you need to replace
<dockerhub-username>with your docker hub username with your dockerhub username for kaniko to push the image to the dockerhub registry. For example, in my case its,bibinwilson/kaniko-test-image:1.0
All the other configurations remain the same.
Now deploy the pod.
kubectl apply -f pod.yamlTo validate the docker image build and push, check the pod logs.
kubectl logs kaniko --follow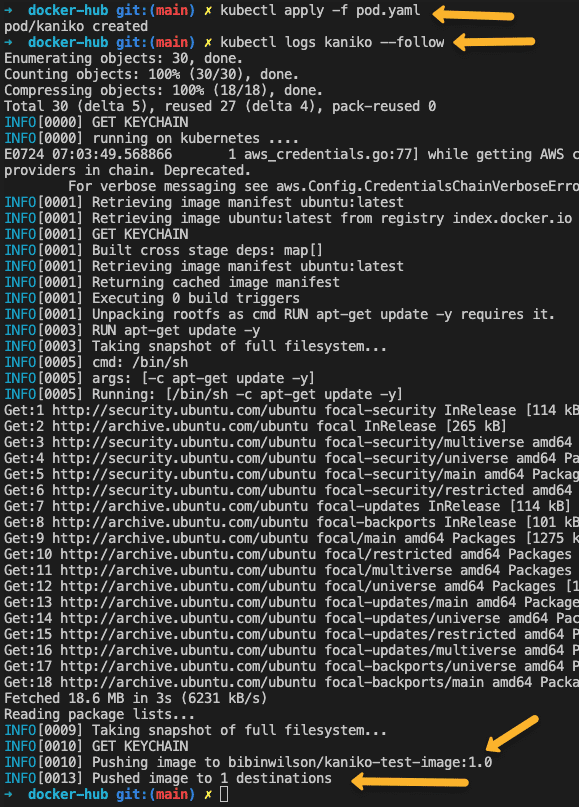
Note: Here we used a static pod name. So to deploy again; first you have to delete the kaniko pod. When you use kaniko for your CI/CD pipeline, the pod gets a random name based on the CI tool you use, and it takes care of deleting the pod.
Docker Build Pipeline Using Jenkins & kaniko on Kubernetes
If you are using Kubernetes for scaling Jenkins build agents, you can make use of Kaniko docker build pods to build the docker images in the CI pipeline.
You can check out my Jenkins build agent setup on Kubernetes where the Jenkins master and agent run on the kubernetes cluster.
To leverage Kaniko for your build pipelines, you should have the Dockerfile along with the application.
Also, you should use the multi-container pod template with a build and kaniko container. For example, maven containers for Java build and kaniko containers take the jar and build the docker image using the Dockerfile present in the repository.
Here is a Jenkinsfile based on a multi-container pod template where you can build your application and use the kaniko container to build the docker image with the application and push it to a Docker registry.
Important Note: You should use the kaniko image with the debug tag in the pod template because we will explicitly run the kaniko executer using bash. The latest tag images do not have a bash.
podTemplate(yaml: '''
    apiVersion: v1
    kind: Pod
    spec:
      containers:
      - name: maven
        image: maven:3.8.1-jdk-8
        command:
        - sleep
        args:
        - 99d
      - name: kaniko
        image: gcr.io/kaniko-project/executor:debug
        command:
        - sleep
        args:
        - 9999999
        volumeMounts:
        - name: kaniko-secret
          mountPath: /kaniko/.docker
      restartPolicy: Never
      volumes:
      - name: kaniko-secret
        secret:
            secretName: dockercred
            items:
            - key: .dockerconfigjson
              path: config.json
''') {
  node(POD_LABEL) {
    stage('Get a Maven project') {
      git url: 'https://github.com/scriptcamp/kubernetes-kaniko.git', branch: 'main'
      container('maven') {
        stage('Build a Maven project') {
          sh '''
          echo pwd
          '''
        }
      }
    }

    stage('Build Java Image') {
      container('kaniko') {
        stage('Build a Go project') {
          sh '''
            /kaniko/executor --context `pwd` --destination bibinwilson/hello-kaniko:1.0
          '''
        }
      }
    }

  }
}
You can use the above Jenkinsfile directly on a pipeline job and test it. It is just a template to get started. You need to replace the repo with your code repo and write the build logic as per the application’s needs.
Conclusion
Building Docker images using kaniko is a secure way to containerized Docker builds.
You can try incorporating kaniko with your pipelines without compromising security.
Also, let me know what you think of this approach.
Also, if you are learning Jenkins, check out my 20+ Jenkins tutorial for beginners.


1 comment
1. Thanks!
2. I just had a huge problem on
sh ‘/kaniko/executor –context `pwd` –destination edpike365/hello-kaniko:1.0’
getting “Error: command not known…”
It was because my Jenkins job had a space in it so the string in “pwd” had a space in it at run time and messed up the args 🙂